

Classic Christmas Toffee is more than just a sweet treat; it’s a cherished tradition, a golden ticket back to the magic of holiday seasons past. There’s something uniquely enchanting about that first delicate crunch, followed by the rich, buttery indulgence that melts gloriously on your tongue. For generations, families have gathered in kitchens, the air thick with the irresistible aroma of caramelizing sugar, perfecting their own secret batches of this beloved confection. I still remember the anticipation as my grandmother would pull out her heavy-bottomed pan, ready to transform simple ingredients into pure holiday gold. This delightful candy holds a special place in my heart, and I’m sure it does for many others too.
What makes Classic Christmas Toffee so universally adored? Perhaps it’s the perfect balance of crispness and chew, the way it beautifully complements a warm cup of cocoa, or simply the joy it brings as a thoughtful, homemade gift. It’s a versatile candy, often adorned with nuts or chocolate, making it a spectacular addition to any festive spread. This recipe promises not just a delicious dessert, but a heartwarming experience, an edible emblem of festive cheer that you can easily recreate and share.

Ingredients:
- 2 cups (4 sticks or 452g) unsalted butter, high quality for the best flavor
- 2 cups (400g) granulated sugar
- ¼ cup (60ml) water
- 2 tablespoons (30ml) light corn syrup (this is your secret weapon against crystallization!)
- 1 teaspoon fine sea salt
- 1 ½ teaspoons pure vanilla extract, good quality
- 2 cups (about 340g) semi-sweet chocolate chips, milk chocolate chips, or a blend of your favorites
- 1 ½ cups finely chopped nuts, such as pecans, almonds, or walnuts (toasted for extra flavor, if you like!)
Essential Equipment for Your Classic Christmas Toffee:
Before we dive into the delicious details of making this Classic Christmas Toffee, let’s make sure you have all the right tools on hand. Having everything ready before you start is key to a smooth and stress-free toffee-making experience.
- Heavy-bottomed 3 to 4-quart saucepan: This is crucial! A heavy bottom helps to distribute heat evenly and prevents the sugar from scorching. I always reach for my stainless steel pot with a thick base.
- Candy thermometer: Absolutely non-negotiable for perfectly consistent toffee. Don’t eyeball it; precision is our friend here. Look for one that clips to the side of your pot.
- 13×18-inch baking sheet (half sheet pan): This size is ideal for spreading the toffee thinly and evenly.
- Parchment paper or aluminum foil: For lining your baking sheet. I personally prefer parchment paper as it offers a superior non-stick surface, making removal a breeze.
- Silicone spatula or wooden spoon: For stirring the butter and sugar mixture initially. Silicone is great because it can handle high heat.
- Heat-proof spatula or offset spatula: For spreading the hot toffee and later the melted chocolate.
- Pastry brush (optional but helpful): For brushing down the sides of the pan with water to prevent sugar crystals.
- Measuring cups and spoons: Of course!
- Small bowl or plate: For holding your chopped nuts.
- Cutting board and sharp knife: For chopping your nuts, if they aren’t pre-chopped.
Preparing Your Workspace for Flawless Classic Christmas Toffee:
Success with this Classic Christmas Toffee recipe truly begins before you even turn on the stove. This preparation step, often called “mise en place,” ensures that everything flows smoothly once the cooking process begins. We’re working with hot sugar, so speed and organization are your allies!
- Line Your Baking Sheet: First things first, grab your 13×18-inch baking sheet. Line it completely with parchment paper, allowing a slight overhang on the sides if possible. This overhang acts as a handy sling later for removing the cooled toffee. If you’re using foil, make sure to lightly grease it with butter or a neutral cooking spray to prevent sticking. I find parchment paper is the easiest to work with for a clean release. Set this prepared pan aside where it’s easily accessible but out of the way.
- Measure All Ingredients: Measure out all your ingredients precisely. That means your butter, sugar, water, corn syrup, salt, vanilla extract, chocolate chips, and chopped nuts. Have them all ready in separate bowls or containers right next to your stovetop. This is vital because once the toffee starts cooking, you won’t have time to measure.
- Chop Your Nuts: If your nuts aren’t already chopped, now is the time to do it. Aim for a fine to medium chop. You want them to adhere well to the chocolate layer without being too chunky. I love using pecans or almonds for their classic flavor and satisfying crunch in Classic Christmas Toffee. Place them in a small bowl ready for sprinkling.
- Attach Your Candy Thermometer: Clip your candy thermometer securely to the side of your heavy-bottomed saucepan. Make sure the tip of the thermometer doesn’t touch the bottom of the pan, but rather rests in the middle of where the toffee mixture will be. Test its position with a little water if you’re unsure.
- Clear Your Countertop: Ensure you have a clear, heat-safe spot on your countertop next to the stove where you can immediately place the hot pan and the prepared baking sheet. Working with hot sugar requires a clear, organized space to prevent accidents.
Crafting the Perfect Golden Toffee Base:
This is where the magic truly happens, transforming simple ingredients into that buttery, crunchy foundation of our Classic Christmas Toffee. Pay close attention to temperature and color here; patience and a good thermometer are your best friends.
- Combine Ingredients in the Pot: Into your heavy-bottomed saucepan, add the measured unsalted butter, granulated sugar, water, light corn syrup, and fine sea salt. Make sure your candy thermometer is already in place, as discussed in the prep steps.
- Initial Melting and Stirring: Place the saucepan over medium heat. Begin stirring the mixture constantly with your silicone spatula or wooden spoon. Your goal in this initial phase is to melt the butter and dissolve all of the sugar crystals. This can take a few minutes, so don’t rush it. You’ll notice the mixture start as cloudy and granular, then gradually become clearer and smoother as the sugar dissolves. It’s very important to ensure all sugar crystals have dissolved before the mixture comes to a full boil. Any undissolved crystals can cause the toffee to crystallize later, resulting in a grainy texture instead of a smooth, glassy one.
- Boiling and Hands-Off Cooking: Once the butter is fully melted and the sugar is completely dissolved, and the mixture comes to a boil, stop stirring. From this point forward, you generally want to avoid stirring the mixture. Stirring can cause sugar crystals from the sides of the pan to fall back into the boiling sugar, initiating crystallization. If you see sugar crystals forming on the sides of the pan above the boiling mixture, gently brush them down into the liquid with a clean pastry brush dipped in a little warm water. This is a pro tip to maintain a smooth, perfect batch of Classic Christmas Toffee.
- Monitor Temperature and Color: Allow the mixture to boil undisturbed, continuously monitoring the candy thermometer. The temperature will slowly but steadily rise. This process can take anywhere from 15 to 25 minutes, depending on your stovetop and pan. We are aiming for the “hard crack” stage, which is between 300°F and 305°F (149°C and 152°C). As the temperature climbs, you’ll also notice a dramatic change in color.
- Around 250°F (121°C), it will still be a very light, bubbly yellow.
- As it approaches 280°F (138°C), it will start to deepen to a light amber.
- The sweet spot for Classic Christmas Toffee is a rich, deep golden or amber color, achieved around 300°F to 305°F. It should look like a beautiful, dark caramel. Don’t let it go too dark, as it will taste burnt, but don’t stop too early, or it won’t be crisp. Trust your thermometer, but also pay attention to the color; it’s a great visual cue.
- Remove from Heat and Add Vanilla: The very moment your thermometer hits 300-305°F (or just slightly above, but no more than 305°F), immediately remove the saucepan from the heat. This timing is critical. Carefully and quickly stir in the vanilla extract. Be cautious, as the mixture will bubble up vigorously when the vanilla is added. Stir just enough to incorporate it, about 5-10 seconds.
The Irresistible Chocolate Layer:
Once your rich, buttery toffee base is ready, it’s time to crown it with a luxurious layer of chocolate and crunchy nuts. This step needs to happen quickly while the toffee is still very hot to ensure the chocolate melts properly.
- Pour and Spread the Toffee: Immediately and carefully pour the hot toffee mixture onto your prepared, parchment-lined baking sheet. Work quickly but cautiously. Use your heat-proof spatula or offset spatula to gently and swiftly spread the toffee evenly across the baking sheet into a thin, consistent layer. Don’t worry too much about absolute perfection, but try to get it as even as possible for uniform thickness and crunch. It will spread quite easily while it’s hot.
- Add the Chocolate Chips: While the toffee is still steaming hot, immediately and generously sprinkle your chocolate chips evenly over the entire surface of the hot toffee. The residual heat from the toffee is exactly what we need to melt the chocolate into a smooth, spreadable consistency.
- Allow Chocolate to Melt: Let the chocolate chips sit on the hot toffee for about 3 to 5 minutes. This gives them enough time to soften and melt from the heat. You’ll see them begin to glisten and lose their solid shape. Patience here is key; resist the urge to spread too soon! If you try to spread them prematurely, they’ll just push around and not create a smooth layer.
- Spread the Melted Chocolate: Once the chocolate chips look soft and melty, use your heat-proof spatula or offset spatula to gently spread the melted chocolate evenly over the entire toffee surface. Aim for a smooth, consistent layer that covers all the glorious golden toffee beneath. Work with broad, even strokes.
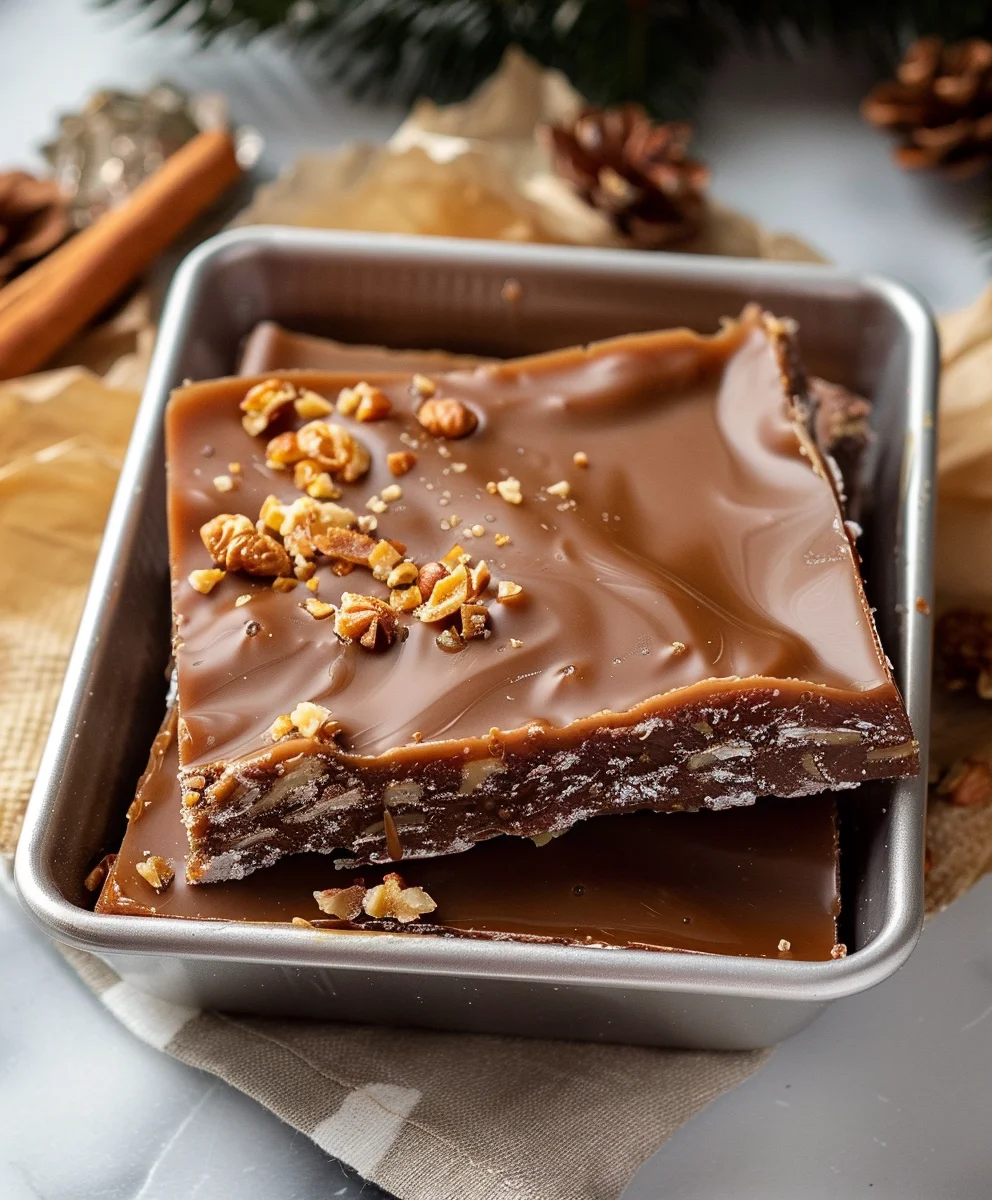
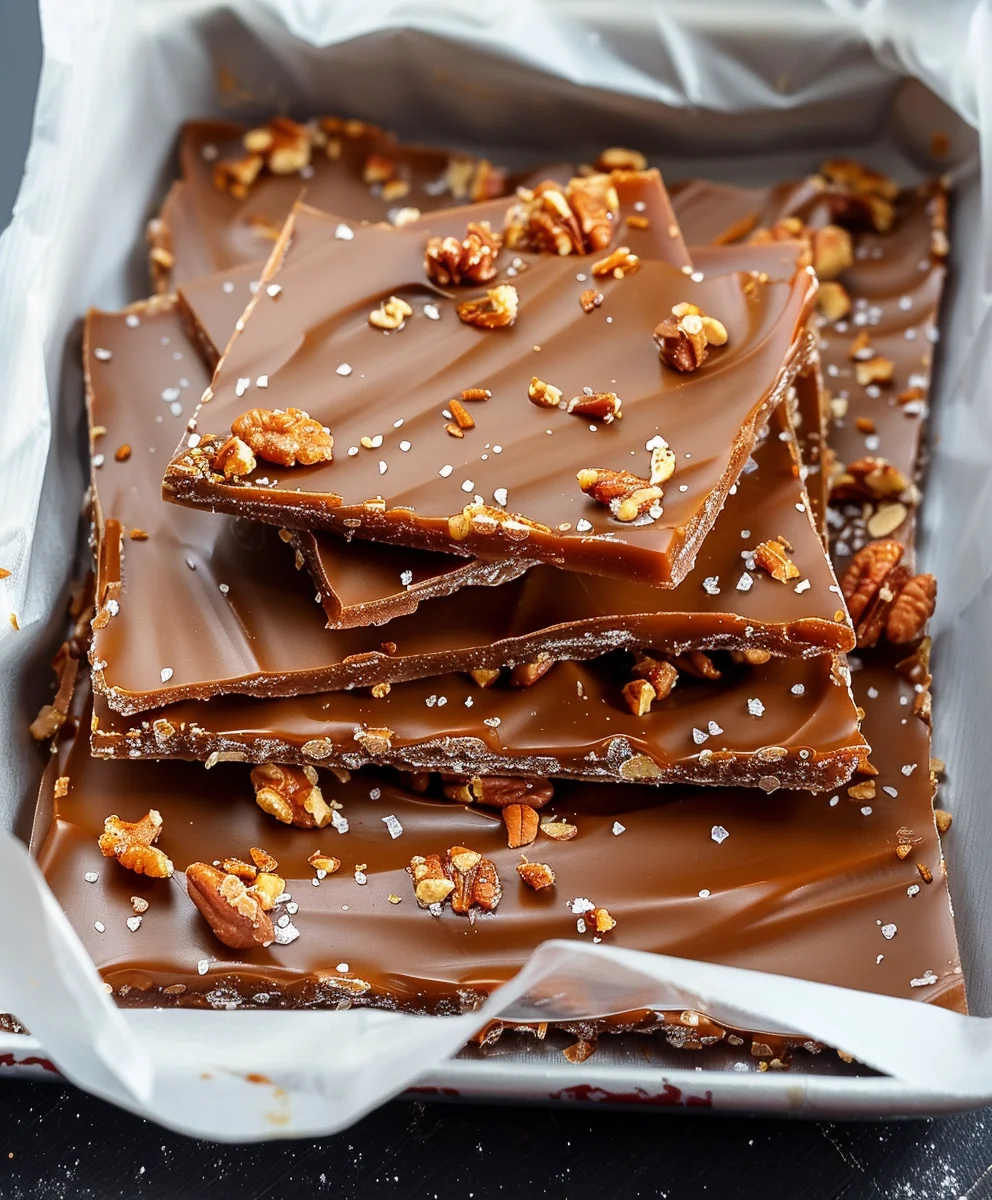
- Sprinkle with Chopped Nuts: Immediately after spreading the chocolate, liberally sprinkle your finely chopped nuts over the melted chocolate layer. You can lightly press them into the chocolate with your hand or the back of your spatula to ensure they adhere well. This is your chance to make it visually appealing and add that incredible textural contrast that defines truly great Classic Christmas Toffee.
Cooling and Setting Your Beautiful Classic Christmas Toffee:
Now comes the hardest part for impatient bakers: waiting! Proper cooling is essential for the toffee to set up perfectly, becoming wonderfully brittle and easy to break. Rushing this step can result in a softer, chewier texture, which isn’t what we’re aiming for with a Classic Christmas Toffee.
- Room Temperature Cooling First: Once the chocolate and nuts are on, leave the baking sheet on a wire rack on your countertop to cool at room temperature for at least 30 minutes, or until the chocolate is no longer wet and tacky to the touch. This initial cooling helps to prevent “bloom” (a white, chalky appearance) on the chocolate that can occur from drastic temperature changes.
- Refrigerate to Fully Set: After the initial room temperature cool-down, carefully transfer the baking sheet to the refrigerator. Allow the toffee to chill for at least 1 to 2 hours, or until it is completely firm and brittle. You want it to be hard enough that when you tap it, it sounds solid. Alternatively, if you’re not in a rush, you can simply let it cool at room temperature for several hours or even overnight, which I sometimes prefer for a very gradual set. The fridge just speeds things up.
Breaking and Storing Your Delicious Classic Christmas Toffee:
The moment of truth! Breaking the toffee is wonderfully satisfying, and then you’ll want to ensure it stays fresh and crisp for as long as possible. This Classic Christmas Toffee is a gift that keeps on giving!
- Prepare for Breaking: Once the toffee is completely solid and firm, carefully lift the entire sheet of toffee from the baking pan using the parchment paper overhang as handles. Transfer it to a clean, sturdy cutting board or a clean, hard surface.
- Break into Pieces: Now for the fun part! You have a few options for breaking your toffee.
- The Hammer Method (my favorite!): Cover the toffee with another sheet of parchment paper or a clean kitchen towel (to prevent flying shards). Using a meat mallet, a rolling pin, or even a small hammer, gently but firmly tap and break the toffee into irregular, bite-sized pieces. Don’t be shy; it’s quite resilient. I love the rustic look of uneven pieces.
- The Knife Method: You can also use a large, sharp knife. Place the knife edge along the toffee and press down firmly to score it, then carefully break along the score lines. This method might yield slightly more uniform pieces but can be a bit more challenging with very brittle toffee.
Aim for pieces that are easy to pick up and enjoy.
- Storing Your Classic Christmas Toffee: To keep your magnificent creation fresh, store the broken pieces in an airtight container at room temperature for up to 2 weeks. If you live in a very warm or humid climate, or if you want to extend its shelf life, you can store it in the refrigerator for up to 1 month. Just be sure to bring it to room temperature for a few minutes before serving for the best texture and flavor. Toffee can also be frozen in an airtight container for up to 3 months; thaw at room temperature before serving. Layering pieces with parchment paper inside the container will prevent them from sticking together.
Expert Tips for Classic Christmas Toffee Success:
Making Classic Christmas Toffee is a rewarding process, but a few common pitfalls can trip up even experienced cooks. Here are my top tips to ensure your toffee turns out perfect every single time:
-
Don’t Skimp on the Butter Quality:
Since butter is one of the main ingredients, its flavor truly shines through. Use a good quality unsalted butter. It makes a noticeable difference in the richness and depth of flavor of your toffee. Think of it as the soul of your toffee!
-
Invest in a Reliable Candy Thermometer:
I cannot stress this enough. Eyeballing the temperature is a recipe for inconsistency. A good candy thermometer is a small investment that guarantees accuracy, which is paramount for achieving the hard crack stage and that perfect brittle texture. Calibrate it occasionally by checking its reading in boiling water (should be 212°F/100°C at sea level).
-
Preventing Crystallization is Key:
This is a common issue! Crystallization turns your smooth toffee grainy. Here’s how to fight it:
- Ensure all sugar crystals are dissolved before the mixture comes to a boil (Step 7).
- Avoid stirring once the mixture is boiling.
- Use a pastry brush dipped in warm water to wash down any sugar crystals that form on the sides of the pan (Step 8).
- The light corn syrup in the recipe is also a crucial anti-crystallization agent, so don’t omit it!
-
Watch the Color Closely (But Trust the Temperature!):
While the thermometer is your primary guide, the color change of the toffee is a fantastic visual cue. Aim for a deep, rich amber, like dark honey. Too pale, and it might be chewy; too dark, and it will taste burnt. The window between perfect and burnt can be very quick, so be attentive, especially once it passes 280°F.
-
Work Quickly Once Off the Heat:
The toffee begins to set as soon as it’s removed from the heat. Have your vanilla extract ready to stir in, and be prepared to pour and spread the toffee onto your prepared sheet immediately. Speed and confidence are essential for spreading an even layer.
-
Don’t Rush the Chocolate Melting:
It’s tempting to start spreading the chocolate chips as soon as they hit the hot toffee. Resist! Give them those 3-5 minutes to properly melt and soften. This ensures a smooth, even chocolate layer that spreads beautifully without tearing the toffee beneath.
-
Experiment with Toppings:
While chopped nuts are classic, feel free to get creative! You could add a sprinkle of flaky sea salt over the chocolate for a gourmet touch, or even a mix of different nuts. Some people like to use finely crushed peppermint candies for a festive twist on their Classic Christmas Toffee, but that’s venturing into different territory!
-
Humidity is the Enemy:
Toffee is highly susceptible to humidity, which can make it sticky and soft. Try to make toffee on a dry day if possible. Always store it in an airtight container to protect it from moisture in the air.
-
Safety First!
Remember, you’re working with extremely hot sugar, which can cause severe burns. Keep children and pets away from the stovetop. Use oven mitts or kitchen towels when handling the hot pot and pan. If you do get hot sugar on your skin, immediately run it under cold water.
-
Clean-Up Tip:
Don’t scrub that sticky pot! Fill your saucepan with water and bring it to a boil on the stove. The residual sugar will dissolve, making cleanup incredibly easy. A little trick I learned from my grandmother!
Conclusion:
So, there we have it, my friends! We’ve journeyed through the delightful process of crafting a truly irresistible treat, one that promises to bring joy and a touch of magic to any occasion, especially during the festive season. This isn’t just another sweet; it’s an experience, a golden ticket to homemade happiness that, once tasted, will surely become a cherished tradition in your kitchen. I genuinely believe this recipe is a must-try for anyone who appreciates the simple elegance of a well-made confection. It’s incredibly satisfying to pull off something so seemingly sophisticated with such straightforward steps, and the reward is absolutely worth every minute spent in front of the stove. The rich, buttery crunch, perfectly enrobed in smooth chocolate and sprinkled with your favorite toppings, creates a symphony of textures and flavors that is utterly captivating. You’ll be amazed at how easily you can create such a professional-looking and tasting treat right in your own home.
Beyond its incredible taste, this confection offers immense versatility. Imagine a platter of this shimmering gold, artfully arranged among your other holiday goodies. It stands out not just for its beauty but for its undeniable quality. For those looking for thoughtful, personalized gifts, a small cellophane bag filled with this homemade goodness, tied with a pretty ribbon, makes for an absolutely heartwarming present. It says “I care,” “I made this for you,” and “enjoy something truly special.” Think beyond just holiday gifting too! It’s perfect for hostess gifts, a thank-you treat for neighbors, or even a little pick-me-up for a friend. Don’t limit its enjoyment to just eating it straight from the tray, as tempting as that is. Try crumbling a few pieces over a scoop of vanilla bean ice cream for an instant upgrade to a simple dessert, or incorporating it into a layered trifle for an unexpected textural delight. It even pairs beautifully with a strong cup of coffee or a glass of dessert wine, enhancing both the drink and the sweet itself.
And now for the fun part: variations! While the base recipe is phenomenal as is, I always encourage a little culinary exploration. Feel free to swap out the classic almond topping for chopped pecans, walnuts, or even macadamia nuts for a different nutty nuance. If dark chocolate isn’t your preference, a creamy milk chocolate or a vibrant white chocolate can be used instead, perhaps even drizzled on top of the dark chocolate for a striking visual contrast. For an extra festive touch, consider sprinkling crushed candy canes or peppermint candies over the melted chocolate before it sets, transforming it into a winter wonderland treat. A sprinkle of flaky sea salt is always a winner for balancing the sweetness and adding a gourmet touch that elevates the entire experience. You could even get adventurous with a pinch of cayenne pepper in the chocolate for a subtle, warming kick, or a hint of orange zest for a bright, citrusy note. The possibilities are truly endless, allowing you to tailor this treat to your exact preferences or to match the theme of your occasion.
Now it’s your turn! I genuinely hope you feel inspired to roll up your sleeves and give this recipe a try. There’s something incredibly therapeutic and rewarding about creating something so delicious from scratch, and I promise you won’t regret the effort. This Classic Christmas Toffee recipe is designed for success, and I’ve poured all my tips into ensuring you have a smooth and enjoyable experience. Once you’ve whipped up your batch of golden perfection, I would absolutely love to hear all about it. Please, don’t keep your culinary triumphs to yourself! Share your experiences, your photos, and any delightful variations you came up with. There’s a wonderful community spirit around sharing homemade treats, and your insights could inspire someone else to try their hand at this wonderful confection. Your feedback and creativity are what make this entire cooking journey so much richer and more fulfilling for all of us. So go forth, create, share, and most importantly, enjoy every single bite of this amazing homemade delight!
Classic Christmas Toffee
This Classic Christmas Toffee recipe delivers a perfect balance of crisp, buttery indulgence, crowned with crunchy nuts. A cherished tradition, it’s easy to make and delicious to share.
Ingredients
-
1 cup unsalted butter (226g)
-
1 cup granulated sugar (200g)
-
1/4 cup water (60ml)
-
1 cup finely chopped nuts (pecans or almonds)
Instructions
- Step 1
Line a 13×18-inch baking sheet with parchment paper. Chop nuts finely and set aside. Clip a candy thermometer to a heavy-bottomed 3-4 quart saucepan, ensuring it doesn’t touch the bottom of the pan. - Step 2
In the saucepan, combine butter, granulated sugar, and water. Heat over medium, stirring constantly with a silicone spatula until butter melts and sugar completely dissolves. Stop stirring once the mixture comes to a full boil. - Step 3
Allow mixture to boil undisturbed. Continuously monitor the candy thermometer until it reaches 300-305°F (149-152°C), which is the ‘hard crack’ stage. The toffee should be a rich, deep golden or amber color. This process typically takes 15-25 minutes. If sugar crystals form on the sides of the pan above the boiling mixture, gently brush them down with a clean pastry brush dipped in warm water. - Step 4
Immediately remove the saucepan from heat the moment it reaches the target temperature. Carefully pour the hot toffee onto the prepared baking sheet. Quickly use a heat-proof spatula to gently and swiftly spread it evenly into a thin, consistent layer. Immediately sprinkle the finely chopped nuts liberally over the hot toffee surface, gently pressing them in to ensure they adhere well. - Step 5
Allow the toffee to cool at room temperature on a wire rack for at least 30 minutes. Then, carefully transfer the baking sheet to the refrigerator and chill for 1 to 2 hours, or until the toffee is completely firm and brittle. Once solid, lift the entire sheet of toffee from the pan using the parchment paper overhang. Transfer it to a clean, sturdy cutting board, and then break it into irregular, bite-sized pieces using a meat mallet, rolling pin, or a large, sharp knife. - Step 6
Store the broken toffee pieces in an airtight container at room temperature for up to 2 weeks. For longer storage or in warm/humid climates, refrigerate for up to 1 month. Toffee can also be frozen in an airtight container for up to 3 months; thaw at room temperature before serving for the best texture and flavor. Layer pieces with parchment paper to prevent sticking.
Important Information
Nutrition Facts (Per Serving)
It is important to consider this information as approximate and not to use it as definitive health advice.
Allergy Information
Please check ingredients for potential allergens and consult a health professional if in doubt.


Leave a Comment