

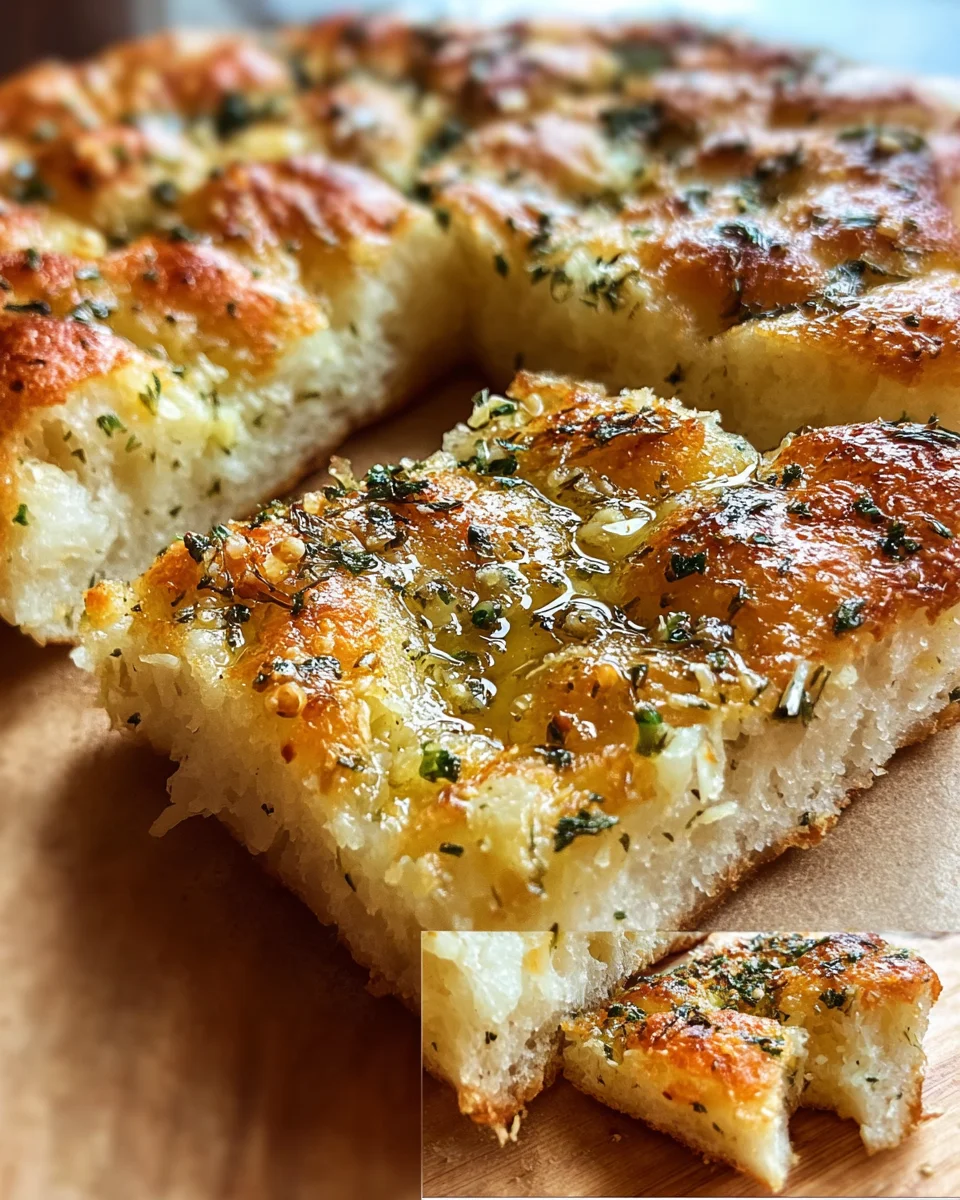
Crispy And Cheesy Garlic Parmesan Focaccia Bread Youll Love is more than just a dish; it’s an irresistible invitation to a world of aromatic delights and satisfying textures. Imagine pulling apart a warm slice, the golden crust crackling ever so gently, revealing a wonderfully airy interior studded with savory garlic, rich Parmesan, and a hint of fresh herbs. Originating from the Liguria region of Italy, focaccia has a rich history dating back to ancient times, initially baked in hearths and evolving into the beloved flatbread we cherish today. It was traditionally a simple bread, often drizzled with olive oil and sprinkled with salt, enjoyed as a breakfast treat or an accompaniment to meals. Today, its versatility knows no bounds, making it a perfect appetizer, a delightful side dish, or even the base for a gourmet sandwich.
People absolutely adore this dish because of its incredible interplay of textures and flavors. The initial crispness gives way to a soft, chewy crumb, while the pungent garlic perfectly balances the salty, umami notes of the Parmesan cheese. Each bite offers a burst of savory goodness that is truly addictive. I’m so excited to guide you through creating this culinary masterpiece in your own kitchen. I promise you, mastering this Crispy And Cheesy Garlic Parmesan Focaccia Bread Youll Love will become one of your proudest kitchen achievements, bringing joy and deliciousness to your table with every golden, fragrant loaf.

Ingredients:
For the Focaccia Dough:
- 500g (about 4 cups) Strong Bread Flour or All-Purpose Flour: While all-purpose flour works, I find that bread flour, with its higher protein content, really gives you that beautiful, chewy interior and helps achieve an incredible crust, which is essential for our Crispy And Cheesy Garlic Parmesan Focaccia Bread.
- 10g (about 1 tablespoon) Fine Sea Salt: This isn’t just for flavor; it also helps to strengthen the gluten structure, contributing to the focaccia’s texture.
- 7g (about 2 ¼ teaspoons) Instant Yeast: Make sure your yeast is fresh! This is what will make our focaccia light and airy.
- 400ml (about 1 ¾ cups) Warm Water (around 105-115°F / 40-46°C): The warmth helps to activate the yeast, but be careful not to make it too hot, as that can kill it.
- 30ml (about 2 tablespoons) Extra Virgin Olive Oil, plus more for the bowl and pan: Good quality olive oil is key here. It adds richness to the dough and contributes to that signature focaccia flavor and texture.
For the Garlic Parmesan Topping:
- 60ml (about ¼ cup) Extra Virgin Olive Oil: Again, choose a good quality one. This will be infused with garlic for our topping.
- 4-6 Cloves Garlic, minced: Freshly minced garlic is non-negotiable for that vibrant garlic flavor we’re aiming for in this Crispy And Cheesy Garlic Parmesan Focaccia Bread.
- ½ teaspoon Dried Oregano (or 1 ½ teaspoons fresh, chopped): Oregano provides a lovely herbaceous note that complements the garlic and cheese beautifully.
- ¼ teaspoon Red Pepper Flakes (optional, for a hint of heat): I love adding a little kick, but feel free to omit if you prefer.
- 100g (about 1 cup) Freshly Grated Parmesan Cheese: Skip the pre-grated stuff! Freshly grated Parmesan melts better and has a far superior flavor. This is a crucial element for the “cheesy” part of our focaccia.
- Flaky Sea Salt, for finishing: This adds a wonderful textural contrast and bursts of salty flavor.
- Freshly Ground Black Pepper, to taste: A little bit of pepper elevates all the other flavors.
Equipment You’ll Need:
- Large Mixing Bowl: Essential for combining and rising the dough.
- Kitchen Scale: For precise ingredient measurement, especially flour, which can vary greatly by volume.
- 9×13 inch (23×33 cm) Baking Pan or a Half Sheet Pan: A light-colored metal pan is ideal for even baking and a golden bottom crust.
- Plastic Wrap or a Damp Kitchen Towel: For covering the dough during its rises.
- Small Saucepan or Microwave-Safe Bowl: For gently warming the olive oil for the topping.
- Pastry Brush: To evenly distribute the garlic oil.
Preparing the Dough – The Foundation of Your Crispy And Cheesy Garlic Parmesan Focaccia Bread:
- Activate the Yeast: In your large mixing bowl, combine the warm water and instant yeast. Give it a gentle stir and let it sit for about 5-10 minutes. You should see a foamy layer developing on the surface; this tells you your yeast is alive and ready to work its magic. If you don’t see any foam, your water might have been too hot or too cold, or your yeast may be old. In that case, it’s best to start again with fresh yeast and properly tempered water. We want a lively start for our incredibly Crispy And Cheesy Garlic Parmesan Focaccia Bread.
- Combine Dry Ingredients: While the yeast is activating, in a separate, smaller bowl, whisk together your bread flour and fine sea salt. This ensures the salt is evenly distributed throughout the flour, preventing concentrated salty spots in your finished focaccia.
- Mix the Dough: Once your yeast is foamy, pour the flour and salt mixture into the wet ingredients in the large mixing bowl. Add the 2 tablespoons of extra virgin olive oil. Using a sturdy wooden spoon or your hands, mix everything together until a shaggy dough forms and all the flour is hydrated. It’s okay if it looks a bit messy and sticky at this stage; we’re just looking for everything to come together.
-
Knead for Gluten Development: Now comes the fun part! This dough is quite wet, so traditional kneading on a floured surface might be challenging. I prefer the “stretch and fold” method directly in the bowl, or using a stand mixer with a dough hook if you have one.
- By Hand (Stretch and Fold): Lightly oil your hands. Grab a portion of the dough from the edge, stretch it upwards, and fold it over towards the center of the bowl. Rotate the bowl a quarter turn and repeat. Continue this process for about 5-7 minutes. The dough will start off very loose and sticky, but as you continue to stretch and fold, you’ll notice it becoming smoother, more elastic, and easier to handle. This gentle kneading develops the gluten network, which is crucial for the focaccia’s signature airy crumb.
- By Stand Mixer: Attach the dough hook and mix on low speed for 8-10 minutes. The dough will be very sticky at first, but it should pull away from the sides of the bowl eventually, though it will remain soft and somewhat tacky. This extended kneading time ensures the gluten is fully developed.
You’re looking for a smooth, elastic, and slightly tacky dough that can pass the “windowpane test” – if you can gently stretch a small piece of dough thin enough to see light through it without tearing, your gluten is well developed.
First Rise:
- Prepare for the Rise: Once the dough is properly kneaded, drizzle a little extra olive oil into the large mixing bowl, ensuring the bottom and sides are lightly coated. This prevents the dough from sticking as it expands. Place your dough into the oiled bowl, then gently turn it over once to coat the top as well. This olive oil on the surface helps keep the dough moist and prevents a dry skin from forming.
- Cover and Let Rise: Cover the bowl tightly with plastic wrap or a damp kitchen towel. This creates a warm, humid environment that’s perfect for yeast activity. Place the bowl in a warm, draft-free spot in your kitchen. I often put it in a slightly warm (but turned off) oven or near a sunny window.
- The Bulk Fermentation: Allow the dough to rise for 1 to 1.5 hours, or until it has visibly doubled in size. The exact time will depend on the temperature of your kitchen. Patience is key here! This long, slow rise allows the flavors to develop beautifully and creates a truly airy texture for your Crispy And Cheesy Garlic Parmesan Focaccia Bread. You’ll notice bubbles forming within the dough, which is a great sign of yeast activity.
Shaping and Second Proofing:
- Prepare the Baking Pan: Generously drizzle about 2-3 tablespoons of extra virgin olive oil into your 9×13 inch baking pan. Use your hands or a pastry brush to ensure the entire bottom and about an inch up the sides are well coated with oil. This liberal application of oil is crucial for achieving that wonderfully crispy, golden-brown bottom crust that defines good focaccia.
- Transfer the Dough: Gently scrape the risen dough out of the bowl and into the prepared baking pan. Try to disturb it as little as possible to preserve those precious air bubbles.
- Initial Spreading: Using your oiled fingertips, gently press the dough to roughly fill the pan. It might resist and spring back a bit; that’s normal. Don’t force it. If it resists too much, let it rest for 10-15 minutes, uncovered, to allow the gluten to relax, then try again. You may need to repeat this resting and pressing process 2-3 times until the dough fills the pan relatively evenly.
- The Dimpling Process: Once the dough is spread out, generously drizzle another tablespoon or two of olive oil over the top surface of the dough. Then, using your oiled fingertips (or the handle of a wooden spoon for deeper dimples), press firmly straight down into the dough, creating deep indentations all over the surface. These dimples are not just for aesthetics; they create pockets for the olive oil and toppings to gather, ensuring every bite is flavorful and helping to prevent large, uneven air pockets in the finished bread. This is a signature characteristic of a perfect Crispy And Cheesy Garlic Parmesan Focaccia Bread.
- Second Proof: Cover the pan loosely with plastic wrap or a clean kitchen towel. Let the focaccia proof again in a warm spot for another 30-45 minutes. During this second rise, the dough will puff up noticeably, and the dimples will become softer and more rounded. This final proof is important for maximum lightness and airiness in your focaccia. Towards the end of this proofing time, preheat your oven.
Preparing the Garlic Parmesan Topping:
- Infuse the Oil: While your focaccia is enjoying its second proof, prepare the flavor-packed topping. In a small saucepan or a microwave-safe bowl, combine the ¼ cup extra virgin olive oil, minced garlic, dried oregano, and red pepper flakes (if using). Gently heat this mixture over low heat on the stovetop or in the microwave for about 1-2 minutes, just until the garlic becomes fragrant and lightly sizzles. Be careful not to brown or burn the garlic, as this will make it bitter. We’re simply infusing the oil with all those wonderful aromas. Remove from heat and let it sit to allow the flavors to deepen.
Baking Your Crispy And Cheesy Garlic Parmesan Focaccia Bread:
- Preheat the Oven: Preheat your oven to a blazing 425°F (220°C). A hot oven is critical for achieving a beautifully crispy crust and a rapid rise, giving your focaccia that characteristic open crumb. If you have a baking steel or stone, place it in the oven during preheating for an even crispier bottom.
- Apply Topping Before Baking: Once your focaccia has finished its second proof and your oven is preheated, remove the cover. Using a pastry brush, liberally brush the warm garlic-infused olive oil mixture all over the surface of the dough, making sure some of it seeps into those beautiful dimples.
- Add the Cheese and Seasoning: Now, evenly sprinkle the freshly grated Parmesan cheese over the entire surface of the focaccia. Don’t be shy here! This is where the “cheesy” part of our Crispy And Cheesy Garlic Parmesan Focaccia Bread truly comes to life. Finish with a generous sprinkle of flaky sea salt and a few grinds of fresh black pepper.
- Bake to Golden Perfection: Carefully transfer the pan to your preheated oven. Bake for 25-30 minutes. You’ll know it’s done when the top is a deep golden brown, the cheese is melted and slightly bubbly, and the edges are beautifully crisp. The bottom should also be a rich golden brown; you can gently lift the focaccia with a spatula to check. If the bottom needs more browning, you can bake for a few extra minutes directly on the oven rack, if safe, or return it to the pan.
- Cooling is Crucial: Once baked, immediately remove the focaccia from the oven. Carefully lift it out of the baking pan and transfer it to a wire rack to cool. This step is very important! Cooling on a wire rack allows air to circulate around the entire focaccia, preventing the bottom crust from becoming soggy due to trapped steam. Let it cool for at least 15-20 minutes before slicing. This resting period allows the internal structure of the bread to set and makes for easier, cleaner slices.
Serving and Storage:
- Enjoy Fresh: This Crispy And Cheesy Garlic Parmesan Focaccia Bread You’ll Love is absolutely at its best when served warm, straight from the oven. The crust is perfectly crispy, the interior is soft and airy, and the garlic-parmesan topping is wonderfully fragrant and savory. Slice it into squares or strips and serve it as an appetizer, alongside a bowl of pasta, with a hearty soup, or as part of an antipasto platter. It’s also fantastic for sandwiches.
- Storage: If by some miracle you have any leftovers, store the focaccia in an airtight container or wrapped tightly in foil at room temperature for up to 2 days. To refresh it, simply pop slices into a toaster oven or a regular oven at 350°F (175°C) for a few minutes until warmed through and crispy again. You can also freeze individual slices, well-wrapped, for up to 1 month. Thaw at room temperature and reheat as desired. However, I doubt you’ll have any left once you taste this incredibly flavorful and satisfying Crispy And Cheesy Garlic Parmesan Focaccia Bread!
Conclusion:
Well, my friends, we’ve journeyed through every delightful step, and now you stand on the precipice of creating something truly spectacular in your own kitchen. I genuinely hope you’re feeling as excited as I am about this recipe, because what you’re about to bake is not just bread; it’s an experience. This isn’t just any focaccia; it’s destined to become a staple, a star, a dish that will have everyone asking for the recipe. I’ve poured my heart into guiding you through the process of making what I believe is the ultimate Crispy And Cheesy Garlic Parmesan Focaccia Bread Youll Love. Its irresistible charm lies in that golden, dimpled crust that crackles ever so slightly, giving way to an incredibly soft, airy interior. And let’s not forget the star players: the pungent, aromatic garlic, the rich, nutty Parmesan, and that luxurious layer of melted cheese that simply elevates it beyond compare. The scent alone, wafting from your oven, is enough to gather everyone around the kitchen island, eagerly anticipating that first glorious bite.
A Symphony of Flavors and Textures You Can’t Resist
From the moment you pull this gorgeous creation from the oven, you’ll understand exactly why I’m so passionate about it. The interplay of textures – the crisp edges, the tender crumb, the slightly chewy pockets – combined with the bold, savory flavors of garlic and cheese, creates a truly unforgettable bite. It’s comforting, it’s robust, and it’s surprisingly versatile. You’ll find yourself reaching for this recipe time and time again, whether you’re feeding a crowd or simply treating yourself to a truly exceptional homemade bread. It’s the kind of bread that transforms an ordinary meal into something special, making every occasion feel a little more gourmet and a lot more delightful. Trust me, once you taste that perfect balance of crispiness and cheesy goodness, you’ll know exactly what I mean.
Serving Suggestions and Creative Twists to Explore
Now that you’ve mastered this incredible focaccia, let’s talk about how to truly make it sing at your table. While it’s utterly divine enjoyed on its own, perhaps still warm from the oven, torn into rustic pieces, its potential extends far beyond that. For a simple yet elegant appetizer, slice it into strips and serve it with your favorite marinara sauce for dipping, or a vibrant pesto for an herbaceous kick. Imagine it alongside a hearty bowl of minestrone or a rich tomato bisque, where its textured surface becomes the perfect vehicle for soaking up all those delicious, comforting brothy flavors. It’s also an absolute dream paired with any pasta dish, from a classic spaghetti aglio e olio to a creamy fettuccine Alfredo; it provides that much-needed textural contrast and a burst of savory flavor.
But don’t stop there! Think about using thicker slices as the foundation for an extraordinary open-faced sandwich. Top it with some fresh mozzarella, ripe tomatoes, and basil for a Caprese focaccia, or pile on some roasted vegetables and a drizzle of balsamic glaze for a delightful vegetarian option. For the meat lovers, thin slices of prosciutto or salami would be utterly fantastic. You could even experiment with different cheeses – a sharp provolone or a smoky Gouda could introduce wonderful new dimensions. And if you’ve got any leftovers (a rare occurrence, I assure you!), try turning it into croutons for your salads or crumbling it over a casserole for an extra crispy, cheesy topping. The possibilities, as you can see, are endless, and each variation simply enhances the magic of this fantastic bread.
Your Culinary Adventure Awaits!
So, what are you waiting for? Take this recipe, gather your ingredients, and embark on what I promise will be a truly rewarding baking adventure. Don’t be intimidated; the beauty of focaccia lies in its rustic charm and forgiving nature. Each dimple, each golden bubble, is a testament to the love and effort you’ve put in. I am absolutely confident that you will achieve fantastic results, filling your home with the most incredible aroma and your belly with pure happiness. There’s an immense satisfaction that comes from creating something so delicious from scratch, and I truly want you to experience that joy.
Once you’ve baked your very own batch of this delightful creation, I would absolutely love to hear all about your experience! Did you stick to the recipe exactly, or did you add your own unique twist? What did you serve it with? Please, share your stories, your triumphs, and especially your photos! Seeing your beautiful creations makes my day and inspires countless others. Tag me, comment below, or simply drop a line to let me know how much you adored making (and devouring!) this Crispy And Cheesy Garlic Parmesan Focaccia Bread Youll Love. Happy baking, my dear food enthusiasts!
Crispy, Cheesy Garlic Parmesan Focaccia Bread
Indulge in an irresistible Crispy And Cheesy Garlic Parmesan Focaccia Bread. This delightful Italian flatbread, originating from Liguria, features a golden, crispy crust, an airy interior, and is generously studded with savory garlic, rich Parmesan, and fresh herbs. Perfect as an appetizer, side dish, or sandwich base, it’s a culinary masterpiece you’ll love creating in your own kitchen.
Ingredients
Instructions
Important Information
Nutrition Facts (Per Serving)
It is important to consider this information as approximate and not to use it as definitive health advice.
Allergy Information
Please check ingredients for potential allergens and consult a health professional if in doubt.


Leave a Comment