

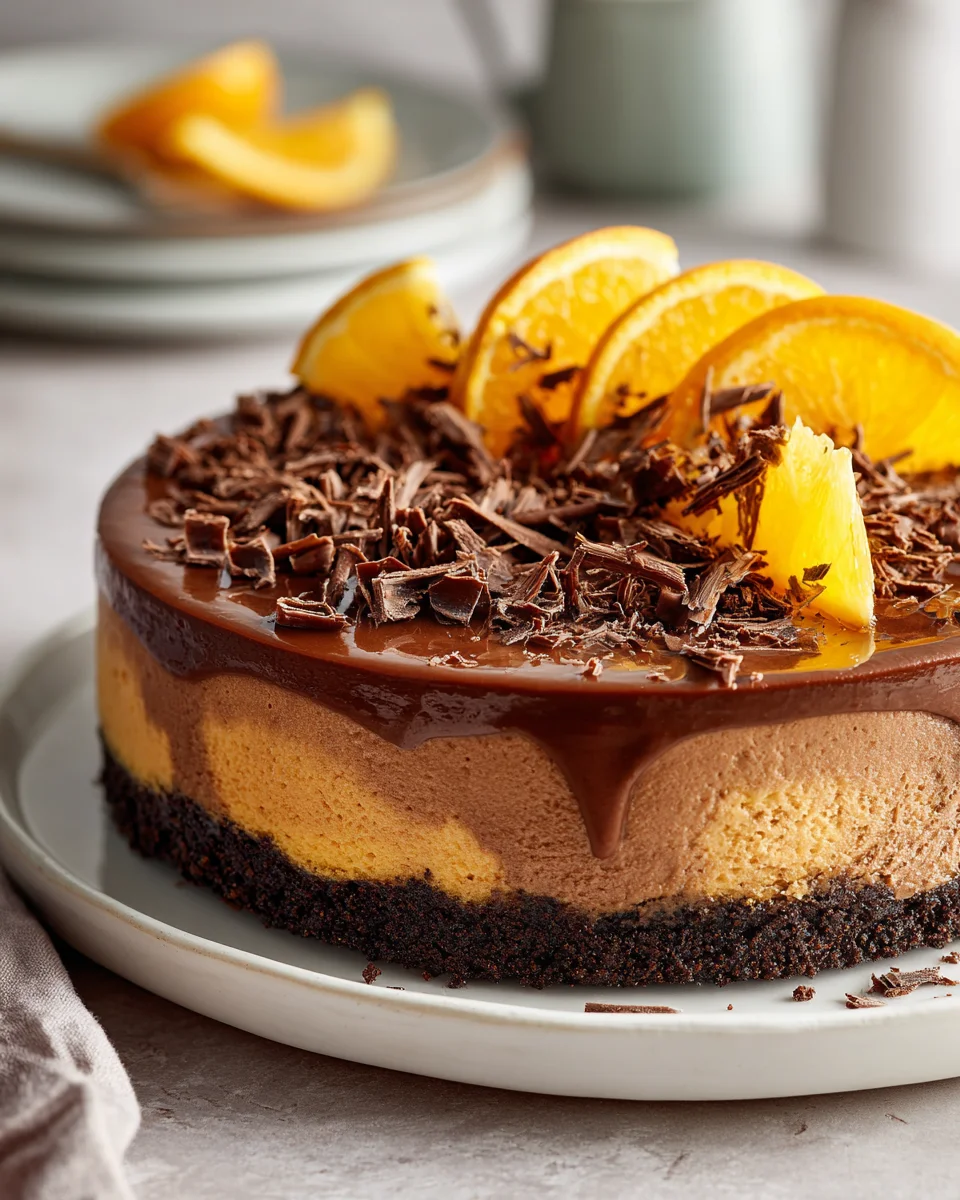
Chocolate Orange Cheesecake
Oh, where do I even begin with this absolute showstopper? If you’re anything like me, the mere mention of chocolate and orange together sends a little thrill of excitement down your spine. But imagine that iconic duo, not just in a humble bar, but transformed into a velvety, luscious cheesecake! That’s exactly what we’re diving into today. What makes this Chocolate Orange Cheesecake so incredibly special is how it beautifully balances the intense richness of dark chocolate with the bright, zesty perfume of fresh orange. It’s a sophisticated flavor pairing that’s utterly irresistible.
You, my friend, are going to adore this recipe because it delivers on every single promise: a creamy, dreamy texture, a vibrant burst of citrus, and that deep, comforting chocolatey goodness we all crave. Prepare to impress everyone with this magnificent dessert – it’s a harmonious blend of sweet, tangy, and utterly decadent, all nestled on a perfectly crisp biscuit base. Get ready to fall in love with your new favorite dessert!

Ingredient Notes
There’s nothing quite like the decadent combination of rich chocolate and bright, zesty orange, and in a cheesecake, it’s absolutely divine! To make sure your Chocolate Orange Cheesecake turns out perfectly, paying attention to your ingredients is key. Here’s a rundown of what you’ll need and some helpful notes for substitutions.
For the Crust
- Digestive Biscuits: I typically use about 200g (7 oz) of digestive biscuits for the base. They have a lovely neutral flavor that lets the chocolate and orange shine through. If you want an even more chocolatey base, chocolate digestive biscuits work wonderfully! Graham crackers are also a fantastic alternative if digestives aren’t readily available where you are.
- Melted Butter: Unsalted butter is my go-to. It binds the biscuit crumbs together to form a sturdy, delicious crust. About 75g (5 tablespoons) is usually enough.
For the Filling
- Full-Fat Cream Cheese: This is non-negotiable for a truly creamy, rich cheesecake. Please, don’t skimp and use low-fat; the texture just won’t be the same. Ensure it’s at room temperature before you start mixing – this prevents lumps and makes for a super smooth batter. I usually use around 750g (three 8-oz blocks).
- Granulated Sugar: For sweetness and to balance the tang of the cream cheese.
- Large Eggs: Again, room temperature is best for smooth incorporation. They help set the cheesecake.
- Sour Cream: This adds a lovely tang and extra creaminess, contributing to that signature cheesecake texture. Full-fat Greek yogurt is an excellent substitute if you don’t have sour cream on hand. Like the cream cheese and eggs, room temperature is ideal here too.
- Vanilla Extract: Just a teaspoon or two to enhance all the other flavors.
- Good Quality Cocoa Powder: Unsweetened cocoa powder is what you need to infuse that deep chocolate flavor. I recommend using a Dutch-processed cocoa for a richer, less acidic taste, which pairs beautifully with the orange.
- Orange Zest: The star of the show! Freshly grated zest from about 2-3 large oranges (or 3-4 smaller ones) is crucial. Don’t skip this – it provides intense orange aroma and flavor. Make sure to only get the bright orange part, avoiding the bitter white pith.
- Fresh Orange Juice: A couple of tablespoons of freshly squeezed orange juice complements the zest and adds a lovely bright note.
- Melted Dark Chocolate: Around 100g (3.5 oz) of good quality dark chocolate (70% cocoa solids is my preference) melted and cooled slightly. This provides a deep, luxurious chocolate flavor that elevates the cheesecake beyond just cocoa powder. Semi-sweet chocolate can also be used if you prefer a slightly sweeter profile.
- Non-alcoholic Orange Flavoring (Optional): For an intensified orange flavor, some recipes might suggest an orange liqueur. If you’re looking for a non-alcoholic alternative, a teaspoon of orange extract or an extra tablespoon of fresh orange juice will give you that bright citrus kick without the alcohol.
For the Topping (Optional)
- Chocolate Ganache: A simple ganache made with dark chocolate and heavy cream provides a beautiful, glossy finish and another layer of chocolate indulgence.
- Orange Zest, Chocolate Curls, or Orange Segments: Perfect for decorating and highlighting the flavors.
Step-by-Step Instructions
Making a cheesecake might seem a little daunting, but I promise it’s straightforward if you follow these steps carefully, especially with the water bath trick! Let’s get baking this delicious Chocolate Orange Cheesecake.
Step 1: Prepare Your Pan and Oven
- Preheat your oven to 160°C (325°F).
- Get a 23 cm (9-inch) springform pan ready. I like to lightly grease the bottom, then place a circle of parchment paper inside. For good measure, I also wrap the outside of the pan securely with two layers of heavy-duty aluminum foil. This is crucial if you’re using a water bath, which I highly recommend for a crack-free, creamy cheesecake.
Step 2: Make the Biscuit Crust
- Crush your digestive biscuits (or chosen alternative) into fine crumbs. You can do this in a food processor or by placing them in a sealed bag and crushing them with a rolling pin.
- Melt the butter and pour it over the biscuit crumbs. Mix well until all the crumbs are moistened.
- Press the mixture firmly and evenly into the bottom of your prepared springform pan. You can use the back of a spoon or the bottom of a glass to get a really compact base.
- Bake the crust for 8-10 minutes, just until it’s slightly golden. This helps it firm up and prevents it from getting soggy. Remove from the oven and set aside to cool slightly while you prepare the filling. Reduce oven temperature to 150°C (300°F).
Step 3: Prepare the Cheesecake Filling
- In a large mixing bowl, beat the softened cream cheese and granulated sugar together with an electric mixer on medium speed until the mixture is completely smooth and creamy, with no lumps. Scrape down the sides of the bowl often.
- Add the eggs, one at a time, beating on low speed just until each egg is incorporated. Be careful not to overmix here; too much air can cause cracks during baking.
- Gently fold in the sour cream (or Greek yogurt), vanilla extract, fresh orange zest, and fresh orange juice until just combined.
- In a separate bowl, melt the dark chocolate (either in a microwave in 30-second bursts, stirring in between, or over a double boiler). Let it cool slightly.
- Add the cooled melted chocolate and the cocoa powder to the cream cheese mixture. Mix on low speed, or by hand with a spatula, until the chocolate and cocoa are fully incorporated and the batter is a uniform chocolate-orange color. Again, avoid overmixing.
Step 4: Bake the Cheesecake (with a Water Bath!)
- Pour the chocolate orange filling over your cooled biscuit crust in the springform pan. Gently tap the pan on the counter a few times to release any large air bubbles.
- Carefully place your foil-wrapped springform pan into a larger roasting pan.
- Pour hot water into the roasting pan, making sure it comes about halfway up the sides of the springform pan. Be careful not to splash water into the cheesecake itself.
- Carefully transfer the roasting pan with the cheesecake to the preheated oven.
- Bake for 60-75 minutes, or until the edges are set and lightly puffed, but the very center (about a 5cm or 2-inch circle) still has a slight wobble when you gently shake the pan. Don’t worry, it will continue to set as it cools.
Step 5: Cool and Chill
- Once baked, turn off the oven but leave the cheesecake inside with the oven door propped open slightly (using a wooden spoon) for about an hour. This gradual cooling prevents cracks.
- Remove the cheesecake from the oven and the water bath. Remove the foil. Let it cool completely to room temperature on a wire rack.
- Once at room temperature, cover the cheesecake loosely with plastic wrap and refrigerate for at least 6-8 hours, or preferably overnight. Chilling is essential for the cheesecake to fully set and for the flavors to develop.
Step 6: Add Topping (Optional) and Serve
- If you’re adding a ganache topping, prepare it once the cheesecake is fully chilled. Heat heavy cream until simmering, pour over chopped dark chocolate, let sit for 5 minutes, then whisk until smooth. Let it cool slightly until it’s pourable but not hot.
- Carefully pour the ganache over the chilled cheesecake, spreading it gently to the edges.
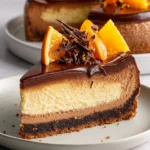
- Garnish with extra orange zest, chocolate curls, or fresh orange segments just before serving.
- To serve, carefully run a thin knife around the edge of the pan before releasing the springform sides. Slice with a sharp, warm knife for clean cuts.
Tips & Suggestions
Crafting the perfect Chocolate Orange Cheesecake is a delightful experience, and a few insider tips can elevate your creation from good to absolutely glorious. I’ve learned these through trial and error, so you don’t have to!
- Room Temperature Ingredients are Critical: I cannot stress this enough! For the creamiest, smoothest, lump-free filling, your cream cheese, eggs, and sour cream absolutely must be at room temperature. Take them out of the fridge at least an hour (preferably two) before you plan to start mixing. This ensures they emulsify beautifully without overmixing.
- Don’t Overmix the Batter: When you’re combining the eggs and subsequently the sour cream, mix only until just combined. Overmixing incorporates too much air into the batter, which can cause your cheesecake to puff up too much during baking and then crack as it cools. Gentle, low-speed mixing is your friend here.
- The Water Bath is Your Best Friend: Seriously, if you want to avoid cracks and achieve that incredibly smooth, even texture, a water bath is essential. The moist heat environment it creates helps the cheesecake bake gently and evenly, preventing it from drying out and cracking. Make sure your springform pan is well-wrapped in heavy-duty foil to prevent water seepage.
- Cooling Gradually Prevents Cracks: Just like not overmixing, letting your cheesecake cool slowly in the turned-off oven (with the door ajar) is crucial. A sudden change in temperature can shock the cheesecake and lead to unsightly cracks on the surface. Patience pays off here!
- Chilling is Non-Negotiable: I know the wait is hard, but don’t rush the chilling process! A minimum of 6-8 hours, or even better, overnight in the refrigerator, is what transforms the baked batter into a firm, sliceable, and intensely flavored cheesecake. It allows the flavors to meld and the texture to fully set.
- Fresh Orange Zest for Maximum Flavor: While orange juice adds moisture, the true, vibrant orange flavor and aroma come from the fresh zest. Use a fine grater or microplane to get all the zest without any of the bitter white pith.
- Quality Chocolate Makes a Difference: Since chocolate is a main player here, using a good quality dark chocolate for melting will significantly impact the depth and richness of your cheesecake’s flavor.
- Clean Slices: For beautifully presented slices, run a long, sharp knife under hot water, wipe it clean, and then make each cut. Clean the knife after each slice for the neatest results.
Storage
Once you’ve gone through all the effort of baking and chilling your delicious Chocolate Orange Cheesecake, you’ll want to store it properly to keep it fresh and tasting its best for as long as possible. Here’s what I recommend:
- In the Refrigerator: Your cheesecake will last beautifully in the refrigerator for up to 4-5 days. Make sure it’s tightly covered with plastic wrap or stored in an airtight container to prevent it from drying out or absorbing any odors from other foods in your fridge. I often leave it in the springform pan base and just cover the top, or transfer individual slices to an airtight container.
- In the Freezer: Yes, you can freeze cheesecake! It’s a great way to make it ahead or save leftovers. You can freeze the whole cheesecake or individual slices.
- Whole Cheesecake: Once completely chilled, remove it from the springform pan base. Wrap the entire cheesecake tightly in several layers of plastic wrap, and then an additional layer of aluminum foil. This dual wrapping protects it from freezer burn.
- Individual Slices: Place slices on a baking sheet and freeze until firm (about 1-2 hours). Once firm, wrap each slice individually in plastic wrap, then place them in an airtight freezer-safe container or a heavy-duty freezer bag. This prevents them from sticking together and makes it easy to grab just one slice when a craving hits!
- Thawing: When you’re ready to enjoy, transfer the frozen cheesecake (whole or slices, still wrapped) to the refrigerator to thaw slowly overnight. Don’t thaw at room temperature, as this can affect the texture.
- Frozen, your Chocolate Orange Cheesecake will maintain its quality for about 1-2 months.
Final Thoughts
And there you have it! I truly believe this Chocolate Orange Cheesecake is more than just a dessert; it’s an experience. The way the rich, deep chocolate perfectly complements the bright, zesty orange creates a flavour profile that is both sophisticated and incredibly comforting. It’s that exquisite balance of sweet and tangy, creamy and crisp, that makes every single bite an absolute delight.
I can’t recommend enough giving this Chocolate Orange Cheesecake a try. Whether you’re looking to impress guests, celebrate a special occasion, or simply treat yourself to something extraordinary, this recipe delivers on all fronts. Prepare to fall in love with its irresistible charm – it truly is a showstopper that will leave everyone asking for more!
Decadent Chocolate Orange Cheesecake Recipe | Must-Try Dessert
- Total Time: 1 hour 45 minutes
- Yield: 12 servings 1x
Description
Indulge in the luxurious blend of rich chocolate and zesty orange with this decadent cheesecake. Perfect for impressing guests or treating yourself, this dessert is a harmonious balance of flavors and textures.
Ingredients
- 200g (7 oz) Digestive Biscuits
- 75g (5 tablespoons) Unsalted Butter
- 750g Full-Fat Cream Cheese
- Granulated Sugar
- Large Eggs
- Sour Cream
- Vanilla Extract
- Good Quality Cocoa Powder
- Orange Zest from 2-3 large oranges (or 3-4 smaller ones)
- Fresh Orange Juice
- 100g (3.5 oz) Melted Dark Chocolate (70% cocoa solids)
- Non-alcoholic Orange Flavoring (Optional)
- Chocolate Ganache (Optional)
- Orange Zest, Chocolate Curls, or Orange Segments (Optional)
Instructions
- Preheat your oven to 160°C (325°F). Prepare a 23 cm (9-inch) springform pan by lightly greasing the bottom and placing a circle of parchment paper inside. Wrap the outside of the pan with two layers of heavy-duty aluminum foil.
- Crush the digestive biscuits into fine crumbs and mix with melted butter until moistened. Press the mixture into the bottom of the prepared springform pan and bake for 8-10 minutes until slightly golden. Set aside to cool and reduce oven temperature to 150°C (300°F).
- In a large mixing bowl, beat the softened cream cheese and granulated sugar together until smooth. Add the eggs one at a time, mixing on low speed until incorporated. Gently fold in the sour cream, vanilla extract, orange zest, and orange juice.
- Melt the dark chocolate and let it cool slightly. Add the cooled melted chocolate and cocoa powder to the cream cheese mixture and mix until fully incorporated.
- Pour the filling over the cooled biscuit crust. Tap the pan on the counter to release air bubbles. Place the foil-wrapped pan into a larger roasting pan and pour hot water into the roasting pan halfway up the sides of the springform pan.
- Bake for 60-75 minutes until the edges are set but the center has a slight wobble. Turn off the oven and leave the cheesecake inside with the door propped open for about an hour.
- Remove the cheesecake from the oven and water bath, let it cool to room temperature, then refrigerate for at least 6-8 hours or overnight.
- If adding a ganache topping, heat heavy cream until simmering, pour over chopped dark chocolate, let sit for 5 minutes, then whisk until smooth. Pour the ganache over the chilled cheesecake and garnish with orange zest, chocolate curls, or orange segments before serving.
- Prep Time: 30 mins
- Cook Time: 75 mins
- Category: Dessert
- Method: Baking
- Cuisine: American
Nutrition
- Serving Size: 1 slice
- Calories: 450
- Sugar: 30 g
- Sodium: 250 mg
- Fat: 30 g
- Saturated Fat: 15 g
- Unsaturated Fat: 10 g
- Trans Fat: 0 g
- Carbohydrates: 35 g
- Fiber: 2 g
- Protein: 6 g
- Cholesterol: 100 mg
Keywords: Ensure all ingredients are at room temperature for the best texture. A water bath is essential for a smooth cheesecake, and chilling overnight is crucial for flavor development.


Leave a Comment