

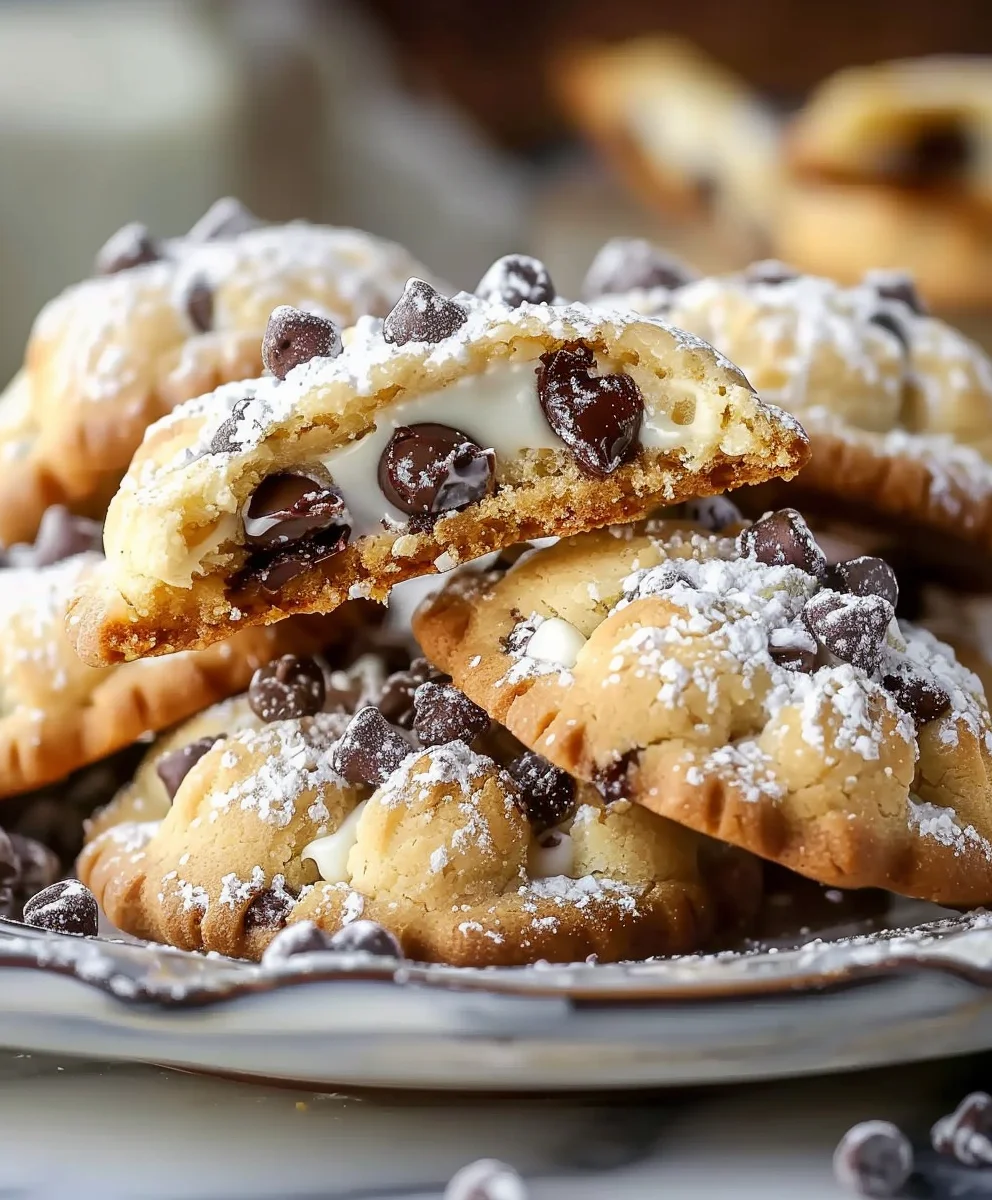
Cannoli Cookies are about to become your new favorite dessert obsession, offering all the iconic flavors of the beloved Sicilian pastry in a delightfully convenient, bite-sized form. Imagine that rich, creamy ricotta filling, subtly sweet and studded with mini chocolate chips or candied fruit, all nestled between two tender, perfectly spiced cookies instead of a fragile fried shell.
I remember my first taste of a traditional cannoli, a true masterpiece of Italian patisserie, often enjoyed during celebrations and festive gatherings. Originating from Sicily, these culinary treasures have captivated palates for centuries with their distinctive blend of textures and harmonious flavors. We’ve meticulously crafted this recipe to capture that very essence, transforming a classic into something wonderfully accessible for home bakers.
Why Everyone Loves Our Cannoli Cookies
People absolutely adore this dish because it delivers the complex, satisfying taste of a cannoli without the traditional frying process, making it a brilliant and less time-consuming alternative. The combination of the slightly crisp edge and the soft, decadent center in these Cannoli Cookies creates an irresistible symphony of textures that will have everyone reaching for another. Get ready to impress your friends and family with this truly special treat!

Ingredients:
Creating these delightful Cannoli Cookies requires a few distinct sets of ingredients: one for the crisp cookie base, another for the luscious ricotta filling, and finally, some optional garnishes that truly elevate them. I’ve carefully selected each component to ensure your Cannoli Cookies capture that iconic flavor profile we all adore from traditional cannoli.
For the Cannoli Cookies (Shells):
- 2 ½ cups (300g) all-purpose flour, spooned and leveled
- 1 teaspoon baking powder
- ½ teaspoon salt
- ¾ cup (170g) unsalted butter, softened to room temperature
- 1 cup (200g) granulated sugar
- 1 large egg
- 1 teaspoon vanilla extract (I always go for pure vanilla for the best flavor!)
- ½ teaspoon almond extract (This adds a subtle, authentic cannoli note)
- Zest of 1 medium orange (About 1 tablespoon, absolutely essential for that bright, citrusy lift)
For the Cannoli Cream Filling:
- 24 ounces (about 3 cups) whole milk ricotta cheese, very well drained (This step is crucial, I can’t stress it enough!)
- ¾ cup (90g) powdered sugar (also known as confectioners’ sugar), sifted
- ½ teaspoon vanilla extract
- ¼ teaspoon almond extract
- ⅛ teaspoon ground cinnamon (Just a tiny pinch to warm things up)
- 3 tablespoons mini chocolate chips, plus more for garnish
- 2 tablespoons candied orange peel or finely chopped pistachios (optional, but highly recommended for texture and flavor)
For Garnish (Optional but Recommended):
- Extra mini chocolate chips
- Chopped pistachios
- Powdered sugar for dusting
Part 1: Preparing the Cannoli Cookie Dough
Let’s get started on the foundation of our amazing Cannoli Cookies! The cookie dough is designed to be subtly crisp and flavorful, much like a classic cannoli shell, but in an easier-to-manage cookie form. Don’t rush these steps; precision here will lead to perfect results.
- First things first, let’s bring all of our cold ingredients, especially the butter and egg, to room temperature. This is a small but mighty tip because it ensures everything combines smoothly and evenly, leading to a much better texture in your final Cannoli Cookies.
- In a medium-sized bowl, I like to whisk together my dry ingredients. This means combining the 2 ½ cups of all-purpose flour, 1 teaspoon of baking powder, and ½ teaspoon of salt. Give them a good whisk for about 30 seconds to ensure they are thoroughly combined. This prevents any pockets of leavening or salt in your cookies. Set this bowl aside for a moment.
- Now, in the bowl of a stand mixer fitted with the paddle attachment, or with a large mixing bowl and a hand mixer, we’ll cream together the butter and sugar. Add the ¾ cup of softened unsalted butter and 1 cup of granulated sugar. Beat these on medium-high speed for about 3-4 minutes. You’re looking for a mixture that is light, fluffy, and noticeably pale in color. This process, known as creaming, incorporates air into the butter, which contributes to the cookies’ tenderness and rise. Don’t skip this step or cut it short! It truly makes a difference in the texture of your Cannoli Cookies.
- Next, it’s time to add our wet ingredients to the creamed butter and sugar. Crack in the 1 large egg, making sure it’s at room temperature. Then, pour in the 1 teaspoon of vanilla extract and ½ teaspoon of almond extract. Beat on medium speed until everything is just combined and the egg is fully incorporated into the mixture. Be careful not to overmix at this stage.
- Now for the star flavor that really makes these Cannoli Cookies sing: the orange zest! Add the zest of 1 medium orange to the wet ingredients. Beat for just another 10-15 seconds to distribute the zest throughout the mixture. The aroma alone will start making your kitchen smell incredible, promising the authentic cannoli experience.
- With the wet ingredients beautifully combined, it’s time to gradually add the dry ingredients to the wet. With the mixer on low speed, slowly add the flour mixture, about a third at a time, to the butter mixture. Mix only until the flour streaks have almost disappeared. It’s crucial not to overmix the dough once the flour is added. Overmixing develops the gluten in the flour too much, which can lead to tough cookies, and we want tender, melt-in-your-mouth Cannoli Cookies.
- Once the dough comes together, stop the mixer. I like to give it a final mix by hand with a rubber spatula, ensuring there are no hidden pockets of dry flour at the bottom of the bowl. The dough will be soft and slightly sticky.
- Now, for a very important step: chilling the dough. Divide the dough in half and flatten each half into a disc. Wrap each disc tightly in plastic wrap. Transfer them to the refrigerator and chill for at least 1 hour, or up to 24 hours. Chilling the dough is absolutely essential for these Cannoli Cookies. It helps the flavors meld, prevents the cookies from spreading too much during baking, and makes the dough much easier to handle when it’s time to roll and cut.
Part 2: Baking the Cannoli Cookies
After a patient wait while our dough chills, it’s finally time to transform that wonderful dough into crisp, fragrant Cannoli Cookies. This is where the magic truly starts to happen, filling your home with an irresistible aroma.
- When you’re ready to bake, preheat your oven to 350°F (175°C). Line two large baking sheets with parchment paper or silicone baking mats. This is my preferred method for preventing sticking and ensuring even baking for my Cannoli Cookies.
- Take one disc of chilled cookie dough out of the refrigerator. On a lightly floured surface, roll out the dough to about ¼-inch thick. If the dough is too cold and hard to roll, let it sit at room temperature for 5-10 minutes, but don’t let it get too warm. You want it pliable but still firm.
- Using a 2-inch round cookie cutter (or your preferred size – I find a 2-inch cutter perfect for these sandwich-style Cannoli Cookies), cut out your cookie shapes. Place the cut-out cookies about 1 inch apart on the prepared baking sheets. Gather the dough scraps, gently re-roll them, and cut out more cookies until all the dough is used.
- Bake one baking sheet at a time in the preheated oven for 9-12 minutes. Baking times can vary slightly depending on your oven, so keep an eye on them. You’re looking for the edges to be lightly golden brown. The centers might still look a little soft, but they will firm up as they cool. For a crispier Cannoli Cookie, you can bake them for an extra minute or two, but be careful not to burn them.
- Once baked, remove the baking sheets from the oven and let the cookies cool on the sheets for about 5 minutes. This allows them to set up a bit before you move them.
- Carefully transfer the partially cooled Cannoli Cookies to a wire rack to cool completely. It’s absolutely essential that the cookies are completely cool before you even think about adding the filling. If they’re warm, the filling will melt and slide right off, creating a messy situation instead of a beautiful Cannoli Cookie. While the first batch cools, repeat the rolling, cutting, and baking process with the second disc of dough.
Part 3: Crafting the Cannoli Cream Filling
Now for the star of the show: the rich, creamy, and oh-so-flavorful cannoli filling! This is what truly transforms our crisp cookies into amazing Cannoli Cookies. The key here is proper preparation of the ricotta, so pay close attention to that first step.
- This is the most critical step for a successful cannoli filling: draining the ricotta cheese. Place the 24 ounces of whole milk ricotta cheese into a fine-mesh sieve lined with cheesecloth or a few layers of paper towels. Set the sieve over a bowl and let it drain in the refrigerator for at least 4 hours, or ideally overnight. The longer it drains, the better. We want to remove as much excess liquid as possible. Skipping this step or not draining it enough will result in a watery filling that will make your Cannoli Cookies soggy, and nobody wants that! After draining, press down on the ricotta to extract any remaining moisture. You should be left with a much firmer, drier ricotta.
- Once your ricotta is beautifully drained and firm, transfer it to a large mixing bowl. Add the ¾ cup of sifted powdered sugar. Sifting the powdered sugar is a small extra step, but it prevents lumps and ensures a super smooth, creamy filling for your Cannoli Cookies.
- Next, add the flavorings that make this filling so iconic: ½ teaspoon of vanilla extract, ¼ teaspoon of almond extract, and ⅛ teaspoon of ground cinnamon.
- Using a spatula or a hand mixer on low speed, mix all the ingredients together until they are just combined and smooth. Be careful not to overmix, as this can make the ricotta lose some of its desired texture. If you’re using a stand mixer, use the paddle attachment on low speed. The goal is a light, airy, and creamy consistency.
- Now, let’s incorporate those wonderful textural elements! Gently fold in the 3 tablespoons of mini chocolate chips. If you’re using them, also fold in the 2 tablespoons of candied orange peel or finely chopped pistachios. I personally love the candied orange peel; it echoes the citrus notes in the cookie and adds a lovely chewiness to the Cannoli Cookies.
- Cover the bowl of cannoli cream filling with plastic wrap and refrigerate it for at least 30 minutes. This allows the flavors to meld beautifully and helps the filling firm up slightly, making it easier to work with when assembling your Cannoli Cookies.
Part 4: Assembling and Finishing Your Cannoli Cookies
The moment of truth has arrived! With our crisp cookies cooled and our creamy filling chilled, it’s time to bring everything together to create spectacular Cannoli Cookies. This is the most rewarding part, seeing your hard work come to fruition!
- Retrieve your completely cooled Cannoli Cookies and your chilled cannoli cream filling. If the filling seems a little too firm, give it a quick stir to loosen it slightly.
- You have a couple of options for applying the filling. For a neater, more professional look, I highly recommend using a piping bag fitted with a round or star tip. Fill the piping bag with the cannoli cream. If you don’t have a piping bag, a small spoon or an offset spatula will work perfectly fine.
- Take one cookie and turn it flat-side up. Pipe or spoon about 1 to 1 ½ tablespoons of the cannoli cream filling onto the center of the cookie, leaving a small border around the edges. You want a generous amount of filling, but not so much that it oozes out excessively when you sandwich the cookies.
- Gently top the filling with another cookie, pressing down very lightly until the filling spreads almost to the edges. You’re creating a delicious sandwich cookie – your very own Cannoli Cookie masterpiece!
- Now for the fun part: garnishing! If desired, you can roll the edges of the assembled Cannoli Cookies in extra mini chocolate chips or chopped pistachios. This not only adds visual appeal but also an extra burst of flavor and texture. A light dusting of powdered sugar over the top of the assembled cookies is also a beautiful finishing touch.
- Repeat this process with the remaining cookies and filling until all your wonderful Cannoli Cookies are assembled.
- Storage and Serving: These Cannoli Cookies are definitely best served fresh, ideally within an hour or two of assembly, especially if you prefer a crisp cookie. However, they can be stored in an airtight container in the refrigerator for up to 2-3 days. Keep in mind that the cookies will soften slightly over time as they sit with the filling, which can still be quite delicious, offering a softer, cake-like texture. If you want to keep the cookies crisp, you can store the cookies and filling separately and assemble them just before serving.
And there you have it! A batch of utterly irresistible Cannoli Cookies, perfect for sharing with friends and family, or simply enjoying all by yourself. Each bite offers that delightful crunch of the cookie followed by the creamy, sweet, and subtly spiced ricotta filling, truly capturing the essence of a classic cannoli in a wonderfully convenient cookie form. Enjoy your baking adventure!
Conclusion:
Well, there you have it, my friends! We’ve journeyed through the steps of creating a truly remarkable dessert, and I genuinely hope you’re as excited about these as I am. These aren’t just any cookies; they are a delightful culinary innovation that brings the iconic flavors and textures of a beloved Italian pastry into a wonderfully convenient, bite-sized form. I’m talking about a creation that marries the creamy, ricotta-infused sweetness of a classic cannoli filling with the satisfying chewiness of a perfect cookie. It’s a genius concept, if I do say so myself, and one that consistently earns rave reviews from everyone who tries it. From the moment that familiar aroma fills your kitchen to the very last crumb, you’ll understand exactly why this recipe has become such a treasured staple in my own baking repertoire.
Why You Absolutely Must Make These Cannoli Cookies
There are so many reasons why this particular recipe stands head and shoulders above many others, making it an absolute must-try for any baking enthusiast or dessert lover. Firstly, let’s talk about the flavor profile. Imagine the rich, subtle tang of ricotta cheese perfectly balanced with granulated sugar, hints of vanilla, and often, a touch of citrus zest, all brought together in a tender, chewy cookie base. Then, there’s the delightful addition of mini chocolate chips or candied fruit, mimicking that quintessential cannoli experience. It’s a symphony of textures too: the soft, slightly crumbly cookie yielding to the creamy, sweet filling that’s subtly integrated throughout. Unlike traditional cannoli, which can be quite labor-intensive with frying shells and meticulous piping, these Cannoli Cookies offer all the deliciousness with significantly less fuss. They are remarkably simple to prepare, requiring no specialized equipment beyond your standard baking tools, making them accessible even for novice bakers. The result is a dessert that feels incredibly gourmet and sophisticated, yet is surprisingly easy to achieve. They are also incredibly versatile, perfect for anything from a casual afternoon snack with coffee to an elegant addition to a holiday dessert platter. Trust me when I say, the joy of biting into one of these is truly incomparable.
Elevate Your Experience: Serving Suggestions and Creative Variations
The beauty of these delightful cookies doesn’t stop at their inherent deliciousness; they also lend themselves beautifully to a myriad of serving suggestions and creative variations that can truly elevate your dessert game. For a classic presentation, a light dusting of powdered sugar over the finished cookies adds a touch of elegance and visual appeal. You could also drizzle them with a bit of melted dark chocolate, creating a lovely contrast in both color and flavor, or even dip one half into chocolate and then sprinkle with chopped pistachios for an extra layer of texture and a nod to traditional Sicilian aesthetics. Imagine serving a warm plate of these alongside a rich espresso or a velvety cappuccino – pure bliss! For a delightful textural contrast, consider a small dollop of mascarpone cheese on the side, perhaps lightly sweetened with a touch of honey or maple syrup. Or, for a truly decadent treat, pair them with a scoop of vanilla bean gelato or a tangy raspberry sorbet for a refreshing counterpoint.
But why stop there? Let your culinary imagination run wild with variations! If you’re a fan of citrus, try incorporating a bit more orange or lemon zest into the dough and even the optional glaze. For those who adore a nutty crunch, finely chopped pistachios or almonds can be folded into the dough or sprinkled on top before baking. Fancy a more intense chocolate experience? Swap out the mini chocolate chips for finely chopped dark chocolate pieces or even add a touch of cocoa powder to a portion of the dough for a marbled effect. For a seasonal twist, consider adding a pinch of cinnamon or nutmeg, especially around the holidays. You could also experiment with different extracts – almond extract can add a delightful complexity, or a touch of rum extract could evoke a more adult, sophisticated flavor. For those with dietary considerations, many of the ingredients can be substituted; for example, a gluten-free all-purpose flour blend can often work wonderfully, and vegan ricotta alternatives are becoming increasingly available, allowing you to adapt these delicious cookies to various needs. The possibilities are truly endless, encouraging you to make this recipe uniquely your own.
Your Turn to Bake and Share!
Now, it’s your turn! I wholeheartedly encourage you to roll up your sleeves, gather your ingredients, and dive into the wonderful world of these incredible cookies. There’s a special kind of satisfaction that comes from baking something so utterly delicious from scratch, and I promise you, the aroma alone is worth the effort. Once you’ve experienced the pure joy of these homemade treats, I would absolutely love to hear about it! Did you try a unique variation? Were they a hit at your latest gathering? Did you discover a new favorite way to enjoy them? Please, don’t keep it to yourself! Share your baking triumphs, your creative twists, and your delicious moments. Tag me on social media or drop a comment below; your experiences inspire not just me, but the entire baking community. Let’s spread the love for these amazing Cannoli Cookies far and wide. Happy baking!

Cannoli Cookies
Enjoy the classic flavors of Sicilian cannoli in an easy-to-make cookie form. Tender, spiced cookies sandwich a creamy ricotta filling with chocolate chips and pistachios, offering a delightful bite-sized Italian treat. This recipe delivers a complex, satisfying taste without the traditional frying process.
Ingredients
-
1 cup (240 ml) all-purpose flour
-
½ cup (100 g) granulated sugar
-
½ cup (120 g) whole milk ricotta cheese, very well drained
-
1 large egg
-
1 tsp vanilla extract
-
1 tsp lemon zest
-
½ cup (75 g) mini chocolate chips
-
½ cup (75 g) chopped pistachios
-
Powdered sugar for dusting
Instructions
-
Step 1
In a bowl, combine 1 cup all-purpose flour. In a separate bowl, whisk ½ cup granulated sugar, 1 large egg, 1 tsp vanilla extract, and 1 tsp lemon zest until blended. Gradually add the flour to the wet mixture, mixing until a soft dough forms. Avoid overmixing. Wrap dough and chill for at least 1 hour. -
Step 2
Preheat oven to 350°F (175°C). Roll chilled dough to ¼-inch thick on a lightly floured surface. Cut into 2-inch rounds and place on parchment-lined baking sheets. Bake for 9-12 minutes, or until edges are lightly golden. Cool completely on a wire rack. -
Step 3
Drain ½ cup whole milk ricotta cheese in a fine-mesh sieve lined with cheesecloth in the refrigerator for at least 4 hours or overnight. Press to remove excess liquid. In a bowl, gently fold drained ricotta with ½ cup mini chocolate chips and ½ cup chopped pistachios. Chill for 30 minutes. -
Step 4
Once cookies are completely cool and filling is chilled, spoon or pipe about 1 to 1 ½ tablespoons of filling onto the flat side of one cookie. Top with another cookie, pressing gently to form a sandwich. -
Step 5
Garnish edges with extra mini chocolate chips or chopped pistachios if desired, and dust assembled Cannoli Cookies lightly with powdered sugar before serving. These cookies are best served fresh, ideally within an hour or two of assembly.
Important Information
Nutrition Facts (Per Serving)
It is important to consider this information as approximate and not to use it as definitive health advice.
Allergy Information
Please check ingredients for potential allergens and consult a health professional if in doubt.

Leave a Comment