

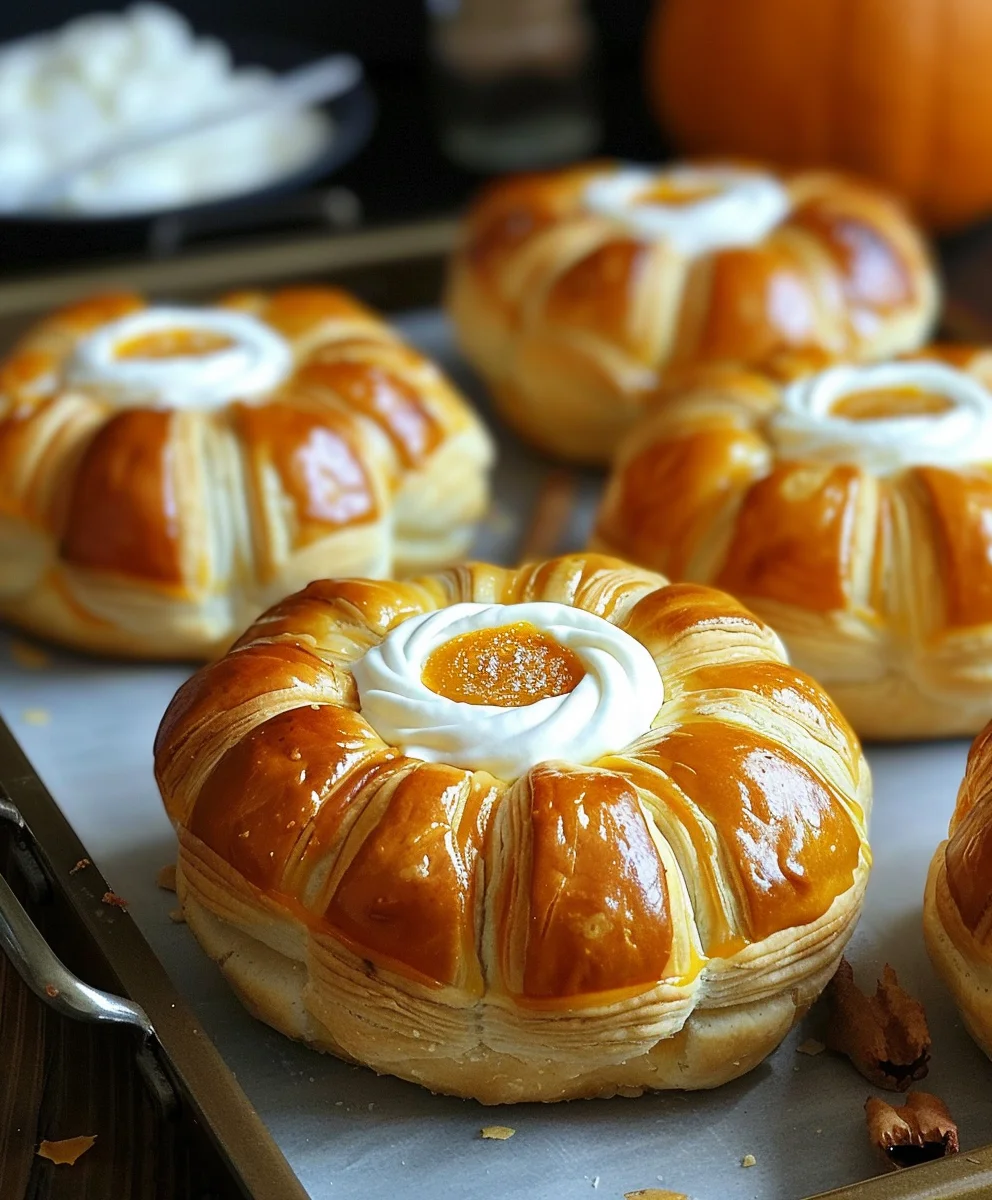
Crescent Pumpkins With Cream Cheese And Pumpkin Pie Filling is the quintessential autumnal delight that promises to enchant your taste buds and impress your guests with minimal effort. If you’re searching for an elegant yet incredibly straightforward dessert that captures the very essence of the season, then you’ve absolutely found your next go-to recipe.
Imagine the delightful sensation of light, flaky crescent dough, baked to golden perfection, cradling a rich, warmly spiced pumpkin pie filling, all beautifully complemented by a luscious, tangy cream cheese swirl. This combination creates a symphony of textures and flavors – a buttery crust giving way to a creamy, sweet interior with that signature hint of autumnal spice. While this specific treat might be a modern twist, it masterfully brings together beloved fall ingredients that have comforted us for generations, making it feel instantly familiar and wonderfully nostalgic.
I find that people absolutely adore these Crescent Pumpkins With Cream Cheese And Pumpkin Pie Filling because they offer gourmet taste without the complex preparation often associated with holiday baking. They are effortlessly convenient for a special breakfast, a festive dessert, or simply a cozy treat with your afternoon coffee. Get ready to experience the pure joy of autumn in every single bite!

Ingredients:
-
For the Cream Cheese Filling:
- 8 ounces (226g) cream cheese, full-fat, softened to room temperature. It’s truly essential for a smooth, lump-free consistency.
- ½ cup (60g) powdered sugar (confectioners’ sugar), sifted. Sifting prevents pesky lumps in your smooth filling.
- 1 teaspoon pure vanilla extract. Don’t skimp on the good stuff; it makes all the difference!
-
For the Enhanced Pumpkin Pie Filling:
- ¾ cup (180g) canned pumpkin puree (not pumpkin pie filling). Make sure it’s just pure pumpkin!
- ¼ cup (50g) granulated sugar. This sweetens the pumpkin just right.
- 1 tablespoon pumpkin pie spice blend. This gives it that comforting, aromatic kick. If you don’t have a blend, you can use: ½ tsp cinnamon, ¼ tsp ginger, ⅛ tsp nutmeg, ⅛ tsp cloves.
- ½ teaspoon pure vanilla extract. Another boost of warmth.
-
For the Crescent “Pumpkin” Pastries:
- 2 cans (8 ounces/226g each) refrigerated crescent roll dough. The classic refrigerated kind works perfectly for this project.
- Optional: A few drops of orange food coloring (gel preferred) to enhance the “pumpkin” look. This is purely for aesthetics, but it really makes them pop!
-
For the Egg Wash:
- 1 large egg.
- 1 tablespoon milk (any kind). This creates that beautiful golden, slightly shiny crust.
-
For the Garnish (Optional but Highly Recommended!):
- 12 small pretzel sticks or short pieces of cinnamon sticks. These make fantastic “stems” for your pumpkins.
- A light dusting of powdered sugar, or a simple glaze (½ cup powdered sugar mixed with 1-2 tablespoons milk/water and ¼ tsp vanilla extract) for an extra touch of sweetness and shine.
Preparation Phase 1: Crafting the Delectable Fillings
My favorite part of any baking project is often the filling, and for our Crescent Pumpkins With Cream Cheese And Pumpkin Pie Filling, we’re going to create two incredibly delicious layers that truly define this treat. Let’s get started with our rich, creamy, and perfectly sweet cream cheese layer, followed by an aromatic, spiced pumpkin filling.
-
Prepare the Cream Cheese Filling:
First, grab your softened cream cheese. It’s absolutely crucial that it’s at room temperature; otherwise, you’ll end up with a lumpy filling, and no one wants that! In a medium mixing bowl, combine the softened cream cheese, sifted powdered sugar, and vanilla extract. Using an electric mixer (handheld or stand mixer with a paddle attachment), beat the ingredients on medium speed for about 2-3 minutes. You’re aiming for a consistency that is incredibly smooth, light, and airy. Scrape down the sides of the bowl frequently to ensure everything is thoroughly incorporated. Whipping it until it’s light and fluffy is key not only for texture but also for making it easier to spread later without tearing the delicate crescent dough. Once it’s perfectly smooth and looks almost like a cloud, set this filling aside. You can even pop it into the fridge for about 10-15 minutes if your kitchen is particularly warm, just to firm it up slightly, which can aid in easier handling during assembly.
-
Enhance the Pumpkin Pie Filling:
Now for the star flavor of the season – pumpkin! In a separate small bowl, combine the canned pumpkin puree, granulated sugar, pumpkin pie spice, and vanilla extract. Stir these ingredients together thoroughly with a spoon or spatula until everything is well combined and the sugar has dissolved. Taste it! This is your chance to adjust the spices to your preference. Do you love a stronger cinnamon kick? Add a pinch more! Craving a hint more sweetness? A tiny bit more sugar won’t hurt. Ensuring the spices are perfectly balanced here will infuse every bite of your “Crescent Pumpkin” with that quintessential autumn warmth. If you desire a more vibrant orange color for your “pumpkins,” you can mix in a few drops of orange food coloring (gel coloring is excellent for this as it’s highly concentrated and won’t thin your filling) into this pumpkin mixture. Stir until the color is evenly distributed. Set this delightful pumpkin concoction aside as well.
Preparation Phase 2: Assembling Your “Crescent Pumpkins”
This is where the magic truly begins as we transform simple crescent dough into adorable, delicious pumpkin-shaped pastries. The process is a bit like crafting, so take your time and enjoy the creative aspect!
-
Prepare Your Work Surface and Dough:
Preheat your oven to 375°F (190°C). Line two large baking sheets with parchment paper or silicone baking mats. This prevents sticking and makes cleanup a breeze. Now, carefully unroll one can of refrigerated crescent roll dough onto a lightly floured surface or directly onto your parchment paper. You’ll notice it comes in perforated triangles. Do not separate them yet! Instead, we’re going to press the perforations together firmly to create one large, rectangular sheet of dough. A gentle pinch and press with your fingers usually does the trick. You can even use a rolling pin to lightly roll over the seams to ensure they are completely sealed, creating a smooth canvas for our creations. Repeat this process with the second can of crescent roll dough on the other prepared baking sheet, or save it for after you’ve worked with the first batch if your counter space is limited.
-
Layer the Fillings:
With your rectangular dough sheet laid out, it’s time for the fillings. Start by evenly spreading the cream cheese filling over the entire surface of the dough, leaving about a ½-inch border along the two longer edges and a slightly smaller border on the shorter edges. This border is important for sealing the pastries later. Aim for a consistent, thin layer of cream cheese; too much can make the pastry difficult to seal and prone to oozing during baking.
Next, carefully spoon dollops of the pumpkin pie filling over the cream cheese layer. Gently spread the pumpkin filling over the cream cheese, again leaving those crucial ½-inch borders. You don’t need to be overly precise here; a rustic spread is perfectly fine. Just ensure you have a relatively even layer of both fillings. The two layers of filling, cream cheese first then pumpkin, create a wonderful textural and flavor contrast that elevates this simple pastry to something truly special.
-
Roll and Cut Your Pastries:
Once both fillings are spread, carefully roll up the dough lengthwise, starting from one of the longer edges. Roll it snugly but not so tightly that you compress the filling out. As you roll, the dough will enclose the two luscious fillings, creating a log. Once rolled, pinch the seam closed to secure it. Now, using a sharp knife or a pizza cutter, cut the log into 12 equal slices, each approximately 1 to 1.5 inches thick. A gentle rocking motion with the knife can help prevent squishing the dough too much, giving you cleaner cuts.
-
Shape into “Pumpkins”:
This is the fun part where they start looking like little pumpkins! Take each sliced piece and gently reshape it into a rounder, more cohesive disc if it’s become slightly oval during cutting. Now, the trick to making them look like pumpkins: use a piece of kitchen twine or unflavored dental floss (about 12 inches long for each pumpkin) to create the segments. You can also use strips of parchment paper for this. Gently wrap the string/floss around the circumference of each pastry, pressing lightly to create four to six even indentations, like the segments of a pumpkin. Don’t tie it too tightly, as the dough will expand. You want to create shallow grooves that define the pumpkin shape, not constrict the dough completely. If using string, you can either tie it loosely or simply tuck the ends underneath. Alternatively, you can achieve a similar effect by using the back of a knife or a skewer to gently press indentations around the sides of each pastry. Arrange these shaped “pumpkins” on your prepared baking sheets, leaving about 2 inches between each, as they will expand during baking. Repeat the entire process with the second can of crescent dough and its fillings.
Preparation Phase 3: The Golden Bake
Now that your adorable little crescent pumpkins are assembled, it’s time to send them off to the oven. This step is crucial for achieving that irresistible golden crust and perfectly cooked interior.
-
Apply the Egg Wash:
In a small bowl, whisk together the large egg and 1 tablespoon of milk until well combined. This is your egg wash, and it’s a baker’s secret weapon for achieving a beautiful, golden-brown sheen and a slightly crispier crust. Using a pastry brush, gently brush the top and sides of each “Crescent Pumpkin” with the egg wash. Be thorough but don’t over-saturate the dough. This step not only contributes to the visual appeal but also adds a subtle richness to the crust, making your pastries look professionally baked.
-
Bake to Golden Perfection:
Carefully transfer your baking sheets to the preheated 375°F (190°C) oven. Bake for 12-16 minutes, or until the pastries are beautifully golden brown, puffed up, and the filling is set. Keep a close eye on them, as oven temperatures can vary, and crescent dough bakes relatively quickly. If you notice one tray browning faster than the other, you might rotate the trays halfway through baking to ensure even cooking. The aroma filling your kitchen at this point will be absolutely enchanting, a true sign that autumn delights are on their way! Once they’re a perfect golden hue, remove the baking sheets from the oven.
-
Cooling:
Allow the “Crescent Pumpkins” to cool on the baking sheets for about 5 minutes before carefully transferring them to a wire rack to cool completely. This initial cooling period on the hot sheet helps them firm up a bit and prevents them from breaking when you move them. Cooling on a wire rack ensures air circulation all around, preventing a soggy bottom and maintaining that lovely flaky crust. If you used string for shaping, gently remove it after the pastries have cooled for a few minutes and are firm enough to handle without losing their shape. You’ll see the lovely pumpkin segments clearly defined.
Preparation Phase 4: The Finishing Touches and Presentation
The final steps are all about adding those charming details that make these pastries truly irresistible and picture-perfect for any autumnal gathering. These small touches make a big difference!
-
Add the “Stems”:
Once the “Crescent Pumpkins” have cooled slightly (they don’t need to be completely cold, just cool enough to handle comfortably), it’s time to give them their adorable stems. Gently insert a small pretzel stick or a short piece of a cinnamon stick into the center top of each pastry. This instantly transforms them into miniature pumpkins, adding a delightful visual element. The cinnamon stick also provides a wonderful aromatic touch that complements the pumpkin pie filling beautifully. This seemingly small detail is what truly sells the “pumpkin” concept and adds a whimsical touch to your creations.
-
Optional Glaze or Dusting:
For an extra touch of sweetness and visual appeal, you have a couple of options. You can simply dust your cooled “Crescent Pumpkins” with a light coating of powdered sugar. This gives them a delicate, snowy look that contrasts beautifully with the golden pastry. Alternatively, for a slightly sweeter and shinier finish, prepare a simple glaze: in a small bowl, whisk together ½ cup of powdered sugar with 1-2 tablespoons of milk or water and a ¼ teaspoon of vanilla extract until smooth. Drizzle this glaze over the cooled pastries. The amount of liquid can be adjusted to achieve your desired consistency – less liquid for a thicker glaze, more for a thinner drizzle. A beautiful glaze not only adds flavor but also makes these pastries feel even more special and indulgent.
-
Serve and Enjoy:
Your beautiful and delicious Crescent Pumpkins With Cream Cheese And Pumpkin Pie Filling are now ready to be enjoyed! They are absolutely wonderful served warm or at room temperature. These make a fantastic breakfast treat, a delightful dessert, or a charming addition to any brunch spread or holiday gathering. The combination of the flaky crescent dough, the sweet and tangy cream cheese, and the spiced pumpkin filling is simply divine. I love to serve them with a fresh cup of coffee or a warm mug of apple cider. Store any leftovers in an airtight container at room temperature for up to 2 days, or in the refrigerator for up to 4 days. Reheat gently in the microwave or a low oven for a few minutes to bring back that freshly baked warmth. Watching faces light up as they take their first bite of these homemade pumpkin pastries is truly the most rewarding part!

Conclusion:
After all our delightful discussion, I truly hope you’re feeling inspired and excited to roll up your sleeves and bring this incredible recipe to life in your own kitchen. I can honestly say, with absolute confidence, that this isn’t just another autumnal treat; it’s a revelation, a heartwarming experience waiting to happen. What makes this recipe an absolute must-try, in my humble opinion, is its unparalleled blend of comforting familiarity and surprising elegance. You get the flaky, buttery goodness of crescent dough, perfectly complementing the rich, spiced warmth of pumpkin pie filling, all tied together with a luscious, tangy cream cheese layer that cuts through the sweetness beautifully. It’s a symphony of textures and flavors that truly embodies the spirit of fall and holiday baking, yet it’s simple enough for any baker, regardless of skill level, to master and enjoy.
I find myself constantly recommending this particular creation because it consistently delivers on taste, convenience, and visual appeal. It’s the kind of dish that garners compliments and requests for the recipe every single time. Imagine the golden-brown edges, the tender, sweet pumpkin, and the creamy, irresistible center – it’s a little bite of heaven that manages to be both decadent and perfectly balanced. This recipe shines as a testament to how simple ingredients can come together to create something truly extraordinary, proving that you don’t need to spend hours in the kitchen to produce a show-stopping dessert or a delightful breakfast pastry.
Now, let’s talk about how to best enjoy these wonderful creations and how you might personalize them. While they are absolutely divine straight out of the oven, still warm and fragrant, they are equally enchanting served at room temperature. For a truly indulgent experience, I highly recommend a dollop of freshly whipped cream or a scoop of vanilla bean ice cream melting over the top – the contrast of warm pastry and cold cream is simply divine. If you’re a coffee lover like me, pairing one of these with your morning latte or a strong cup of dark roast makes for an unforgettable start to the day. For those who prefer tea, a spiced chai or a classic black tea would complement the pumpkin notes wonderfully.
Elevate Your Serving Experience:
- A Drizzle of Decadence: A light drizzle of caramel sauce or a homemade cream cheese glaze (simply powdered sugar, milk, and a tiny bit of vanilla extract) can add an extra layer of sweetness and visual appeal.
- Nutty Perfection: Before baking, sprinkle a handful of finely chopped pecans or walnuts over the tops for an added crunch and nutty flavor profile.
- Spiced Up: If you adore more intense spice, feel free to add an extra pinch of allspice or ground cloves to your pumpkin pie filling mixture. You could even dust the finished pastries with a tiny bit of cinnamon sugar.
- Seasonal Fruit Companion: Serve alongside some fresh berries or thinly sliced apples for a touch of freshness that cuts through the richness.
These variations are just a starting point, of course. Feel free to get creative and make this recipe your own! Perhaps you’ll experiment with a maple glaze, or maybe even a hint of bourbon in the pumpkin filling for an adult twist. The beauty of this recipe lies in its versatility and its forgiving nature.
So, my dear fellow food enthusiasts, I implore you: don’t let this season pass without experiencing the sheer joy of baking and tasting these delightful pastries. This recipe for Crescent Pumpkins With Cream Cheese And Pumpkin Pie Filling is more than just instructions; it’s an invitation to create, to share, and to savor. Gather your ingredients, put on some cozy music, and let your kitchen fill with the most comforting aromas. When they emerge from the oven, golden and glistening, I promise you a moment of pure culinary bliss.
Once you’ve had the chance to try them, I would absolutely love to hear all about your experience! Did you stick to the original recipe, or did you put your own unique spin on it? Did you serve them for breakfast, dessert, or a cozy afternoon treat? Please, don’t hesitate to share your thoughts, your successes, and even your creative adaptations in the comments or on social media. Your feedback and stories truly inspire me and help this wonderful community of home bakers grow. Happy baking, and enjoy every single delicious bite!
Easy Crescent Pumpkins: Cream Cheese & Pumpkin Pie Delight!
Crescent Pumpkins With Cream Cheese And Pumpkin Pie Filling is the quintessential autumnal delight that promises to enchant your taste buds with minimal effort. Light, flaky crescent dough cradles a rich, warmly spiced pumpkin pie filling, beautifully complemented by a luscious, tangy cream cheese swirl, creating a symphony of textures and flavors.
Ingredients
-
2 (8 oz.) cans refrigerated crescent roll dough
-
5 oz. cream cheese, softened
-
2 tbsp granulated sugar
-
1 tsp vanilla extract
-
¾ cup pumpkin puree
-
1 tbsp corn starch
-
2 tbsp packed light-brown sugar
-
2 tbsp granulated sugar
-
¾ tsp ground cinnamon
-
¼ tsp ground ginger
-
¼ tsp nutmeg
-
⅛ tsp allspice
-
1 egg yolk
-
½ tsp vanilla extract
-
2 ½ tbsp melted butter
Instructions
-
Step 1
In a medium bowl, beat 5 oz. softened cream cheese with 2 tbsp granulated sugar and 1 tsp vanilla extract until smooth and fluffy. Set aside. -
Step 2
In a separate small bowl, combine ¾ cup pumpkin puree, 1 tbsp corn starch, 2 tbsp packed light-brown sugar, 2 tbsp granulated sugar, ¾ tsp ground cinnamon, ¼ tsp ground ginger, ¼ tsp nutmeg, ⅛ tsp allspice, 1 egg yolk, and ½ tsp vanilla extract. Stir until thoroughly combined. -
Step 3
Preheat oven to 375°F (190°C). Line two large baking sheets with parchment paper. Unroll each can of crescent roll dough. Press perforations together to form two large rectangular sheets. -
Step 4
Evenly spread the cream cheese filling over each dough rectangle, leaving a ½-inch border. Then, gently spread the pumpkin filling over the cream cheese layer, maintaining the border. -
Step 5
Roll each dough rectangle lengthwise into a snug log. Pinch the seam to seal. Using a sharp knife or pizza cutter, cut each log into 12 equal slices, approximately 1 to 1.5 inches thick. -
Step 6
Gently reshape each slice into a rounder disc. Use kitchen twine, unflavored dental floss, or the back of a knife to create 4-6 gentle indentations around the circumference of each pastry, defining pumpkin segments. Arrange shaped pastries on prepared baking sheets, leaving about 2 inches between each. -
Step 7
Brush the tops and sides of the shaped pastries with 2 ½ tbsp melted butter. Bake for 12-16 minutes, or until beautifully golden brown and puffed. Keep an eye on them as oven temperatures vary. -
Step 8
Remove from oven and allow to cool on the baking sheets for about 5 minutes. Carefully transfer them to a wire rack to cool completely. If using string for shaping, gently remove it once the pastries are firm enough. Serve warm or at room temperature.
Important Information
Nutrition Facts (Per Serving)
It is important to consider this information as approximate and not to use it as definitive health advice.
Allergy Information
Please check ingredients for potential allergens and consult a health professional if in doubt.
Leave a Comment