

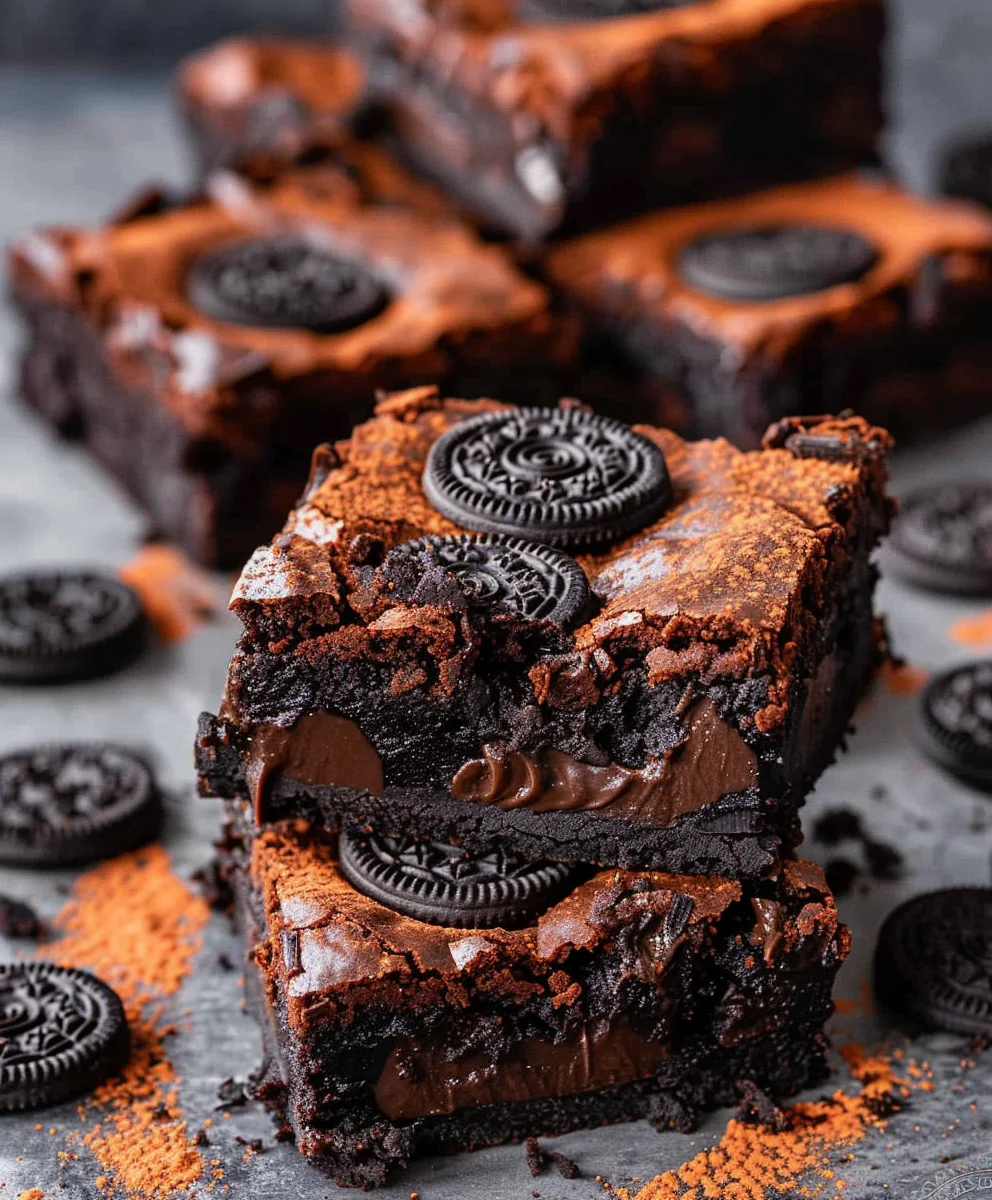
Halloween Oreo Brownies are more than just a dessert; they are a delightful centerpiece that perfectly encapsulates the spooky, sweet spirit of the season! As the air turns crisp and pumpkins adorn every porch, our thoughts naturally drift to treats that are both incredibly delicious and wonderfully festive. I am absolutely thrilled to share with you a recipe that will not only satisfy every chocolate craving but also bring an extra layer of ghoulish delight to your Halloween celebrations. These brownies offer a fantastic way to infuse your holiday with homemade charm and a touch of playful magic.
Imagine sinking your teeth into a rich, fudgy brownie, only to discover the satisfying crunch and creamy sweetness of an Oreo cookie baked right in. This magical combination creates an irresistible texture and flavor profile that makes these treats an instant hit with both kids and adults alike. It’s the ultimate indulgence, marrying the timeless comfort of a classic brownie with the iconic, playful charm of Oreos, making these particular Halloween Oreo Brownies an unforgettable addition to any party or a cozy night in. They truly are the perfect way to add a homemade touch of enchantment to your autumnal festivities!

Ingredients:
- For the Fudgy Brownie Base:
- 1 cup (2 sticks or 226g) unsalted butter, melted
- 2 cups (400g) granulated sugar
- 4 large eggs, at room temperature
- 1 teaspoon pure vanilla extract
- 1 cup (85g) unsweetened cocoa powder, sifted
- 1 cup (125g) all-purpose flour, spooned and leveled
- ½ teaspoon baking powder
- ¼ teaspoon salt
- 1 ½ cups (approximately 15-18 regular) Oreo cookies, coarsely crushed (plus extra for topping, if desired)
- For the Spooky Green Buttercream Frosting:
- 1 cup (2 sticks or 226g) unsalted butter, softened to room temperature
- 4 cups (480g) powdered sugar (confectioners’ sugar), sifted
- ½ teaspoon pure vanilla extract
- 3-4 tablespoons milk or heavy cream, as needed for consistency
- Green gel food coloring (a few drops, or more for desired intensity)
- Pinch of salt
- For the Halloween Decorations:
- Approximately 12-15 Halloween-themed Oreo cookies (orange cream, pumpkin spice, or regular Oreos with Halloween designs)
- Edible candy eyes (various sizes)
- Assorted Halloween sprinkles (optional)
- Melting chocolate (white or dark, for creating spiderwebs or drizzles, optional)
Preparing Your Spooky Brownie Base
Creating the perfect fudgy brownie base is the first step to truly amazing Halloween Oreo Brownies. We want them rich, dense, and packed with that classic chocolate flavor, with delightful chunks of Oreo baked right in.
- Preheat and Prep: First things first, let’s get our oven ready. Preheat your oven to 350°F (175°C). While it’s warming up, prepare a 9×13 inch baking pan. I like to line mine with parchment paper, leaving an overhang on the sides. This creates convenient “handles” later on, making it incredibly easy to lift the entire batch of brownies out of the pan once they’re cooled. Lightly grease the parchment paper with a little butter or non-stick spray for good measure.
- Melt the Butter: In a medium-sized microwave-safe bowl or a saucepan over low heat, melt the unsalted butter. You want it completely liquid but not browned or boiling. Once melted, set it aside to cool slightly for a few minutes. This prevents the butter from cooking the eggs when we combine them.
- Combine Wet Ingredients: In a large mixing bowl, pour in the slightly cooled melted butter. Add the granulated sugar and whisk them together vigorously until well combined and smooth. This step is crucial for achieving that characteristic shiny, crackly brownie top. Next, crack in the four large eggs, one at a time, whisking well after each addition until fully incorporated. Finally, stir in the pure vanilla extract. You should have a glossy, amber-colored mixture.
- Sift Dry Ingredients: In a separate, medium bowl, combine the unsweetened cocoa powder (make sure it’s sifted to avoid lumps!), all-purpose flour, baking powder, and salt. Whisk these dry ingredients together thoroughly. Sifting the cocoa powder is a small step that makes a big difference in ensuring a smooth brownie batter without any powdery pockets.
- Combine Wet and Dry: Gradually add the dry ingredient mixture to the wet ingredient mixture. Using a spatula or wooden spoon, mix until just combined. Be careful not to overmix here! Overmixing can develop the gluten in the flour too much, leading to tough brownies. We’re aiming for fudgy, not chewy in a bad way. Stop mixing as soon as you no longer see streaks of dry flour.
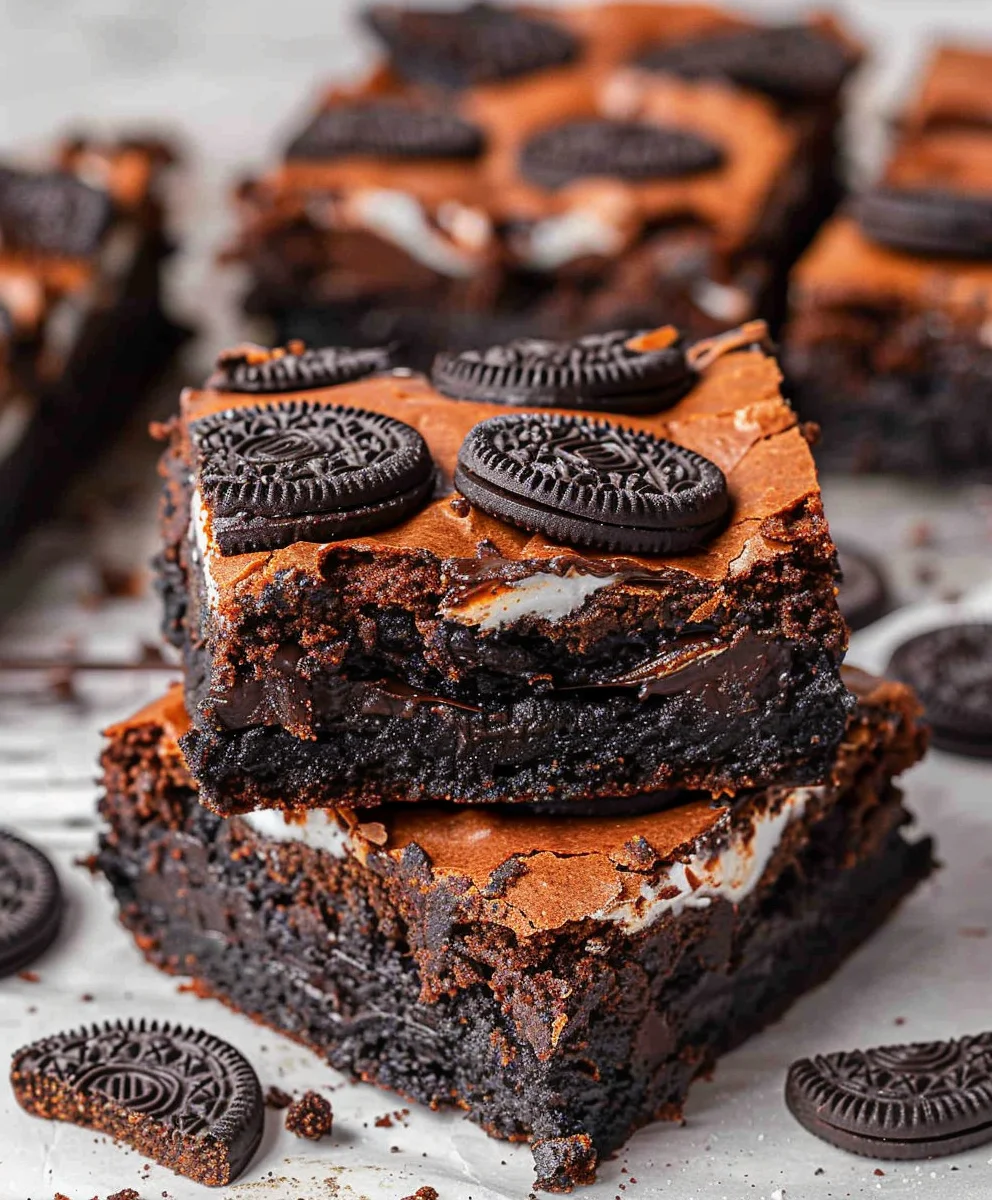
- Fold in the Oreos: Now for the star ingredient of our Halloween Oreo Brownies base! Gently fold in the coarsely crushed Oreo cookies. I like a mix of finely crushed bits and larger chunks for varying textures in every bite. The chocolate from the Oreos will melt slightly into the brownie as it bakes, creating pockets of intensified chocolate flavor.
- Bake to Perfection: Pour the rich brownie batter evenly into your prepared 9×13 inch baking pan. Spread it out with your spatula, making sure it’s level. Transfer the pan to your preheated oven and bake for approximately 25-30 minutes. Baking times can vary, so keep an eye on them. The brownies are done when a toothpick inserted into the center comes out with moist crumbs, but not wet batter. You definitely don’t want to overbake these, as that would sacrifice their signature fudginess.
- Cool Completely: This is arguably the most important step for perfectly sliceable brownies. Once baked, remove the pan from the oven and place it on a wire rack to cool completely. I mean completely! This can take anywhere from 1 to 2 hours, or even longer. Resist the urge to frost them while they’re warm; your frosting will melt and slide right off! Patience is a virtue, especially when it comes to amazing brownies. Once fully cooled, use the parchment paper overhang to lift the entire brownie slab out of the pan and transfer it to a cutting board or another wire rack.
Whipping Up the Ghoulish Green Frosting
Every fantastic brownie deserves an equally fantastic frosting, and for our Halloween Oreo Brownies, we’re going for a vibrant, slightly spooky green buttercream. This frosting is fluffy, sweet, and perfectly complements the rich chocolate base.
- Soften the Butter: Ensure your unsalted butter is genuinely at room temperature – this means it should be soft enough to indent with your finger but not melted. If it’s too cold, your frosting will be lumpy; if it’s too warm, it will be greasy. Place the softened butter in the bowl of a stand mixer fitted with the paddle attachment, or in a large mixing bowl if you’re using a hand mixer.
- Cream the Butter: Beat the butter on medium-high speed for about 2-3 minutes, until it’s light, pale, and fluffy. This step incorporates air into the butter, which is key for a light and airy buttercream. Scrape down the sides of the bowl periodically to ensure even creaming.
- Add Powdered Sugar Gradually: Reduce the mixer speed to low. Gradually add the sifted powdered sugar, about 1 cup at a time, mixing until each addition is just incorporated before adding the next. Adding it slowly prevents a huge cloud of sugar from erupting in your kitchen. Once all the sugar is in, the mixture will be quite thick and crumbly.
- Introduce Liquids and Flavor: With the mixer still on low, add the vanilla extract and the pinch of salt. Now, slowly drizzle in 2 tablespoons of milk or heavy cream. Increase the mixer speed to medium-high and beat for another 3-5 minutes. The frosting should transform into a light, smooth, and spreadable consistency. If it seems too thick, add the remaining milk or cream one tablespoon at a time, until you reach your desired texture. If it’s too thin, you can try adding a little more sifted powdered sugar.
- Color Your Creation: This is where the magic happens for our Halloween theme! Add a few drops of green gel food coloring to the frosting. Start with a small amount, as gel colors are very concentrated. Mix on low speed until the color is evenly distributed. If you want a deeper, more intense green, add more drops gradually until you achieve your desired spooky hue. Remember, it’s easier to add more color than to take it away!
- Final Beat: Give the frosting a final beat on medium-high speed for about 1 minute. This ensures it’s perfectly smooth, airy, and ready to be spread onto your delicious brownie base. Taste and adjust for sweetness if desired, though it should be perfectly balanced.
Assembling Your “Halloween Oreo Brownies” Masterpiece
Now for the truly fun part – bringing all the components together to create your festive and utterly irresistible Halloween Oreo Brownies! This is where your creativity can shine through with spooky decorations.
- Frost the Brownies: Make absolutely certain your brownies are completely cool. Seriously, I cannot stress this enough. If there’s any residual warmth, your beautifully whipped green frosting will melt into a sad, sugary puddle. Once the brownies are cold to the touch, use an offset spatula or the back of a spoon to spread the vibrant green buttercream evenly over the entire surface. Aim for an even layer from edge to edge. The contrast of the dark chocolate brownie and the bright green frosting is already starting to look wonderfully festive!
- Arrange Your Halloween Oreos: This is where the “Oreo” in Halloween Oreo Brownies truly comes into its own. Take your Halloween-themed Oreo cookies and arrange them artfully on top of the frosted brownies. You can place them in neat rows, create a scattered pattern, or even break some in half for an interesting visual. The goal is to make them look appealing and ensure that each potential slice gets a good portion of Oreo goodness. The orange cream filling in some Halloween Oreos provides another lovely pop of color against the green.
-
Add Spooky Details (Optional but Recommended!):
- Candy Eyes: This is my absolute favorite part! Gently press edible candy eyes onto the Halloween Oreos, or directly onto the green frosting in between the cookies. You can create funny faces, eerie monster eyes, or even just random peepers staring out from your brownies. These instantly add character and a playful fright-night touch.
- Halloween Sprinkles: If you have any fun Halloween sprinkle mixes – think bats, ghosts, pumpkins, or just orange and black jimmies – scatter them generously over the frosting. This adds texture, more color, and an extra layer of festivity.
- Chocolate Drizzle/Spiderwebs: For an extra artistic touch, you can melt a small amount of white or dark chocolate. Drizzle it randomly over the brownies for a sophisticated finish, or for a classic Halloween look, pipe thin lines in a concentric circle pattern on the green frosting and then drag a toothpick from the center outwards to create spooky spiderwebs. This technique adds a professional flair that will impress everyone!
- Chill Before Cutting: To ensure clean, beautiful slices, place the entire pan of decorated Halloween Oreo Brownies in the refrigerator for at least 30 minutes, or even longer. This allows the frosting to firm up and the brownies to set, making them much easier to cut without smudging the frosting or having the Oreos shift.
- Slice and Serve: Once chilled, remove the pan from the refrigerator. Using a sharp knife that you’ve run under hot water and wiped clean between each cut, slice the brownies into squares. You can make them as large or as small as you like. Because these are rich, I often opt for slightly smaller squares, but who am I to judge if you want a monstrous treat! Carefully lift each brownie square and arrange them on a serving platter.
- Storage: These delightful Halloween Oreo Brownies can be stored in an airtight container at room temperature for up to 3 days, or in the refrigerator for up to a week. If refrigerating, let them come closer to room temperature for about 15-20 minutes before serving for the best texture and flavor experience. They’re perfect for any Halloween party, school treat, or just a spooky sweet snack at home!
Conclusion:
So, there you have it – my absolute favorite recipe that I genuinely believe you’ll adore just as much as I do. These aren’t just any brownies; they’re a decadent fusion of rich, fudgy chocolate goodness with the irresistible crunch and creamy filling of your beloved Oreo cookies, all wrapped up in a wonderfully festive package. The magic truly happens when that gooey brownie base meets the distinct texture of the crushed Oreos, creating a symphony of textures and flavors in every single bite. They’re surprisingly simple to whip up, yet they deliver an impressive ‘wow’ factor that makes them perfect for any occasion, especially as we head into the spookiest season. Imagine the smiles when these appear on the table – a true crowd-pleaser that effortlessly blends classic comfort with a playful twist. I promise, once you’ve tasted that perfect balance of deep chocolate and sweet cream, you’ll understand why I’m so excited about sharing this with you. This recipe is a guaranteed hit, ensuring every gathering is infused with a touch of homemade warmth and excitement. The sheer joy of biting into a treat that’s both familiar and exciting, with layers of flavor and texture, is what makes these brownies so uniquely special and absolutely essential for your baking repertoire. Trust me, your taste buds will thank you for indulging in this delightful creation.
But the fun doesn’t stop once these beauties come out of the oven! While they are absolutely phenomenal on their own, warm and slightly gooey, there are so many delightful ways to enjoy and even elevate your experience. For a simple yet indulgent treat, try serving them alongside a scoop of creamy vanilla bean ice cream; the contrast of hot and cold, fudgy and smooth, is simply divine. Or, if you’re feeling adventurous, a scoop of pumpkin spice ice cream would truly lean into the seasonal theme, creating an unforgettable dessert that captures the essence of autumn. A drizzle of warm caramel sauce or a generous dollop of freshly whipped cream can transform them into an even more luxurious dessert, adding another layer of richness and sophistication. And why stop there? Think about melting some white chocolate and drizzling it over the cooled brownies for an elegant finish, or perhaps sprinkling some festive orange and black sprinkles on top while they’re still warm for an extra pop of color and a truly celebratory look. For those who love a bit of texture, consider adding a handful of mini chocolate chips or chopped nuts to the batter next time you bake for an added dimension. You could also experiment with different Oreo flavors – imagine mint Oreos for a cool and refreshing twist, or peanut butter Oreos for an even richer and more indulgent experience! They also make fantastic additions to a dessert platter, cut into smaller squares, or even crumbled into a parfait with layers of cream and fresh fruit for a deconstructed delight. The possibilities are truly endless, limited only by your imagination, ensuring every serving is a unique and delightful experience tailored to your cravings.
Time to Bake and Share!
So, what are you waiting for? I genuinely hope you’re feeling inspired to preheat your oven and dive into the wonderful world of baking these incredible Halloween Oreo Brownies. They’re more than just a dessert; they’re an experience waiting to happen, a way to bring a little extra joy and festivity into your home and share some sweetness with your loved ones. I pour my heart into developing recipes like this, and nothing makes me happier than hearing about your successful baking adventures and seeing the delicious results. Once you’ve made them – and I know you will – please don’t keep it a secret! I absolutely adore seeing your culinary creations and hearing your feedback. Share your photos, your unique serving ideas, your family’s reactions, and any clever variations or personal touches you come up with. You can leave a comment below this article, telling me all about your experience, or even better, tag me on social media so I can see your masterpieces firsthand. Let’s create a vibrant community of baking enthusiasts who appreciate the simple pleasure of a perfectly fudgy, incredibly delicious brownie. I’m eagerly anticipating hearing all about your experience with these delightful treats and seeing how you make them your own. Happy baking, everyone, and may your kitchen be filled with the most wonderful, chocolatey aromas!
Halloween Oreo Brownies
Rich, fudgy brownies baked with Oreo cookies and topped with a vibrant green buttercream, Halloween Oreos, and spooky candy eyes. A perfect ghoulish treat for Halloween celebrations, bringing homemade charm and playful magic to your autumn festivities.
Ingredients
-
2/3 cup unsalted butter, melted
-
1/4 cup vegetable oil
-
1 cup granulated sugar
-
1/3 cup brown sugar
-
2 large eggs, cold
-
1 tsp pure vanilla extract
-
2/3 cup unsweetened cocoa powder, sifted
-
1/2 cup all-purpose flour, spooned and leveled
-
1/2 tsp salt
-
15 Oreo cookies, coarsely crushed
-
1 cup unsalted butter, softened (for frosting)
-
4 cups powdered sugar, sifted (for frosting)
-
1/2 tsp pure vanilla extract (for frosting)
-
3-4 tbsp milk or heavy cream (for frosting)
-
Green gel food coloring (for frosting)
-
Pinch of salt (for frosting)
-
5 Halloween-themed Oreo cookies (for topping)
-
Edible candy eyes (for decoration)
-
Assorted Halloween sprinkles (optional)
-
Melting chocolate (white or dark, optional, for decoration)
Instructions
-
Step 1
Preheat oven to 350°F (175°C). Line a 9×13 inch baking pan with parchment paper, leaving an overhang, and grease lightly. -
Step 2
Melt 2/3 cup butter; cool slightly. In a large bowl, whisk melted butter with 1 cup granulated sugar and 1/3 cup brown sugar until smooth. Beat in 2 cold eggs one at a time, then 1 tsp pure vanilla extract. -
Step 3
In a separate bowl, whisk 2/3 cup sifted unsweetened cocoa powder, 1/2 cup all-purpose flour, and 1/2 tsp salt. -
Step 4
Gradually add dry ingredients to wet; mix until just combined (do not overmix). Gently fold in 15 coarsely crushed Oreo cookies. -
Step 5
Pour batter evenly into the prepared pan. Bake for 25-30 minutes, or until a toothpick inserted into the center comes out with moist crumbs. Do not overbake. Cool completely on a wire rack for 1-2 hours. -
Step 6
For the frosting, beat 1 cup softened unsalted butter until light and fluffy. Gradually add 4 cups sifted powdered sugar, 1/2 tsp pure vanilla extract, pinch of salt, and 3-4 tbsp milk. Beat until smooth and spreadable. Mix in green gel food coloring to achieve a spooky hue. -
Step 7
Ensure brownies are fully cooled. Spread the green buttercream evenly over the brownies. Arrange the remaining 5 Halloween-themed Oreo cookies on top. Decorate with edible candy eyes and optional Halloween sprinkles or melted chocolate drizzles/spiderwebs. -
Step 8
Chill decorated brownies in the refrigerator for at least 30 minutes for clean slices. Remove, slice with a hot, clean knife, and serve. Store in an airtight container at room temperature for up to 3 days or refrigerated for up to a week.
Important Information
Nutrition Facts (Per Serving)
It is important to consider this information as approximate and not to use it as definitive health advice.
Allergy Information
Please check ingredients for potential allergens and consult a health professional if in doubt.


Leave a Comment