

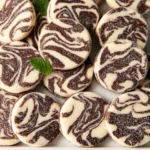
Marbled Chocolate Peppermint Icebox Cookies
Oh, do I have a treat for you today! Marbled Chocolate Peppermint Icebox Cookies are here to steal the show and maybe even your heart. I truly believe these aren’t just any cookies; they’re a little bit of magic, especially if you love that classic combination of rich chocolate and zingy peppermint. What makes them so special, you ask? Well, it’s that stunning marbled effect, for starters – each cookie is a unique work of art thanks to the beautiful swirl of dark chocolate and vibrant peppermint doughs. But it’s not just about looks; the taste is absolutely divine!
You’re going to adore these cookies because they bring all the festive flavor without any of the fuss. Thanks to the “icebox” method, you prepare two contrasting doughs – one rich chocolate, one bright peppermint – swirl them together into a log, then simply chill it. When you’re ready for fresh-baked goodness, just slice and bake whenever you’re ready. No tricky rolling, no tedious cut-outs – just pure, easy cookie bliss. Imagine biting into a crisp-tender cookie where the deep cocoa notes mingle perfectly with a cool burst of peppermint – it’s a flavor symphony that’s utterly irresistible. These Marbled Chocolate Peppermint Icebox Cookies are perfect for holiday platters, a delightful homemade gift, or simply to enjoy with a cup of coffee or tea. Get ready to bake something truly spectacular and ridiculously easy!

Welcome to my kitchen, where we’re about to create some truly stunning and delicious Marbled Chocolate Peppermint Icebox Cookies! These cookies are not just a feast for the taste buds with their rich chocolate and refreshing peppermint flavors, but they’re also a visual delight with their beautiful marbled swirl. Perfect for holidays, gifting, or just a special treat, these icebox cookies are fantastic because much of the work can be done ahead of time. Let’s get baking!
Ingredient Notes
Creating these Marbled Chocolate Peppermint Icebox Cookies relies on a few key ingredients to achieve both the distinct flavors and the beautiful visual effect. Here’s what you’ll need and a few notes on why:
- All-Purpose Flour: This is our base for both cookie doughs. I always recommend sifting it after measuring to ensure a light, airy dough without lumps. If you’re looking for a gluten-free option, a good quality 1:1 gluten-free all-purpose baking blend can be substituted, though the texture might be slightly different.
- Unsweetened Cocoa Powder: For the chocolate half of our cookies, unsweetened natural cocoa powder works wonderfully, giving a classic chocolate flavor. If you prefer a darker, more intense chocolate, Dutch-processed cocoa powder is an excellent alternative, though it reacts differently with leavening agents, so you might need a tiny tweak to baking soda/powder.
- Unsalted Butter: The cornerstone of any good cookie! Make sure your butter is at room temperature – not melted, but soft enough to easily indent with your finger. This allows it to cream properly with the sugar, creating a light, fluffy base for our doughs. If you need a dairy-free option, a good quality vegan butter stick can be used as a direct substitute.
- Granulated Sugar & Powdered Sugar (Confectioners’ Sugar): We’ll use granulated sugar for creaming with butter, contributing to that crisp-chewy texture. Powdered sugar is sometimes used in part for its fineness, which can contribute to a slightly softer, melt-in-your-mouth texture in some cookie recipes. For this recipe, granulated sugar is typically sufficient for both doughs.
- Large Eggs: Room temperature eggs incorporate better into the dough, leading to a smoother, more emulsified mixture. They add richness and help bind everything together.
- Pure Vanilla Extract: A classic enhancer that complements both chocolate and peppermint beautifully. Always opt for pure vanilla extract for the best flavor.
- Peppermint Extract: This is where the “peppermint” magic happens! Peppermint extract is potent, so I recommend starting with the specified amount and perhaps adding a tiny bit more to taste if you desire a stronger minty kick, but be careful not to overdo it – a little goes a long way!
- Red Food Coloring: To get that festive, vibrant peppermint look for one of our doughs, gel food coloring is my go-to. It provides intense color without adding excess liquid to the dough. You can skip it if you prefer a natural look, or try natural alternatives like beet powder, though the color may be less vibrant and could subtly affect flavor.
- Baking Soda and Salt: Baking soda helps with leavening and tenderness, reacting with the cocoa powder (if using natural cocoa). Salt is crucial for balancing the sweetness and enhancing all the other flavors. Don’t skip it!
- Optional Topping: Crushed candy canes or peppermint candies can be added as a festive garnish, either pressed gently into the cookie log before chilling or sprinkled on top of the cookies just after baking while they’re still warm.
Step-by-Step Instructions
Let’s walk through creating these gorgeous Marbled Chocolate Peppermint Icebox Cookies. Patience, especially with chilling, is your best friend here!
- Prepare Your Dry Ingredients: In two separate bowls, prepare your dry mixtures. For the chocolate dough: whisk together 1¼ cups all-purpose flour, ¼ cup unsweetened cocoa powder, ½ teaspoon baking soda, and ¼ teaspoon salt. For the peppermint dough: whisk together 1½ cups all-purpose flour, ½ teaspoon baking soda, and ¼ teaspoon salt. Set these aside.
- Cream Butter and Sugar: In a large mixing bowl, using an electric mixer, cream ½ cup (1 stick) softened unsalted butter with ¾ cup granulated sugar until light and fluffy. This should take about 2-3 minutes. Repeat this process in a separate bowl for the peppermint dough, using ½ cup (1 stick) softened unsalted butter and ¾ cup granulated sugar.
- Add Wet Ingredients: To the chocolate butter mixture, beat in 1 large egg and 1 teaspoon pure vanilla extract until just combined. To the peppermint butter mixture, beat in 1 large egg, 1 teaspoon pure vanilla extract, 1 to 1½ teaspoons peppermint extract (adjust to your preference), and a few drops of red gel food coloring until the desired vibrant red color is achieved and ingredients are well blended.
- Combine Wet and Dry: Gradually add the chocolate dry ingredient mixture to the chocolate wet mixture, mixing on low speed until just combined and a soft dough forms. Be careful not to overmix. Repeat this process with the peppermint dry ingredient mixture and the peppermint wet mixture until that dough is formed. You now have two distinct doughs.
- Initial Chill (Optional): If your doughs feel too soft to handle easily, you can wrap them separately in plastic wrap and chill for about 15-20 minutes. This will make rolling easier.
- Layering and Marbling: This is the fun part!
- On a lightly floured surface or between two sheets of parchment paper, roll out the chocolate dough into a rectangle, approximately 10×12 inches and about ¼-inch thick.
- Repeat with the peppermint dough, rolling it to the same dimensions and thickness.
- Carefully peel off the top parchment from the peppermint dough. Invert the peppermint dough directly onto the chocolate dough, aligning the edges as best you can. Gently peel off the second piece of parchment from the peppermint dough.
- Now, starting from one of the longer sides, carefully but firmly roll the layered dough into a tight log. As you roll, ensure it’s compact to avoid air pockets.
- For a more dramatic marble effect, once your log is formed, you can gently twist the log a few times. Alternatively, you can cut the log in half lengthwise and stack one half on top of the other, then gently re-roll into a log. Another technique involves cutting the log into several pieces, stacking them, and gently pressing them together before re-rolling. Don’t overdo it, or the colors will blend into a uniform, less attractive shade.
- Critical Chill: Wrap the dough log tightly in plastic wrap. Chill in the refrigerator for at least 2-4 hours, or preferably overnight. This step is crucial for icebox cookies; it firms up the butter, preventing excessive spreading during baking and making the log easy to slice cleanly.
- Slice and Bake: When you’re ready to bake, preheat your oven to 375°F (190°C). Line baking sheets with parchment paper. Unwrap the chilled dough log and, using a sharp knife, slice it into uniform ¼-inch thick rounds. Place the cookie slices about 1 inch apart on the prepared baking sheets.
- Bake Until Set: Bake for 8-10 minutes, or until the edges are just set and lightly golden. The cookies may still look soft in the center but will firm up as they cool.
- Cool: Let the cookies cool on the baking sheets for 2-3 minutes before transferring them to a wire rack to cool completely. If you’re adding crushed candy canes, sprinkle them on top while the cookies are still warm from the oven.
Tips & Suggestions
To ensure your Marbled Chocolate Peppermint Icebox Cookies turn out perfectly every time, here are a few of my favorite tips:
- Don’t Rush the Chill: I cannot stress this enough – the chilling time is absolutely essential for icebox cookies. A well-chilled dough log will slice beautifully and hold its shape much better in the oven, giving you those perfectly round, non-spreading cookies. If your log starts to soften while slicing, pop it back in the fridge for 10-15 minutes.
- Master the Marble: The key to distinct marbling is gentle handling. Don’t overwork the dough once you’ve layered it. A few gentle twists or a simple roll-up is usually sufficient to create beautiful swirls without muddling the colors. Think of it more as a swirl than a full mix.
- Uniform Slices for Even Baking: Use a sharp knife and try to slice your cookies as evenly as possible. This ensures they all bake at the same rate, preventing some from burning while others are still underdone.
- Adjust Peppermint Intensity: If you’re unsure about the strength of peppermint extract, start with the lower recommended amount (e.g., 1 teaspoon) and taste a tiny bit of the peppermint dough before adding more. Remember, the flavor often intensifies slightly after baking.
- Combatting Spread: If your cookies are spreading more than desired, it usually means your dough wasn’t cold enough, or your butter was too soft initially. A quick re-chill of the remaining dough log can often fix this for subsequent batches.
- Flavor Variations: While these are delicious as is, you could drizzle the cooled cookies with melted white chocolate or dark chocolate for an extra layer of decadence. A sprinkle of sea salt on the chocolate dough can also enhance the flavor profile. For an even more complex chocolate flavor, you could add a teaspoon of instant espresso powder to the chocolate dough.
- Cookie Thickness: For crispier cookies, slice them a bit thinner (⅛-inch). For chewier cookies, go a little thicker (⅓-inch). Adjust baking time accordingly.
Storage
These Marbled Chocolate Peppermint Icebox Cookies are wonderful for make-ahead baking, which is one of the best things about icebox cookies! Here’s how to store them:
- Unbaked Dough Log:
- Refrigerator: Once wrapped tightly in plastic wrap, the unbaked dough log can be stored in the refrigerator for up to 1 week. This makes them perfect for holiday entertaining, as you can bake fresh cookies on demand.
- Freezer: For longer storage, wrap the dough log tightly in plastic wrap, then an additional layer of aluminum foil, or place it in a freezer-safe bag. It can be frozen for up to 3 months. When you’re ready to bake, thaw the log in the refrigerator overnight before slicing and baking as directed.
- Baked Cookies:
- Room Temperature: Once completely cooled, store the baked cookies in an airtight container at room temperature for up to 5-7 days. To maintain freshness, you can place a slice of bread in the container with the cookies; the cookies will absorb moisture from the bread, keeping them soft.
- Freezer: Baked and completely cooled cookies can also be frozen. Arrange them in a single layer on a baking sheet to freeze solid, then transfer them to a freezer-safe bag or airtight container, separated by parchment paper. They will keep well for 1-2 months. Thaw at room temperature before serving.
Enjoy your beautifully crafted and delicious Marbled Chocolate Peppermint Icebox Cookies!

Final Thoughts
As we wrap up this delightful journey, I truly hope you’re feeling inspired to whip up a batch of these incredible Marbled Chocolate Peppermint Icebox Cookies. There’s just something magical about how the rich chocolate swirls beautifully with the vibrant peppermint, creating a treat that’s as stunning to look at as it is delicious to eat. The genius of the icebox method means you get to enjoy gourmet-level cookies with minimal fuss, making them perfect for any occasion – from a cozy night in to a festive gathering. I promise, once you experience the refreshing burst of peppermint against the deep chocolate in every bite, you’ll understand why these Marbled Chocolate Peppermint Icebox Cookies are not just a recipe, but a truly indispensable addition to your baking repertoire. They are absolutely a must-try!
Easy Marbled Chocolate Peppermint Icebox Cookies Recipe
- Total Time: 40 minutes
- Yield: 24 cookies 1x
Description
Indulge in the festive flavors of Marbled Chocolate Peppermint Icebox Cookies, where rich chocolate meets refreshing peppermint in a stunning swirl. These cookies are not only visually delightful but also incredibly easy to prepare, making them perfect for any occasion.
Ingredients
- 1¼ cups all-purpose flour (for chocolate dough)
- ¼ cup unsweetened cocoa powder
- ½ teaspoon baking soda (for chocolate dough)
- ¼ teaspoon salt (for chocolate dough)
- 1½ cups all-purpose flour (for peppermint dough)
- ½ teaspoon baking soda (for peppermint dough)
- ¼ teaspoon salt (for peppermint dough)
- ½ cup (1 stick) unsalted butter, softened
- ¾ cup granulated sugar (for chocolate dough)
- ½ cup (1 stick) unsalted butter, softened (for peppermint dough)
- ¾ cup granulated sugar (for peppermint dough)
- 1 large egg (for chocolate dough)
- 1 teaspoon pure vanilla extract (for chocolate dough)
- 1 large egg (for peppermint dough)
- 1 teaspoon pure vanilla extract (for peppermint dough)
- 1 to 1½ teaspoons peppermint extract
- A few drops of red gel food coloring
- Baking soda
- Salt
- Optional: Crushed candy canes or peppermint candies
Instructions
- In two separate bowls, prepare your dry mixtures. For the chocolate dough: whisk together 1¼ cups all-purpose flour, ¼ cup unsweetened cocoa powder, ½ teaspoon baking soda, and ¼ teaspoon salt. For the peppermint dough: whisk together 1½ cups all-purpose flour, ½ teaspoon baking soda, and ¼ teaspoon salt. Set these aside.
- In a large mixing bowl, using an electric mixer, cream ½ cup (1 stick) softened unsalted butter with ¾ cup granulated sugar until light and fluffy. This should take about 2-3 minutes. Repeat this process in a separate bowl for the peppermint dough, using ½ cup (1 stick) softened unsalted butter and ¾ cup granulated sugar.
- To the chocolate butter mixture, beat in 1 large egg and 1 teaspoon pure vanilla extract until just combined. To the peppermint butter mixture, beat in 1 large egg, 1 teaspoon pure vanilla extract, 1 to 1½ teaspoons peppermint extract, and a few drops of red gel food coloring until the desired vibrant red color is achieved and ingredients are well blended.
- Gradually add the chocolate dry ingredient mixture to the chocolate wet mixture, mixing on low speed until just combined and a soft dough forms. Be careful not to overmix. Repeat this process with the peppermint dry ingredient mixture and the peppermint wet mixture until that dough is formed. You now have two distinct doughs.
- If your doughs feel too soft to handle easily, you can wrap them separately in plastic wrap and chill for about 15-20 minutes. This will make rolling easier.
- On a lightly floured surface or between two sheets of parchment paper, roll out the chocolate dough into a rectangle, approximately 10×12 inches and about ¼-inch thick. Repeat with the peppermint dough, rolling it to the same dimensions and thickness.
- Carefully peel off the top parchment from the peppermint dough. Invert the peppermint dough directly onto the chocolate dough, aligning the edges as best you can. Gently peel off the second piece of parchment from the peppermint dough.
- Starting from one of the longer sides, carefully but firmly roll the layered dough into a tight log. As you roll, ensure it's compact to avoid air pockets. For a more dramatic marble effect, once your log is formed, you can gently twist the log a few times.
- Wrap the dough log tightly in plastic wrap. Chill in the refrigerator for at least 2-4 hours, or preferably overnight.
- When you're ready to bake, preheat your oven to 375°F (190°C). Line baking sheets with parchment paper. Unwrap the chilled dough log and, using a sharp knife, slice it into uniform ¼-inch thick rounds. Place the cookie slices about 1 inch apart on the prepared baking sheets.
- Bake for 8-10 minutes, or until the edges are just set and lightly golden. The cookies may still look soft in the center but will firm up as they cool.
- Let the cookies cool on the baking sheets for 2-3 minutes before transferring them to a wire rack to cool completely. If you're adding crushed candy canes, sprinkle them on top while the cookies are still warm from the oven.
- Prep Time: 30 mins
- Cook Time: 10 mins
- Category: Dessert
- Method: Baking
- Cuisine: American
Nutrition
- Serving Size: 1 cookie
- Calories: 100
- Sugar: 8 g
- Sodium: 50 mg
- Fat: 4 g
- Saturated Fat: 2 g
- Unsaturated Fat: 1 g
- Trans Fat: 0 g
- Carbohydrates: 14 g
- Fiber: 1 g
- Protein: 1 g
- Cholesterol: 20 mg
Keywords: The chilling time is essential for icebox cookies to ensure they slice beautifully and hold their shape. Adjust the peppermint intensity according to your preference, and consider adding toppings like melted chocolate or crushed candy canes for extra flavor.
Leave a Comment