

Sesame Chicken, oh, what a delight! If you’ve ever craved that irresistible combination of crispy chicken pieces coated in a glossy, sweet, and savory sauce, then you’re undoubtedly familiar with this beloved dish. I know I certainly am!
The Delicious History of Sesame Chicken
While Sesame Chicken is a cornerstone of Chinese-American takeout menus across the globe, its history is a fascinating journey of culinary evolution, reflecting how traditional flavors adapt and thrive in new cultural contexts. Often considered a delicious cousin to other popular sweet and sour chicken variations, this dish rose to prominence as a uniquely American interpretation, skillfully designed to appeal to a broad palate with its approachable yet complex taste. It embodies the innovation found in adapting classic techniques to create something new and universally appealing.
Why We Adore This Dish!
People absolutely adore this dish not just for its incredible flavor profile—a perfect balance of umami, sweetness, and a hint of tang—but also for its satisfying texture. We’re talking about tender chicken enveloped in a delightful crispness, all brought together by that iconic, rich glaze, often generously sprinkled with sesame seeds. It’s comforting, exciting, and, as you’ll soon discover, surprisingly easy to master at home, promising a restaurant-quality experience right in your very own kitchen.

Ingredients:
-
For the Chicken:
- 1.5 lbs (about 680g) boneless, skinless chicken thighs or breasts, cut into 1-inch (2.5 cm) pieces. I personally lean towards thighs for their juiciness, but breasts work beautifully too if you prefer leaner meat.
- 1 tablespoon soy sauce (or tamari for a gluten-free option)
- 1 tablespoon rice wine (Shao Xing wine is traditional, but dry sherry or even a splash of mirin can be substituted)
- 1 teaspoon sesame oil
- 1/2 teaspoon white pepper
-
For the Crispy Coating:
- 1 cup all-purpose flour
- 1/2 cup cornstarch
- 1 teaspoon salt
- 1/2 teaspoon white pepper
- 2 large eggs, lightly beaten
-
For the Sesame Chicken Sauce:
- 1/2 cup soy sauce (low sodium is often preferred to control saltiness)
- 1/4 cup rice vinegar (unseasoned is best for a balanced flavor)
- 1/2 cup granulated sugar
- 1/4 cup honey (adds a lovely depth and glaze)
- 2 tablespoons sesame oil (pure sesame oil for maximum flavor)
- 2 tablespoons freshly grated ginger (don’t skimp on this, it’s key!)
- 4 cloves garlic, minced (freshly minced is always superior)
- 1 teaspoon sriracha or chili garlic sauce (optional, for a little kick to your Sesame Chicken)
- 1/4 cup water or chicken broth
- 2 tablespoons cornstarch (for thickening the sauce)
- 2 tablespoons toasted sesame seeds, plus more for garnish
-
For Frying:
- 6-8 cups vegetable oil, canola oil, or peanut oil, for deep frying. Choose an oil with a high smoke point.
-
For Garnish:
- 2 tablespoons toasted sesame seeds
- 1/4 cup chopped green onions (scallions), green parts only
- Cut and Marinate the Chicken:
I always start by preparing my chicken. Take your boneless, skinless chicken thighs or breasts and cut them into uniform 1-inch (2.5 cm) pieces. Consistency in size is super important here, as it ensures that every piece of your Sesame Chicken cooks evenly and thoroughly. In a medium bowl, combine the cut chicken with 1 tablespoon of soy sauce, 1 tablespoon of rice wine, 1 teaspoon of sesame oil, and 1/2 teaspoon of white pepper. Toss everything together until the chicken is well coated. I like to let it marinate for at least 15-20 minutes at room temperature, or even longer in the refrigerator (up to an hour) if I have the time. This brief marinade infuses the chicken with foundational flavors, making every bite more delicious even before the crispy coating and glorious sauce are added. While this isn’t a long marinade, it does make a noticeable difference in the final taste profile of your Sesame Chicken. - Prepare the Dredging Station:
While the chicken is marinating, I set up my dredging station. In a shallow dish or a sturdy resealable bag, whisk together the all-purpose flour, cornstarch, 1 teaspoon of salt, and 1/2 teaspoon of white pepper. The cornstarch in this mixture is your secret weapon for achieving that incredibly crispy crust on your Sesame Chicken; it really makes all the difference! In another shallow dish, lightly beat the two large eggs. Having these ready to go will make the coating process much smoother and less messy. - Whisk Together Sauce Ingredients (Except Thickeners and Seeds):
Now, let’s get that magnificent Sesame Chicken sauce ready! In a medium saucepan, I combine the 1/2 cup soy sauce, 1/4 cup rice vinegar, 1/2 cup granulated sugar, 1/4 cup honey, 2 tablespoons sesame oil, 2 tablespoons freshly grated ginger, 4 cloves of minced garlic, and the optional 1 teaspoon of sriracha or chili garlic sauce if you’re feeling a little spicy. Give it a good whisk to ensure all the sugar and honey start to dissolve. - Prepare the Cornstarch Slurry:
In a small separate bowl, I whisk together 1/4 cup of cold water or chicken broth with 2 tablespoons of cornstarch until there are absolutely no lumps. This is called a cornstarch slurry, and it’s what we’ll use to thicken our sauce to that perfect glossy consistency that beautifully coats every piece of Sesame Chicken. It’s crucial that the water is cold when mixing with cornstarch to prevent lumps from forming. - Cook and Thicken the Sauce:
Place the saucepan with your sauce mixture over medium heat. Bring it to a gentle simmer, stirring occasionally. Once it’s simmering, slowly pour in the cornstarch slurry while continuously whisking. This steady whisking is key to preventing lumps and ensuring a smooth, velvety sauce. Continue to cook and whisk for 2-3 minutes, or until the sauce has thickened to a consistency that coats the back of a spoon. It should be thick enough to cling to your chicken pieces, but not gloopy. Once it reaches your desired thickness, remove it from the heat and stir in 2 tablespoons of toasted sesame seeds. This adds another layer of nutty flavor and a lovely texture to the sauce. I usually taste it at this point and adjust any seasonings if needed – sometimes a tiny pinch more sugar or a splash more vinegar can perfect it to your liking. Set the sauce aside; it’s going to be the crowning glory of our Sesame Chicken! - Coat the Chicken:
This is where we build that incredible crispy exterior! One piece at a time, take a marinated chicken piece, shake off any excess liquid, and first dredge it thoroughly in the flour-cornstarch mixture. Make sure it’s completely coated. Then, dip it into the beaten egg, allowing any excess egg to drip off. Finally, return it to the flour-cornstarch mixture for a second coating, pressing gently to ensure the flour adheres well. This double-dredging technique creates a thicker, crispier crust that’s ideal for Sesame Chicken. As you coat each piece, place them on a clean plate or a wire rack set over a baking sheet, making sure they don’t touch each other. This prevents them from sticking together and helps the coating set slightly. I always try to ensure an even coating on every piece for maximum crunch! - Preheat the Frying Oil:
In a large, heavy-bottomed pot or a deep fryer, pour enough vegetable oil (6-8 cups) to submerge the chicken pieces. I usually aim for at least 2-3 inches of oil depth. Heat the oil over medium-high heat until it reaches a temperature of 350-375°F (175-190°C). A kitchen thermometer is your best friend here; maintaining the correct oil temperature is paramount for perfectly crispy, non-greasy Sesame Chicken. If the oil isn’t hot enough, the chicken will absorb too much oil and become soggy; if it’s too hot, the coating will burn before the chicken is cooked through. If you don’t have a thermometer, you can test the oil by dropping a tiny pinch of flour into it; if it sizzles vigorously, it’s ready. - Fry the Chicken in Batches:
Carefully lower the coated chicken pieces into the hot oil, working in small batches. It’s crucial not to overcrowd the pot, as this will drop the oil temperature too quickly and result in less crispy chicken. I typically fry about 6-8 pieces at a time, depending on the size of my pot. Fry the chicken for 4-6 minutes, or until it’s beautifully golden brown and cooked through. The internal temperature of the chicken should reach 165°F (74°C). Use a slotted spoon or spider to carefully remove the cooked chicken from the oil. - Drain the Fried Chicken:
As you remove each batch of crispy Sesame Chicken, transfer it to a wire rack set over a baking sheet lined with paper towels. This setup allows excess oil to drain away, keeping your chicken as crispy as possible. While the chicken is draining, I immediately move on to frying the next batch, continuing until all the chicken is cooked. Maintaining that consistent oil temperature between batches is key for uniform results. - Optional Double Fry for Extra Crispiness:
For an exceptionally crispy exterior, a trick I often employ is a second fry. Once all the chicken has been fried once and drained, increase the oil temperature slightly to 375-400°F (190-205°C). Carefully return the chicken to the hot oil, again in small batches, and fry for another 60-90 seconds. This quick second fry will make your Sesame Chicken unbelievably crunchy, sealing in the juices and creating a perfect texture that stands up beautifully to the sauce. This step is optional but highly recommended if you want restaurant-quality crispiness! Drain on the wire rack again. - Combine Chicken and Sauce:
Right before serving, I gently reheat the Sesame Chicken sauce over low heat if it has cooled down and become too thick. You want it warm and pourable. In a large bowl, or directly in the saucepan you made the sauce in, add the freshly fried, crispy chicken. Pour about half to two-thirds of the warm sesame sauce over the chicken. Toss gently but quickly to ensure every piece is evenly coated in that glorious, sticky sauce. The goal is to coat it well without letting the chicken sit in the sauce for too long, which would compromise its crispiness. I always prefer to add the sauce at the last minute to preserve that amazing crunch. - Garnish and Serve Immediately:
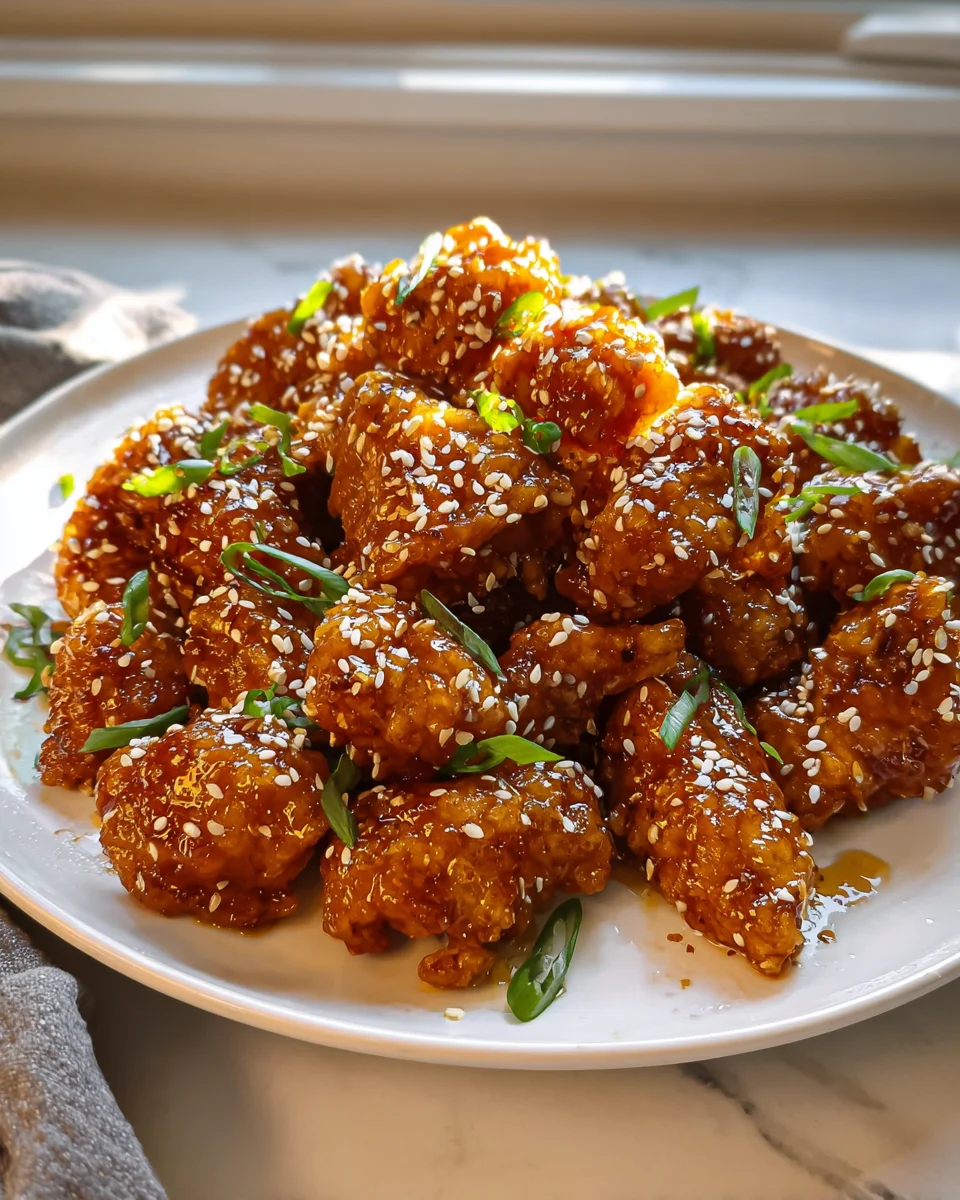
Transfer the sauced Sesame Chicken to a serving platter. Drizzle any remaining sauce over the top, if desired. Now for the final flourish! Generously sprinkle with additional toasted sesame seeds and the vibrant green chopped green onions. The green onions add a fresh, pungent contrast to the rich sauce, and the extra sesame seeds enhance the nutty aroma and provide a pleasant textural crunch. - Serving Suggestions:
Serve your homemade Sesame Chicken immediately with a side of fluffy steamed white rice to soak up every last drop of that amazing sauce. It also pairs wonderfully with blanched or stir-fried broccoli, asparagus, or a simple side salad to complete your meal. This dish is best enjoyed fresh, so try to time your cooking so that the chicken goes from the wok to the table as quickly as possible. Every bite promises a delightful crunch followed by succulent chicken enveloped in that perfect balance of sweet, savory, and tangy sesame sauce. Enjoy creating this classic takeout favorite right in your own kitchen!
Prepping the Chicken
Making the Sesame Chicken Sauce
Coating and Frying the Chicken
Finishing and Serving the Sesame Chicken
Conclusion:
And there you have it! We’ve journeyed through the magic behind creating what I truly believe is a masterpiece of home cooking. This isn’t just another recipe; it’s an invitation to elevate your weeknight dinners, to impress your guests, or simply to treat yourself to an explosion of irresistible flavors and textures. What makes this particular take on Sesame Chicken an absolute must-try isn’t just its delectable taste, but also the sheer satisfaction you’ll feel bringing such a restaurant-quality dish to life in your own kitchen.
I know, I know – there are countless recipes out there, but trust me when I say this one stands out. From the moment the chicken hits the pan, achieving that beautiful golden crisp, to the rich, glossy sauce bubbling to perfection, every step is designed for maximum flavor and ease. The balance of sweet, savory, and nutty notes in the homemade sauce, perfectly clinging to each tender piece of chicken, is simply unparalleled. It’s a dish that smells as good as it tastes, filling your home with an aroma that promises pure culinary bliss. It’s the kind of meal that brings smiles to faces, silences a hungry crowd, and inevitably prompts requests for seconds. The incredible depth of flavor achieved with relatively simple ingredients is truly astonishing, making it a perfect example of how thoughtful cooking can transform everyday components into something extraordinary. This recipe truly delivers on all fronts: flavor, texture, and that undeniable “wow” factor.
Now, let’s talk about making this dish truly your own. While a classic serving of fluffy white or brown rice and a side of vibrant steamed broccoli or crisp green beans is always a winner, the possibilities extend far beyond. For an exciting textural contrast, consider pairing your chicken with a bed of chewy lo mein noodles or even light, delicate vermicelli. If you’re looking to boost your vegetable intake, a colorful stir-fry of bell peppers, snap peas, carrots, and mushrooms would be a fantastic accompaniment, absorbing all that glorious sauce. For a lighter, more refreshing option, spoon the chicken into crisp lettuce cups, perhaps with a sprinkle of shredded carrots or a handful of fresh cilantro, turning it into a delightful appetizer or a lighter main course. Imagine setting out bowls of warm rice, crisp lettuce, and various toppings like chopped peanuts, green onions, and extra sesame seeds, allowing everyone to build their perfect meal!
Elevate Your Dining Experience with Creative Twists
And don’t hesitate to play with variations to suit your palate! If you crave a bit of heat, a pinch of red pepper flakes or a dash of sriracha in the sauce will add a welcome kick. For an extra layer of freshness, a squeeze of lime juice or a sprinkle of fresh cilantro just before serving can brighten the entire dish. Vegetarians or those looking to reduce meat can easily adapt this recipe by substituting the chicken with crispy fried tofu, cauliflower florets, or even portobello mushrooms, ensuring everyone can enjoy the incredible flavors of this versatile sauce. You could even try adding a touch of grated ginger to the sauce for an even more aromatic profile. The beauty of this recipe lies in its adaptability; it’s a fantastic foundation for culinary creativity, encouraging you to experiment and discover your new favorite combinations.
So, what are you waiting for? I wholeheartedly encourage you to roll up your sleeves, gather your ingredients, and dive into the joyful process of making this phenomenal dish. There’s something incredibly rewarding about serving a meal you’ve crafted with your own hands, especially one that garners such rave reviews. Once you’ve experienced the magic, I would absolutely love to hear about it! Please, share your culinary adventures, your clever variations, and your delightful serving suggestions in the comments below. Did you find a new favorite side dish? Did your family go wild for it? Your feedback and experiences not only inspire me but also help our wonderful community of home cooks. Happy cooking, and I can’t wait to hear all about your delicious journey!
Easy Sesame Chicken Recipe – Quick & Delicious Dinner!
Craving crispy chicken in a glossy, sweet, and savory sauce? This quick and delicious Sesame Chicken recipe delivers a beloved takeout experience at home, featuring tender chicken in a delightful crisp batter, coated in a simple yet irresistible sesame sauce.
Ingredients
Instructions
Important Information
Nutrition Facts (Per Serving)
It is important to consider this information as approximate and not to use it as definitive health advice.
Allergy Information
Please check ingredients for potential allergens and consult a health professional if in doubt.

Leave a Comment