

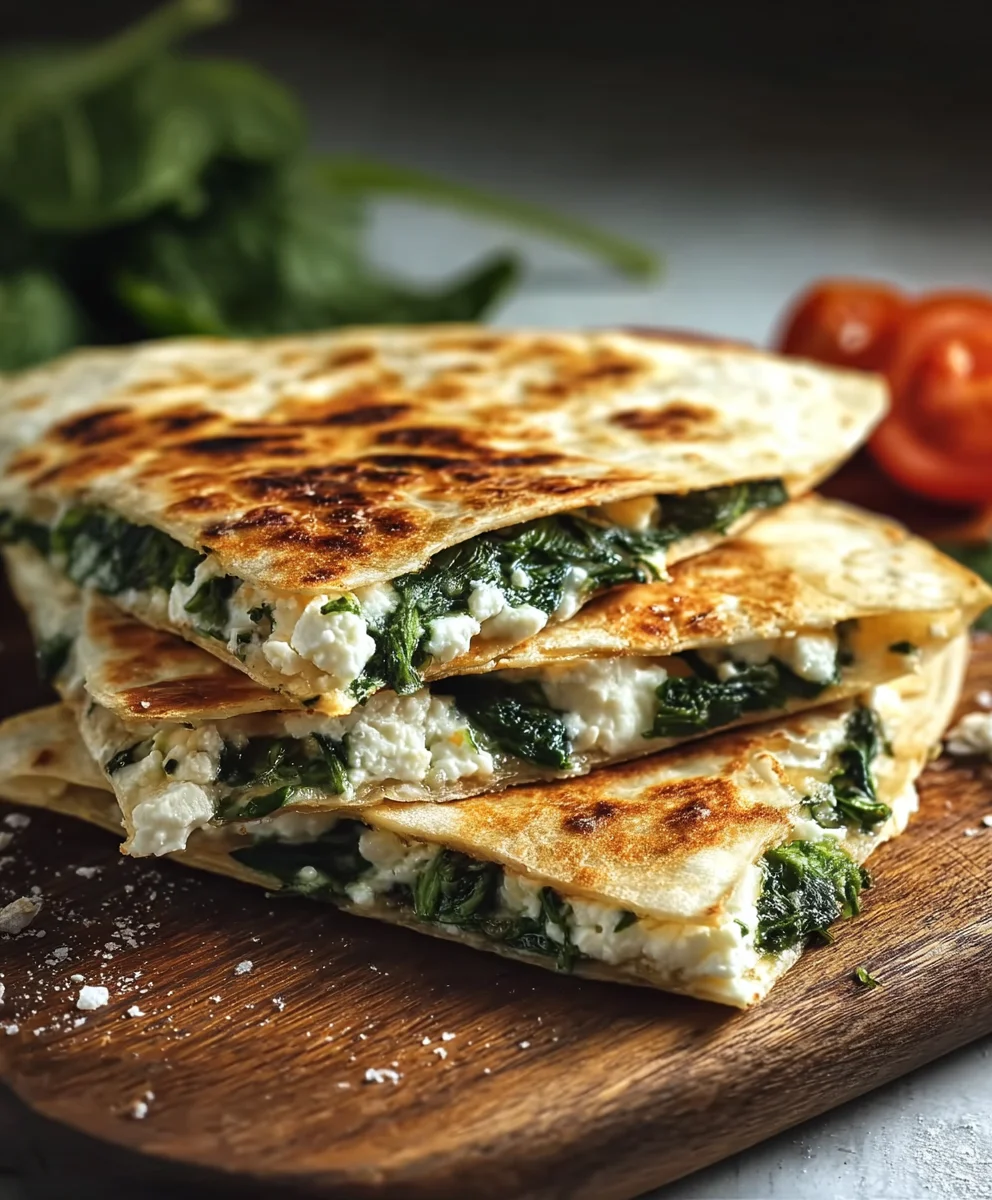
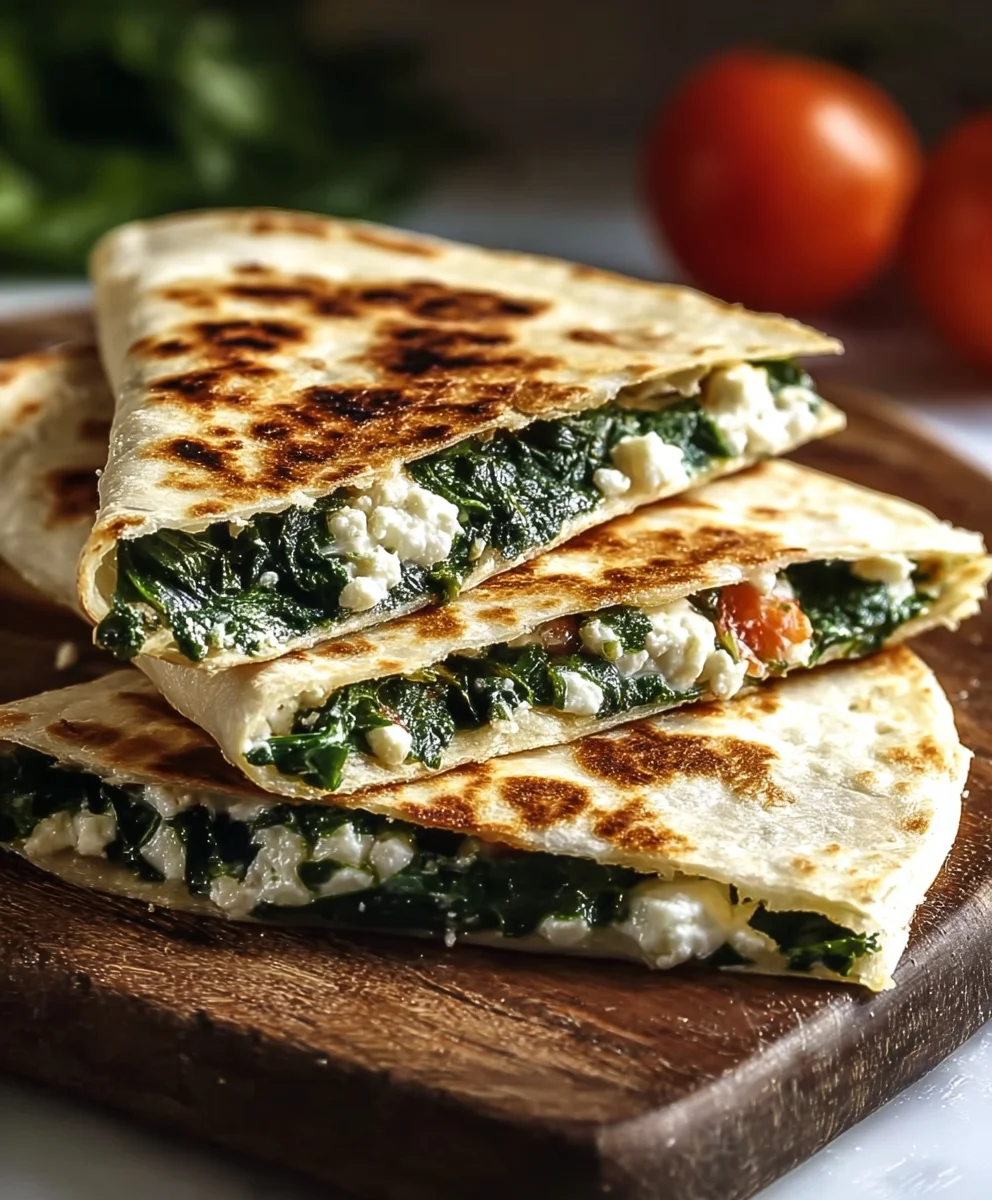
Spinach And Feta Quesadillas offer a delightful escape for your taste buds, transforming simple ingredients into a meal that feels both gourmet and incredibly comforting. Imagine biting into a perfectly golden, crispy tortilla, giving way to a warm, savory filling where creamy feta cheese melts beautifully with tender, earthy spinach, all bound by gooey Monterey Jack or mozzarella. It’s a symphony of textures and flavors that makes weeknight cooking feel like a culinary adventure, providing a satisfying solution that doesn’t compromise on taste.
While the quesadilla itself boasts rich Mexican heritage, a staple loved for its versatility and simplicity, our unique take elevates it with a Mediterranean-inspired twist. This fusion brings a sophisticated yet approachable flavor profile that people adore, combining the best of both worlds. Whether you’re seeking a quick, satisfying lunch, a light dinner, or an impressive appetizer for guests, these Spinach And Feta Quesadillas deliver every time. Their ease of preparation combined with their irresistible taste and wholesome ingredients makes them an absolute favorite for busy individuals and families alike. I am genuinely excited for you to discover the magic within this recipe.

Ingredients:
- Large Flour Tortillas: I recommend using 8 to 10 large flour tortillas, typically the ‘burrito size’ (about 10-inch diameter). These provide a generous surface area for your delicious filling and are easy to fold without tearing.
- Fresh Spinach: You’ll need approximately 10-12 ounces (about two standard bags) of fresh spinach. I always go for fresh because it wilts down beautifully and offers a vibrant, earthy flavor that dried spinach simply can’t match. Remember to wash it thoroughly!
- Feta Cheese: Grab 6-8 ounces of good quality feta cheese. I prefer a block of feta that I can crumble myself, as it often has a creamier texture and richer flavor compared to pre-crumbled varieties, but either will work wonderfully for our Spinach And Feta Quesadillas.
- Monterey Jack Cheese: About 1.5-2 cups of shredded Monterey Jack cheese. This is my go-to for quesadillas because it melts incredibly well, providing that essential gooey factor and helping to bind our filling together inside the tortilla. A Mexican blend with Monterey Jack is also a fantastic option.
- Yellow or White Onion: One small onion, finely diced. It provides a sweet, aromatic base for our spinach filling, adding depth of flavor that really elevates the whole dish.
- Garlic: 2-3 cloves of fresh garlic, minced. Garlic is absolutely essential for almost any savory dish in my kitchen, and it pairs perfectly with spinach and feta, offering a pungent, aromatic kick.
- Olive Oil: About 2 tablespoons for sautéing, plus a little extra if needed for cooking the quesadillas. A good quality extra virgin olive oil enhances the flavors of our vegetables.
- Unsalted Butter: 2-3 tablespoons, divided, for cooking the quesadillas. Butter adds an incredible richness and helps achieve that beautiful golden-brown, crispy exterior on our tortillas. If you prefer, you can use more olive oil here too.
- Salt: To taste. I always recommend tasting as you go, but you’ll definitely need some for seasoning the spinach.
- Freshly Ground Black Pepper: To taste. A generous amount of freshly ground pepper adds a wonderful aroma and gentle spice to the filling.
- Red Pepper Flakes (Optional): A pinch or two, if you like a little heat. I often add them to give these Spinach And Feta Quesadillas a subtle, warm kick without overpowering the other delicate flavors.
Preparing the Flavorful Spinach and Feta Filling
This is where the magic begins for our Spinach And Feta Quesadillas. A well-prepared filling is the heart of any great quesadilla, and we want ours to be incredibly flavorful and well-balanced. Taking a little extra time here makes all the difference.
-
Prep Your Vegetables with Care:
First things first, let’s get our spinach ready. I always start by taking my 10-12 ounces of fresh spinach and giving it a really good wash under cold running water. Spinach can sometimes hide a bit of grit, so a thorough rinse is key. After washing, and this is a crucial step, you need to dry the spinach very well. Excess moisture in the spinach will make your filling watery, leading to soggy quesadillas, which we absolutely want to avoid! You can use a salad spinner for this, or simply pat it dry with paper towels. I find a salad spinner to be the most efficient method.
Next, move on to your aromatics. Take your small yellow or white onion and finely dice it. Uniformly small pieces ensure it cooks evenly and blends seamlessly into the filling without creating large crunchy bits. Then, peel and mince your 2-3 cloves of fresh garlic. Fresh garlic truly makes a difference here, providing a more vibrant and pungent flavor than powdered garlic.
-
Sautéing the Aromatics to Build a Flavor Base:
Now, let’s get cooking! Place a large skillet or a Dutch oven over medium heat. Once it’s hot, add about 1 tablespoon of olive oil. Let the oil shimmer for a moment, indicating it’s ready. Add your finely diced onions to the hot oil. I like to let them cook gently for about 5-7 minutes, stirring occasionally, until they become translucent and softened, but not browned. This slow sautéing brings out their natural sweetness.
Once the onions are ready, add your minced garlic to the skillet. Be careful not to burn it! Garlic cooks much faster than onions, so I only let it cook for about 30-60 seconds, or until it becomes wonderfully fragrant. It should smell absolutely amazing in your kitchen at this point, laying a beautiful aromatic foundation for our Spinach And Feta Quesadillas.
-
Wilting the Spinach and Evaporating Moisture:
With our aromatics perfected, it’s time for the star vegetable: the spinach. Add your dried spinach to the skillet with the onions and garlic. If you’re using a large amount of spinach, you might need to add it in batches. Just add a handful, let it wilt down slightly, then add more until all the spinach is in the pan. Continue to cook, stirring occasionally, until the spinach is completely wilted and significantly reduced in volume. This usually takes another 5-7 minutes.
Here’s another critical step: even after wilting, spinach retains a lot of water. To ensure our Spinach And Feta Quesadillas are perfectly crisp and not soggy, we need to remove as much excess moisture as possible. I usually press the spinach against the side of the pan with my spatula to squeeze out liquid, then pour any accumulated water out of the pan. Alternatively, you can transfer the cooked spinach mixture to a fine-mesh sieve set over a bowl and press down firmly with the back of a spoon to extract all the water. This step is non-negotiable for a superior quesadilla!
-
Combining with Feta and Perfecting the Seasoning:
Once your spinach is thoroughly wilted and drained, transfer it to a medium-sized mixing bowl. Now it’s time to introduce the delightful tang of feta cheese. Take your 6-8 ounces of feta and crumble it directly into the bowl with the spinach. If you’re using a block, simply break it apart with your fingers.
Next, season the mixture with salt and a generous amount of freshly ground black pepper. Remember that feta cheese is quite salty on its own, so start with a smaller amount of salt and taste the mixture before adding more. This is also the perfect moment to stir in a pinch or two of red pepper flakes if you enjoy a little heat in your Spinach And Feta Quesadillas. Mix everything together really well, ensuring the feta is evenly distributed throughout the spinach. I often use my hands for this, as it allows me to really combine the ingredients effectively.
Finally, set the filling aside and let it cool slightly. A warm filling is fine, but if it’s too hot, it can start to melt the Monterey Jack cheese too quickly when we assemble, making things a bit messier. A slightly cooled filling is much easier to work with.
Assembling Your Delicious Spinach And Feta Quesadillas
Now that our savory filling is perfectly prepared, it’s time for the fun part: assembling these incredible Spinach And Feta Quesadillas! This process is straightforward but requires a little attention to detail to ensure even distribution and a well-sealed package.
-
Laying the Foundation for a Melty Masterpiece:
Take one of your large flour tortillas and lay it flat on a clean, dry work surface. This will be the base for our quesadilla. I like to ensure I have ample space around me for easy assembly. Now, take about a quarter cup of your shredded Monterey Jack cheese and sprinkle it evenly over only half of the tortilla. This initial layer of cheese is incredibly important; it acts as a delicious “glue” that helps bind the filling to the tortilla and ensures everything stays neatly tucked inside as it cooks and melts. Don’t go too heavy, just a nice, even sprinkle.
-
Adding the Star Filling:
Next, spoon a generous amount of your cooled spinach and feta mixture over the half of the tortilla that you just topped with cheese. I typically use about a quarter to a third of a cup of filling per quesadilla, but adjust according to your preference and the size of your tortillas. Spread the filling evenly over the cheese, making sure to leave a small border (about half an inch) around the edge of the tortilla. This border is essential for allowing the tortilla to seal properly when folded, preventing the filling from spilling out during cooking.
Think about distributing the filling from edge to edge within that half-circle, ensuring every bite of your cooked Spinach And Feta Quesadilla will be bursting with flavor.
-
Topping with More Gooey Goodness:
To really maximize the melty factor and provide an extra layer of “glue” on top of our filling, sprinkle another quarter cup of shredded Monterey Jack cheese directly over the spinach and feta mixture. This top layer of cheese will melt down, encapsulating the filling and ensuring a cohesive, gooey interior for your quesadilla. It also contributes to the rich, creamy texture we all love in a classic quesadilla.
-
Folding and Preparing for the Pan:
Carefully fold the other, empty half of the tortilla over the filling, creating a perfect crescent shape. Gently press down along the folded edge and over the top to help compress the filling and ensure a good seal. You don’t need to press too hard, just enough to bring the two halves together. At this point, you have an assembled raw quesadilla, ready for cooking. Repeat this assembly process for all remaining tortillas and filling until you have a stack of beautiful, ready-to-cook Spinach And Feta Quesadillas.
Cooking Your Golden Brown Spinach And Feta Quesadillas To Perfection
This is where our assembled quesadillas transform into golden, crispy, melty delights. Proper cooking technique is key to achieving that perfect balance of a crunchy exterior and a hot, gooey interior for our Spinach And Feta Quesadillas.
-
Heat the Pan to the Right Temperature:
Place a large, heavy-bottomed non-stick skillet or a flat griddle over medium heat. It’s important to let the pan heat up gradually and evenly. I usually give it about 2-3 minutes to reach the right temperature. Once it’s warm, add about half a tablespoon (or a pat) of unsalted butter or a drizzle of olive oil to the pan. Swirl it around gently to coat the bottom evenly. You want just enough fat to prevent sticking and encourage browning, but not so much that the quesadillas become greasy. If using butter, wait until it’s melted and just starting to foam before adding your quesadillas.
-
Cook the First Side to Golden Perfection:
Carefully place one or two of your assembled Spinach And Feta Quesadillas into the hot pan. Make sure not to overcrowd the pan; leave enough space between them so they can cook evenly and you can easily flip them. Cooking too many at once will lower the pan temperature and result in steamed, rather than crispy, quesadillas.
Let them cook for approximately 3-5 minutes on the first side. During this time, the bottom of the tortilla will turn a beautiful golden brown and become wonderfully crispy. Crucially, the cheese inside will begin to melt, holding all that delicious spinach and feta filling together. You can gently lift an edge with a spatula to peek underneath and check for that perfect golden hue. Don’t rush this step – patience is a virtue for perfectly crispy quesadillas!
-
Flip and Finish Cooking Through:
Once the first side is beautifully golden brown, use a wide, sturdy spatula to carefully flip each quesadilla over to the other side. If your pan seems a little dry, you can add another small pat of butter or a tiny drizzle of olive oil to the empty spots in the pan before flipping. Cook the second side for another 3-5 minutes, or until it, too, is golden brown and crispy. By this point, the cheese inside should be completely melted and wonderfully gooey, and the spinach and feta filling will be heated through and piping hot.
The goal is to achieve a consistent golden-brown color on both sides with a satisfying crispness. If they’re browning too quickly, lower the heat slightly; if they’re not browning enough, you can increase it a touch. Every stove is a little different, so trust your eyes and nose!
-
Remove and Allow a Brief Rest:
Once your Spinach And Feta Quesadillas are cooked to perfection – golden on both sides, crispy, and visibly melty inside – carefully remove them from the pan and transfer them to a cutting board. I know it’s tempting to dive right in, but I recommend letting them rest for just 1-2 minutes. This brief resting period allows the melted cheese to set slightly, which makes them much easier to slice without all the delicious filling oozing out, and helps maintain their structural integrity.
-
Slice and Serve Immediately:
After their short rest, take a sharp knife or a pizza cutter and slice each quesadilla into wedges. Typically, I cut each crescent-shaped quesadilla into three triangular pieces, but you can slice them into quarters if you prefer smaller bites. The moment they are sliced is when they are at their absolute best: warm, crispy, and with that irresistible gooey cheese and savory spinach and feta filling. Serve these incredible Spinach And Feta Quesadillas immediately while they are hot and fresh!
Serving Suggestions and Tips for Your Delicious Spinach And Feta Quesadillas
Congratulations, you’ve just created some truly spectacular Spinach And Feta Quesadillas! While they are fantastic on their own, a few simple additions can elevate the experience even further. Here are some of my favorite ways to enjoy them, along with a few useful tips:
-
Classic Toppings for Maximum Flavor:
For a traditional quesadilla experience, I absolutely love serving these with a dollop of cool sour cream or plain Greek yogurt. The creaminess provides a lovely contrast to the richness of the filling. A side of vibrant salsa (whether homemade or store-bought) adds a burst of fresh, tangy flavor, and a spoonful of creamy guacamole or sliced avocado brings healthy fats and a smooth texture. These classic pairings truly complement the savory notes of the Spinach And Feta Quesadillas.
-
Adding Freshness and Brightness:
A squeeze of fresh lime juice over the top right before serving can really brighten up the flavors. The acidity cuts through the richness beautifully. A sprinkle of freshly chopped cilantro or parsley not only adds a lovely pop of color but also brings a fresh herbaceous note that I find particularly delightful with spinach and feta.
-
Perfect Side Dishes:
If you’re looking to make it a fuller meal, these Spinach And Feta Quesadillas pair wonderfully with a simple green salad dressed with a light vinaigrette. The crispness of the salad offers a refreshing counterpoint. A side of seasoned black beans, a colorful corn salad, or even some refried beans can also make for a satisfying and complete meal.
-
Make-Ahead Magic:
One of my favorite tips for busy weeknights is to prepare the spinach and feta filling ahead of time. You can cook the spinach, combine it with the feta and seasonings, and store it in an airtight container in the refrigerator for up to 2-3 days. When you’re ready to eat, simply assemble and cook the quesadillas fresh. This dramatically cuts down on prep time when you’re in a hurry.
-
Freezing for Future Convenience:
Yes, you can freeze these Spinach And Feta Quesadillas! After cooking them completely and allowing them to cool, you can individually wrap them in plastic wrap, then place them in a freezer-safe bag or container. They’ll keep well for up to 1-2 months. To reheat, I usually pop them into a preheated oven (around 375°F/190°C) directly from frozen for about 15-20 minutes, or until heated through and crispy again. A toaster oven also works great for individual portions!
-
Customization is Key:
While the classic Spinach And Feta Quesadillas are phenomenal, don’t hesitate to get creative! You could add some cooked, shredded chicken for extra protein, or a handful of finely diced bell peppers for added crunch and sweetness. Other cheeses like provolone or a sharp white cheddar could be interesting additions, or even a sprinkle of crumbled goat cheese for extra tang. Feel free to experiment and make them your own!
-
Moisture Management is Crucial:
I cannot stress enough the importance of squeezing out all excess water from the cooked spinach. This is the number one secret to truly crispy, non-soggy Spinach And Feta Quesadillas. Don’t skip it!
-
Don’t Overcrowd the Pan:
Resist the urge to cook too many quesadillas at once. Give them space in the pan to ensure even heat distribution and proper browning. Cooking in batches might take a little longer, but the superior texture is absolutely worth it.
Conclusion:
So, there you have it! We’ve journeyed through the simple steps to create a truly unforgettable meal, and I sincerely hope you’re feeling inspired to bring this deliciousness into your own kitchen. What makes these Spinach And Feta Quesadillas an absolute game-changer in your culinary repertoire? First and foremost, it’s the unparalleled harmony of flavors that will dance on your palate. The earthiness of the fresh, vibrant spinach, combined with the salty, tangy punch of the creamy feta cheese, all perfectly nestled within a beautifully golden, crispy tortilla, creates a symphony for your taste buds. It’s a deceptively simple dish, yet it delivers such complex satisfaction and a truly gourmet feel without any of the fuss.
But it’s not just about the incredible taste; it’s about the sheer convenience and remarkable versatility these quesadillas offer. In our increasingly fast-paced world, finding a recipe that is both incredibly delicious and remarkably quick to prepare is like striking culinary gold. These quesadillas come together in mere minutes, making them an ideal and stress-free solution for a speedy weeknight dinner when time is precious. They’re also wonderfully suited for a delightful weekend brunch, perhaps even alongside a sunny-side-up egg, or transformed into an impressive and easy-to-serve appetizer when you’re entertaining guests. Their adaptability means they fit perfectly into almost any mealtime scenario.
Plus, who can argue with a meal that effortlessly sneaks in a good dose of wholesome greens? It’s a fantastic and appealing way to enjoy vegetables, even for those who might typically be a bit skeptical or reluctant about their greens. The vibrant spinach doesn’t just add a beautiful splash of color and fresh texture; it also brings a wealth of essential nutrients, making these quesadillas a surprisingly guilt-free indulgence that nourishes your body while delighting your taste buds.
Now, let’s talk about how you can elevate your quesadilla experience even further, taking it from fantastic to truly extraordinary. While these quesadillas are undoubtedly fantastic on their own, a simple dollop of cool, refreshing sour cream, a spoonful of zesty, homemade salsa, or a generous scoop of creamy, fresh guacamole can truly transform each bite into something magical. For those who enjoy a bit of heat and adventure, a dash or drizzle of your favorite hot sauce will provide a delightful and invigorating kick. But don’t stop there! Think about serving them alongside a crisp, vibrant green salad tossed in a light vinaigrette for a complete and beautifully balanced meal. Or, for a more robust and comforting option, pair them with a warm, soothing bowl of classic tomato soup – it’s a match made in heaven.
The true beauty of quesadillas lies in their incredible adaptability and the endless possibilities for customization. Feel completely free to unleash your creativity and get inventive with your fillings! You could effortlessly add some tender, grilled chicken for an extra boost of lean protein, or sautéed mushrooms and colorful bell peppers for more texture, depth, and flavor. For a delightful Mediterranean twist, consider adding some briny black olives or sun-dried tomatoes. Don’t be afraid to experiment with different cheeses too – a blend of gooey mozzarella and sharp cheddar can add a wonderfully stretchy and rich dimension, while fresh goat cheese could offer a creamier, tangier alternative to feta. For a fun, breakfast-inspired version, imagine adding some fluffy scrambled eggs and a sprinkle of fresh, chopped chives. The options are truly limitless!
I genuinely believe that once you try this recipe, it will swiftly become a cherished and frequently requested staple in your home. There’s something immensely satisfying about creating something so delicious and impressive with such surprisingly little effort. So, what are you waiting for? Gather your ingredients, fire up your pan, and embark on this incredibly rewarding culinary journey. Once you’ve experienced the magic of these sensational Spinach And Feta Quesadillas, I would absolutely love, love, love to hear from you! Please do come back and generously share your thoughts, tips, and experiences in the comments section below. Did you try any exciting variations that blew your mind? What did your family and friends think? Your unique experiences and invaluable feedback truly inspire me and help this wonderful cooking community grow and flourish. Happy cooking, my friends!
People Also Ask:
Can I prepare the spinach and feta filling ahead of time?
Absolutely! Preparing the filling in advance is a fantastic time-saver that will make your meal prep even smoother. You can sauté the spinach, allow it to cool, and then mix it with the crumbled feta, along with any other desired seasonings, up to 2-3 days beforehand. Store this pre-made filling in an airtight container in the refrigerator. When you’re ready to make your quesadillas, simply scoop out the prepared filling and assemble them as usual. This clever trick makes quick weeknight meals even quicker and less stressful!
What’s the best way to reheat leftover quesadillas?
To ensure your leftover quesadillas remain deliciously crispy and avoid becoming soggy, I highly recommend avoiding the microwave if at all possible. The best method is to reheat them in a dry skillet over medium heat for a few minutes on each side until they are thoroughly warmed through and the tortilla regains its delightful crispness. Alternatively, you can use a toaster oven or even a regular oven set to about 350°F (175°C) for 5-7 minutes. These methods will help prevent them from becoming disappointingly soft or rubbery.
Can I freeze Spinach And Feta Quesadillas?
Yes, you certainly can! To freeze them, it’s generally best to cook them first. Allow the cooked quesadillas to cool completely to room temperature. Then, wrap each individual quesadilla tightly in plastic wrap, followed by a layer of aluminum foil, or place them neatly into an airtight freezer-safe bag. They can be safely frozen for up to 2-3 months. When you’re ready to enjoy, you can reheat them directly from frozen in a skillet or oven until they are thoroughly warmed through and wonderfully crispy. This is a brilliant way to have a quick, homemade meal ready and waiting whenever you need it!
What kind of tortillas work best for these quesadillas?
For these flavorful Spinach And Feta Quesadillas, I wholeheartedly recommend using medium to large flour tortillas, typically about 8-10 inches in diameter. Flour tortillas are wonderfully pliable, making them easy to fold and manage, and they crisp up beautifully to provide the perfect golden canvas for your delicious filling. While corn tortillas can certainly be used for a different texture and flavor profile, they tend to be less flexible and might crack more easily when folded. However, if you prefer the distinctive taste of corn, gently warm them first to increase their pliability before filling them.
How can I make this recipe more protein-rich?
Adding more protein to your already amazing quesadillas is incredibly easy and highly customizable! You can effortlessly incorporate cooked, shredded chicken (rotisserie chicken works absolute wonders for convenience and speed), sautéed shrimp, or even crumbled cooked sausage. For a fantastic vegetarian protein boost, consider adding black beans (drained and rinsed), or a handful of cooked lentils to the existing spinach and feta mixture. These additions will not only significantly increase the protein content but also add another delightful layer of flavor, texture, and satiety to your already amazing quesadillas, making them even more satisfying!
Spinach & Feta Quesadillas
Easy Spinach & Feta Quesadillas offer a delightful escape for your taste buds, transforming simple ingredients into a gourmet and comforting meal. Enjoy golden, crispy tortillas filled with creamy feta, tender spinach, and savory additions for a quick lunch, light dinner, or impressive appetizer.
Ingredients
-
4 medium tortillas (flour, whole wheat, or gluten-free)
-
2 cups fresh spinach, chopped
-
1 cup feta cheese, crumbled
-
2 tablespoons olive oil or butter, for cooking
-
¼ cup sun-dried tomatoes, chopped
-
¼ cup black olives, sliced
-
½ cup cooked grilled chicken, diced
Instructions
-
Step 1
Wilt chopped spinach in a skillet over medium heat. Squeeze out all excess moisture thoroughly to prevent soggy quesadillas. In a bowl, combine the wilted spinach, crumbled feta cheese, chopped sun-dried tomatoes, sliced black olives, and diced cooked grilled chicken. Mix well. -
Step 2
Lay a tortilla flat on a clean surface. Spoon a portion of the filling (about 1/4 of total) evenly over half of the tortilla. Fold the empty half of the tortilla over the filling to create a crescent shape. Gently press along the folded edge to help seal. -
Step 3
Heat 1 tablespoon of olive oil or butter in a large non-stick skillet over medium heat. Place one or two assembled quesadillas in the hot pan, ensuring not to overcrowd. Cook for 3-5 minutes per side until each side is golden brown and crispy, and the filling is hot and melty. Add more oil/butter as needed for subsequent quesadillas. -
Step 4
Remove cooked quesadillas from the pan and let them rest on a cutting board for 1-2 minutes. Slice each crescent-shaped quesadilla into 2-3 wedges. Serve immediately with your favorite toppings like sour cream, salsa, or guacamole.
Important Information
Nutrition Facts (Per Serving)
It is important to consider this information as approximate and not to use it as definitive health advice.
Allergy Information
Please check ingredients for potential allergens and consult a health professional if in doubt.


Leave a Comment