

Olivier Salad Wreath – just the name evokes images of festive gatherings, sparkling decorations, and the comforting taste of tradition. I find few dishes capture the spirit of celebration quite like this vibrant, savory creation, especially when presented in its beautiful, circular form. It’s not merely a salad; it’s a culinary masterpiece that often takes center stage on holiday tables, particularly across Eastern Europe and Russia, symbolizing togetherness and shared joy. This classic dish has a storied past, evolving from a gourmet restaurant item to a beloved household staple, and its enduring popularity is a testament to its irresistible charm.
The story of Olivier Salad is as rich as its flavor. Originally conceived in the 1860s by Belgian chef Lucien Olivier at his famous Hermitage restaurant in Moscow, the original recipe was a highly guarded secret, featuring exquisite ingredients like grouse, veal tongue, and crayfish. Over time, as it became a staple in Soviet-era cuisine, the recipe evolved into the more accessible, yet equally beloved, version we know today, featuring hearty potatoes, carrots, peas, eggs, pickles, and often chicken or ham, all bound together with a creamy dressing. It became synonymous with New Year’s Eve, a symbol of hope and togetherness, passed down through generations.
Why We Adore This Festive Dish
People absolutely adore this salad for so many reasons. Its unique blend of flavors – a harmonious mix of savory, slightly sweet, and tangy notes – creates an incredibly satisfying experience with every bite. The creamy texture, combined with the slight crunch of the pickles, makes it utterly irresistible and wonderfully comforting. But beyond the taste, there’s the profound sense of nostalgia; for many, it tastes like childhood memories and cherished family traditions. And when you arrange it as an Olivier Salad Wreath, it transforms from a simple side dish into an impressive, edible centerpiece, radiating warmth and welcoming cheer. It’s comforting, endlessly customizable, and truly embodies the joy of sharing good food with loved ones.

Ingredients:
- For the Main Salad:
- 6 medium-sized potatoes (about 2.5 lbs), peeled and diced into ½-inch cubes
- 4 medium carrots (about 1.5 lbs), peeled and diced into ½-inch cubes
- 5 large hard-boiled eggs, peeled and diced into ½-inch cubes
- 1.5 cups cooked chicken breast, ham, or bologna, diced into ½-inch cubes (I often opt for chicken for a lighter touch, but traditionalists might love the bologna!)
- 1 cup frozen green peas, thawed
- 1 cup pickled dill cucumbers (gherkins), finely diced (about 4-5 medium gherkins)
- ½ cup finely chopped red onion (optional, but I love the little kick it provides!)
- For the Dressing:
- 1.5 cups good quality mayonnaise (I prefer a rich, full-fat variety for the best texture)
- 2 tablespoons Dijon mustard (or more, to taste, if you like a tangier dressing)
- 1 teaspoon salt, or to taste
- ½ teaspoon black pepper, freshly ground, or to taste
- 1 tablespoon fresh lemon juice (this really brightens up the flavors!)
- For the Olivier Salad Wreath Decoration:
- A handful of fresh dill sprigs, for garnish
- A handful of fresh parsley sprigs, for garnish
- ¼ cup fresh cranberries or pomegranate seeds, for festive color
- 1 small red bell pepper or cucumber, for cutting out decorative shapes (like stars or small flowers)
- Optional: Extra mayonnaise for a smooth outer coating, if desired
Preparing the Core Components
- Cooking the Potatoes and Carrots: My first step for any fantastic Olivier Salad Wreath is perfectly cooked vegetables. I start by placing the peeled, diced potatoes and carrots into separate pots. It’s crucial to cook them separately because they have different cooking times, and we want each to be tender but not mushy. I cover them with cold water, add a pinch of salt to each pot, and bring them to a boil. Once boiling, I reduce the heat to a simmer. The carrots usually take about 8-10 minutes, and the potatoes around 10-15 minutes, depending on the size of your dice. I always test them with a fork; they should be easily pierced but still hold their shape. As soon as they are tender, I drain them immediately and spread them out on a baking sheet or large platter to cool completely. Cooling them quickly prevents them from continuing to cook and becoming overly soft. This step is absolutely essential for the perfect texture in our Olivier Salad Wreath. Trust me, nobody wants mushy potato salad!
- Boiling the Eggs: Next up are the eggs. For perfectly hard-boiled eggs every time, which are critical for the aesthetic and texture of our salad, I place the eggs in a single layer in a saucepan and cover them with about an inch of cold water. I bring the water to a rolling boil over high heat, then immediately turn off the heat, cover the pan, and let the eggs sit in the hot water for exactly 10-12 minutes. This method ensures a fully set yolk without that dreaded green ring. Once the time is up, I transfer the eggs to an ice bath for at least 5 minutes. This stops the cooking process and makes them much easier to peel. Once cooled, I peel them gently and dice them into ½-inch cubes, just like the other vegetables.
- Preparing the Protein: If I’m using chicken breast, I typically poach it for tenderness. I place the chicken breast in a saucepan, cover it with water or chicken broth, add a bay leaf and a few peppercorns for flavor, and bring it to a gentle simmer. I cook it for about 15-20 minutes, or until it’s cooked through. Once done, I remove it from the liquid, let it cool completely, and then dice it into ½-inch cubes. If I’m using ham or bologna, it’s much simpler – I just dice them straight away to the same ½-inch size. Consistency in dicing is key for a beautiful and harmonious Olivier Salad Wreath.
- Thawing Peas and Dicing Pickles & Onion: The frozen green peas simply need to be thawed. I usually just run them under cold water for a minute or two, or let them sit at room temperature while I’m preparing other ingredients. For the pickled dill cucumbers, I make sure to dice them quite finely. This ensures their tangy crunch is distributed evenly throughout the salad without overpowering any single bite. If I’m adding red onion, I chop it very finely as well. For a milder onion flavor, you can soak the chopped onion in cold water for 10-15 minutes, then drain thoroughly before adding to the salad. This little trick reduces its pungency, making it more palatable for those who are sensitive to raw onion.
Assembling the Olivier Salad Base
- Combining the Salad Ingredients: Now comes the exciting part where all our perfectly prepared components start to come together for our Olivier Salad Wreath! In a very large mixing bowl – I always opt for one that feels almost too big, just to give myself plenty of room – I gently combine the cooled diced potatoes, carrots, hard-boiled eggs, cooked and diced protein (chicken, ham, or bologna), thawed green peas, finely diced pickled cucumbers, and the optional finely chopped red onion. It’s important to be gentle when mixing to avoid mashing the tender vegetables, especially the potatoes. We want distinct, beautifully diced pieces in every spoonful.
- Preparing the Dressing: In a separate medium-sized bowl, I whisk together all the dressing ingredients: the generous amount of mayonnaise, Dijon mustard, salt, freshly ground black pepper, and fresh lemon juice. I taste it at this stage and adjust the seasonings if needed. Sometimes I like a little extra lemon juice for brightness, or a dash more mustard for a tangier profile. This dressing is the heart of the Olivier Salad, providing that iconic creamy, savory, and slightly tangy flavor. Getting it just right here is crucial for the overall success of your Olivier Salad Wreath.
- Dressing the Salad: Once the dressing is perfect, I pour it over the combined salad ingredients in the large bowl. Using a large spatula or two spoons, I very gently fold the dressing into the salad. The goal is to evenly coat all the ingredients without crushing them. I take my time with this step, ensuring every piece gets its fair share of that delicious creamy dressing. I continue to fold until everything is uniformly combined. Then, I give it one final taste test. This is my chance to add any last-minute salt, pepper, or a touch more lemon juice if it feels like it needs it. The flavor balance is absolutely paramount here for a truly memorable Olivier Salad Wreath.
- Chilling the Salad: Once mixed, I cover the bowl tightly with plastic wrap and refrigerate the salad for at least 2-4 hours, or even better, overnight. This chilling period is not optional; it’s a non-negotiable step! It allows all the flavors to meld beautifully, deepen, and truly develop. The salad will also firm up slightly, which is crucial for shaping it into our festive wreath later on. This rest makes all the difference in achieving that classic, comforting Olivier Salad taste.
Creating the Olivier Salad Wreath
- Choosing Your Wreath Mold: Now for the creative part of making your Olivier Salad Wreath! I have a few tricks up my sleeve for forming the perfect wreath shape. You can use a springform pan (my preferred method if serving a crowd), a large round platter, or even individual plates for smaller portions. If using a springform pan, I recommend lining the bottom with parchment paper for easier transfer later. If using a platter, you’ll need a round object to create the hole in the center – a clean, empty can (like a tomato paste can), a small glass, or a ramekin works perfectly. I simply place it upright in the center of my serving platter.
- Forming the Wreath Shape: I spoon the chilled Olivier salad around the central object (or directly into the ring of the springform pan). Then, using the back of my spoon or a spatula, I gently but firmly press the salad down and against the sides to create a dense, uniform ring. This firm pressing is essential to ensure the Olivier Salad Wreath holds its shape when unmolded. I make sure the top is relatively smooth and even. If you’re using a springform pan, this step is even easier as the sides will hold everything in place. For a platter with a central object, I’m careful to compact it well around the object and maintain a consistent outer edge.
- Final Chilling for Stability: Once shaped, I return the entire platter or springform pan with the salad to the refrigerator for at least another hour. This additional chilling time allows the salad to firm up further in its new wreath shape, making it much more stable and easy to decorate. Patience here pays off in a beautifully formed Olivier Salad Wreath!
- Unmolding and Smoothing: When I’m ready to serve, I carefully remove the central can or glass from the middle of the Olivier Salad Wreath. If I used a springform pan, I gently release the spring and lift the ring. Sometimes, I like to take an extra step for a super polished look. I’ll take a small amount of extra mayonnaise and, using an offset spatula or the back of a spoon, gently spread a thin, smooth layer over the entire outer surface of the wreath. This creates a pristine “canvas” for my festive decorations.
Decorating Your Festive Olivier Salad Wreath
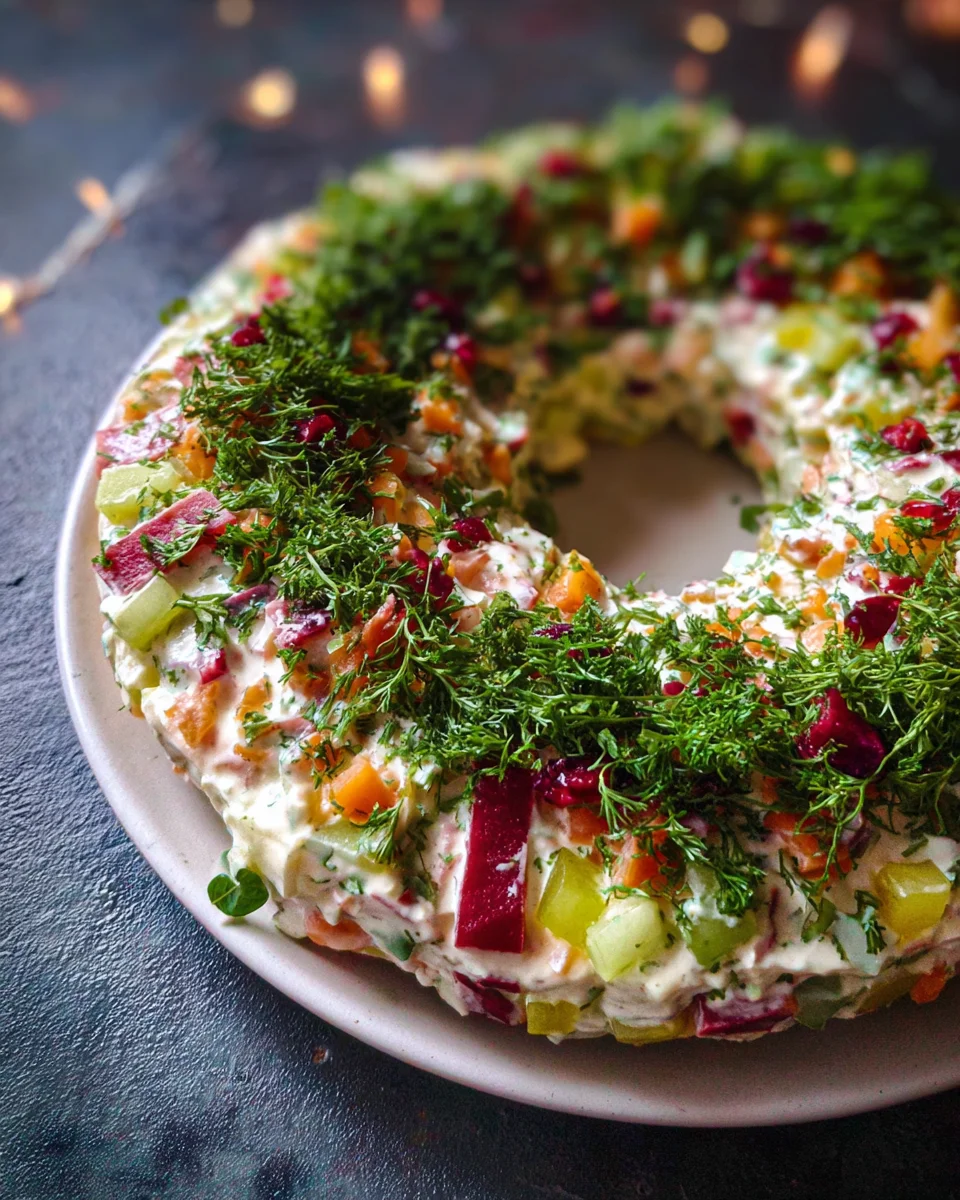
- Adding the Greenery: This is where the Olivier Salad Wreath truly comes alive and transforms into a festive centerpiece! I start by artfully arranging fresh dill and parsley sprigs all around the top and outer edges of the salad ring. Think of it like adding the green foliage to a Christmas wreath. I aim for a lush, natural look, allowing some sprigs to overlap slightly. The vibrant green against the creamy salad is just stunning.
- Incorporating Festive Berries: To add pops of color and a touch of holiday cheer, I sprinkle fresh cranberries or pomegranate seeds over the green herbs. Their bright red hue provides a beautiful contrast and makes the Olivier Salad Wreath look incredibly inviting and celebratory. They truly mimic the berries on a traditional wreath.
- Crafting Decorative Shapes: For an extra special touch, I often use a small cookie cutter (star, snowflake, or tiny flower shapes work wonderfully) to cut shapes from a thin slice of red bell pepper or cucumber. I then carefully place these little edible decorations strategically around the wreath. These small details elevate the presentation and show just how much thought and care went into creating this beautiful Olivier Salad Wreath. It’s these thoughtful touches that really make it shine!
- Final Touches and Serving: I take a moment to step back and admire my creation, making any final adjustments to the garnish. Your Olivier Salad Wreath is now ready to be presented! It makes an absolutely stunning centerpiece for any holiday table or special gathering. Guests are always so impressed by the presentation, and the taste, of course, is a beloved classic. Enjoy serving this beautiful and delicious Olivier Salad Wreath!
Conclusion:
And there you have it, my friends! We’ve reached the delicious culmination of our culinary journey, and I genuinely hope you’re feeling as inspired and hungry as I am right now. This isn’t just any salad; it’s a masterpiece that truly elevates the simple act of eating into a memorable occasion. The recipe we’ve explored today is, without a doubt, a must-try for so many reasons. It perfectly balances a delightful medley of textures – the tender potatoes, the crisp carrots, the succulent chicken, and the bright tang of pickles – all bound together by that creamy, rich dressing. What truly sets this particular presentation apart is its festive charm; serving up an Olivier Salad Wreath transforms a classic into a showstopper, making any gathering feel a little more special and a lot more beautiful.
I can personally attest to the joy this dish brings. Every time I prepare it, I’m met with oohs and aahs, and there’s never a crumb left. It’s the kind of comforting, satisfying dish that warms the soul while simultaneously delighting the palate with its harmonious blend of savory and slightly sweet notes. Imagine the delight on your guests’ faces as they encounter this stunning centerpiece on your holiday table or at your next potluck. It’s more than just a side dish; it’s a conversation starter, a focal point that invites everyone to gather around and enjoy. Its vibrant colors, especially when garnished thoughtfully, are a feast for the eyes before you even take the first incredible bite.
Serving Suggestions to Make It Shine Even Brighter
While the Olivier Salad Wreath is undoubtedly a star on its own, I have a few suggestions to help you integrate it perfectly into your meal plans. It’s an ideal accompaniment to roasted meats, such as a succulent roasted chicken, a tender beef roast, or even a holiday ham. The refreshing creaminess of the salad provides a wonderful counterpoint to richer main courses. For a lighter meal, serve it alongside some crusty artisanal bread or warm dinner rolls – perfect for scooping up every last bit. It also pairs wonderfully with other traditional side dishes, creating a diverse and satisfying spread. Think about serving it alongside some lightly steamed green beans or a simple tomato and cucumber salad for added freshness. For brunch, it can be a fantastic savory option next to scrambled eggs and smoked salmon, adding an unexpected but utterly delightful touch to your morning spread.
Don’t limit this beauty to just grand celebrations either! While it shines brightly during holidays, it’s also fantastic for a weekend lunch, a sophisticated picnic, or even as a special treat for a weeknight dinner. The leftovers, if you’re lucky enough to have any, are just as delicious the next day, making it an excellent meal prep option for busy individuals. Just be sure to store it properly in an airtight container in the refrigerator to maintain its freshness and flavor.
Endless Variations to Suit Your Taste Buds
One of the things I love most about classic recipes is their adaptability, and this Olivier Salad Wreath is no exception. While the traditional version is absolutely perfect, feel free to experiment and make it your own! If you’re not a fan of chicken, you could easily substitute it with cooked turkey, ham, or even a firm white fish. For a vegetarian twist, consider adding some marinated tofu, chickpeas, or an extra helping of your favorite vegetables like sweet bell peppers or blanched asparagus. You can play with the vegetables too – a touch of finely diced celery can add extra crunch, or some sweet corn kernels can introduce a subtle sweetness. For a bolder flavor, you might want to add a pinch of smoked paprika to the dressing or a dash of your favorite hot sauce if you like a little kick.
The garnishes offer another fantastic avenue for creativity. Beyond the traditional dill, parsley, and cranberries, think about using cherry tomatoes cut into halves, thin slices of hard-boiled egg arranged artfully, or even a sprinkle of toasted nuts for added texture. Imagine a beautiful border of thinly sliced cucumbers or radishes around the wreath’s edge! The possibilities are truly endless, allowing you to tailor this incredible dish to your personal preferences and whatever ingredients you have on hand. It’s a wonderful opportunity to let your culinary imagination run wild and create something truly unique.
Your Turn to Create and Share!
Now that you’re armed with all the tips, tricks, and inspiration, it’s your turn to bring this magnificent Olivier Salad Wreath to life in your own kitchen! I wholeheartedly encourage you to roll up your sleeves, gather your ingredients, and embark on this delightful cooking adventure. The satisfaction of creating something so beautiful and utterly delicious is truly unparalleled. Don’t be shy about making it your own – embrace the variations, add your personal flair, and most importantly, have fun with it! Once you’ve wowed yourself and your loved ones with this incredible dish, I would absolutely love to hear about your experience. Please share your successes, your clever variations, and especially your stunning photos with me and our community. What did you love most about it? How did you present your wreath? Did you discover a new favorite ingredient to add? Your stories and pictures inspire us all, and I can’t wait to see the incredible creations that come out of your kitchens. Happy cooking, everyone!
Festive Olivier Salad Wreath: Perfect for Any Celebration!
The Olivier Salad Wreath is a vibrant, savory culinary masterpiece that captures the spirit of celebration. This classic dish, featuring hearty vegetables and a creamy dressing, is transformed into an impressive, edible centerpiece, radiating warmth and welcoming cheer, perfect for holiday tables and special gatherings.
Ingredients
Instructions
Important Information
Nutrition Facts (Per Serving)
It is important to consider this information as approximate and not to use it as definitive health advice.
Allergy Information
Please check ingredients for potential allergens and consult a health professional if in doubt.


Leave a Comment