

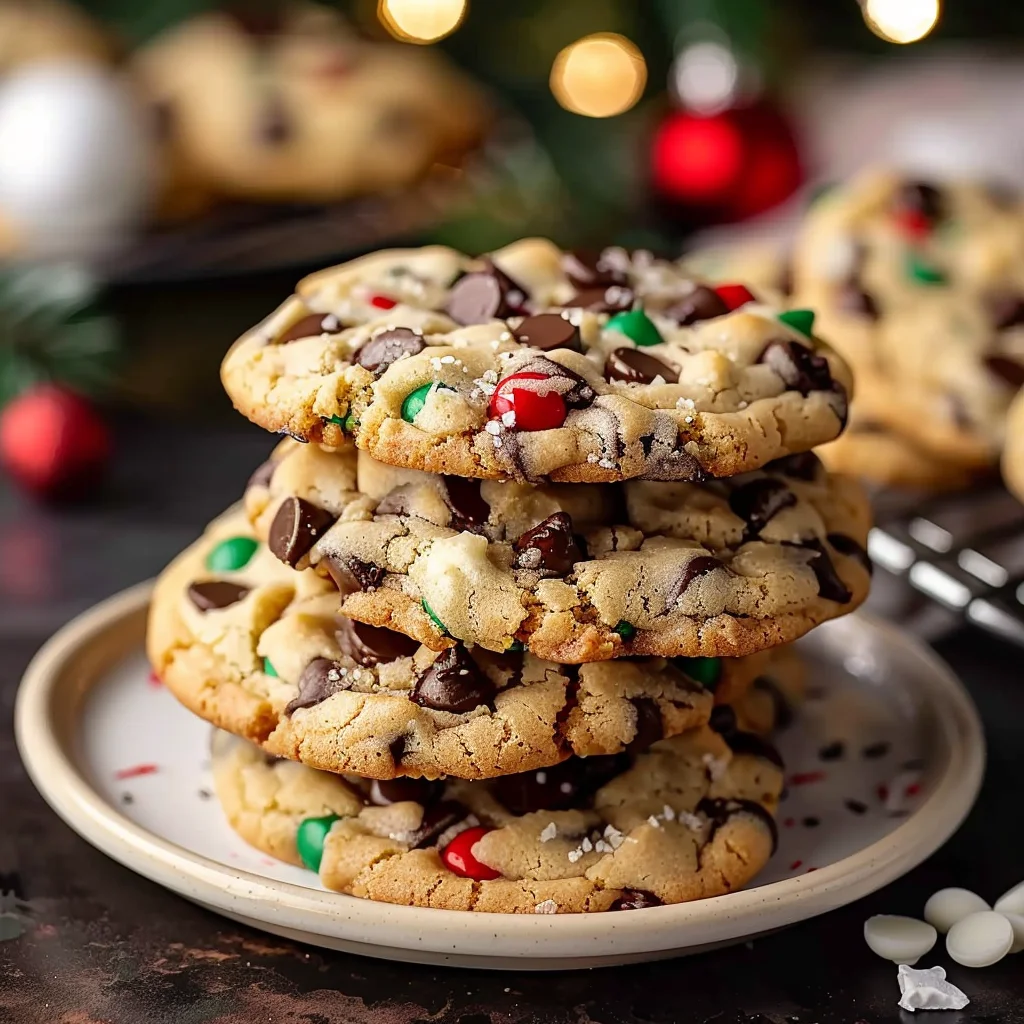
Winter Wonderland Chocolate Chip Cookies are more than just a sweet treat; they are a delightful invitation to embrace the cozy magic of the colder months. Imagine stepping in from the crisp air, greeted by the comforting aroma of freshly baked goods – that’s the feeling these cookies evoke. For generations, chocolate chip cookies have held a special place in our hearts and kitchens, a quintessential American classic that symbolizes home and happiness. This particular rendition elevates that beloved tradition, infusing it with a touch of seasonal sparkle and warmth that is utterly irresistible.
What Makes These Winter Wonderland Chocolate Chip Cookies a Universal Favorite?
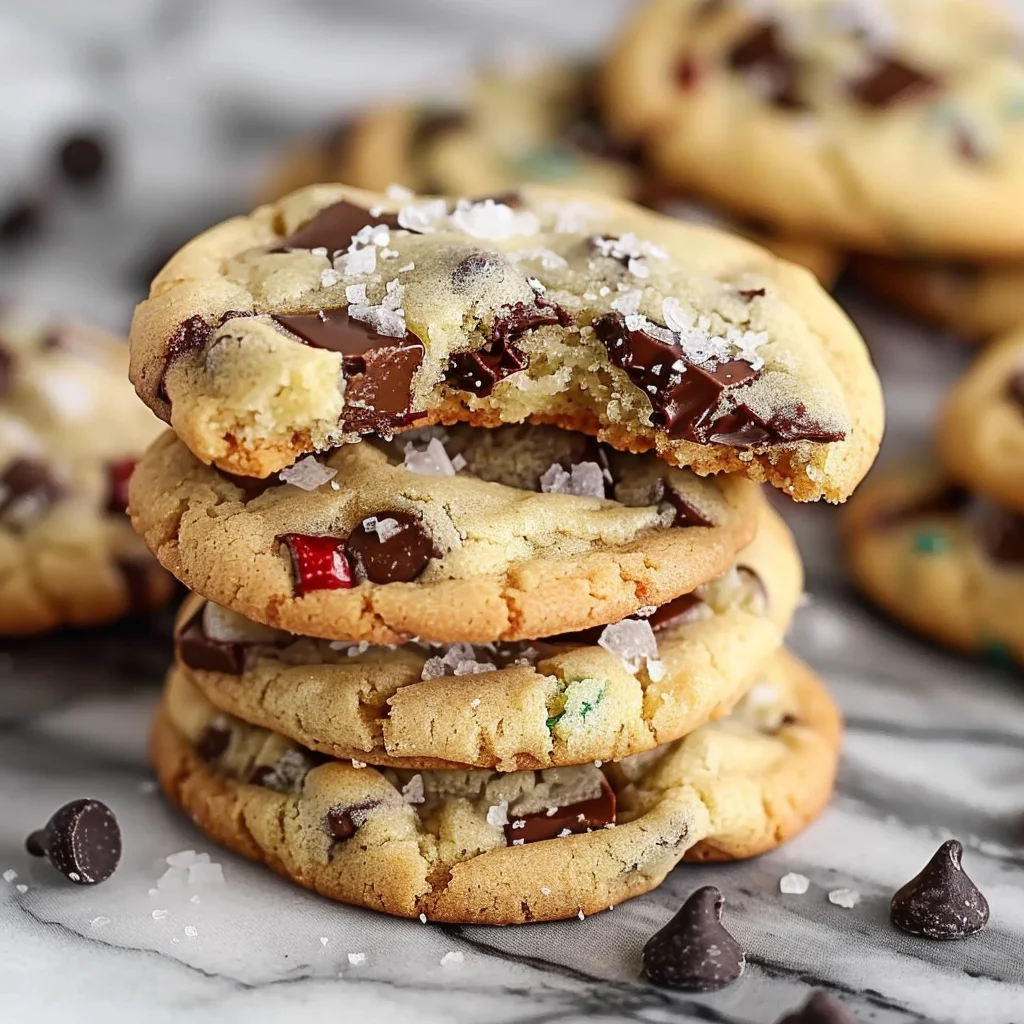
I find that what truly makes these cookies shine, especially during winter, is their perfect balance of textures and flavors. Each bite delivers a chewy, golden-brown edge yielding to a soft, melt-in-your-mouth center, studded generously with rich, velvety chocolate chips. The subtle hint of festive spices, perhaps a whisper of cinnamon or nutmeg, transforms an everyday classic into something truly special – a culinary hug on a plate. They are incredibly versatile, perfect for sharing at holiday gatherings, gifting to loved ones, or simply enjoying with a warm mug of cocoa by a crackling fire. These Winter Wonderland Chocolate Chip Cookies aren’t just a recipe; they are an experience, promising warmth, joy, and a taste of pure winter bliss with every single bite.

Ingredients:
- For the Dry Ingredients:
- 2 ½ cups (300g) all-purpose flour, spooned and leveled
- 1 teaspoon baking soda
- ¾ teaspoon salt (fine sea salt is my preference here, it disperses so beautifully)
- For the Wet Ingredients:
- 1 cup (226g) unsalted butter, softened to room temperature (this is crucial, not melted, not cold)
- ¾ cup (150g) granulated sugar
- 1 cup (220g) packed light brown sugar
- 2 large eggs, at room temperature (again, temperature matters for emulsification)
- 2 teaspoons pure vanilla extract (I love a good quality vanilla for these cookies)
- For the Mix-Ins:
- 1 cup (170g) semi-sweet chocolate chips (good quality makes a difference!)
- ¾ cup (127g) white chocolate chips or chopped white chocolate bar
- ½ cup (85g) festive holiday sprinkles (think silver, white, blue, or iridescent for that true “Winter Wonderland” vibe)
- Optional: ½ teaspoon peppermint extract (for a subtle minty kick, truly makes them Winter Wonderland Chocolate Chip Cookies)
Preparing Your Workspace & Pre-baking Essentials
Before we dive into the delightful process of creating these exquisite Winter Wonderland Chocolate Chip Cookies, it’s always a good idea to set ourselves up for success. Trust me, a well-prepared kitchen makes the baking experience so much more enjoyable and efficient. First things first, let’s preheat our oven. Turn your oven to 375°F (190°C). This gives it ample time to reach and maintain the correct temperature, which is essential for even baking and that perfect golden-brown edge. While the oven is warming up, grab a couple of large baking sheets. I find that lining them with parchment paper or silicone baking mats is a game-changer. It prevents sticking, ensures easy cleanup, and helps the cookies bake uniformly without getting overly browned on the bottom. If you don’t have parchment or silicone mats, you can lightly grease your baking sheets, but be sparing – too much grease can make the cookies spread excessively. Also, take out your unsalted butter and eggs from the refrigerator if you haven’t already. We need them to be at room temperature for the best emulsion and dough consistency. Room temperature butter should yield slightly when pressed but not be greasy or oily, and the eggs should feel neither hot nor cold to the touch. This foundational step is often overlooked, but it truly lays the groundwork for perfect Winter Wonderland Chocolate Chip Cookies.
Crafting the Dry Ingredient Blend
Now, let’s get into the heart of our cookie dough. In a medium-sized bowl, we’re going to whisk together all of our dry ingredients. This step is more important than it might seem at first glance, as it ensures that the leavening agent and salt are evenly distributed throughout the flour. If these aren’t mixed properly, you might end up with unevenly risen cookies or pockets of saltiness, and we definitely don’t want that for our beautiful Winter Wonderland Chocolate Chip Cookies! I start by adding 2 ½ cups of all-purpose flour. When measuring flour, remember to spoon it into your measuring cup and then level it off with a straight edge, like the back of a knife. Never pack your flour into the cup, as this can lead to too much flour and a dense, dry cookie. After the flour, add 1 teaspoon of baking soda. This is our primary leavening agent, responsible for giving our cookies that lovely lift and chewiness. Finally, add ¾ teaspoon of fine sea salt. I prefer sea salt because its crystals are finer and dissolve more readily, ensuring a consistent saltiness throughout the dough that perfectly balances the sweetness. Once all three dry ingredients are in the bowl, grab a whisk and gently but thoroughly combine them. Whisk for about 30 seconds to a minute, making sure there are no visible clumps of baking soda or salt. Set this bowl aside for now; we’ll be adding it to our wet ingredients a little later.
Whipping Up the Wet Foundation
This is where the magic really starts to happen, creating the rich, creamy base for our Winter Wonderland Chocolate Chip Cookies. In a large mixing bowl, preferably one that fits comfortably on a stand mixer, or using a hand mixer, combine your softened unsalted butter, granulated sugar, and light brown sugar. For the butter, remember it should be soft enough to leave an indentation when pressed, but not melted. If it’s too warm, your cookies might spread too much. Begin creaming these ingredients together on medium speed. You want to beat them for a good 2-3 minutes, perhaps even a bit longer, until the mixture becomes wonderfully light, fluffy, and noticeably paler in color. This process, known as creaming, incorporates air into the butter and sugar, which contributes to the cookies’ texture and rise. Scrape down the sides of the bowl frequently with a spatula to ensure everything is evenly combined. Next, we’ll add our eggs, one at a time. Add the first large, room-temperature egg, beating well after each addition until it’s fully incorporated before adding the next. This allows the egg to emulsify properly with the butter and sugar, creating a smoother, more cohesive mixture. Once both eggs are in and beaten, pour in your 2 teaspoons of pure vanilla extract. If you’re opting for the subtle minty hint, this is also the moment to add your optional ½ teaspoon of peppermint extract. Beat for another 30 seconds until everything is beautifully combined and fragrant. The aroma alone at this stage is absolutely intoxicating, a promise of the deliciousness to come.
Uniting Wet and Dry for the Perfect Dough
Now that we have our perfectly whisked dry ingredients and our wonderfully creamed wet foundation, it’s time to bring them together to form our cookie dough. This step requires a gentle touch and careful attention to avoid overmixing, which can lead to tough cookies – something we definitely want to avoid for our tender Winter Wonderland Chocolate Chip Cookies. With your mixer on the lowest speed, or by hand with a sturdy spatula, gradually add the dry ingredient mixture to the wet ingredients. I usually add about a third of the dry mixture at a time, letting it just combine before adding the next portion. Mix only until the flour streaks have almost disappeared. You don’t want to overwork the gluten in the flour; doing so can develop too much elasticity, resulting in a less tender cookie. As soon as you see no more significant dry pockets of flour, stop mixing. It’s perfectly fine, even desirable, to have a few faint streaks of flour remaining at this point. We will finish incorporating them when we add our delightful mix-ins, ensuring the dough remains tender. This minimal mixing is a key secret to a soft and chewy cookie. Use your spatula to give the bowl one last good scrape, making sure any hidden dry spots from the bottom or sides of the bowl are folded into the dough. The dough will be thick and somewhat sticky, but very workable.
The Chocolatey & Festive Mix-Ins
Here’s where our Winter Wonderland Chocolate Chip Cookies truly come alive with their festive flair and irresistible flavor. This is the fun part where we load our perfectly prepared dough with all the goodies! Gently fold in 1 cup of semi-sweet chocolate chips. These classic chips provide that comforting, rich chocolate flavor that everyone adores. Next, add ¾ cup of white chocolate chips or, if you prefer, finely chopped white chocolate bar. The white chocolate adds a beautiful creamy contrast and a lovely color pop that screams “winter.” Finally, for that true “Winter Wonderland” effect, fold in ½ cup of your chosen festive holiday sprinkles. I love using a mix of silver, white, iridescent, and perhaps some light blue sprinkles to really capture the icy, magical aesthetic. Be careful not to overmix the sprinkles, especially if they are delicate, as their colors can sometimes bleed into the dough if agitated too much. Use a sturdy spatula to gently fold all these delightful additions into the dough until they are evenly distributed. Take your time, making sure every scoop of dough will have a generous amount of chocolate and sprinkles. The dough should look absolutely gorgeous and inviting at this point, promising a mouthful of flavor and texture in every bite. This careful folding ensures that the sprinkles and chocolate don’t get crushed or unevenly distributed, maintaining the visual appeal and deliciousness of our special cookies.
Chilling for Optimal Flavor and Texture
This step, while requiring a bit of patience, is absolutely crucial for achieving the best possible flavor and texture in your Winter Wonderland Chocolate Chip Cookies. Do not skip it! Cover the bowl containing your beautifully mixed dough tightly with plastic wrap. Place it in the refrigerator to chill for at least 2 hours, or ideally, overnight (8-12 hours). What does chilling the dough do? It allows the butter to re-solidify, preventing the cookies from spreading too much in the oven, giving them a thicker, chewier texture. More importantly, it gives the flour time to fully hydrate, which leads to a more tender crumb. And perhaps most delightfully, chilling allows the flavors to meld and deepen. The sugars and extracts have more time to fully infuse throughout the dough, resulting in a more complex and satisfying flavor profile. If you can manage it, an overnight chill truly transforms these cookies into something extraordinary. When you’re ready to bake, remove the dough from the refrigerator about 15-20 minutes before you plan to scoop it. This allows it to soften slightly, making it easier to work with, but still cold enough to maintain its structure during baking. This patient wait will be incredibly rewarding, yielding cookies that are far superior to those baked immediately.
Baking Your Winter Wonderland Chocolate Chip Cookies
It’s finally time for the grand finale – baking our spectacular Winter Wonderland Chocolate Chip Cookies! Make sure your oven has been preheated to 375°F (190°C) for a good while and is consistently at that temperature. Take your slightly softened, chilled dough and a cookie scoop (I prefer a 1.5-2 tablespoon scoop for uniformly sized cookies). Scoop generous mounds of dough and place them about 2 inches apart on your prepared baking sheets. Don’t crowd the pan; this allows for even air circulation and prevents the cookies from baking into each other. Typically, I can fit about 12 cookies per standard baking sheet. If you want a slightly more rustic look, you can gently tear some dough pieces for varying shapes, but scooping ensures consistency. Once your sheets are filled, place one baking sheet at a time into the preheated oven. Bake for 10-12 minutes, or until the edges are beautifully golden brown and set, but the centers still look slightly soft and underbaked. This is the secret to a chewy center! Keep a close eye on them during the last few minutes, as oven temperatures can vary, and cookies can go from perfectly baked to overdone very quickly. The white chocolate and sprinkles might make them look a bit different from traditional chocolate chip cookies, so focus on the edges for doneness. If you are baking multiple batches, let your baking sheets cool slightly between batches, or use multiple cool sheets, as placing dough on a hot sheet can cause excessive spreading. Once out of the oven, the smell will be absolutely divine, a true highlight of the baking experience!
Cooling and Finishing Touches
The journey isn’t quite over yet; proper cooling is just as important as proper baking to achieve that perfect cookie texture. Once you pull those gorgeous Winter Wonderland Chocolate Chip Cookies from the oven, they will be very soft and fragile. Resist the urge to move them immediately! Allow them to cool on the baking sheet for about 5-7 minutes. During this time, the residual heat from the baking sheet will continue to cook them slightly, allowing the centers to set up beautifully while maintaining that desirable chewiness. The chocolate will also firm up just enough, preventing a melty mess when you transfer them. After this initial cooling period on the baking sheet, carefully transfer the cookies to a wire cooling rack to cool completely. Using a wide, thin spatula can help prevent breakage. Cooling on a wire rack ensures air circulation all around the cookie, preventing the bottoms from becoming soggy and helping them achieve that ideal texture – crisp edges and a soft, chewy interior. Once fully cooled, if you’re feeling extra festive and want to enhance their “Winter Wonderland” appearance, you could very lightly dust them with a sprinkle of powdered sugar, resembling freshly fallen snow. This adds an extra layer of magic and makes them truly irresistible. You’ve done it! You’ve created a batch of cookies that are not just delicious but also a feast for the eyes, perfect for sharing during the colder months.
Tips for Success & Storage
To ensure your Winter Wonderland Chocolate Chip Cookies are consistently perfect every time, I’ve gathered a few extra tips and tricks I’ve learned over the years. First, when it comes to ingredients, quality truly matters. Using good quality butter, pure vanilla extract, and your favorite brand of chocolate chips will elevate the flavor significantly. Second, measuring accurately, especially flour, is paramount. Too much flour makes dry, crumbly cookies, while too little can lead to excessive spreading. Always spoon and level your flour, never scoop directly from the bag. Third, room temperature ingredients for the wet mixture are non-negotiable for a smooth emulsion and consistent dough. If your eggs are cold, you can warm them quickly by placing them in a bowl of warm (not hot!) water for 5-10 minutes. For butter, you can cut it into smaller pieces to help it soften faster, but avoid microwaving it, as even a few seconds too long can melt it. Fourth, don’t skimp on the chilling time. It’s the secret to deep flavor and that wonderfully thick, chewy texture. If you’re short on time, even 30 minutes in the freezer can help, but it’s no substitute for a good fridge chill. Lastly, know your oven. Ovens can have hot spots, so rotating your baking sheet halfway through baking can help ensure even browning.
When it comes to storage, these delightful Winter Wonderland Chocolate Chip Cookies are best enjoyed fresh, within 2-3 days of baking. Store them in an airtight container at room temperature. To keep them extra soft, you can even add half a slice of bread to the container; the cookies will absorb moisture from the bread, keeping them moist (just remember to replace the bread every couple of days). If you want to plan ahead, the cookie dough itself freezes beautifully. Simply scoop the dough into balls, place them on a parchment-lined baking sheet, and freeze until solid. Once frozen, transfer the dough balls to a freezer-safe bag or container. They can be stored in the freezer for up to 3 months. When you’re ready for a fresh batch, simply place the frozen dough balls on a baking sheet and bake them directly from frozen, adding an extra 2-4 minutes to the baking time. This way, you can enjoy warm, fresh-baked Winter Wonderland Chocolate Chip Cookies whenever the craving strikes, making them perfect for unexpected guests or a cozy night in. Enjoy the magic!
Conclusion:
And there you have it, my friends! We’ve journeyed through the magic of creating something truly special, a treat that transcends the ordinary and brings a genuine smile to every face it graces. If you’ve followed along, you’re now equipped to bake a batch of cookies that aren’t just delicious, but also tell a story, evoke warmth, and sprinkle a little joy into your everyday. This isn’t just another cookie recipe; it’s an experience, a delightful escape, and a guaranteed crowd-pleaser that I simply cannot stop raving about. I poured my heart into perfecting every step, every ingredient ratio, to ensure you achieve nothing short of cookie perfection, a bake that will impress everyone fortunate enough to taste it.
What makes these particular chocolate chip cookies an absolute must-try? It’s more than just the perfect balance of crisp edges and a gloriously chewy center, though we’ve certainly mastered that. It’s the subtle hints of seasonal spices that dance on your palate, the way the rich chocolate melts just so, creating pockets of pure bliss, and the unexpected whisper of something truly festive that sets them apart. These aren’t just any cookies; they are the quintessential Winter Wonderland Chocolate Chip Cookies. I promise you, from the moment you take that first bite, you’ll understand. The carefully selected ingredients and the method we’ve perfected ensure a depth of flavor that many recipes simply overlook. We’re talking about a cookie that delivers a comforting hug with every morsel, a cookie designed to chase away the chill and fill your home with an aroma that is nothing short of heavenly. Imagine the cozy evenings, the delighted gasps, the requests for “just one more.” This recipe is your secret weapon for creating those unforgettable moments, whether it’s for a festive gathering, a quiet evening by the fire, or simply a well-deserved treat after a long day.
Beyond Just a Cookie, It’s an Emotion
This recipe is about crafting a memory, a warm beacon in the chill of the season. It’s about indulging in a moment of pure, unadulterated pleasure, made all the more special because you created it with your own hands. The texture, the taste, the way they practically melt in your mouth – it all comes together to form a symphony of sensations that elevates the humble chocolate chip cookie to an art form. You won’t find a more comforting, more delightful, or more perfectly balanced cookie to brighten your days. They possess a unique charm that resonates deeply, making them a staple in my kitchen and, I hope, soon in yours too. Each bite is a testament to the simple joy of baking and the profound satisfaction of sharing something truly special.
Now, let’s talk about how to truly savor these delectable creations and how you might personalize them even further. While they are utterly divine straight from the cooling rack, still slightly warm with gooey chocolate, their versatility knows no bounds. Imagine serving them alongside a steaming mug of homemade hot cocoa, perhaps with a dollop of whipped cream and a sprinkle of cinnamon. It’s a match made in heaven that amplifies the cozy factor tenfold! For an extra special dessert, try crumbling a few over a scoop of high-quality vanilla bean ice cream, allowing the warmth of the cookie to slightly soften the ice cream – pure decadence! They also make a fantastic accompaniment to your morning coffee or afternoon tea, turning a simple break into a luxurious ritual. Consider packing a few in a lunchbox for a delightful midday surprise, or gifting a beautifully arranged plate to a neighbor or friend – nothing says “I care” quite like homemade cookies. If you’re feeling adventurous, consider a few delightful variations to truly make them your own. You could experiment with adding a pinch of orange zest to the dough for a bright, citrusy counterpoint to the rich chocolate, or perhaps a sprinkle of flaky sea salt on top before baking to enhance the chocolate’s intensity. For a touch of nutty warmth, a handful of finely chopped pecans or walnuts could be folded into the dough. And for those who love a bit of sparkle, a light dusting of edible glitter or shimmering sugar before serving can truly embody that “Winter Wonderland” theme, turning each cookie into a tiny, edible masterpiece. The possibilities are endless, and each tweak promises a new dimension of flavor to explore. Don’t be afraid to let your culinary creativity shine; these cookies are a wonderful canvas for your imagination!
So, what are you waiting for? I sincerely hope you feel inspired to gather your ingredients, preheat your oven, and embark on this wonderful baking adventure. Trust me when I say, the reward is well worth the effort. There’s a profound satisfaction that comes from pulling a tray of perfectly baked cookies from the oven, especially when they smell this incredible and taste even better. Once you’ve made them, I would absolutely love to hear about your experience! Did you stick to the recipe, or did you try one of the variations? What was your favorite part of the baking process, or perhaps, your favorite moment enjoying them? Please, share your stories, your triumphs, and even your questions in the comments below. Your feedback and personal touches are what make our baking community so vibrant and inspiring. Let’s spread the joy of these exceptional cookies far and wide, making every kitchen a little bit cozier and every snack time a little more magical! Happy baking, everyone, and I can’t wait to hear all about your cookie adventures!
Winter Wonderland Chocolate Chip Cookies
These Winter Wonderland Chocolate Chip Cookies are a delightful invitation to embrace the cozy magic of the colder months. Each bite delivers a chewy, golden-brown edge yielding to a soft, melt-in-your-mouth center, studded with rich chocolate chips and festive peppermint, promising warmth and joy.
Ingredients
-
1 cup unsalted butter, softened
-
3/4 cup granulated sugar
-
3/4 cup brown sugar, packed
-
2 large eggs
-
1 teaspoon vanilla extract
-
2 1/4 cups all-purpose flour
-
1 teaspoon baking soda
-
1/2 teaspoon salt
-
2 cups semi-sweet chocolate chips
-
1/2 cup white chocolate chips
-
1/2 cup crushed peppermint candies
Instructions
-
Step 1
Preheat oven to 375°F (190°C). Line baking sheets with parchment paper. Ensure butter and eggs are at room temperature. -
Step 2
In a medium bowl, whisk together the 2 1/4 cups all-purpose flour, 1 teaspoon baking soda, and 1/2 teaspoon salt. Set aside. -
Step 3
In a large mixing bowl, cream the 1 cup softened unsalted butter, 3/4 cup granulated sugar, and 3/4 cup packed brown sugar until light and fluffy (2-3 minutes). Beat in the 2 large eggs one at a time, then stir in the 1 teaspoon vanilla extract. -
Step 4
Gradually add the dry ingredient mixture to the wet ingredients, mixing on low speed until just combined. Do not overmix; stop when a few flour streaks remain. -
Step 5
Gently fold in the 2 cups semi-sweet chocolate chips, 1/2 cup white chocolate chips, and 1/2 cup crushed peppermint candies until evenly distributed. -
Step 6
Cover the dough tightly with plastic wrap and refrigerate for at least 2 hours, or ideally overnight (8-12 hours). Remove from fridge 15-20 minutes before scooping. -
Step 7
Scoop 1.5-2 tablespoon mounds of dough onto prepared baking sheets, 2 inches apart. Bake for 10-12 minutes at 375°F (190°C), or until edges are golden brown and centers are slightly soft. -
Step 8
Allow cookies to cool on the baking sheet for 5-7 minutes before carefully transferring them to a wire rack to cool completely. Optionally, dust with powdered sugar for a ‘snowy’ effect.
Important Information
Nutrition Facts (Per Serving)
It is important to consider this information as approximate and not to use it as definitive health advice.
Allergy Information
Please check ingredients for potential allergens and consult a health professional if in doubt.


Leave a Comment