

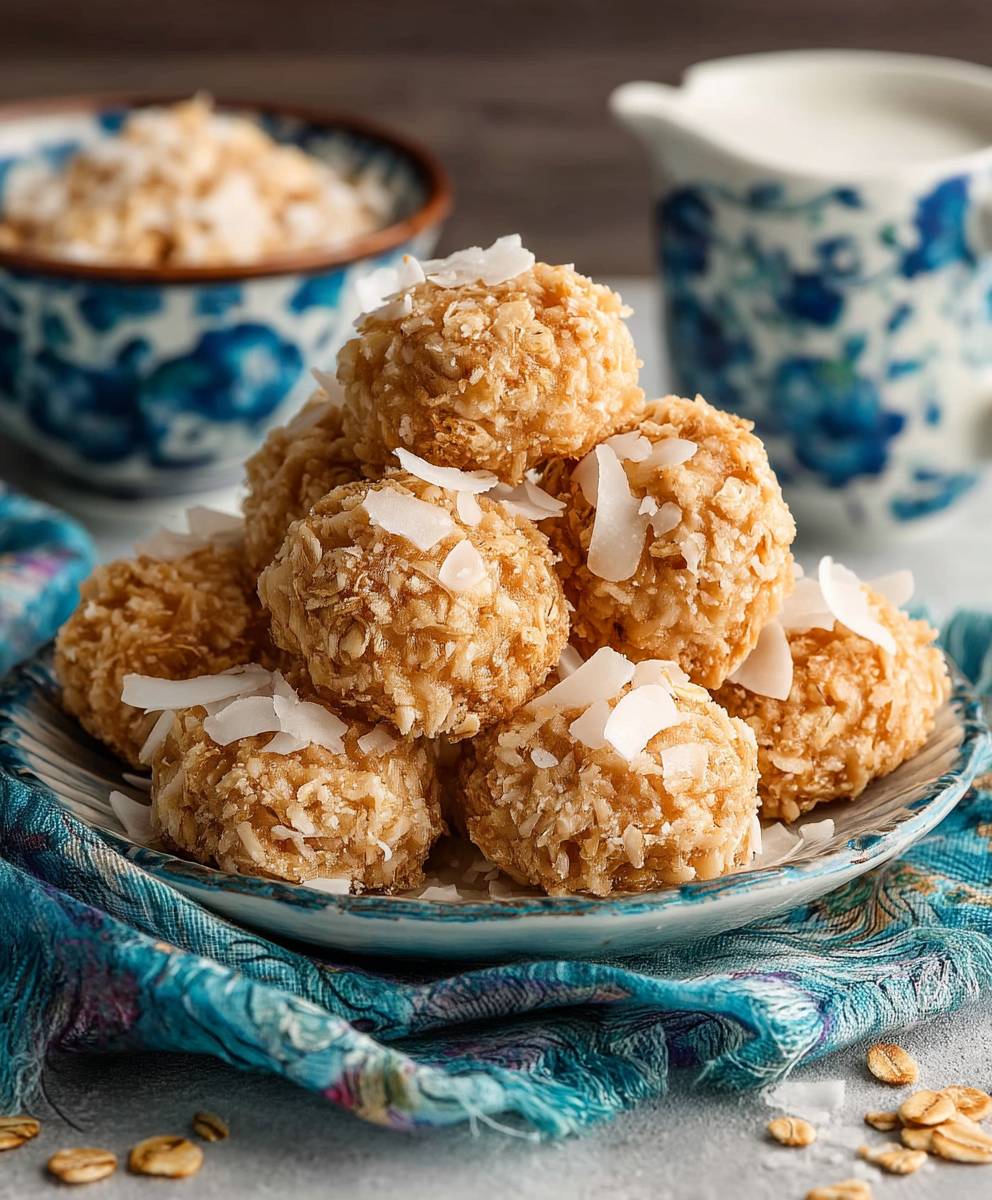
Fiddle Diddles no bake cookies! Just the name alone conjures up images of childhood joy and sweet, chocolatey goodness, doesn’t it? Forget slaving over a hot oven; these delightful treats are ready in minutes, making them the perfect solution for those sudden sweet cravings or a last-minute dessert for a gathering.
While the exact origins of Fiddle Diddles no bake cookies are shrouded in a bit of mystery, their popularity exploded in the mid-20th century, likely born from a desire for quick and easy desserts during a time when convenience was becoming increasingly valued. These cookies represent a simpler time, a nostalgic nod to homemade goodness without the fuss.
What makes these cookies so irresistible? It’s the perfect combination of textures and flavors. The creamy, rich chocolate and peanut butter base is perfectly complemented by the satisfying crunch of the oats. They’re sweet, salty, and oh-so-addictive! Plus, the no-bake aspect makes them incredibly convenient, even for novice bakers. Who can resist a recipe that requires minimal effort and delivers maximum flavor? I know I can’t!

Ingredients:
- 1 cup granulated sugar
- ½ cup (1 stick) unsalted butter, cut into pieces
- ¼ cup milk
- 3 tablespoons unsweetened cocoa powder
- ½ teaspoon salt
- 3 cups quick-cooking oats (not instant)
- ½ cup peanut butter (creamy or chunky, your preference!)
- 1 teaspoon vanilla extract
- Optional: ½ cup chopped walnuts or pecans for extra crunch
Preparing the Chocolate-Peanut Butter Base
Okay, let’s get started! The first part is all about creating that rich, chocolatey base that makes these cookies so addictive. Don’t worry, it’s super simple.
- Combine Sugar, Butter, Milk, Cocoa, and Salt: In a medium saucepan, combine the granulated sugar, butter, milk, cocoa powder, and salt. Make sure you use a saucepan that’s big enough to hold all the ingredients comfortably, as the mixture will bubble up a bit later.
- Melt and Boil: Place the saucepan over medium heat. Stir constantly with a wooden spoon or heat-resistant spatula until the butter is completely melted and the sugar is dissolved. This is important to prevent a grainy texture in your final cookies. Once everything is melted, bring the mixture to a rolling boil. A rolling boil means the mixture is bubbling vigorously all over the surface, not just around the edges.
- Boil for Exactly 1 Minute: Once the mixture reaches a rolling boil, set a timer for exactly one minute. Continue stirring constantly during this minute. This step is crucial for achieving the right consistency. Boiling for too long will make the cookies dry and crumbly, while not boiling long enough will make them too soft.
- Remove from Heat: After the minute is up, immediately remove the saucepan from the heat. Don’t leave it on the burner, even if it’s turned off, as the residual heat can continue to cook the mixture.
Adding the Oats, Peanut Butter, and Vanilla
Now for the good stuff! This is where we add the ingredients that give these cookies their signature flavor and texture.
- Stir in Oats: Add the quick-cooking oats to the saucepan. Stir well to ensure that all the oats are evenly coated with the chocolate mixture. You want every oat to be covered in that deliciousness!
- Add Peanut Butter and Vanilla: Add the peanut butter and vanilla extract to the saucepan. Stir until the peanut butter is completely melted and everything is thoroughly combined. The mixture should be smooth and creamy. If you’re using chunky peanut butter, the chunks will add a nice texture to the cookies.
- Optional: Add Nuts: If you’re using chopped walnuts or pecans, add them to the saucepan now. Stir to distribute them evenly throughout the mixture.
Forming the Cookies
This is the fun part! Get ready to make some cookies!
- Drop by Spoonfuls: Drop spoonfuls of the mixture onto a wax paper-lined baking sheet. I like to use a cookie scoop to ensure that all the cookies are the same size, but you can also use a regular spoon. Aim for about 1-2 tablespoons of mixture per cookie.
- Shape (Optional): If you want your cookies to be perfectly round, you can gently shape them with your fingers or the back of a spoon. However, I usually just leave them as they are for a more rustic look.
Setting and Storing the Cookies
Almost there! Now we just need to let the cookies set up.
- Let Set: Let the cookies set at room temperature for at least 30 minutes, or until they are firm to the touch. You can speed up the process by placing the baking sheet in the refrigerator for about 15-20 minutes.
- Store: Once the cookies are set, store them in an airtight container at room temperature. They will keep for several days, but they’re usually gone long before that!
Tips and Tricks for Perfect Fiddle Diddles
Here are a few extra tips to help you make the best Fiddle Diddles ever:
- Use Quick-Cooking Oats: Don’t use instant oats or old-fashioned oats. Quick-cooking oats are the perfect texture for these cookies.
- Don’t Overcook the Mixture: Boiling the mixture for exactly one minute is crucial. Overcooking will result in dry, crumbly cookies.
- Adjust Peanut Butter to Taste: If you prefer a stronger peanut butter flavor, you can add a little more peanut butter.
- Add a Pinch of Espresso Powder: For a deeper, richer chocolate flavor, add a pinch of espresso powder to the saucepan along with the cocoa powder.
- Experiment with Toppings: Get creative with toppings! You can sprinkle the cookies with sea salt, shredded coconut, or chocolate sprinkles before they set.
- Make Them Gluten-Free: Use certified gluten-free quick-cooking oats to make these cookies gluten-free.
- Prevent Sticking: Make sure to use wax paper or parchment paper to line your baking sheet. This will prevent the cookies from sticking and make them easy to remove.
Troubleshooting
Sometimes things don’t go exactly as planned. Here are some common problems and how to fix them:
- Cookies are Too Soft: If your cookies are too soft, it could be because you didn’t boil the mixture for long enough. Next time, make sure to boil it for exactly one minute. You can also try refrigerating the cookies for a longer period of time.
- Cookies are Too Dry: If your cookies are too dry, it could be because you boiled the mixture for too long. Next time, be careful not to overcook it. You can also try adding a little more milk to the mixture.
- Cookies are Grainy: If your cookies are grainy, it could be because the sugar wasn’t completely dissolved. Make sure to stir the mixture constantly until the sugar is dissolved before bringing it to a boil.
- Cookies are Sticking to the Baking Sheet: Make sure you’re using wax paper or parchment paper to line your baking sheet. If the cookies are still sticking, you can try greasing the paper with a little butter or cooking spray.
Enjoy your Fiddle Diddles! They’re the perfect treat for any occasion.
Conclusion:
And there you have it! These Fiddle Diddles no bake cookies are truly a must-try recipe for anyone craving a sweet treat without the fuss of baking. I know, I know, there are a million no-bake cookie recipes out there, but trust me, the unique combination of textures and flavors in these little gems sets them apart. The creamy peanut butter, the crunchy oats, the chewy coconut, and the satisfying snap of the chocolate – it’s a symphony of deliciousness in every bite!
But why are they *really* a must-try? Because they’re ridiculously easy! Seriously, if you can melt butter and stir ingredients together, you can make these. No oven required, which makes them perfect for hot summer days or when you just don’t feel like dealing with preheating and timers. Plus, they’re incredibly customizable.
Serving Suggestions and Variations:
Think of this recipe as a starting point for your own no-bake cookie adventures! Want to add a little extra something? Here are a few ideas:
* Nutty Delight: Swap out some of the oats for chopped walnuts, pecans, or almonds for an even nuttier flavor.
* Chocolate Overload: Use dark chocolate instead of semi-sweet for a richer, more intense chocolate experience. Or, drizzle melted white chocolate over the finished cookies for a beautiful and decadent touch.
* Spice It Up: Add a pinch of cinnamon or nutmeg to the mixture for a warm, comforting flavor.
* Fruity Fun: Stir in some dried cranberries, raisins, or chopped dates for a chewy and fruity twist.
* Espresso Kick: Add a teaspoon of instant espresso powder to the chocolate mixture for a mocha-flavored cookie.
* Kid-Friendly: Use colorful sprinkles or mini marshmallows to make them extra appealing to little ones.
* Vegan Option: Substitute the butter with coconut oil and use dairy-free chocolate chips to make these cookies vegan-friendly.
These Fiddle Diddles no bake cookies are fantastic on their own, of course. But they’re also wonderful served with a cold glass of milk, a scoop of vanilla ice cream, or even crumbled over yogurt for a quick and easy dessert. They’re perfect for potlucks, bake sales, or just a simple weeknight treat. I often make a batch on Sunday evening to have something sweet on hand throughout the week. They store beautifully in an airtight container at room temperature for several days (if they last that long!).
I truly believe that this recipe will become a staple in your kitchen. It’s a crowd-pleaser, it’s easy to make, and it’s incredibly satisfying. So, what are you waiting for? Gather your ingredients, put on some music, and get ready to whip up a batch of these irresistible Fiddle Diddles no bake cookies.
I’m so excited for you to try this recipe! Once you do, please come back and share your experience in the comments below. Let me know what variations you tried, what your family thought, and any tips or tricks you discovered along the way. I love hearing from you and learning how you make this recipe your own. Happy cooking (or rather, no-baking)! I can’t wait to hear all about your Fiddle Diddles no bake cookies success!
Fiddle Diddles No Bake Cookies: The Ultimate Easy Recipe
Classic no-bake chocolate peanut butter oat cookies that are quick, easy, and irresistibly delicious.
Ingredients
Instructions
Recipe Notes
- Use quick-cooking oats, not instant or old-fashioned.
- Boil the chocolate mixture for exactly one minute to achieve the right consistency. Overcooking will result in dry cookies.
- Adjust the amount of peanut butter to your taste.
- For a deeper chocolate flavor, add a pinch of espresso powder.
- Experiment with toppings like sea salt, shredded coconut, or chocolate sprinkles.
- Use certified gluten-free oats to make these cookies gluten-free.
- Line your baking sheet with wax paper or parchment paper to prevent sticking.
- If cookies are too soft, boil the mixture for the full minute next time or refrigerate longer.
- If cookies are too dry, be careful not to overcook the mixture.
- If cookies are grainy, ensure the sugar is completely dissolved before boiling.


Leave a Comment