

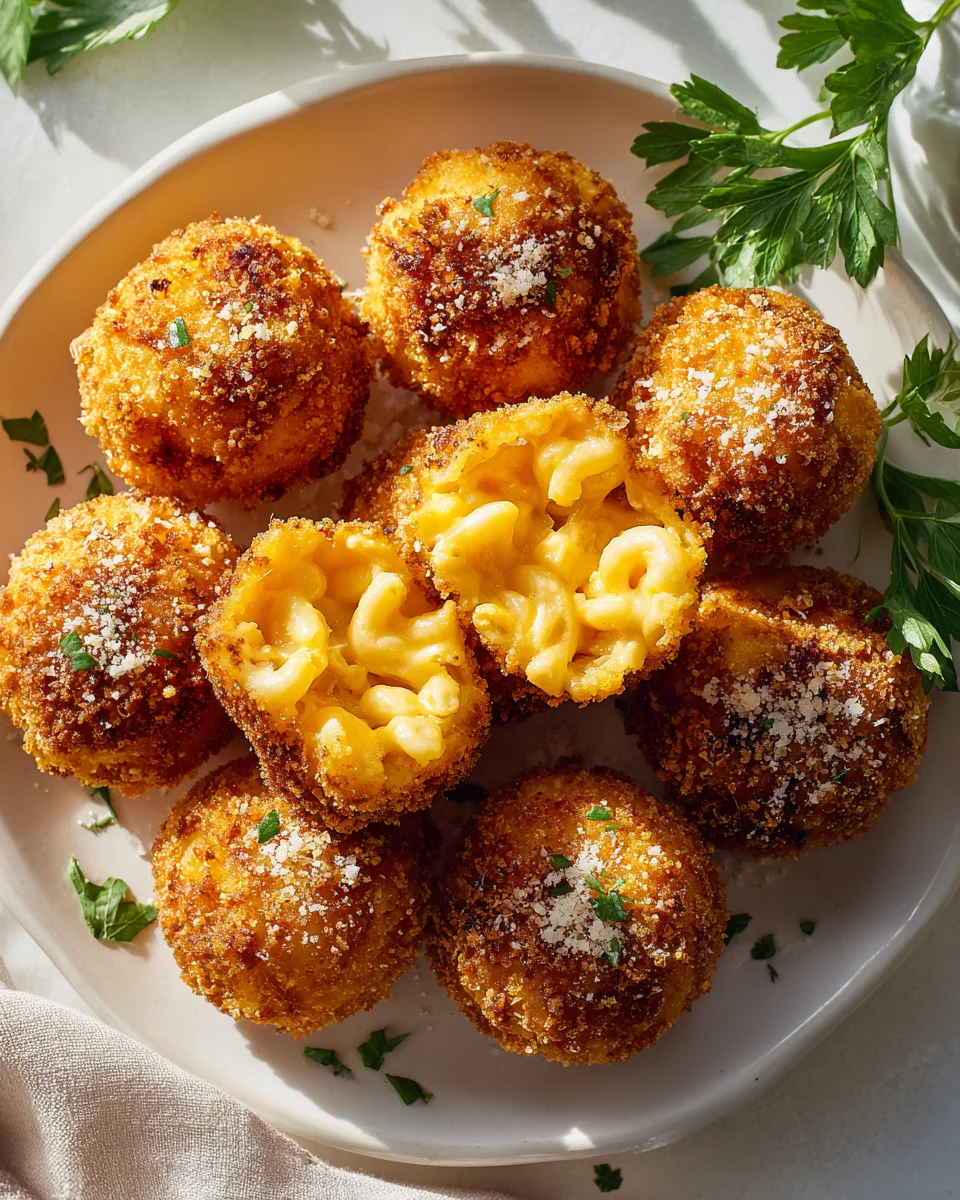
Fried Mac And Cheese Bites
Oh, prepare yourselves, because you’re about to dive into a recipe that takes one of the most beloved comfort foods and elevates it to an absolutely irresistible, shareable (or not!) snack. We’re talking about Fried Mac And Cheese Bites, and let me tell you, these little nuggets of pure joy are an absolute game-changer!
What makes these so special? Well, imagine the ultimate creamy, cheesy goodness of your favorite mac and cheese, perfectly chilled and then transformed into adorable, bite-sized morsels. Now, picture those morsels coated in a crispy, golden-brown shell, fried to perfection. The contrast between that satisfying crunch on the outside and the warm, gooey, cheesy interior is pure magic. It’s familiar, yet excitingly new!
You are going to absolutely adore these for so many reasons. They’re the ultimate party appetizer, a crowd-pleaser for game day, or just a wonderfully indulgent treat for yourself on a cozy night in. They’re super fun to make and even more fun to eat. Plus, they’re a fantastic way to give leftover mac and cheese a glorious second life. We’ll be taking that delicious, pre-made mac and cheese, forming it into perfect little bites, giving it a quick breading, and then frying it until golden and utterly delicious. Get ready for a new obsession!

Ingredient Notes
Creating perfect Fried Mac And Cheese Bites starts with selecting the right components for a robust and flavorful mac and cheese base that can withstand frying. It’s not just about taste; it’s about texture and stability!
The Macaroni
- Elbow Macaroni: This is the classic choice for a reason. Its small, curved shape holds the cheese sauce beautifully and is easy to form into bites. You’ll want to cook it al dente, meaning still slightly firm to the bite, as it will continue to cook a tiny bit when mixed with the hot sauce and certainly when fried. Overcooked pasta will lead to mushy bites.
- Substitutions: Other small pasta shapes like ditalini, small shells, or even orecchiette can work, but avoid anything too large or delicate.
The Cheese Blend
The cheese is the star! For Fried Mac And Cheese Bites, you need a blend that melts smoothly, provides rich flavor, and, crucially, firms up well when chilled. This ensures your bites hold their shape.
- Sharp Cheddar: Essential for that classic mac and cheese tang and a beautiful golden color. I always recommend grating your own cheddar from a block – pre-shredded cheeses often contain anti-caking agents that can make your sauce gritty and prevent smooth melting.
- Monterey Jack: This cheese adds incredible creaminess and melts wonderfully, helping to bind the mac and cheese together. It’s milder than cheddar, balancing the flavors.
- Smoked Gouda or Gruyere: For a more gourmet twist and deeper flavor, I sometimes add a bit of smoked gouda or Gruyere. These cheeses offer a nutty complexity that elevates the dish, and they also firm up well.
- Substitutions: Feel free to experiment! Colby Jack, Fontina, or even a good quality mozzarella (in combination with other flavorful cheeses) can work. Avoid extremely soft or watery cheeses.
The Sauce Base
A good roux is the foundation of a creamy, stable cheese sauce.
- Unsalted Butter & All-Purpose Flour: These two create the roux, which thickens the milk. Unsalted butter allows you to control the seasoning precisely.
- Whole Milk or Half-and-Half: Whole milk provides a rich, creamy texture. Half-and-half will make an even richer sauce. Avoid skim milk, as it won’t give you the desired luxurious consistency.
- Seasonings: Salt, freshly ground black pepper, a pinch of nutmeg (enhances cheese flavor beautifully!), and a dash of mustard powder (or a teaspoon of Dijon mustard) are my go-to’s. The mustard doesn’t make it taste like mustard; it brightens the cheese flavor.
The Breading
This is what gives our bites their irresistible crunch!
- All-Purpose Flour: For the first dredge, it helps the egg wash adhere.
- Eggs: Beaten eggs form the wet layer that glues the breadcrumbs to the mac and cheese.
- Panko Breadcrumbs: These are non-negotiable for me! Panko breadcrumbs are Japanese-style breadcrumbs that are coarser and flakier than regular breadcrumbs. They absorb less oil and provide an incredibly light and crispy crust that truly makes these bites shine.
- Substitutions: While regular breadcrumbs can be used, your bites won’t be as crispy. For a gluten-free option, use gluten-free all-purpose flour and gluten-free panko breadcrumbs.
Frying Oil
- Vegetable Oil, Canola Oil, or Peanut Oil: You’ll need an oil with a high smoke point for deep frying. These options are neutral in flavor and perfect for achieving a golden, crispy exterior.
Step-by-Step Instructions
Get ready to turn your humble mac and cheese into an extraordinary fried treat! This process requires a bit of patience, especially with chilling, but trust me, it’s worth every moment.
Step 1: Cook the Macaroni
- First things first, cook your elbow macaroni according to package directions, but aim for al dente. This means it should still have a slight bite to it. Drain the pasta well and set it aside in a large bowl. Don’t rinse it; the starch helps the sauce cling.
Step 2: Prepare the Cheese Sauce
- In a large saucepan or Dutch oven over medium heat, melt 4 tablespoons of unsalted butter. Once melted, whisk in 4 tablespoons of all-purpose flour to create a roux. Cook this mixture for about 1-2 minutes, stirring constantly, until it forms a pale, bubbly paste and smells slightly nutty.
- Gradually whisk in 3 cups of whole milk or half-and-half, pouring it in slowly to avoid lumps. Continue whisking until the sauce thickens and comes to a gentle simmer.
- Reduce the heat to low. Add your grated cheeses (2 cups sharp cheddar, 1 cup Monterey Jack, and any optional cheeses like Gruyere). Stir constantly until all the cheese is completely melted and the sauce is smooth and creamy.
- Season with 1 teaspoon salt, 1/2 teaspoon black pepper, a pinch of nutmeg, and a dash of mustard powder or 1 teaspoon Dijon mustard. Taste and adjust seasonings as needed. Remember, the flavor should be pronounced, as it will be less intense once fried.
Step 3: Combine Macaroni and Cheese Sauce
- Pour the warm cheese sauce over your cooked macaroni in the large bowl. Stir gently until every piece of pasta is thoroughly coated. This mac and cheese should be slightly thicker than what you’d typically serve on its own; we want it to hold together.
Step 4: Chill the Mac and Cheese (CRITICAL STEP!)
- Transfer the mac and cheese mixture into a shallow baking dish or a container. Press it down firmly into an even layer. This is the MOST IMPORTANT step for successful Fried Mac And Cheese Bites!
- Cover the dish with plastic wrap and refrigerate for at least 4 hours, or ideally, overnight. The mac and cheese MUST be completely cold and firm throughout. If it’s not firm, your bites will fall apart during forming and frying.
Step 5: Form the Bites
- Once thoroughly chilled and firm, scoop out portions of the mac and cheese. You can use a small cookie scoop, a spoon, or simply cut the chilled block into 1-inch squares.
- Gently roll or shape each portion into a compact ball or square, ensuring they are tightly packed. Aim for uniform size for even frying.
- Place the formed bites on a parchment-lined baking sheet. For extra insurance, you can pop these back into the fridge for another 30 minutes to firm up even more.
Step 6: Set Up Your Breading Station
- Prepare three shallow dishes or bowls:
- Dish 1: 1 cup all-purpose flour.
- Dish 2: 2 large eggs, lightly beaten with 1 tablespoon of water or milk.
- Dish 3: 2 cups Panko breadcrumbs. You can season the Panko with a pinch of salt and pepper if desired.
Step 7: Bread the Mac And Cheese Bites
- Working with one bite at a time, dredge it first in the flour, shaking off any excess.
- Next, dip it into the beaten egg mixture, ensuring it’s fully coated. Let any excess egg drip off.
- Finally, roll the bite thoroughly in the Panko breadcrumbs, pressing gently to make sure the breadcrumbs adhere completely and create a thick, even crust.
- Place the breaded bites back on the parchment-lined baking sheet. Repeat with all the remaining bites.
- Again, for best results, refrigerate the breaded bites for at least 30 minutes (or up to an hour) before frying. This helps the breading adhere firmly and prevents it from falling off during frying.
Step 8: Fry the Mac And Cheese Bites
- In a large, heavy-bottomed pot or Dutch oven, pour enough high smoke point oil (like vegetable, canola, or peanut oil) to reach a depth of about 2-3 inches. Heat the oil over medium-high heat until it reaches 350-360°F (175-180°C). Use a candy or deep-fry thermometer to monitor the temperature; this is crucial for crispy, non-greasy bites.
- Carefully lower a few breaded mac and cheese bites into the hot oil using a slotted spoon or spider. Do not overcrowd the pot, as this will drop the oil temperature and lead to soggy bites. Fry in batches.
- Fry for 2-4 minutes, turning occasionally, until the bites are deeply golden brown and crispy on all sides.
- Using a slotted spoon, carefully remove the fried bites from the oil and transfer them to a plate lined with paper towels to drain excess oil.
- Repeat with the remaining batches, allowing the oil to come back up to temperature between each batch.
Step 9: Serve Immediately!
- Serve your glorious Fried Mac And Cheese Bites hot, with your favorite dipping sauces!
Tips & Suggestions
To truly master your Fried Mac And Cheese Bites, here are some nuggets of wisdom I’ve picked up along the way. These specific tips will help you achieve maximum crispiness and flavor!
- Don’t Skimp on the Chill Time: I cannot stress this enough. The mac and cheese needs to be rock solid cold. This is the secret to bites that hold their shape. If you try to form or fry warm mac and cheese, it will melt into a sad, greasy puddle. Overnight chilling is always my recommendation.
- Make a Thicker Mac and Cheese: When preparing your initial mac and cheese, aim for a slightly thicker, less “saucy” consistency than you might for a typical bowl of mac and cheese. This ensures it’s denser and holds its shape better once chilled. Don’t add extra milk if the sauce seems too thick; it needs that body.
- Season Aggressively: Remember that frying can mellow flavors a bit. Make sure your mac and cheese base is well-seasoned, perhaps even a touch saltier than you’d normally prefer, to ensure the flavor shines through after frying.
- Double Breading for Extra Crunch: For an ultra-crispy crust, you can double-bread your bites. After the first round of flour, egg, and Panko, dip them back into the egg wash and then into the Panko again. This creates a thicker, more durable, and crispier shell.
- Maintain Oil Temperature: This is crucial for successful frying. If the oil is too cool, the bites will absorb too much oil and become greasy. If it’s too hot, the exterior will burn before the inside warms through. Use a thermometer and adjust the heat as needed to keep it between 350-360°F (175-180°C).
- Don’t Overcrowd the Pot: Frying in small batches is key. Overcrowding drops the oil temperature quickly and leads to uneven cooking and greasy bites. Give each bite space to get gloriously golden.
- Experiment with Add-ins: While the classic is wonderful, feel free to get creative with your mac and cheese base.
- Spice It Up: Fold in finely diced fresh or pickled jalapeños for a kick.
- Smoky Flavor: Add cooked and crumbled beef bacon or finely diced smoked beef brisket for a rich, savory depth (ensuring no pork products are used).
- Herbaceous Notes: A sprinkle of fresh chives or parsley in the mac and cheese before chilling can add freshness.
- Caramelized Onions: Sweet caramelized onions can add a wonderful savory sweetness.
- Dipping Sauce Suggestions: These bites are fantastic on their own, but a good dipping sauce takes them over the top! Try marinara sauce, ranch dressing, sriracha mayo, a sweet chili sauce, or even a tangy barbecue sauce.
- Work Ahead: You can make and chill the mac and cheese up to 2 days in advance. You can also form and bread the bites and store them in the fridge on a baking sheet (covered loosely) for a few hours before frying, or even freeze them (see Storage section).
Storage
Once you’ve gone to the trouble of making these delicious Fried Mac And Cheese Bites, you’ll want to know how to properly store any leftovers and perhaps even prepare them ahead of time. Here’s what I recommend:
Storing Leftover Cooked Bites
- Refrigeration: Cooked Fried Mac And Cheese Bites are best enjoyed fresh, but leftovers can be stored. Allow them to cool completely to room temperature. Place them in an airtight container and refrigerate for up to 3-4 days.
- Reheating: To maintain crispness, avoid reheating in the microwave, which can make them soggy. The best methods for reheating are:
- Oven: Preheat your oven or toaster oven to 350°F (175°C). Place the bites on a baking sheet and heat for 10-15 minutes, or until warmed through and crispy.
- Air Fryer: Preheat your air fryer to 350°F (175°C). Air fry for 5-8 minutes, shaking the basket halfway through, until hot and re-crisped.
Freezing Uncooked Breaded Bites (Make Ahead)
This is a fantastic option for meal prep or if you want to have a quick appetizer on hand!
- Flash Freeze: After forming and breading your mac and cheese bites (Step 7), place them in a single layer on a parchment-lined baking sheet. Transfer the baking sheet to the freezer for 1-2 hours, or until the bites are solid. This prevents them from sticking together.
- Transfer to Bag: Once frozen solid, transfer the individual frozen breaded bites to a freezer-safe airtight bag or container. They can be stored in the freezer for up to 2-3 months.
- Frying from Frozen: When you’re ready to fry, do NOT thaw them. Fry them directly from frozen. You may need to increase the frying time by 1-2 minutes compared to fresh bites to ensure they are heated through to the center. Maintain the oil temperature at 350-360°F (175-180°C).
Freezing Cooked Bites
- Flash Freeze: If you have cooked and cooled leftovers that you want to freeze, place them in a single layer on a parchment-lined baking sheet and freeze until solid.
- Transfer to Bag: Once frozen, transfer to a freezer-safe bag or container. Store for up to 1 month for best quality.
- Reheating from Frozen: Reheat in a preheated oven at 375°F (190°C) for 15-20 minutes, or in an air fryer at 375°F (190°C) for 10-12 minutes, until heated through and crispy.
Final Thoughts
There’s something truly magical about taking a beloved classic and giving it an exciting new twist, and that’s precisely what we’ve achieved with these Fried Mac And Cheese Bites. I hope you’ve enjoyed crafting these crispy, creamy, and utterly irresistible morsels as much as I have enjoyed sharing the recipe with you.
These aren’t just any appetizers; they’re a celebration of comfort food elevated to gourmet snack status. Each bite delivers that familiar, cheesy goodness of mac and cheese, perfectly encapsulated in a golden-brown, satisfyingly crunchy exterior. They’re the ultimate crowd-pleaser, whether you’re hosting a game night, looking for a show-stopping party appetizer, or simply treating yourself to an incredibly satisfying snack.
So, go ahead and make a batch of these incredible Fried Mac And Cheese Bites. Trust me, the joy on everyone’s faces – including your own – when they discover the delicious surprise inside each crispy shell is truly priceless. Get ready to impress and delight; these bites are destined to become a new favorite in your culinary repertoire!

Fried Mac And Cheese Bites: Crispy, Cheesy, Irresistible!
- Total Time: 45 minutes
- Yield: 4 servings 1x
Description
Dive into the ultimate comfort food with these Fried Mac And Cheese Bites, perfectly crispy on the outside and gooey on the inside. They’re an irresistible snack that will elevate any gathering or cozy night in!
Ingredients
- 2 cups elbow macaroni
- 4 tablespoons unsalted butter
- 4 tablespoons all-purpose flour
- 3 cups whole milk or half-and-half
- 2 cups sharp cheddar, grated
- 1 cup Monterey Jack, grated
- Optional: smoked gouda or Gruyere, grated
- 1 teaspoon salt
- 1/2 teaspoon black pepper
- Pinch of nutmeg
- Dash of mustard powder or 1 teaspoon Dijon mustard
- 1 cup all-purpose flour (for breading)
- 2 large eggs (for breading)
- 1 tablespoon water or milk (for breading)
- 2 cups Panko breadcrumbs
- Vegetable oil, canola oil, or peanut oil (for frying)
Instructions
- Cook the elbow macaroni according to package directions until al dente. Drain and set aside in a large bowl.
- In a large saucepan or Dutch oven over medium heat, melt the unsalted butter. Whisk in the all-purpose flour to create a roux and cook for 1-2 minutes until slightly nutty.
- Gradually whisk in the whole milk or half-and-half until the sauce thickens and simmers.
- Reduce heat to low and add the grated cheeses, stirring until melted and smooth. Season with salt, black pepper, nutmeg, and mustard.
- Pour the cheese sauce over the cooked macaroni and stir until thoroughly coated.
- Transfer the mixture to a shallow baking dish, press down firmly, cover with plastic wrap, and refrigerate for at least 4 hours or overnight.
- Once chilled, scoop portions of the mac and cheese and shape into compact balls or squares. Place on a parchment-lined baking sheet.
- Set up a breading station with three shallow dishes: one with all-purpose flour, one with beaten eggs and water or milk, and one with Panko breadcrumbs.
- Dredge each bite in flour, dip in the egg mixture, then roll in Panko breadcrumbs. Place back on the baking sheet and refrigerate for 30 minutes.
- In a large pot, heat oil to 350-360°F (175-180°C). Fry the bites in batches for 2-4 minutes until golden brown. Drain on paper towels.
- Serve hot with your favorite dipping sauces!
- Prep Time: 15 mins
- Cook Time: 30 mins
- Category: Appetizer
- Method: Frying
- Cuisine: American
Nutrition
- Serving Size: 1 bite
- Calories: 150
- Sugar: 1 g
- Sodium: 300 mg
- Fat: 8 g
- Saturated Fat: 4 g
- Unsaturated Fat: 2 g
- Trans Fat: 0 g
- Carbohydrates: 15 g
- Fiber: 1 g
- Protein: 5 g
- Cholesterol: 50 mg
Keywords: Ensure the mac and cheese is thoroughly chilled to hold its shape. For extra crunch, consider double-breading the bites. Maintain oil temperature for optimal frying results.
Leave a Comment