

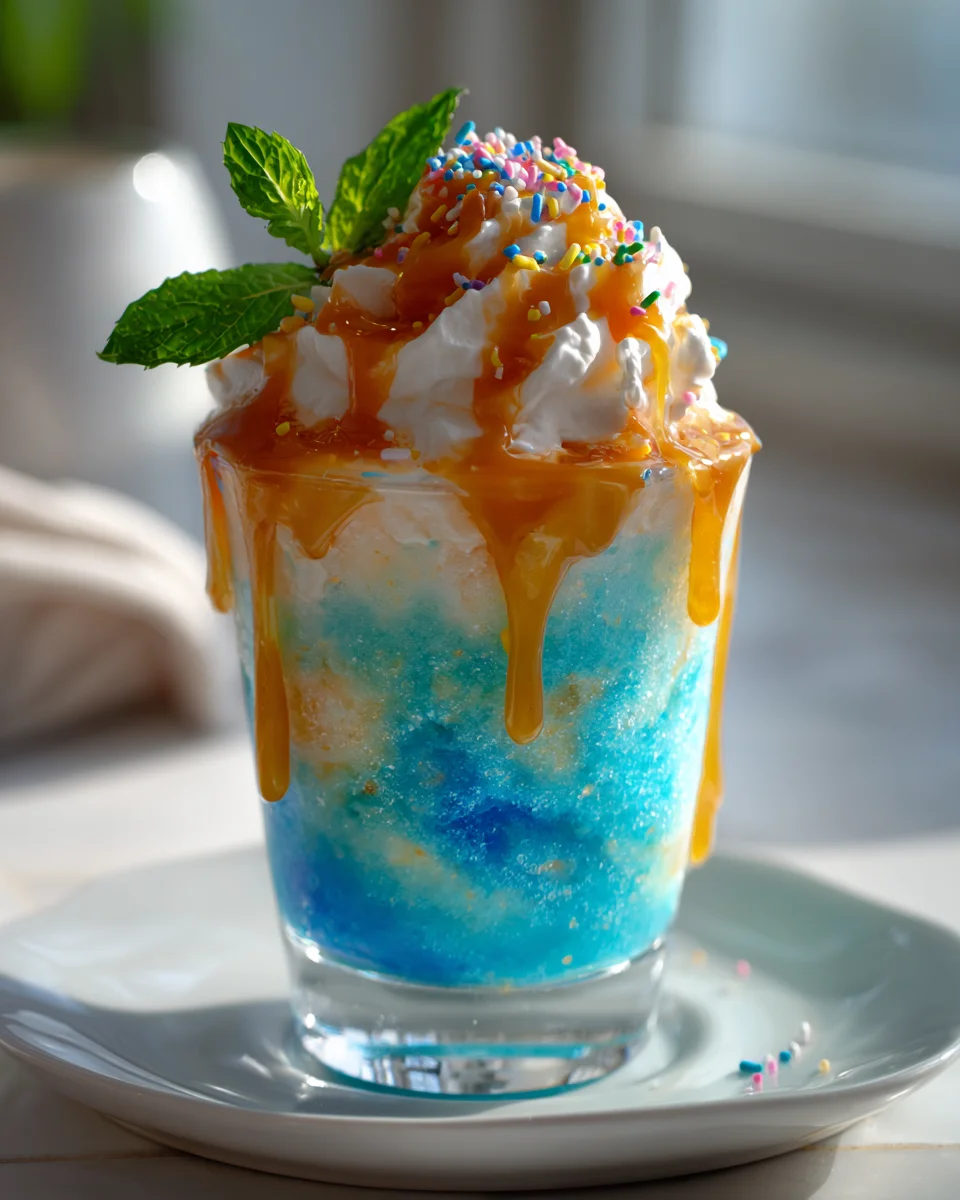
Frozen Dirty Soda Slushies!
Oh my goodness, get ready to meet your new favorite frosty obsession! I’m so excited to share this recipe with you because it takes the beloved ‘dirty soda’ concept – that magical mix of soda, cream, and a hint of flavor – and transforms it into an unbelievably refreshing, icy slushy. What makes this special, you ask? It’s the ultimate upgrade to a classic, turning a simple drink into a sophisticated, yet super fun, frozen treat that’s bursting with flavor and delightful texture. It’s a unique way to enjoy all the creamy, fizzy goodness you love, but in a whole new, invigorating form!
You, my friend, are going to absolutely adore these Frozen Dirty Soda Slushies because they’re the perfect answer to a hot day, a sweet craving, or just when you need a little pick-me-up. They’re incredibly easy to whip up, endlessly customizable to whatever soda and syrup combination your heart desires, and guaranteed to bring a smile to anyone’s face. Imagine sipping on a frosty blend that’s sweet, creamy, and wonderfully bubbly all at once – it’s pure bliss in a glass and a fantastic way to cool down!
Essentially, we’re taking your go-to soda (think cola, root beer, or even a lemon-lime soda!), blending it with ice until it’s perfectly slushy, then swirling in that signature ‘dirty’ touch of cream or half-and-half and a flavorful syrup (like coconut, vanilla, or cherry) to create a truly decadent, yet surprisingly simple, non-alcoholic beverage. It’s a fantastic way to enjoy a fun, customizable treat that’s both refreshing and satisfying. Get ready to blend your way to happiness!

Ingredient Notes
Crafting the perfect Frozen Dirty Soda Slushie starts with understanding the star ingredients that give this frosty treat its signature taste and texture. I find that a balance of sweet, creamy, and icy is key to hitting that nostalgic soda shop vibe right in your own kitchen!
- Your Favorite Soda: This is the backbone of our slushie! While a classic cola (like Coca-Cola or Pepsi) works wonderfully, I personally adore experimenting. Dr. Pepper with coconut is an iconic dirty soda combination that translates beautifully into a slushie. Root beer, Sprite, or even a citrusy soda like Mountain Dew can also be fantastic bases. For a more intense flavor, you might even consider freezing some of your soda into ice cubes beforehand – though regular ice is perfectly fine too!
- Creamer: This is what gives “dirty soda” its “dirty” status – that luscious, creamy swirl! My go-to is often a half-and-half or heavy cream for a rich texture. For a dairy-free or lighter option, I’ve had great success with full-fat coconut milk or even a dairy-free coffee creamer; just be mindful of its sweetness. Sweetened condensed milk is another fantastic option if you want to add extra sweetness and thickness, giving your slushie a wonderfully indulgent mouthfeel.
- Flavor Syrup: This is where the magic truly happens, elevating your soda to something extraordinary. Vanilla syrup is a universal crowd-pleaser and pairs well with almost any soda. For that classic dirty soda experience, coconut syrup is a must-try, especially with Dr. Pepper or cola. Caramel, hazelnut, or even a simple fruit-flavored syrup like raspberry or peach can create unique and delicious variations. If you don’t have syrup, a splash of vanilla extract can work in a pinch, though it won’t be quite as sweet.
- Ice: Critical for our slushie texture! Regular ice cubes from your freezer are perfectly adequate. If you have access to crushed ice, it can blend a bit more easily, but my trusty blender handles standard cubes like a champ. The amount of ice will dictate how thick and frosty your slushie becomes, so we’ll be adding it gradually.
- Optional Garnishes: Don’t forget the fun! A dollop of whipped cream, a maraschino cherry, or a fresh lime wedge (especially with Dr. Pepper and coconut) really completes the experience.
Step-by-Step Instructions
Whipping up these Frozen Dirty Soda Slushies is incredibly simple, making them perfect for a quick treat or last-minute entertaining. My secret for the best texture is to blend in stages, ensuring everything gets perfectly pulverized into a smooth, icy dream. Let’s get slushie-making!
- Gather Your Tools: First things first, make sure you have a sturdy blender. A high-powered blender is ideal for achieving that super smooth, fine slushie consistency, but most standard blenders will do the trick if you’re patient. I also like to have my serving glasses ready to go, perhaps even chilled in the freezer for a few minutes to keep my slushie colder longer.
- Combine Liquids First: Into your blender, pour your chosen soda, creamer, and flavor syrup. I usually start with about 1 cup of soda, 2 tablespoons of creamer, and 1-2 tablespoons of syrup per serving, but these are totally adjustable to your taste. Pouring the liquids in first helps the blender blades get a good start before the ice is added, preventing them from getting stuck.
- Add the Ice Gradually: This is the crucial step for getting that perfect slushie texture. Start by adding about 1 cup of ice cubes for every 1 cup of liquid you put in. Secure the lid on your blender.
- Blend and Pulse: Begin blending on a low setting, then gradually increase the speed. You’ll likely need to use the “pulse” function frequently, especially at the start, to break down the ice. If your blender has a tamper, use it to push the ingredients down towards the blades, but always be careful and only use it when the blender is running on a low speed or off, following your blender’s safety guidelines.
- Check Consistency and Add More Ice (or Liquid): After about 30-60 seconds of blending, stop and check the consistency. It should be thick, icy, and spoonable, but still pourable. If it’s too thin for your liking, add a few more ice cubes and blend again until desired thickness is reached. If it’s too thick and the blades are struggling, add a tiny splash more of soda (about a tablespoon at a time) to help loosen it up. I keep blending and pulsing until there are no large ice chunks left and the mixture is uniformly smooth and slushie-like.
- Taste and Adjust: Give your slushie a quick taste test. This is your chance to adjust the sweetness or creaminess. Need more vanilla? Add another splash of syrup. Want it richer? Stir in a bit more creamer. Blend for a few more seconds to incorporate any additions.
- Serve Immediately: Pour your perfectly blended Frozen Dirty Soda Slushie into chilled glasses. I love to top mine with a swirl of whipped cream and a cherry or a fresh lime wedge to really elevate the presentation. Grab a straw and enjoy right away!
Tips & Suggestions
Making a fantastic Frozen Dirty Soda Slushie is more than just throwing ingredients into a blender; it’s about perfecting that frosty, creamy balance. Over the years, I’ve picked up a few tricks that really make these slushies shine. Here are my top tips for creating your best batch yet:
- Chill Everything: This is a game-changer! The colder your soda, creamer, and syrup are before they even hit the blender, the less ice you’ll need, which means a more intensely flavored slushie. I even like to chill my serving glasses in the freezer for 10-15 minutes before pouring for maximum frosty enjoyment.
- Experiment with Soda & Syrup Combinations: Don’t be afraid to get creative! While Dr. Pepper with coconut syrup and a squeeze of lime is legendary, try other pairings. A classic cola with vanilla and a splash of cherry syrup is divine. Root beer with a hint of caramel and a generous swirl of cream tastes like a deconstructed root beer float. Lemon-lime soda with raspberry syrup and a touch of cream is wonderfully refreshing. The possibilities are endless, so play around and find your favorite!
- Adjust Sweetness to Your Liking: Different sodas have varying levels of sweetness, and so do creamers and syrups. Always taste your slushie before the final pour. If it’s not sweet enough, add a little more syrup or even a touch of simple syrup. If it’s too sweet, a tiny squeeze of fresh lime juice can help cut through the richness and add a bright counterpoint.
- Achieve the Perfect Slushie Consistency: This is crucial. Start with less ice than you think you need, then add more incrementally until you reach that ideal thick, spoonable, yet drinkable consistency. If your blender is struggling, add a tiny splash of soda or water (just a tablespoon at a time) to help loosen it up. Avoid over-blending, as this can melt the ice and create a thinner, less satisfying slushie.
- Batch Small for Best Results: While it’s tempting to make a huge batch, slushies are best enjoyed immediately. Making smaller batches ensures a consistently thick and icy texture for everyone. If you’re serving a crowd, blend in rounds.
- Garnish Generously: A slushie is a celebration! Don’t skip the garnishes. A mountain of whipped cream, a bright maraschino cherry, a fresh fruit slice (like lime or orange), or even a drizzle of extra syrup can elevate your slushie from good to absolutely fabulous.
- Consider Non-Carbonated Alternatives: If you’re worried about too much fizz or want a slightly different texture, you can experiment with using chilled sparkling water with added sugar and flavorings as your base instead of traditional soda. This gives you more control over the sweetness and carbonation level.
Storage
When it comes to Frozen Dirty Soda Slushies, I have to be upfront: they are definitely best enjoyed immediately. The magic of a slushie lies in its delicate balance of crushed ice and liquid, and that balance doesn’t hold up well over time.
As soon as a slushie sits, even for a short while, the ice begins to melt, separating from the creamy soda base. This can result in a watery, less flavorful drink, with a layer of ice at the top and liquid at the bottom. The creamy texture will also diminish significantly.
However, if you do find yourself with a tiny bit left over and absolutely must save it, here are my suggestions:
- Immediate Consumption is Key: My strongest advice is to only make as much as you plan to drink right away. They are designed to be an instant gratification treat!
- Short-Term Refrigeration (Not Ideal): You can attempt to store any leftovers in an airtight container in the refrigerator for a very short period (no more than an hour or two). Be aware that it will completely melt and separate. It will essentially become a chilled dirty soda, losing all its slushie appeal. You can stir it up and drink it as a regular beverage, but it won’t be the same.
- Freezing (Difficult to Revive): Storing a slushie in the freezer is even less recommended. It will freeze solid into a block of ice, often with the flavors unevenly distributed. While you could theoretically re-blend it with a splash of fresh soda or creamer to try and achieve a slushie consistency again, it’s rarely as good as the fresh batch. The ice crystals become much larger, and the texture won’t be as smooth and fine.
So, my friend, do yourself a favor: blend it, garnish it, and enjoy every single icy, creamy sip of your Frozen Dirty Soda Slushie the moment it’s made!
Final Thoughts
There you have it! I truly believe that trying these Frozen Dirty Soda Slushies is an absolute must. Forget your average cold drink; this recipe takes things to a whole new level of refreshing delight. It’s not just a beverage; it’s an experience, blending that familiar soda comfort with an icy, creamy twist that makes every sip feel like a mini-celebration.
I find that the unique combination of flavors and the incredible slushie texture makes these Frozen Dirty Soda Slushies perfect for any occasion, whether you’re hosting a backyard gathering, enjoying a quiet afternoon, or simply need a pick-me-up. They’re surprisingly simple to make, yet deliver an impressive and deeply satisfying treat that will have everyone asking for more. Trust me, once you taste the delightful chill and nuanced sweetness of these Frozen Dirty Soda Slushies, you’ll wonder how you ever lived without them!
Frozen Dirty Soda Slushies: Your Ultimate Refreshing Treat
- Total Time: 10 minutes
- Yield: 2 servings
Description
These Frozen Dirty Soda Slushies are the perfect blend of creamy, fizzy goodness, transforming a classic drink into a refreshing icy treat. Ideal for hot days or sweet cravings, they are endlessly customizable and guaranteed to bring a smile to your face.
Ingredients
- Your Favorite Soda (e.g., Coca-Cola, Pepsi, Dr. Pepper, Root Beer, Sprite, Mountain Dew)
- Creamer (e.g., half-and-half, heavy cream, full-fat coconut milk, dairy-free coffee creamer, sweetened condensed milk)
- Flavor Syrup (e.g., vanilla syrup, coconut syrup, caramel syrup, hazelnut syrup, raspberry syrup, peach syrup)
- Ice (regular ice cubes or crushed ice)
- Optional Garnishes (e.g., whipped cream, maraschino cherry, fresh lime wedge)
Instructions
- Gather Your Tools: Make sure you have a sturdy blender and your serving glasses ready.
- Combine Liquids First: Pour your chosen soda, creamer, and flavor syrup into the blender.
- Add the Ice Gradually: Start by adding about 1 cup of ice cubes for every 1 cup of liquid.
- Blend and Pulse: Begin blending on a low setting, gradually increasing the speed and using the pulse function as needed.
- Check Consistency and Add More Ice (or Liquid): Stop and check the consistency, adding more ice or soda as needed.
- Taste and Adjust: Give your slushie a taste test and adjust sweetness or creaminess as desired.
- Serve Immediately: Pour into chilled glasses, garnish, and enjoy right away.
- Prep Time: 10 mins
- Cook Time: 0 mins
- Category: Beverage
- Method: Blending
- Cuisine: American
Nutrition
- Serving Size: 1 glass
- Calories: 250
- Sugar: 40 g
- Sodium: 50 mg
- Fat: 10 g
- Saturated Fat: 5 g
- Unsaturated Fat: 3 g
- Trans Fat: 0 g
- Carbohydrates: 35 g
- Fiber: 0 g
- Protein: 1 g
- Cholesterol: 20 mg
Keywords: Chill your ingredients and glasses for a better slushie texture. Experiment with different soda and syrup combinations to find your favorite flavor.

Leave a Comment