

Frozen Yogurt Bark: the easiest, most refreshing, and customizable treat you’ll make all summer! Are you craving something sweet but dreading the guilt that often comes with it? Imagine a dessert that’s not only delicious but also packed with probiotics and bursting with fresh fruit. That’s the magic of Frozen Yogurt Bark!
While the exact origins of frozen yogurt bark are difficult to pinpoint, its popularity has exploded in recent years as people seek healthier and more convenient alternatives to traditional ice cream. It perfectly embodies the modern desire for quick, nutritious snacks that don’t compromise on flavor. Think of it as a blank canvas for your culinary creativity – a simple base of creamy yogurt transformed into a vibrant masterpiece with your favorite toppings.
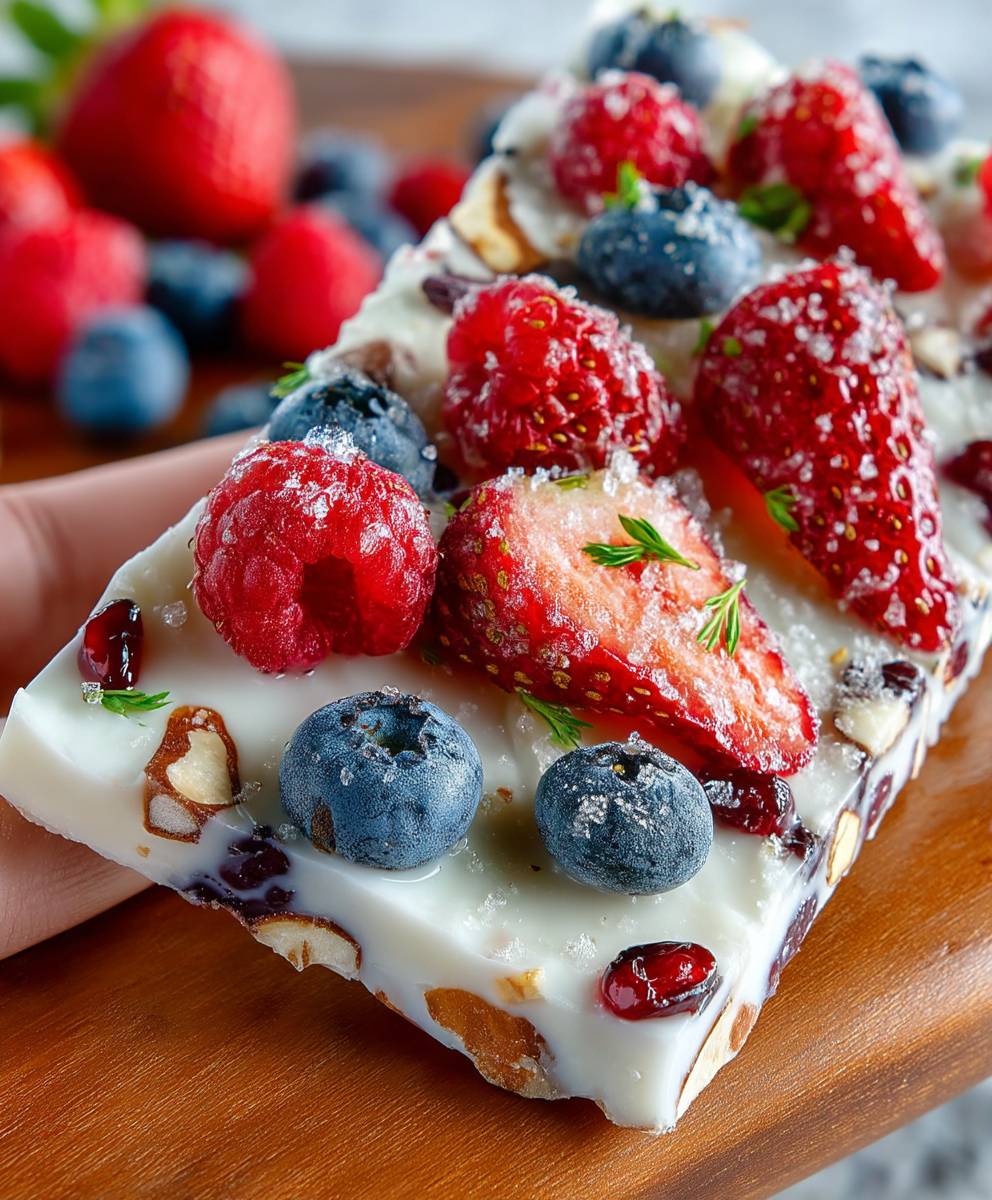
What makes Frozen Yogurt Bark so irresistible? It’s the delightful combination of textures: the smooth, cool yogurt against the satisfying crunch of nuts, seeds, or granola, and the juicy burst of fresh berries. It’s also incredibly convenient. Simply spread, sprinkle, freeze, and break! Plus, it’s a fantastic way to use up leftover fruit and customize it to your dietary needs and preferences. Whether you’re looking for a healthy breakfast, a post-workout snack, or a guilt-free dessert, this recipe is a winner. Get ready to discover your new favorite way to enjoy frozen yogurt!

Ingredients:
- 2 cups plain Greek yogurt (full-fat or non-fat, your preference!)
- 1/4 cup honey (or maple syrup, agave, or your favorite sweetener)
- 1 teaspoon vanilla extract
- 1/2 cup mixed berries (strawberries, blueberries, raspberries, blackberries – fresh or frozen)
- 1/4 cup granola (any flavor you like!)
- 1/4 cup shredded coconut (unsweetened)
- 2 tablespoons chopped nuts (almonds, walnuts, pecans – optional)
- 2 tablespoons mini chocolate chips (optional)
- Pinch of sea salt (optional, but enhances the flavors!)
Preparing the Yogurt Base:
Okay, let’s get started! The base of our frozen yogurt bark is super simple, but it’s important to get the consistency right. We want it thick enough to spread easily and freeze well.
- Strain the Yogurt (Optional, but Recommended): This step is crucial if you’re using Greek yogurt that seems a bit watery. Line a colander with a cheesecloth or a clean kitchen towel. Place the colander over a bowl. Pour the Greek yogurt into the lined colander. Let it sit in the refrigerator for at least 30 minutes, or even better, for a couple of hours. This will remove excess whey and make the yogurt thicker, resulting in a less icy bark. If your yogurt is already very thick, you can skip this step.
- Combine Yogurt, Sweetener, and Vanilla: In a medium-sized bowl, combine the strained Greek yogurt (or unstrained if you skipped the previous step), honey (or your chosen sweetener), and vanilla extract.
- Mix Thoroughly: Use a whisk or a spatula to mix the ingredients together until they are completely combined and smooth. Make sure there are no lumps of yogurt remaining. Taste the mixture and adjust the sweetness if needed. Remember that the flavors will be slightly muted once frozen, so you might want to make it a tad sweeter than you think.
Preparing the Toppings:
Now for the fun part – the toppings! This is where you can really get creative and customize your frozen yogurt bark to your liking. I’m using a mix of berries, granola, coconut, nuts, and chocolate chips, but feel free to experiment with whatever you have on hand.
- Prepare the Berries: If you’re using fresh berries, wash them thoroughly and pat them dry. Hull the strawberries and slice them into smaller pieces. If you’re using frozen berries, you can use them directly from the freezer, but I recommend letting them thaw slightly for about 5-10 minutes so they’re easier to work with.
- Chop the Nuts (If Using): If you’re using nuts, chop them into small pieces. You can use a knife or a food processor for this.
- Gather All Toppings: Have all your toppings ready to go in separate bowls. This will make the assembly process much smoother.
Assembling the Frozen Yogurt Bark:
Alright, we’re ready to put it all together! This is where the magic happens. We’ll spread the yogurt base onto a baking sheet and then sprinkle on all those delicious toppings.
- Prepare the Baking Sheet: Line a baking sheet with parchment paper or a silicone baking mat. This will prevent the yogurt bark from sticking to the pan and make it easy to remove once it’s frozen.
- Spread the Yogurt Base: Pour the yogurt mixture onto the prepared baking sheet. Use a spatula or the back of a spoon to spread it into an even layer, about 1/4 inch thick. You can make it any shape you like – a rectangle, a square, or even a freeform shape. Just make sure it’s relatively even in thickness so it freezes evenly.
- Add the Toppings: Now, sprinkle the toppings evenly over the yogurt base. Start with the berries, then add the granola, shredded coconut, chopped nuts (if using), and mini chocolate chips (if using). Gently press the toppings into the yogurt so they adhere well.
- Sprinkle with Sea Salt (Optional): If you’re using sea salt, sprinkle a pinch evenly over the top of the bark. This will enhance the sweetness and add a nice savory contrast.
Freezing the Frozen Yogurt Bark:
Almost there! Now we just need to freeze the bark until it’s solid. This usually takes a few hours, but it’s best to let it freeze overnight for the best results.
- Freeze the Bark: Carefully transfer the baking sheet to the freezer. Make sure it’s placed on a flat surface so the yogurt bark freezes evenly.
- Freeze for at Least 4 Hours (or Overnight): Let the yogurt bark freeze for at least 4 hours, or preferably overnight, until it’s completely solid.
Breaking and Storing the Frozen Yogurt Bark:
The moment we’ve been waiting for! Time to break the bark into pieces and enjoy. This is the most satisfying part, I promise!
- Remove from Freezer: Once the yogurt bark is frozen solid, remove it from the freezer.
- Break into Pieces: Use your hands or a large knife to break the yogurt bark into irregular pieces. You can make them as big or as small as you like.
- Store the Bark: Store the frozen yogurt bark pieces in an airtight container or a freezer bag in the freezer. It will keep for up to 2-3 weeks.
Tips and Variations:
Here are a few extra tips and ideas to help you customize your frozen yogurt bark:
- Use Different Fruits: Experiment with different fruits like mango, pineapple, kiwi, or peaches.
- Add Nut Butter: Swirl a tablespoon or two of peanut butter, almond butter, or cashew butter into the yogurt base before freezing.
- Make it Vegan: Use a plant-based yogurt alternative like coconut yogurt or almond yogurt.
- Add Spices: Sprinkle a pinch of cinnamon, nutmeg, or ginger into the yogurt base for a warm and cozy flavor.
- Drizzle with Chocolate: Drizzle melted chocolate over the frozen yogurt bark before breaking it into pieces.
- Use Different Sweeteners: Try using different sweeteners like stevia or monk fruit sweetener for a lower-sugar option.
- Add Seeds: Sprinkle chia seeds, flax seeds, or hemp seeds over the yogurt bark for added nutrition.
- Make it a Dessert Pizza: Instead of breaking it into pieces, cut the frozen bark into slices like a pizza.
Enjoy!
That’s it! You’ve made your own delicious and healthy frozen yogurt bark. Enjoy it as a snack, a dessert, or even a breakfast treat. It’s the perfect way to cool down on a hot day and satisfy your sweet tooth without any guilt.
Conclusion:
This Frozen Yogurt Bark recipe isn’t just another dessert; it’s a vibrant, healthy, and incredibly customizable treat that deserves a permanent spot in your recipe repertoire. I truly believe you’ll find yourself reaching for it again and again, especially during those warm summer months or whenever you’re craving something sweet without the guilt.
Why is it a must-try? Well, beyond its simplicity – seriously, it takes minutes to prepare! – it’s packed with goodness. We’re talking probiotics from the yogurt, antioxidants from the berries, and healthy fats from the nuts (if you choose to add them). But more than that, it’s just plain delicious! The creamy, tangy yogurt base combined with the burst of fresh fruit and the satisfying crunch of your favorite toppings creates a symphony of textures and flavors that will tantalize your taste buds. It’s a guilt-free indulgence that satisfies your sweet tooth while nourishing your body.
But the real beauty of this recipe lies in its versatility. Feel free to experiment with different yogurt flavors. Vanilla Greek yogurt provides a classic base, but don’t be afraid to try honey, coconut, or even a subtly flavored fruit yogurt. The possibilities are endless! And when it comes to toppings, let your imagination run wild.
Serving Suggestions and Variations:
* Berry Blast: Stick with the classic combination of blueberries, raspberries, and strawberries for a burst of summer flavor.
* Tropical Paradise: Add chunks of mango, pineapple, and shredded coconut for a taste of the tropics.
* Chocolate Lover’s Dream: Drizzle melted dark chocolate over the bark before freezing, or sprinkle with mini chocolate chips.
* Nutty Delight: Incorporate chopped almonds, walnuts, pecans, or pistachios for added crunch and healthy fats.
* Peanut Butter Power: Swirl in a spoonful of peanut butter or sprinkle with peanut butter chips for a protein-packed treat.
* Kid-Friendly Fun: Let the kids get involved in decorating the bark with their favorite sprinkles, candies, or even crushed cookies (in moderation, of course!).
* Breakfast Bark: Add granola and a drizzle of honey for a quick and easy breakfast on the go.
* Elegant Dessert: Top with edible flowers and a dusting of powdered sugar for a sophisticated dessert presentation.
Serving this Frozen Yogurt Bark is just as easy as making it. Simply break it into pieces and serve immediately. It’s perfect as a refreshing snack on a hot day, a light dessert after dinner, or even a healthy treat to pack in your lunchbox. You can also crumble it over smoothies or yogurt bowls for an extra boost of flavor and texture.
I’m so excited for you to try this recipe and discover your own favorite variations. I know you’ll love how easy it is to make, how delicious it tastes, and how good it makes you feel. So, go ahead, gather your ingredients, and get ready to create your own masterpiece of frozen yogurt goodness!
Don’t forget to share your creations with me! I’d love to see your photos and hear about your favorite flavor combinations. Tag me on social media and let me know what you think. Happy freezing! I am sure you will enjoy this Frozen Yogurt Bark as much as I do.
Frozen Yogurt Bark: The Ultimate Guide to Easy & Healthy Treats
Easy, customizable frozen yogurt bark with berries, granola, coconut, and more! A healthy and refreshing treat perfect for any time of day.
Ingredients
- 2 cups plain Greek yogurt (full-fat or non-fat, your preference!)
- 1/4 cup honey (or maple syrup, agave, or your favorite sweetener)
- 1 teaspoon vanilla extract
- 1/2 cup mixed berries (strawberries, blueberries, raspberries, blackberries – fresh or frozen)
- 1/4 cup granola (any flavor you like!)
- 1/4 cup shredded coconut (unsweetened)
- 2 tablespoons chopped nuts (almonds, walnuts, pecans – optional)
- 2 tablespoons mini chocolate chips (optional)
- Pinch of sea salt (optional, but enhances the flavors!)
Instructions
- (Optional) Strain the Yogurt: Line a colander with cheesecloth or a clean kitchen towel. Place over a bowl. Pour yogurt into the lined colander. Refrigerate for at least 30 minutes (or up to 2 hours) to remove excess whey. Skip if your yogurt is already very thick.
- Combine Yogurt, Sweetener, and Vanilla: In a medium bowl, combine the strained (or unstrained) Greek yogurt, honey (or sweetener), and vanilla extract.
- Mix Thoroughly: Whisk or use a spatula to mix until completely combined and smooth. Taste and adjust sweetness if needed (remember flavors will be muted when frozen).
- Prepare the Berries: If using fresh berries, wash and pat dry. Hull and slice strawberries. If using frozen, thaw slightly (5-10 minutes).
- Chop the Nuts (If Using): Chop nuts into small pieces using a knife or food processor.
- Gather All Toppings: Have all toppings ready in separate bowls.
- Prepare the Baking Sheet: Line a baking sheet with parchment paper or a silicone baking mat.
- Spread the Yogurt Base: Pour yogurt mixture onto the prepared baking sheet. Spread into an even layer, about 1/4 inch thick.
- Add the Toppings: Sprinkle toppings evenly over the yogurt base. Start with berries, then granola, coconut, nuts (if using), and chocolate chips (if using). Gently press toppings into the yogurt.
- Sprinkle with Sea Salt (Optional): Sprinkle a pinch of sea salt evenly over the top.
- Freeze the Bark: Carefully transfer the baking sheet to the freezer. Place on a flat surface.
- Freeze for At Least 4 Hours (or Overnight): Freeze for at least 4 hours, or preferably overnight, until completely solid.
- Remove from Freezer: Once frozen solid, remove from the freezer.
- Break into Pieces: Use your hands or a large knife to break the yogurt bark into irregular pieces.
- Store the Bark: Store in an airtight container or freezer bag in the freezer for up to 2-3 weeks.
Notes
- Straining the Yogurt: This step is optional but highly recommended for a less icy bark.
- Sweetness: Remember that the flavors will be slightly muted once frozen, so you might want to make it a tad sweeter than you think.
- Customization: Feel free to experiment with different fruits, nuts, sweeteners, and spices.
- Vegan Option: Use a plant-based yogurt alternative.
- Storage: Store in an airtight container or freezer bag in the freezer for up to 2-3 weeks.


Leave a Comment