

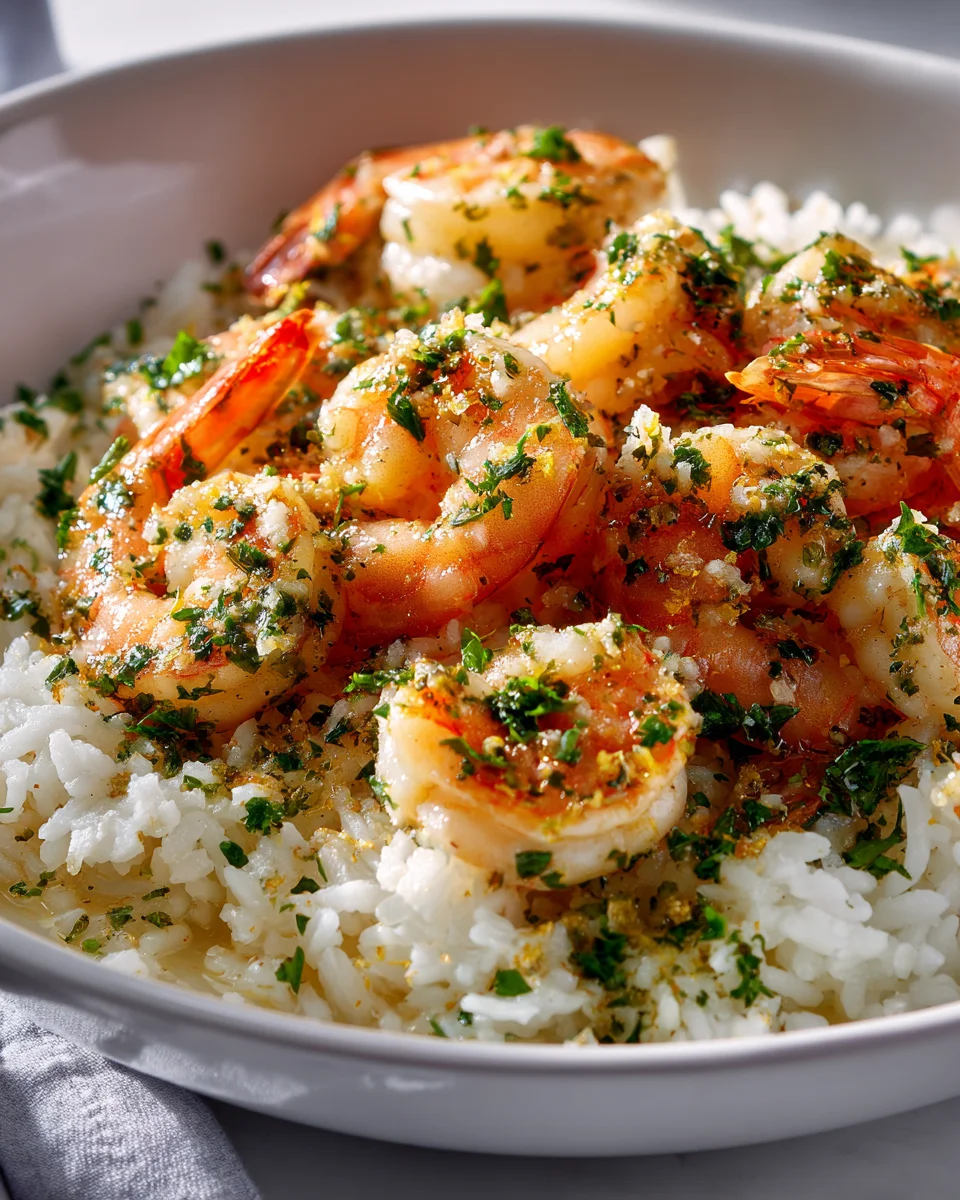
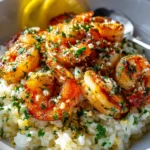
Garlic Butter Shrimp And Rice Skillet
There are some recipes that just hit different, and for me, Garlic Butter Shrimp And Rice Skillet is absolutely one of them. What makes this dish so incredibly special, you ask? Well, it’s that magical combination of speed, flavor, and unbelievably easy cleanup! I mean, who doesn’t love a delicious meal that comes together in a single pan?
You are absolutely going to adore this recipe because it’s the ultimate weeknight warrior. Picture plump, juicy shrimp, swimming in a decadent, aromatic garlic butter sauce, all mixed with perfectly cooked, fluffy rice. It’s a complete meal, bursting with savory goodness, and it’s ready faster than you can order takeout. Plus, that luscious garlic butter sauce is just to die for, elevating simple ingredients into something truly extraordinary. Get ready for a new favorite that will have everyone asking for seconds!

Ingredient Notes
I absolutely adore this Garlic Butter Shrimp and Rice Skillet, and it’s all thanks to the simple yet impactful ingredients that come together in one pan. Getting these right is key to a truly flavorful and satisfying meal. Here’s what I typically reach for:
- Shrimp: For this skillet, I highly recommend using large (like a 21/25 count) raw shrimp, peeled and deveined. You can choose to leave the tails on for presentation or remove them for easier eating – it’s entirely up to you! Fresh shrimp will always give you the best flavor and texture, but good quality frozen shrimp works wonderfully too. Just make sure to thaw it completely in the refrigerator overnight or under cold running water, then pat it very dry before cooking. This helps ensure a beautiful sear and prevents the shrimp from steaming instead of browning.
- Unsalted Butter: Butter is the backbone of that rich, garlicky flavor. I always opt for unsalted so I can control the overall saltiness of the dish myself. If you only have salted butter, just be sure to reduce the amount of added salt later on.
- Fresh Garlic: This is a garlic butter shrimp dish, so don’t be shy! I use a generous amount of freshly minced garlic – usually 6-8 cloves, but sometimes more if I’m feeling extra garlicky. Fresh really makes a difference here; pre-minced jarred garlic just doesn’t quite hit the same notes.
- Long-Grain White Rice: Jasmine or Basmati rice are my top choices for this skillet. They cook up fluffy and separate, absorbing all the delicious flavors without becoming overly sticky or mushy. Avoid instant rice as it won’t give you the same texture, and brown rice takes significantly longer to cook, so you’d need to adjust the liquid and cooking time accordingly.
- Chicken or Vegetable Broth: Using broth instead of just water adds an incredible depth of flavor to the rice. I always go for a low-sodium variety so I can season to taste. If you don’t have broth, water with a bouillon cube or powder can work in a pinch, but the flavor won’t be quite as rich.
- Seasonings: Beyond salt and freshly ground black pepper, I like to add a pinch of dried oregano or Italian seasoning. For a subtle kick, a tiny dash of red pepper flakes can be a wonderful addition, bringing a little warmth to the dish.
- Fresh Lemon Juice: A squeeze of fresh lemon juice right at the end is a game-changer! It brightens up all the rich flavors and adds a fantastic zesty finish. Don’t skip it!
- Fresh Parsley or Chives: A sprinkle of fresh chopped parsley or chives at the end not only adds a lovely pop of color but also a fresh, herbaceous note that complements the garlic and shrimp perfectly.
Substitutions:
- Protein: While shrimp is the star, if you wanted to try something different, scallops or even small pieces of chicken breast (cut into 1-inch cubes) could work. Just adjust cooking times accordingly – scallops cook very quickly, similar to shrimp, while chicken will take a bit longer.
- Butter: For a slightly lighter version, you could use olive oil or a combination of olive oil and butter. The butter, however, truly contributes to that signature rich flavor.
- Rice: If you’re looking for a different grain, quinoa could be used, but it will require different liquid ratios and cooking times than long-grain white rice, and the texture of the finished dish will be quite different.
- Deglazing Liquid: This dish doesn’t typically call for alcohol, so there’s no need for alcohol alternatives. If you find some delicious browned bits on the bottom of your skillet after cooking the shrimp, a splash of broth works perfectly for deglazing.
Step-by-Step Instructions
Making this Garlic Butter Shrimp and Rice Skillet is incredibly straightforward, which is one of the reasons I love it so much! It’s all done in one pan, meaning less cleanup and more time to enjoy your delicious meal. Here’s how I get it done:
- Prep the Shrimp: First things first, get your shrimp ready. If using frozen, ensure they are fully thawed. Then, pat them very, very dry with paper towels. This step is crucial for getting a nice sear. Season the shrimp generously with a good pinch of salt and black pepper on both sides.
- Sear the Shrimp: Heat a large, oven-safe skillet (I love using my cast iron or a good non-stick pan for this) over medium-high heat. Add about half of your unsalted butter. Once the butter is melted and shimmering, add the seasoned shrimp in a single layer, making sure not to overcrowd the pan. You might need to do this in two batches. Cook for 1-2 minutes per side, just until the shrimp turn pink and opaque. They cook incredibly fast, so watch them closely! As soon as they’re done, remove the shrimp from the skillet and set them aside on a plate. Don’t worry if they’re not fully cooked through; they’ll finish cooking later.
- Sauté the Aromatics: Reduce the heat to medium. Add the remaining unsalted butter to the same skillet. Once melted, add your generous amount of minced garlic. Sauté for about 30 seconds to 1 minute, stirring constantly, until fragrant. Be careful not to burn the garlic, as burnt garlic turns bitter. If you like, this is also where I sometimes add a pinch of red pepper flakes for a little heat.
- Toast the Rice: Add the uncooked long-grain white rice to the skillet with the garlic. Stir it around for 1-2 minutes, coating the grains in the butter and garlic. This step helps to lightly toast the rice, adding a lovely nutty flavor and helping the grains stay separate when cooked.
- Add Broth and Simmer: Pour in the chicken or vegetable broth. Give everything a good stir, making sure to scrape up any browned bits from the bottom of the pan (that’s flavor!). Bring the liquid to a gentle simmer. Once simmering, reduce the heat to low, cover the skillet tightly with a lid, and let it cook undisturbed for about 15-18 minutes. Resist the urge to peek or stir, as this allows the rice to steam properly and cook evenly.
- Rest the Rice: After the cooking time, remove the skillet from the heat, but keep the lid on. Let the rice rest for another 5 minutes. This allows any remaining liquid to be absorbed and the rice grains to fluff up beautifully.
- Combine and Finish: Remove the lid and gently fluff the rice with a fork. Stir the reserved cooked shrimp back into the skillet with the rice. Add a good squeeze of fresh lemon juice and sprinkle in your fresh chopped parsley or chives. Give it a gentle toss to combine everything. Taste and adjust seasonings – you might need a little more salt or pepper.
- Serve Immediately: This dish is best enjoyed fresh off the stove!
Tips & Suggestions
To really master this Garlic Butter Shrimp and Rice Skillet and make it consistently amazing, I’ve picked up a few helpful tricks along the way. These tips ensure you get tender shrimp, perfectly cooked rice, and maximum flavor every time:
- Don’t Overcook the Shrimp: This is probably the most critical tip! Shrimp cook incredibly fast, and overcooked shrimp become rubbery and tough. I always recommend searing them briefly, just until they’re mostly opaque and pink. They’ll finish cooking when you stir them back into the hot rice at the end. Err on the side of slightly undercooked when you first remove them from the pan.
- Pat the Shrimp Dry: I know I mentioned it in the ingredient notes, but it bears repeating. Excess moisture prevents the shrimp from searing properly and instead causes them to steam. A good sear means more flavor and better texture.
- Use a Good Skillet with a Tight-Fitting Lid: A large, heavy-bottomed skillet (like cast iron or a sturdy non-stick) that can go from stovetop to table is ideal. The tight-fitting lid is crucial for properly steaming the rice. If your skillet doesn’t have one, you can often use aluminum foil to create a tight seal.
- Resist the Urge to Peek at the Rice: Once the broth is added and the skillet is covered, let the rice do its thing! Lifting the lid allows steam to escape, which can lead to unevenly cooked or dry rice. Trust the process and the timing.
- Fresh Garlic is Non-Negotiable: While convenience items have their place, this dish truly shines with freshly minced garlic. Its pungent, aromatic flavor is essential to the “garlic butter” aspect. Jarred minced garlic just won’t give you the same vibrant taste.
- Adjust Heat for Garlic: When sautéing the garlic, keep a close eye on it and adjust the heat as needed. Garlic can burn very quickly, turning bitter and unpleasant. You want it fragrant and lightly golden, not dark brown.
- Lemon Zest for Extra Brightness: In addition to the squeeze of fresh lemon juice, sometimes I’ll microplane a little bit of lemon zest into the dish at the very end. The zest contains oils that offer an even more intense citrus aroma and flavor.
- Make it a Complete Meal: This skillet is quite hearty on its own, but I often like to serve it with a simple side. A crisp green salad with a light vinaigrette is a perfect complement, cutting through the richness of the butter. A side of steamed green beans or asparagus also works wonderfully.
Storage
This Garlic Butter Shrimp and Rice Skillet is definitely at its absolute best when enjoyed fresh, straight from the pan. However, if you happen to have leftovers, I can certainly guide you on how to store and reheat them safely and with the best possible results.
- Cooling: First, it’s important to cool the leftovers quickly to prevent bacterial growth. Once you’ve served your meal, allow any remaining skillet contents to cool down to room temperature within two hours. You can spread it out on a shallow plate or baking sheet to speed up the cooling process if you have a large amount.
- Refrigeration: Once cooled, transfer the Garlic Butter Shrimp and Rice Skillet to an airtight container. I usually opt for a glass container as it doesn’t absorb odors. Store it in the refrigerator for up to 2-3 days. Beyond that, the quality of the shrimp can start to decline, becoming a bit tougher, and the rice can dry out.
- Reheating:
- Microwave: This is often the quickest method for individual portions. Place the desired amount of shrimp and rice in a microwave-safe dish. Add a tablespoon or two of water or broth and cover loosely with a lid or damp paper towel. Microwave on medium power in 60-second intervals, stirring in between, until heated through. Adding a little liquid helps to rehydrate the rice and prevent the shrimp from drying out too much.
- Stovetop: For larger portions or if you prefer to avoid the microwave, you can reheat the skillet on the stovetop. Place the leftovers in a non-stick skillet over medium-low heat. Add a splash of water or broth (about 1-2 tablespoons per serving) and cover. Heat gently, stirring occasionally, until everything is warmed through. This method tends to maintain a better texture for both the shrimp and rice compared to a dry microwave reheat.
Regardless of the method, be mindful not to overcook the shrimp during reheating, as they can become even more rubbery. Reheat just until piping hot.
- Freezing: I generally do not recommend freezing this Garlic Butter Shrimp and Rice Skillet. The texture of cooked shrimp changes significantly after freezing and thawing – it tends to become rubbery and tough. The rice can also become mushy or grainy upon thawing and reheating. While it won’t be unsafe to eat, the quality and enjoyment of the dish will be noticeably diminished. It’s truly a dish best savored fresh or within a couple of days from the refrigerator.
Final Thoughts
Well, there you have it! I truly believe this is one of the most satisfying and easiest dishes you can whip up. The Garlic Butter Shrimp And Rice Skillet isn’t just a meal; it’s a culinary hug that comes together in a single pan. I just love how the aromatic garlic and rich butter perfectly coat every piece of succulent shrimp and infuse into every grain of rice, creating a symphony of flavors that’s simply irresistible. This Garlic Butter Shrimp And Rice Skillet is a must-try because it delivers incredible taste with minimal fuss, making it perfect for a quick weeknight dinner or a relaxed weekend treat. I promise you, once you experience the comforting, savory goodness of this Garlic Butter Shrimp And Rice Skillet, it will quickly become a beloved staple in your home. Go on, give it a try – you won’t regret it!
Garlic Butter Shrimp & Rice Skillet: Quick & Easy Dinner!
- Total Time: 45 minutes
- Yield: 4 servings
Description
This Garlic Butter Shrimp and Rice Skillet is a quick and flavorful one-pan meal that combines juicy shrimp with aromatic garlic butter and fluffy rice. Perfect for a weeknight dinner, it’s easy to make and even easier to clean up!
Ingredients
- Large raw shrimp, peeled and deveined (21/25 count)
- Unsalted butter
- Fresh garlic, minced (6-8 cloves)
- Long-grain white rice (Jasmine or Basmati)
- Chicken or vegetable broth (low-sodium)
- Salt
- Freshly ground black pepper
- Dried oregano or Italian seasoning
- Red pepper flakes (optional)
- Fresh lemon juice
- Fresh parsley or chives, chopped
Instructions
- Prep the Shrimp: If using frozen shrimp, ensure they are fully thawed and pat them very dry with paper towels. Season the shrimp generously with salt and black pepper on both sides.
- Sear the Shrimp: Heat a large, oven-safe skillet over medium-high heat. Add half of the unsalted butter. Once melted, add the seasoned shrimp in a single layer and cook for 1-2 minutes per side until pink and opaque. Remove the shrimp from the skillet and set aside.
- Sauté the Aromatics: Reduce heat to medium and add the remaining unsalted butter to the skillet. Once melted, add the minced garlic and sauté for 30 seconds to 1 minute until fragrant.
- Toast the Rice: Add the uncooked long-grain white rice to the skillet and stir for 1-2 minutes to coat the grains in butter and garlic.
- Add Broth and Simmer: Pour in the chicken or vegetable broth, stir to combine, and bring to a gentle simmer. Cover tightly and cook undisturbed for 15-18 minutes.
- Rest the Rice: After cooking, remove the skillet from heat and let it rest with the lid on for another 5 minutes.
- Combine and Finish: Fluff the rice with a fork, stir in the reserved shrimp, add fresh lemon juice, and sprinkle with parsley or chives. Toss gently to combine.
- Serve Immediately: Enjoy the dish fresh off the stove!
- Prep Time: 15 mins
- Cook Time: 30 mins
- Category: Dinner
- Method: Stovetop
- Cuisine: American
Nutrition
- Serving Size: 1 bowl
- Calories: 450
- Sugar: 1 g
- Sodium: 600 mg
- Fat: 20 g
- Saturated Fat: 10 g
- Unsaturated Fat: 8 g
- Trans Fat: 0 g
- Carbohydrates: 45 g
- Fiber: 2 g
- Protein: 25 g
- Cholesterol: 200 mg
Keywords: To ensure tender shrimp, avoid overcooking them. Pat the shrimp dry before searing for better texture. Fresh garlic is essential for flavor, and a tight-fitting lid is crucial for properly steaming the rice.
Leave a Comment