

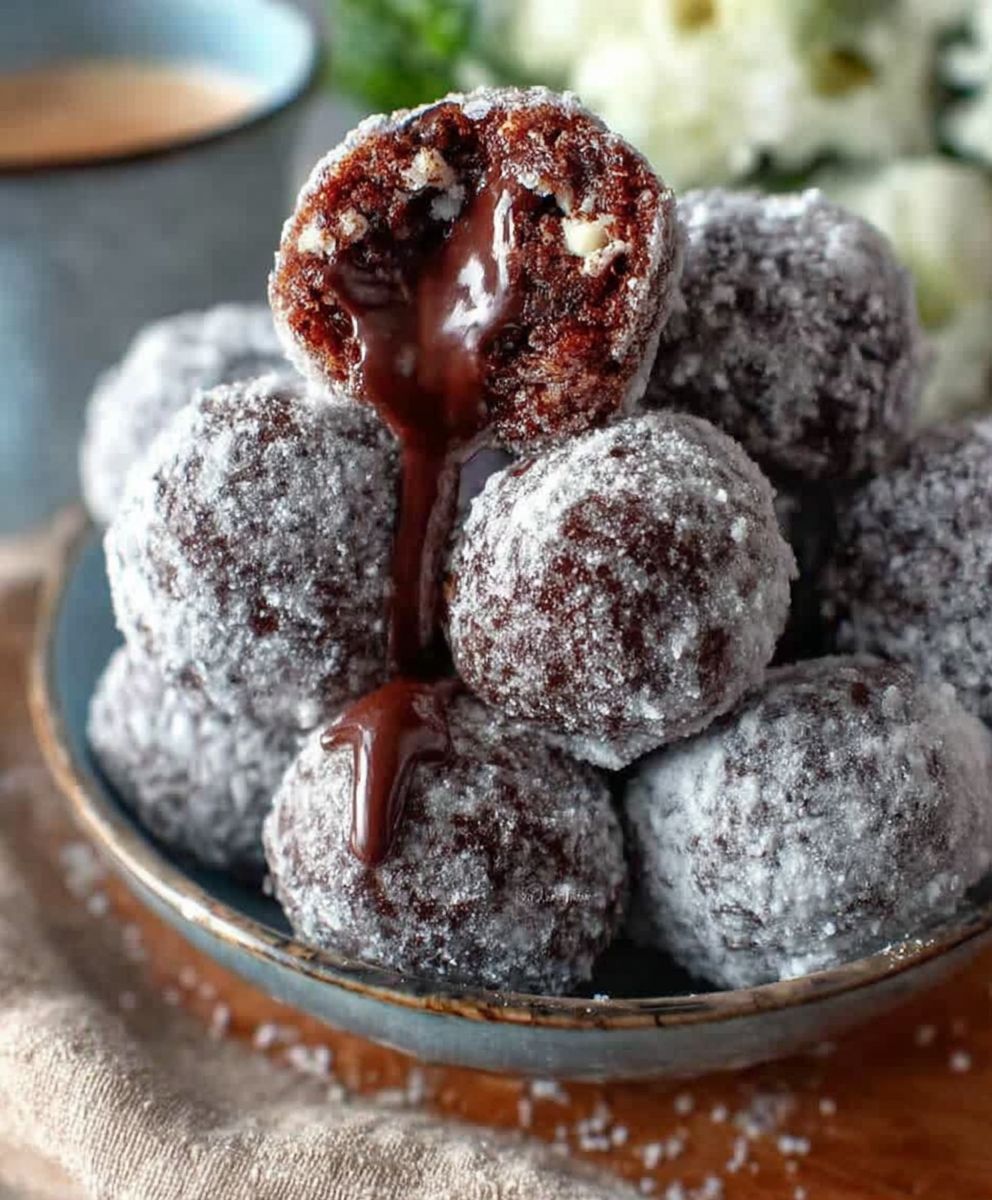
Glazed Chocolate Donut Holes: Prepare to enter a world of irresistible, bite-sized bliss! Imagine sinking your teeth into a perfectly round, miniature donut, its soft, cakey interior giving way to a glossy, decadent chocolate glaze. These aren’t just donut holes; they’re tiny explosions of happiness, guaranteed to brighten any morning or sweeten any afternoon.
While the exact origins of the donut hole are debated, their popularity is undeniable. Some say they were born from the center of a traditional donut, ingeniously fried to avoid waste. Others believe they were created to ensure even cooking throughout the larger donut. Regardless of their history, these delightful treats have become a beloved staple in bakeries and homes around the globe.
What makes these glazed chocolate donut holes so universally adored? It’s a combination of factors. The rich, chocolatey flavor is a classic crowd-pleaser, while the soft, airy texture is simply divine. Their small size makes them perfect for snacking, sharing, or indulging in a guilt-free treat. Plus, they’re incredibly convenient to make at home, allowing you to enjoy fresh, warm donut holes whenever the craving strikes. So, get ready to experience pure joy in every bite with this easy and delicious recipe!

Ingredients:
- For the Donut Holes:
- 2 ¼ cups all-purpose flour, plus more for dusting
- ¼ cup granulated sugar
- 2 ¼ teaspoons (1 packet) active dry yeast
- ½ teaspoon salt
- ½ cup milk, lukewarm (about 110°F)
- ¼ cup unsalted butter, melted
- 1 large egg
- 1 teaspoon vanilla extract
- Vegetable oil, for frying
- For the Chocolate Glaze:
- 4 ounces semi-sweet chocolate, finely chopped
- 2 tablespoons unsalted butter
- 2 tablespoons milk
- 1 cup powdered sugar, sifted
- ½ teaspoon vanilla extract
- Pinch of salt
Preparing the Dough:
- Activate the Yeast: In a large bowl, or the bowl of your stand mixer, combine the lukewarm milk, sugar, and yeast. Let it sit for 5-10 minutes, or until the yeast is foamy. This step is crucial to ensure your yeast is alive and active, which will help your donut holes rise properly. If the yeast doesn’t foam, it’s likely expired, and you’ll need to start over with fresh yeast.
- Combine Wet Ingredients: Once the yeast is foamy, add the melted butter, egg, and vanilla extract to the bowl. Whisk everything together until well combined. Make sure your butter isn’t too hot, or it could cook the egg.
- Add Dry Ingredients: In a separate bowl, whisk together the flour and salt. Gradually add the dry ingredients to the wet ingredients, mixing on low speed with the dough hook attachment (if using a stand mixer) or with a wooden spoon (if mixing by hand). Mix until a shaggy dough forms.
- Knead the Dough: If using a stand mixer, knead the dough on medium speed for 5-7 minutes, or until it becomes smooth and elastic. If kneading by hand, turn the dough out onto a lightly floured surface and knead for 8-10 minutes, or until it reaches the same smooth and elastic consistency. The dough should be slightly tacky but not sticky. If it’s too sticky, add a tablespoon of flour at a time until it reaches the right consistency.
- First Rise: Place the dough in a lightly oiled bowl, turning to coat. Cover the bowl with plastic wrap or a clean kitchen towel and let it rise in a warm place for 1-1.5 hours, or until doubled in size. The warmer the environment, the faster the dough will rise. You can place the bowl in a slightly warmed oven (turned off!) or near a sunny window.
Shaping and Second Rise:
- Punch Down the Dough: Once the dough has doubled in size, gently punch it down to release the air. Turn the dough out onto a lightly floured surface.
- Roll and Cut: Roll the dough out to about ½ inch thickness. Use a small cookie cutter (about 1 inch in diameter) or a small glass to cut out donut holes. You can also use a piping bag to pipe out small circles of dough if you prefer a more uniform shape.
- Second Rise: Place the donut holes on a baking sheet lined with parchment paper. Cover them loosely with plastic wrap or a clean kitchen towel and let them rise for another 30-45 minutes, or until they are puffy. This second rise is important for creating light and airy donut holes.
Frying the Donut Holes:
- Heat the Oil: Pour about 2-3 inches of vegetable oil into a deep pot or Dutch oven. Heat the oil over medium heat to 350°F (175°C). Use a deep-fry thermometer to monitor the temperature of the oil. Maintaining the correct temperature is crucial for even cooking and preventing the donut holes from becoming greasy.
- Fry in Batches: Carefully drop a few donut holes into the hot oil, being careful not to overcrowd the pot. Fry for 1-2 minutes per side, or until golden brown. Use a slotted spoon or spider to flip the donut holes and remove them from the oil.
- Drain Excess Oil: Place the fried donut holes on a wire rack lined with paper towels to drain excess oil. This will help prevent them from becoming soggy.
- Cool Slightly: Let the donut holes cool slightly before glazing.
Preparing the Chocolate Glaze:
- Melt the Chocolate and Butter: In a heatproof bowl set over a saucepan of simmering water (double boiler), combine the chopped chocolate and butter. Make sure the bottom of the bowl doesn’t touch the water. Stir occasionally until the chocolate and butter are completely melted and smooth.
- Add Milk and Vanilla: Remove the bowl from the heat and stir in the milk, vanilla extract, and salt.
- Whisk in Powdered Sugar: Gradually whisk in the sifted powdered sugar until the glaze is smooth and glossy. If the glaze is too thick, add a teaspoon of milk at a time until it reaches the desired consistency. If it’s too thin, add a tablespoon of powdered sugar at a time.
Glazing the Donut Holes:
- Dip the Donut Holes: Dip each donut hole into the chocolate glaze, coating it completely. You can use a fork or your fingers to do this.
- Let Excess Drip Off: Let the excess glaze drip off before placing the glazed donut holes back on the wire rack.
- Optional: Add Sprinkles: If desired, sprinkle the glazed donut holes with sprinkles while the glaze is still wet.
- Set the Glaze: Let the glaze set completely before serving. This will take about 15-20 minutes.
Tips for Perfect Donut Holes:
- Use Fresh Yeast: Make sure your yeast is fresh and active for the best results.
- Don’t Overcrowd the Pot: Frying too many donut holes at once will lower the oil temperature and result in greasy donut holes.
- Maintain Oil Temperature: Use a deep-fry thermometer to monitor the oil temperature and adjust the heat as needed.
- Sift the Powdered Sugar: Sifting the powdered sugar will prevent lumps in the glaze.
- Adjust Glaze Consistency: Adjust the amount of milk or powdered sugar in the glaze to achieve the desired consistency.
Variations:
- Cinnamon Sugar Donut Holes: Toss the fried donut holes in cinnamon sugar instead of glazing them.
- Vanilla Glazed Donut Holes: Use a vanilla glaze instead of chocolate glaze.
- Filled Donut Holes: Inject the donut holes with your favorite filling, such as jam, custard, or Nutella.
Conclusion:
And there you have it! These Glazed Chocolate Donut Holes are truly irresistible, and I’m confident they’ll become a new favorite in your household. From the rich, chocolatey dough to the shimmering, sweet glaze, every bite is a little piece of heaven. But why is this recipe a must-try? It’s simple: these donut holes are incredibly easy to make, require minimal ingredients you likely already have in your pantry, and deliver a taste that rivals anything you’d find at a fancy bakery. Forget those store-bought, often stale, donut holes – these are fresh, warm, and bursting with flavor.
The beauty of this recipe also lies in its versatility. While the classic glaze is divine, feel free to experiment! Dust them with powdered sugar for a lighter touch, drizzle them with white chocolate for a contrasting sweetness, or even roll them in cinnamon sugar for a warm, comforting treat. For a more decadent experience, try dipping them in melted dark chocolate and sprinkling them with sea salt. The possibilities are endless!
Serving suggestions? Oh, where do I even begin? These Glazed Chocolate Donut Holes are perfect for breakfast, brunch, or a delightful afternoon snack. Imagine serving them warm with a cup of freshly brewed coffee or a glass of cold milk. They’re also a fantastic addition to any party or gathering. Picture a platter piled high with these glistening donut holes – they’re guaranteed to be the first thing to disappear! For a truly special occasion, consider creating a donut hole tower, drizzled with various glazes and adorned with sprinkles. It’s a showstopper that’s sure to impress.
But don’t just take my word for it. The real magic happens when you try this recipe yourself. I’ve poured my heart into creating a recipe that’s both delicious and accessible, and I truly believe you’ll love the results. The aroma of baking chocolate will fill your kitchen, and the satisfaction of creating something so delightful from scratch is simply unmatched.
So, what are you waiting for? Gather your ingredients, preheat your oven, and get ready to embark on a donut hole adventure! I promise you won’t regret it. And remember, baking is all about having fun and experimenting. Don’t be afraid to put your own spin on the recipe and make it your own. Maybe add a hint of espresso powder to the dough for a mocha flavor, or incorporate some chopped nuts for added texture.
I’m so excited for you to try these Glazed Chocolate Donut Holes! Once you do, I’d absolutely love to hear about your experience. Did you make any variations? What did your family and friends think? Share your photos and stories in the comments below – I can’t wait to see your creations! Happy baking, and enjoy every single bite of these little chocolate gems. I am sure you will agree that this recipe for **Glazed Chocolate Donut Holes** is a winner!
Glazed Chocolate Donut Holes: The Ultimate Guide to Baking Perfection
Soft, fluffy, bite-sized donut holes fried to golden perfection and dipped in a rich chocolate glaze. An irresistible treat!
Ingredients
Instructions
Recipe Notes
- Use fresh yeast for the best results.
- Don’t overcrowd the pot when frying.
- Maintain the oil temperature at 350°F (175°C).
- Sift the powdered sugar to prevent lumps in the glaze.
- Adjust the glaze consistency by adding milk or powdered sugar as needed.
- For Cinnamon Sugar Donut Holes: Toss the fried donut holes in cinnamon sugar instead of glazing them.
- For Vanilla Glazed Donut Holes: Use a vanilla glaze instead of chocolate glaze.
- For Filled Donut Holes: Inject the donut holes with your favorite filling, such as jam, custard, or Nutella.


Leave a Comment