

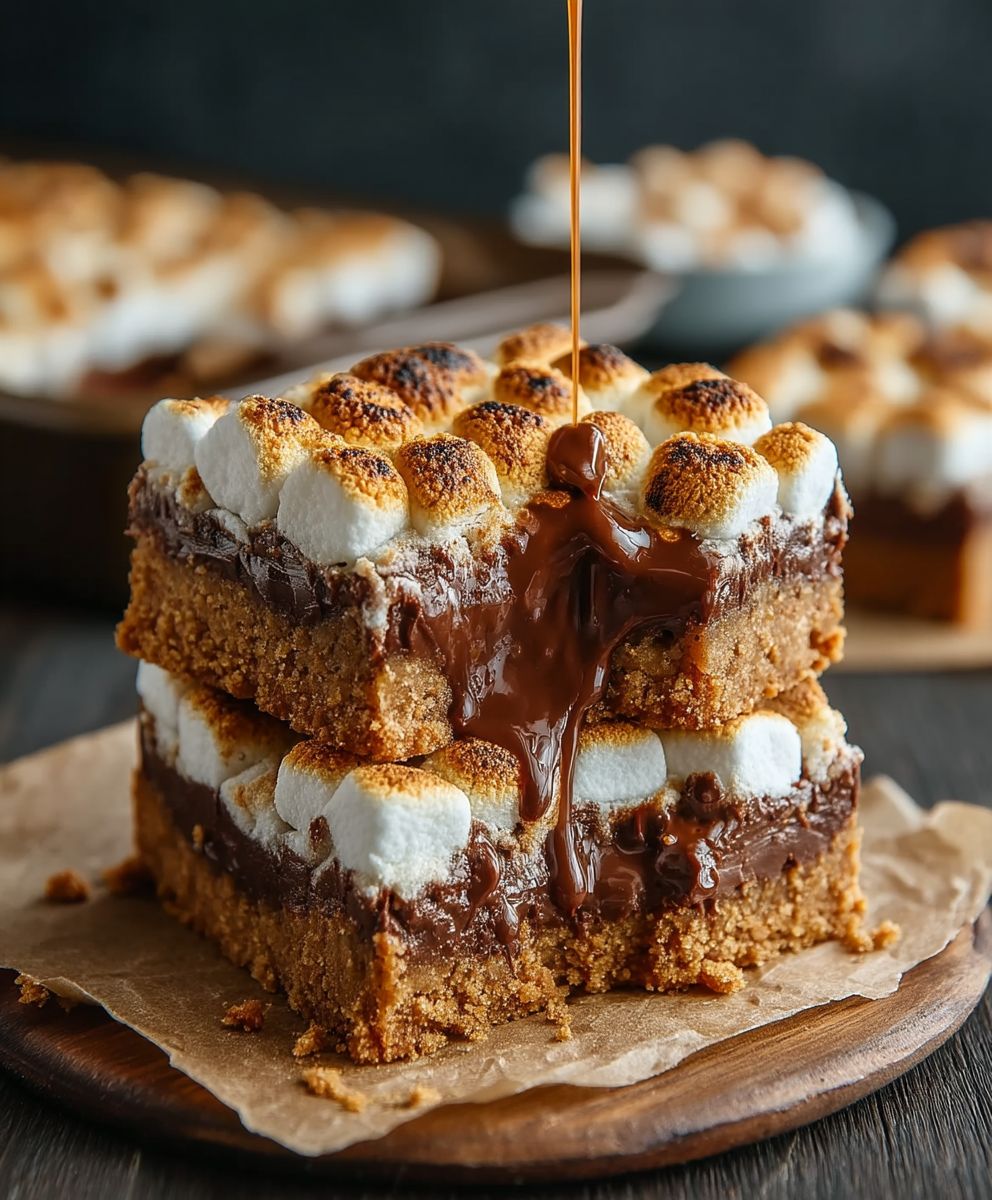
Gooey Smores Bars: Prepare to be transported back to crackling campfires and starry nights with every single bite! Imagine the irresistible combination of crunchy graham crackers, melted chocolate, and gooey marshmallows, all fused together in a handheld treat that’s far easier to make than traditional s’mores. Forget the skewers and open flames; these bars bring the beloved campfire classic right into your kitchen, ready to be enjoyed any time of year.
While the exact origins of the s’more are a bit hazy, its popularity exploded in the early 20th century, with the first known recipe appearing in a Girl Scout guidebook in the 1920s. It quickly became a quintessential American treat, synonymous with summer camps and backyard gatherings. The beauty of the s’more lies in its simplicity – a celebration of textures and flavors that perfectly complement each other.
What makes gooey smores bars so universally loved? It’s the delightful contrast! The crisp graham cracker base provides a sturdy foundation for the rich, melty chocolate and the soft, pillowy marshmallows. The combination of sweet, crunchy, and gooey is simply irresistible. Plus, these bars are incredibly convenient. No campfire needed! They’re perfect for potlucks, bake sales, or a quick and easy dessert when you’re craving a taste of nostalgia. Get ready to experience the magic of s’mores in a whole new, incredibly delicious way!

Ingredients:
- For the Graham Cracker Crust:
- 1 ½ cups graham cracker crumbs (about 12 full sheets)
- 5 tablespoons (70g) unsalted butter, melted
- ¼ cup (50g) granulated sugar
- For the Gooey Marshmallow Layer:
- 1 (10 ounce) bag large marshmallows
- 3 tablespoons (45g) unsalted butter
- 1 teaspoon vanilla extract
- ¼ teaspoon salt
- For the Chocolate Topping:
- 1 ½ cups (255g) semi-sweet chocolate chips
- 1 tablespoon (15ml) coconut oil (or vegetable oil)
- Optional Toppings:
- Mini marshmallows
- Extra graham cracker crumbs
- Sea salt flakes
Preparing the Graham Cracker Crust:
- Preheat your oven to 350°F (175°C). This is a crucial first step, so don’t skip it!
- In a medium bowl, combine the graham cracker crumbs, melted butter, and granulated sugar. I like to use a fork to ensure everything is evenly distributed. You want the mixture to resemble wet sand.
- Press the graham cracker mixture firmly into the bottom of an 8×8 inch baking pan. I find that using the bottom of a measuring cup helps to create a smooth and even crust. Make sure to get into all the corners!
- Bake the crust for 8-10 minutes, or until it’s lightly golden brown. Keep a close eye on it, as it can burn easily. Once baked, remove from the oven and let it cool slightly while you prepare the marshmallow layer.
Making the Gooey Marshmallow Layer:
- In a large, microwave-safe bowl, combine the marshmallows and butter. I prefer using a glass bowl for this, but any microwave-safe bowl will work.
- Microwave on high for 1-2 minutes, stirring every 30 seconds, until the marshmallows are melted and smooth. Be careful, as the mixture will be very hot! The timing can vary depending on your microwave, so keep a close watch. You want them completely melted, but not burnt.
- Stir in the vanilla extract and salt. This adds a depth of flavor that really elevates the marshmallow layer. Make sure everything is well combined.
- Pour the melted marshmallow mixture over the slightly cooled graham cracker crust. Spread it evenly using a spatula. Don’t worry if it seems a little sticky; that’s exactly what we want!
Creating the Chocolate Topping:
- In a separate microwave-safe bowl, combine the chocolate chips and coconut oil (or vegetable oil). The oil helps to create a smooth and shiny chocolate topping.
- Microwave on high for 30 seconds intervals, stirring in between, until the chocolate is completely melted and smooth. Again, be careful not to overheat the chocolate, as it can seize up. If you prefer, you can melt the chocolate in a double boiler over simmering water.
- Pour the melted chocolate over the marshmallow layer. Spread it evenly using a spatula.
Assembling and Finishing Touches:
- If desired, sprinkle the top with mini marshmallows, extra graham cracker crumbs, and/or sea salt flakes. The sea salt adds a wonderful contrast to the sweetness of the bars.
- Let the bars cool completely at room temperature for at least 2 hours, or until the chocolate is set. This is important, as it allows the bars to firm up and makes them easier to cut. If you’re impatient (like me!), you can speed up the process by refrigerating them for about an hour.
- Once the bars are set, cut them into squares using a sharp knife. I find that running the knife under hot water and wiping it clean between cuts helps to prevent the chocolate from cracking.
- Store the smores bars in an airtight container at room temperature for up to 3 days. They’re best enjoyed fresh, but they’ll still be delicious after a few days!
Tips and Tricks for Perfect Smores Bars:
- Don’t overbake the crust: A slightly underbaked crust is better than a burnt one. Keep a close eye on it while it’s in the oven.
- Use good quality chocolate: The quality of the chocolate will greatly impact the flavor of the bars. I recommend using a good quality semi-sweet chocolate.
- Be patient: Letting the bars cool completely is essential for them to set properly and be easy to cut.
- Get creative with toppings: Feel free to experiment with different toppings, such as chopped nuts, pretzels, or even a drizzle of caramel sauce.
- For extra gooeyness: If you want an even gooier marshmallow layer, you can add a few extra marshmallows to the mixture.
- Prevent sticking: Line your baking pan with parchment paper for easy removal and cleanup. Leave an overhang of parchment paper on the sides to easily lift the bars out of the pan.
- Variations: Try using different types of chocolate, such as milk chocolate or dark chocolate. You can also add a layer of peanut butter between the crust and the marshmallow layer for a peanut butter cup smores bar.
- Microwave Melting Tips: When melting the marshmallows and chocolate in the microwave, use short intervals (30 seconds) and stir frequently to prevent burning. Burnt marshmallows and chocolate are not your friends!
- Cutting Cleanly: For neat cuts, use a warm, clean knife. Run the knife under hot water, dry it thoroughly, and then slice. Repeat this process between each cut.
- Serving Suggestions: These bars are delicious on their own, but you can also serve them with a scoop of vanilla ice cream or a dollop of whipped cream. They’re also great for parties and potlucks!
Conclusion:
And there you have it! These Gooey Smores Bars are truly a must-try for anyone who loves the classic campfire treat. I know, I know, there are a million smores recipes out there, but trust me on this one. The combination of the buttery graham cracker crust, the decadent chocolate layer, and the perfectly toasted marshmallows creates a symphony of flavors and textures that will have you reaching for seconds (and maybe thirds!).
What makes these bars so special? It’s the perfect balance. The graham cracker crust provides a sturdy and slightly sweet base, preventing the bars from becoming overly gooey. The chocolate layer, whether you opt for milk, dark, or semi-sweet, adds a rich and satisfying depth. And of course, the marshmallows – the star of the show! Toasted to golden-brown perfection, they offer that signature gooeyness and slightly smoky flavor that we all crave.
But the best part? These bars are incredibly easy to make! No complicated techniques or fancy ingredients required. Just a few simple steps and you’ll have a batch of these irresistible treats ready to devour. They’re perfect for potlucks, parties, or even just a cozy night in.
Now, let’s talk serving suggestions and variations. While these Gooey Smores Bars are delicious on their own, there are plenty of ways to customize them to your liking. For an extra touch of indulgence, try drizzling them with melted chocolate or caramel sauce. A sprinkle of sea salt can also enhance the sweetness and add a delightful salty-sweet contrast.
If you’re feeling adventurous, consider adding some chopped nuts, such as pecans or walnuts, to the graham cracker crust for added texture and flavor. You could also experiment with different types of chocolate, like white chocolate or peanut butter chips. For a truly decadent experience, try adding a layer of Nutella between the graham cracker crust and the chocolate layer.
Another fun variation is to use flavored marshmallows, such as strawberry or vanilla. This can add a unique twist to the classic smores flavor. And if you’re looking for a healthier option, you can use whole wheat graham crackers and dark chocolate with a higher cocoa content.
These bars are best served warm, when the marshmallows are still gooey and the chocolate is melted. You can enjoy them straight from the oven, or let them cool slightly before cutting them into squares. They also store well in an airtight container at room temperature for up to three days, although I doubt they’ll last that long!
I truly believe that these Gooey Smores Bars are a crowd-pleaser. They’re simple, delicious, and guaranteed to bring a smile to everyone’s face. So, what are you waiting for? Gather your ingredients, preheat your oven, and get ready to experience the ultimate smores indulgence.
I’m so excited for you to try this recipe! Once you do, please come back and share your experience in the comments below. I’d love to hear what you think and what variations you tried. Did you add any special ingredients? Did you serve them with anything else? Your feedback is invaluable and helps me to improve my recipes and create even more delicious treats for you to enjoy. Happy baking! And remember, don’t be afraid to get a little messy – that’s part of the fun!
Gooey Smores Bars: The Ultimate Recipe for Summer Treats
Easy and delicious S'mores Bars with a graham cracker crust, gooey marshmallow center, and rich chocolate topping. Perfect for a quick dessert!
Ingredients
Instructions
Recipe Notes
- Don’t overbake the crust.
- Use good quality chocolate.
- Be patient and let the bars cool completely.
- Get creative with toppings.
- For extra gooeyness, add a few extra marshmallows.
- Line your baking pan with parchment paper for easy removal.
- Try different types of chocolate or add a layer of peanut butter.
- When melting in the microwave, use short intervals and stir frequently.
- For neat cuts, use a warm, clean knife.
- Serve with ice cream or whipped cream.
Leave a Comment