

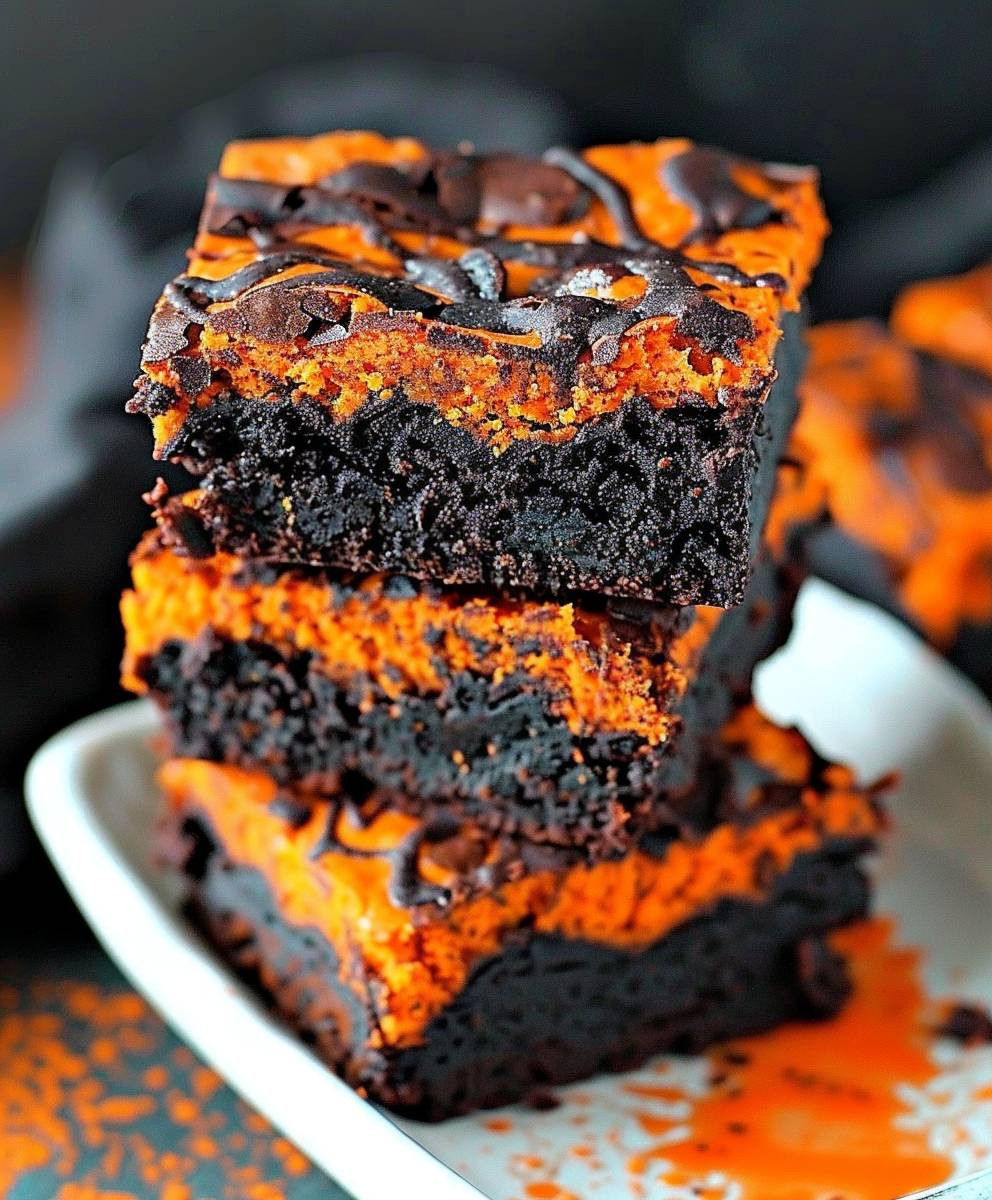
Halloween Brownies
Halloween Brownies: Are you ready to conjure up some seriously spooky deliciousness this Halloween? Forget the same old candy corn – this year, I’m sharing my recipe for intensely decadent, frightfully fun Halloween Brownies. These aren’t your average brownies; they’re a masterpiece of chocolatey goodness, perfectly textured, and adorned with delightfully creepy decorations that will have your guests screaming for more (in a good way, of course!).
While the precise origins of brownies are a bit murky, their evolution into the beloved treat we know today is a testament to the power of simple ingredients transformed into something extraordinary. And what better time to celebrate this chocolatey classic than Halloween? The holiday’s inherent spookiness lends itself perfectly to creative brownie decorating, allowing for endless possibilities in terms of presentation.
What makes these Halloween Brownies so irresistible? It’s the perfect combination of fudgy, chewy texture and intensely rich chocolate flavor. The slightly bitter cocoa powder is balanced beautifully by the sweetness of the sugar, creating a harmonious taste sensation that’s both satisfying and addictive. Plus, let’s be honest, the ease of preparation makes them perfect for busy Halloween schedules. You can whip up a batch in no time, leaving you plenty of time to focus on other spooky festivities.
So, gather your ingredients, put on your witch’s hat (metaphorically, or literally!), and let’s get baking! Prepare to be amazed by how easily you can create these show-stopping, delicious Halloween Brownies. They’re guaranteed to be the star of your Halloween spread.

Ingredients:
- 2 cups (250g) all-purpose flour
- ¾ cup (60g) unsweetened cocoa powder
- 1 ½ teaspoons baking powder
- ¾ teaspoon baking soda
- ¾ teaspoon salt
- 1 ½ cups (300g) granulated sugar
- ¾ cup (170g) unsalted butter, melted and cooled slightly
- 4 large eggs
- 1 teaspoon vanilla extract
- 1 cup (240ml) buttermilk
- 1 cup (170g) semi-sweet chocolate chips
- ½ cup (70g) chopped pecans or walnuts (optional)
For the Halloween Frosting:
- 1 cup (2 sticks) unsalted butter, softened
- 3 cups (360g) powdered sugar
- ½ cup (60g) unsweetened cocoa powder
- ½ cup (120ml) milk
- 1 teaspoon vanilla extract
- Orange food coloring gel (optional, for a pumpkin spice effect)
- Green food coloring gel (optional, for a spooky green effect)
- Black food coloring gel (optional, for a witch’s brew effect)
- Halloween sprinkles (various colors and shapes)
- Miniature candy corn
- Small gummy worms
- Pretzel sticks
- Miniature chocolate chips
Preparing the Brownie Batter:
- Preheat your oven to 350°F (175°C). Grease and flour a 9×13 inch baking pan. I like to line the bottom with parchment paper for easy removal later – it makes cleanup a breeze!
- In a large bowl, whisk together the flour, cocoa powder, baking powder, baking soda, and salt. Make sure everything is well combined to avoid lumps in your brownies.
- In a separate bowl, cream together the sugar and melted butter until smooth. This step is important for a rich and decadent brownie. Don’t rush it!
- Beat in the eggs one at a time, then stir in the vanilla extract. I like to add the vanilla last for the best flavor infusion.
- Gradually add the dry ingredients to the wet ingredients, alternating with the buttermilk, beginning and ending with the dry ingredients. Mix until just combined – don’t overmix! Overmixing can lead to tough brownies.
- Stir in the chocolate chips and nuts (if using). This is my favorite part – adding all those delicious goodies!
- Pour the batter into the prepared pan and spread evenly. Make sure it reaches all the corners for even baking.
Baking the Brownies:
- Bake for 30-35 minutes, or until a toothpick inserted into the center comes out with moist crumbs attached. Don’t overbake! Slightly underbaked brownies are fudgier and more delicious.
- Let the brownies cool completely in the pan before frosting. This is crucial for a smooth, even frosting application. Patience is key here!
Making the Halloween Frosting:
- In a large bowl, beat the softened butter until light and fluffy. This takes a few minutes, but it’s worth it for a smooth and creamy frosting.
- Gradually add the powdered sugar and cocoa powder, alternating with the milk, and beat until smooth and creamy. I usually add the powdered sugar in stages to avoid a huge cloud of dust!
- Stir in the vanilla extract. A little vanilla goes a long way in enhancing the flavor.
- Divide the frosting into three separate bowls. This allows you to create different colored frostings for a more festive look.
- Add orange food coloring to one bowl, green to another, and black to the third. Start with a small amount of food coloring and add more as needed to achieve your desired shade. It’s always easier to add more than to take away!
- Once the brownies are completely cool, frost them with the different colored frostings. Get creative with your designs! You can create spooky patterns or simply spread the frosting evenly.
- Decorate with Halloween sprinkles, candy corn, gummy worms, pretzel sticks, and miniature chocolate chips. Let your imagination run wild! This is the fun part where you can really personalize your brownies.
Tips for Success:
- Don’t overmix the batter: Overmixing develops the gluten in the flour, resulting in tough brownies. Mix until just combined.
- Use good quality cocoa powder: The flavor of your brownies will be greatly enhanced by using a high-quality unsweetened cocoa powder.
- Let the brownies cool completely before frosting: This prevents the frosting from melting and ensures a smooth, even finish.
- Get creative with your decorations: Use your favorite Halloween candies and sprinkles to create a spooky and festive treat.
- Store leftover brownies in an airtight container at room temperature for up to 3 days, or in the refrigerator for up to a week.
Troubleshooting:
Brownies are dry:
You may have overbaked them. Next time, check for doneness a few minutes earlier.
Brownies are gummy:
You may have underbaked them. Try baking for a few more minutes next time.
Frosting is too thick:
Add a little more milk, a teaspoon at a time, until you reach your desired consistency.
Frosting is too thin:
Add a little more powdered sugar, a tablespoon at a time, until you reach your desired consistency.
Conclusion:
So there you have it – my recipe for the ultimate Halloween Brownies! I truly believe this recipe is a must-try for several reasons. First, the flavor combination is simply irresistible. The deep, rich chocolate of the brownies is perfectly complemented by the spooky, subtly sweet notes of the candy corn and the satisfying crunch of the pretzels. It’s a delightful balance of textures and tastes that will leave everyone wanting more. Second, these brownies are incredibly easy to make, even for beginner bakers. The straightforward instructions and readily available ingredients mean you can whip up a batch in no time at all, perfect for a last-minute Halloween gathering or a fun weekend baking project. And finally, the presentation is undeniably festive! These Halloween Brownies are guaranteed to be a conversation starter and a visual delight at any Halloween party or gathering. They’re the perfect spooky treat to impress your friends and family.
Why These Halloween Brownies Are Special:
What sets these Halloween Brownies apart from other brownie recipes is their unique blend of classic brownie goodness with a fun, festive twist. I’ve carefully chosen each ingredient to ensure a perfect harmony of flavors and textures. The candy corn adds a touch of unexpected sweetness and a vibrant pop of color, while the pretzels provide a delightful salty crunch that cuts through the richness of the chocolate. It’s this attention to detail that elevates these brownies from a simple dessert to a truly memorable Halloween treat. I’ve even experimented with different types of chocolate – dark, milk, and even white chocolate – to find the perfect balance, and I encourage you to do the same and discover your favorite variation!
Serving Suggestions & Variations:
These Halloween Brownies are delicious on their own, but you can easily elevate them further with a few simple additions. A dollop of whipped cream or a scoop of vanilla ice cream is a classic pairing that enhances the richness of the chocolate. For an extra spooky touch, consider dusting them with powdered sugar to create a ghostly effect. Alternatively, you could drizzle them with a dark chocolate ganache for an even more decadent experience. Feeling adventurous? Try adding chopped pecans or walnuts for added texture and flavor. You could even experiment with different types of candy – perhaps some chopped Snickers or Reese’s Pieces for a truly personalized Halloween treat. The possibilities are endless!
For those who prefer a less intense chocolate flavor, you can easily adjust the recipe by reducing the amount of cocoa powder or using a lighter chocolate. For a vegan version, simply substitute the eggs and butter with vegan alternatives readily available in most supermarkets. Don’t be afraid to experiment and make these brownies your own!
Give it a Try and Share Your Experience!
I genuinely hope you’ll give my Halloween Brownies recipe a try. I’m confident that they’ll become a new Halloween tradition in your household. Once you’ve baked them, I’d love to hear about your experience! Share your photos and feedback on social media using the hashtag #HalloweenBrownies. I can’t wait to see your spooky creations and hear about how much your friends and family enjoyed them. Happy baking, and have a spooktacular Halloween!
Remember to share your baking journey with me! I’m excited to see your delicious Halloween Brownies.
Halloween Brownies: Spooky-Delicious Recipes & Ideas
Fudgy Halloween brownies topped with colorful Halloween frosting and festive decorations.
Ingredients
Instructions
Recipe Notes
- Don’t overmix the brownie batter to avoid tough brownies.
- Use good quality cocoa powder for best flavor.
- Let brownies cool completely before frosting to prevent melting.
- Get creative with your Halloween decorations!
- Store leftover brownies in an airtight container at room temperature for up to 3 days, or in the refrigerator for up to a week.

Leave a Comment