

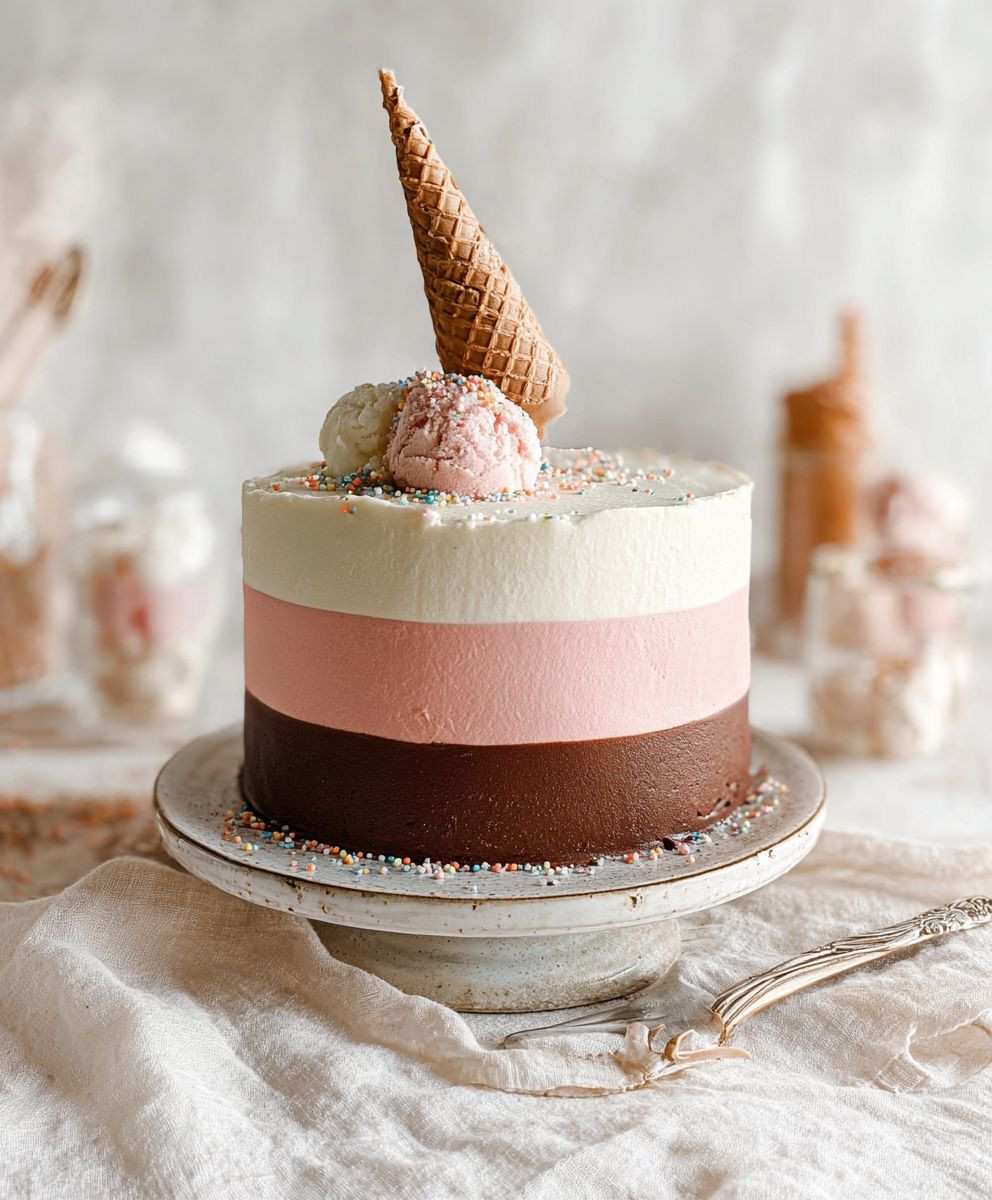
High Altitude Neapolitan Cake: Prepare to embark on a baking adventure that reaches new heights! Have you ever dreamt of a cake that’s not only visually stunning but also boasts a symphony of flavors in every bite? This isn’t just any cake; it’s a Neapolitan dream, adapted for the unique challenges of high-altitude baking. Forget dry, crumbly cakes that fall flat – we’re about to conquer the thin air and create a masterpiece.
The classic Neapolitan flavor combination – chocolate, vanilla, and strawberry – has delighted taste buds for generations. Its roots can be traced back to the late 19th century, with its popularity soaring in America during the early 20th century. The appeal is undeniable: a harmonious blend of rich chocolate, creamy vanilla, and the bright, fruity tang of strawberry. It’s a nostalgic flavor profile that evokes childhood memories and pure, simple joy.
But what happens when you take this beloved flavor trio to higher elevations? Baking at high altitude requires adjustments to ensure a moist, tender crumb and a cake that rises beautifully. That’s where this recipe comes in. We’ve carefully tweaked the ingredients and techniques to create a High Altitude Neapolitan Cake that’s perfectly balanced, incredibly delicious, and a guaranteed showstopper. Get ready to impress your friends and family with a cake that’s as delightful to look at as it is to eat!

Ingredients:
- For the Cake:
- 2 1/4 cups (270g) cake flour, sifted
- 1 tablespoon baking powder
- 1/2 teaspoon baking soda
- 1/2 teaspoon salt
- 1 cup (2 sticks, 226g) unsalted butter, softened
- 1 3/4 cups (350g) granulated sugar
- 4 large eggs
- 1 teaspoon vanilla extract
- 1 cup (240ml) buttermilk
- For the Chocolate Layer:
- 1/4 cup (25g) unsweetened cocoa powder
- 2 tablespoons hot water
- For the Strawberry Layer:
- 1/2 cup (approximately 100g) fresh strawberries, pureed
- 1/4 teaspoon red food coloring (optional, for enhanced color)
- For the Frosting:
- 1 cup (2 sticks, 226g) unsalted butter, softened
- 4 cups (480g) powdered sugar, sifted
- 1/2 cup (120ml) heavy cream
- 1 teaspoon vanilla extract
- Pinch of salt
- For Decoration (Optional):
- Fresh strawberries, sliced
- Chocolate shavings
Preparing the Cake Batter:
- Preheat and Prepare: I always start by preheating my oven to 350°F (175°C). Since we’re at high altitude, I’m reducing the temperature to 325°F (163°C) to prevent the cake from drying out. Grease and flour three 8-inch round cake pans. I like to use parchment paper rounds at the bottom for easy release. This step is crucial!
- Combine Dry Ingredients: In a medium bowl, whisk together the sifted cake flour, baking powder, baking soda, and salt. Sifting the cake flour is really important for a light and airy texture. Don’t skip this!
- Cream Butter and Sugar: In a large bowl, using an electric mixer, cream together the softened butter and granulated sugar until light and fluffy. This usually takes about 3-5 minutes. Make sure the butter is truly softened, but not melted.
- Add Eggs: Beat in the eggs one at a time, making sure each egg is fully incorporated before adding the next. Then, stir in the vanilla extract.
- Alternate Wet and Dry Ingredients: Gradually add the dry ingredients to the wet ingredients, alternating with the buttermilk. Begin and end with the dry ingredients. So, add about 1/3 of the dry ingredients, then 1/2 of the buttermilk, then another 1/3 of the dry ingredients, the remaining buttermilk, and finally the last 1/3 of the dry ingredients. Mix until just combined. Be careful not to overmix! Overmixing develops the gluten in the flour, which can result in a tough cake.
Creating the Flavored Layers:
- Divide the Batter: Divide the cake batter evenly into three separate bowls. I use a kitchen scale to ensure each bowl has the same amount of batter. This helps the layers bake evenly.
- Prepare the Chocolate Layer: In a small bowl, whisk together the cocoa powder and hot water until a smooth paste forms. Add this chocolate paste to one of the bowls of cake batter and gently fold it in until evenly combined. Be careful not to overmix.
- Prepare the Strawberry Layer: In another small bowl, combine the strawberry puree and red food coloring (if using). Add this mixture to another bowl of cake batter and gently fold it in until evenly combined. Again, avoid overmixing.
- The Vanilla Layer: The remaining bowl of cake batter will be your vanilla layer. You can add an extra 1/4 teaspoon of vanilla extract to enhance the vanilla flavor if you like.
Baking the Cakes:
- Pour into Pans: Pour each flavored batter into a prepared cake pan, spreading evenly.
- Bake: Bake in the preheated oven for 25-30 minutes, or until a wooden skewer inserted into the center comes out clean. Since we’re at high altitude, the baking time might be slightly shorter, so keep a close eye on them.
- Cool: Let the cakes cool in the pans for 10 minutes before inverting them onto a wire rack to cool completely. Make sure they are completely cool before frosting.
Making the Frosting:
- Cream Butter: In a large bowl, using an electric mixer, cream the softened butter until light and fluffy. This usually takes about 3-5 minutes.
- Add Powdered Sugar: Gradually add the sifted powdered sugar to the butter, beating on low speed until combined. Sifting the powdered sugar prevents lumps in the frosting.
- Add Liquid and Flavorings: Gradually add the heavy cream, vanilla extract, and salt to the mixture. Beat on medium speed until light and fluffy. If the frosting is too thick, add a little more heavy cream, one tablespoon at a time, until you reach the desired consistency. If it’s too thin, add a little more powdered sugar.
Assembling the Cake:
- Level the Cakes: If the cakes have domed on top, use a serrated knife to level them. This will ensure a stable and even cake.
- First Layer: Place the chocolate cake layer on a serving plate or cake stand. Spread a generous layer of frosting evenly over the top.
- Second Layer: Carefully place the vanilla cake layer on top of the frosting. Spread another generous layer of frosting evenly over the top.
- Third Layer: Carefully place the strawberry cake layer on top of the frosting.
- Crumb Coat: Apply a thin layer of frosting over the entire cake. This is called a crumb coat and it helps to seal in any loose crumbs. Refrigerate the cake for 30 minutes to allow the crumb coat to set.
- Final Frosting: Apply a final, thicker layer of frosting over the entire cake, smoothing it out as desired. You can use an offset spatula or a cake smoother for a professional finish.
Decorating the Cake (Optional):
- Get Creative: Decorate the cake with fresh strawberry slices and chocolate shavings. You can also pipe frosting rosettes or create other decorative designs.
- Chill: Refrigerate the cake for at least 30 minutes before serving to allow the frosting to set. This will also make it easier to slice.
High Altitude Adjustments Explained:
Why are adjustments necessary?
At higher altitudes, the air pressure is lower. This affects baking in several ways:
- Liquids Evaporate Faster: This can lead to drier cakes.
- Gases Expand More: This can cause cakes to rise too quickly and then collapse.
- Leavening Agents Work More Quickly: This can also contribute to cakes rising too quickly.
Specific Adjustments for this Recipe:
- Reduced Oven Temperature: Lowering the oven temperature to 325°F (163°C) helps to slow down the baking process and prevent the cake from drying out.
- Slightly Less Leavening: While this recipe doesn’t explicitly reduce the leavening agents, it’s something to consider if you’re consistently having issues with cakes rising too much and then collapsing. You could reduce the baking powder by 1/4 teaspoon.
- Increased Liquid: Adding a tablespoon or two of extra buttermilk can help to compensate for the faster evaporation of liquids. I didn’t find it necessary for this recipe, but it’s something to keep in mind.
Troubleshooting Tips:
- Cake Collapsing: This is often caused by too much leavening or too high of an oven temperature. Try reducing the baking powder slightly and making sure your oven temperature is accurate.
- Dry Cake: This can be caused by overbaking or too much evaporation. Make sure you’re not overbaking the cake and consider adding a tablespoon or two of extra buttermilk.
- Uneven Baking: Make sure your oven is properly calibrated and that the cake pans are evenly spaced in the oven.
Tips for Success:
Conclusion:
This High Altitude Neapolitan Cake isn’t just a dessert; it’s a delightful experience, a trip down memory lane with a sophisticated twist, and a testament to the fact that even at higher elevations, baking perfection is absolutely achievable. I truly believe this recipe is a must-try for anyone who loves the classic Neapolitan flavors but craves something a little more special, a little more… elevated (pun intended!). The layers of rich chocolate, creamy vanilla, and vibrant strawberry, all perfectly balanced and moist, create a symphony of flavors that will have everyone asking for seconds.
Why is this cake a must-try? Because it’s more than just a cake; it’s a conversation starter, a showstopper, and a guaranteed crowd-pleaser. The high-altitude adjustments ensure a light and airy texture, preventing the dreaded dense or gummy result that can plague baking at higher elevations. The individual flavor profiles shine through, creating a harmonious blend that’s both familiar and exciting. Plus, the beautiful tri-color presentation makes it a stunning centerpiece for any occasion.
But the fun doesn’t stop there! This recipe is incredibly versatile. Feel free to experiment with different serving suggestions and variations to make it your own. For a truly decadent experience, try serving each slice with a dollop of freshly whipped cream and a sprinkle of cocoa powder. A scoop of vanilla bean ice cream alongside the cake is another fantastic option, complementing the vanilla layer beautifully.
Looking for variations? Consider adding a layer of raspberry jam between the strawberry cake and the vanilla cake for an extra burst of fruity flavor. Or, for the chocolate lovers out there, you could incorporate chocolate chips into the chocolate cake batter for an even richer, more intense chocolate experience. You could even try using different extracts to enhance the flavors – a touch of almond extract in the vanilla layer or a hint of orange extract in the chocolate layer would add a unique and delicious twist.
Serving Suggestions:
* With a scoop of vanilla bean ice cream.
* With a dollop of freshly whipped cream and cocoa powder.
* Alongside fresh berries.
* With a drizzle of chocolate sauce.
* As part of a dessert buffet.
Variations:
* Add raspberry jam between the strawberry and vanilla layers.
* Incorporate chocolate chips into the chocolate cake batter.
* Use different extracts to enhance the flavors (almond in vanilla, orange in chocolate).
* Top with a chocolate ganache for extra richness.
* Create a mini version using cupcake tins.
I’m so excited for you to try this High Altitude Neapolitan Cake recipe! I poured my heart and soul into perfecting it, and I truly believe you’ll love the results. Don’t be intimidated by the multiple layers; the instructions are clear and easy to follow, and the end result is well worth the effort.
So, grab your apron, preheat your oven, and get ready to bake a cake that will impress your friends and family. And most importantly, don’t forget to have fun! Baking should be a joyful experience, and I hope this recipe brings you as much joy as it has brought me.
Once you’ve tried it, I’d absolutely love to hear about your experience! Share your photos and comments on social media using #HighAltitudeNeapolitanCake and tag me so I can see your creations. Let me know what variations you tried and what your family and friends thought. I can’t wait to see your beautiful cakes and hear your delicious stories! Happy baking!
High Altitude Neapolitan Cake: Baking Tips and Recipe
Three-layer cake with vanilla, chocolate, and strawberry flavors, frosted with creamy buttercream. Perfect for celebrations!
Ingredients
Instructions
Recipe Notes
- Sifting the cake flour and powdered sugar is crucial for a light and airy texture and smooth frosting.
- Do not overmix the cake batter after adding the dry ingredients, as this can result in a tough cake.
- Ensure the cakes are completely cool before frosting to prevent the frosting from melting.
- High Altitude Adjustments: Reduce oven temperature to 325°F (163°C). Consider reducing baking powder by 1/4 teaspoon or adding 1-2 tablespoons of extra buttermilk if needed.
- For best results, use a kitchen scale to ensure even division of the cake batter.
Leave a Comment