

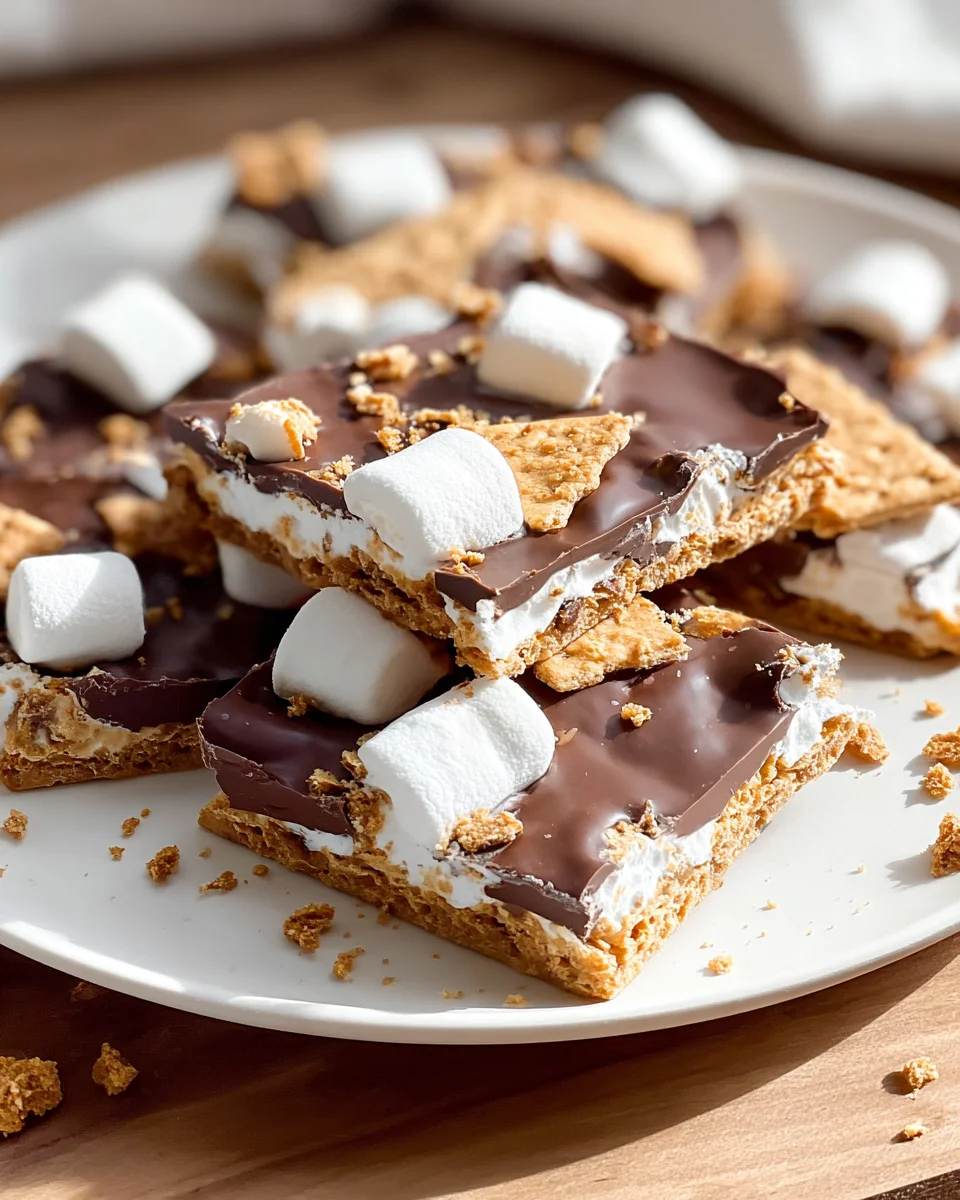
Irresistible Smores Bark Recipe For Sweet Nostalgia offers a delightful escape to childhood campfires without the need for a tent or a crackling fire. I’m thrilled to share a treat that perfectly encapsulates the gooey, chocolatey, crunchy magic of s’mores, reimagined into an incredibly easy-to-make bark. Who doesn’t adore the classic s’more, a timeless staple of summer nights and scouting adventures? Its origins trace back to simple campfire cooking, where toasted marshmallows, melted chocolate, and crisp graham crackers came together in a symphony of flavors and textures. It’s a culinary hug that transcends generations!
This modern twist takes all those beloved elements and streamlines them into a stress-free dessert perfect for any occasion. People absolutely adore this dish because it delivers that exact same comforting taste and satisfying crunch, but in a format that’s endlessly shareable and incredibly convenient. It’s the ultimate crowd-pleaser, boasting layers of rich chocolate, fluffy mini marshmallows, and crunchy graham cracker pieces that create an unforgettable sensory experience. Every bite of this Irresistible Smores Bark Recipe For Sweet Nostalgia promises a journey back to simpler, sweeter times, making it a perfect dessert for parties, potlucks, or just a cozy night in. Get ready to create some delicious memories with minimal effort!

Ingredients:
- For the Chocolate Base:
- 12 oz (approximately 340g) good quality semi-sweet chocolate chips or chopped chocolate bars. I find a mix often gives the best flavor depth, so feel free to experiment!
- 6 oz (approximately 170g) milk chocolate chips or chopped milk chocolate. This adds that classic s’mores creaminess and sweetness.
- 1 tablespoon coconut oil or vegetable shortening (optional, but highly recommended for a smoother melt and easier slicing).
- For the Graham Cracker Crunch:
- 6-8 full sheet graham crackers, roughly crushed. I love to get a mix of fine crumbs and larger pieces for texture contrast.
- 2 tablespoons unsalted butter, melted.
- 1 tablespoon granulated sugar.
- A tiny pinch of salt (just a quarter teaspoon, it really brings out the flavor!).
- For the Marshmallow Topping:
- 2 cups mini marshmallows. These toast beautifully and give you that perfect gooey factor without overwhelming the bark.
- 1 cup regular-sized marshmallows, cut into quarters (optional, but adds more textural variety and bigger pockets of gooeyness).
- Optional Embellishments:
- A sprinkle of flaky sea salt (highly recommended to balance the sweetness).
- A drizzle of white chocolate or dark chocolate for extra flair.
- A dusting of cocoa powder.
Equipment You’ll Need:
- Large baking sheet (13×18 inches): Essential for spreading out your bark thinly and evenly.
- Parchment paper or silicone baking mat: Crucial for easy removal and cleanup. Trust me, you don’t want chocolate stuck to your pan!
- Microwave-safe bowls (at least two, medium-sized): For melting your different chocolates.
- Rubber spatula or spoon: For stirring chocolate and spreading it smoothly.
- Small mixing bowl: For combining graham cracker crumbs.
- Small saucepan or double boiler setup: If you prefer the double boiler method for melting chocolate.
- Small saucepan or heatproof bowl: For melting butter for the graham crackers.
- Measuring cups and spoons: Standard kitchen tools.
- Rolling pin or food processor: For crushing graham crackers.
- Kitchen torch (optional, but highly recommended for that authentic toasted marshmallow look and taste!): This is how we get those perfectly browned tops.
- Sharp knife: For cutting the finished bark into pieces.
Preparing Your Workspace and Ingredients:
- Line Your Baking Sheet: First things first, grab your large baking sheet and line it generously with parchment paper or a silicone baking mat. Make sure the paper extends slightly over the edges; this will give you little handles to easily lift the cooled bark later. This step is paramount for a smooth release of your irresistible s’mores bark.
- Prepare the Graham Cracker Crunch: This is where we start building that foundational layer of nostalgia. In a medium bowl, combine your crushed graham crackers. If you’re using full sheets, place them in a zip-top bag and crush them with a rolling pin until you have a mix of fine crumbs and some slightly larger pieces – this variation in texture is key to a satisfying bite. Now, melt your 2 tablespoons of unsalted butter. Pour the melted butter over the crumbs, then add your granulated sugar and that tiny pinch of salt. Mix everything really well with a spoon until the crumbs are evenly moistened. This mixture will become the backbone of your Irresistible Smores Bark Recipe For Sweet Nostalgia. Spread these prepared graham cracker crumbs evenly across the lined baking sheet. You don’t need to press them down firmly just yet, but try to get them in a single, relatively even layer. Set this aside.
- Measure Your Marshmallows: Get your mini marshmallows and any quartered regular marshmallows ready in separate bowls. Having everything prepped before you start melting chocolate is a true time-saver and stress-reducer. We’re aiming for efficiency here so your chocolate doesn’t seize up while you’re fumbling for ingredients.
Melting the Chocolate Base:
- Melt the Semi-Sweet Chocolate: We’ll start with the semi-sweet chocolate as our primary base. Place your 12 oz of semi-sweet chocolate chips or chopped chocolate into a large microwave-safe bowl. If you’re using the optional coconut oil or shortening, add it now. Microwave the chocolate in 30-second intervals, stirring thoroughly after each interval. This gentle melting process is crucial to prevent burning or seizing the chocolate. Keep going until the chocolate is mostly melted, with just a few small lumps remaining. Remove it from the microwave and stir continuously until all the lumps have dissolved and the chocolate is completely smooth and glossy. The residual heat will finish the job beautifully. Alternatively, you can use a double boiler: place the chocolate in a heatproof bowl set over a saucepan of simmering water, ensuring the bowl does not touch the water. Stir until melted and smooth.
- Melt the Milk Chocolate: In a separate microwave-safe bowl, melt your 6 oz of milk chocolate chips using the exact same gentle microwave method (30-second intervals, stirring well) or the double boiler. Once both chocolates are beautifully melted and smooth, we’re ready for the next exciting step. The quality of your chocolate here truly makes a difference in the final taste of your Irresistible Smores Bark Recipe For Sweet Nostalgia.
- Combine and Spread the Chocolate: Now for the magic! Pour the melted semi-sweet chocolate directly over the prepared graham cracker layer on your baking sheet. Use your rubber spatula to gently spread the chocolate evenly from edge to edge, ensuring the graham crackers are fully covered. You want a relatively thin but consistent layer. Immediately, while the semi-sweet chocolate is still wet, dollop spoonfuls of the melted milk chocolate over the semi-sweet layer. Using a skewer or the back of a spoon, gently swirl the milk chocolate into the semi-sweet chocolate to create beautiful marbled patterns. Don’t overmix, we want distinct swirls! This creates a visually appealing and delicious foundation for our bark.
Assembling the S’mores Bark Layers:
- Add the Marshmallows: This is where the bark truly transforms into that classic s’mores experience. While the chocolate is still very much melted and warm, generously sprinkle your mini marshmallows evenly over the entire chocolate surface. Feel free to use a little more in some areas for extra marshmallowy goodness. If you’ve quartered regular marshmallows, sprinkle those in as well, ensuring a good distribution. The warmth of the chocolate will help the marshmallows adhere beautifully.
- Toast the Marshmallows (The Fun Part!): This step is optional, but it’s what elevates your Irresistible Smores Bark Recipe For Sweet Nostalgia from good to absolutely phenomenal. If you have a kitchen torch, carefully and evenly toast the tops of the marshmallows until they are golden brown and slightly caramelized, just like they’ve been roasted over a campfire. Move the torch continuously to prevent burning. Be careful not to over-torch, as they can burn quickly! If you don’t have a torch, you can briefly place the baking sheet under a broiler for 1-2 minutes, watching it like a hawk, until they are lightly browned. The broiler method requires intense supervision, as marshmallows can go from perfect to burnt in seconds. The kitchen torch provides much more control and is highly recommended.
- Optional Embellishments: If you’re feeling fancy, now is the time to add a final flourish. While the marshmallows are still warm and the chocolate is setting, sprinkle a touch of flaky sea salt over the top. This simple addition is a game-changer, enhancing all the sweet flavors and providing a delightful contrast. You could also drizzle a little extra melted white chocolate or dark chocolate over the top for another layer of visual appeal and flavor.
The Crucial Chill Time:
- Chill for Setting: Once your s’mores bark is assembled and the marshmallows are toasted to perfection, it’s time for the most important part: chilling. Carefully transfer the baking sheet to your refrigerator. It’s essential to let the bark chill completely until it is firm and solid. This usually takes at least 1.5 to 2 hours, but I often recommend leaving it for 3-4 hours, or even overnight, to ensure the chocolate is perfectly set and easy to break without melting in your hands immediately. Don’t rush this process; patience will be rewarded with a clean, crisp break.
- Why Chilling is Key: Proper chilling ensures that the chocolate sets back into a stable, snappy form. If you try to break it too soon, it will be soft, messy, and won’t have that satisfying crack that defines good bark. This also helps the graham cracker base adhere firmly to the chocolate layer, preventing crumbling when you break it apart.
Breaking and Storing Your S’mores Bark:
- Break It Up: Once your s’mores bark is completely chilled and firm, remove the baking sheet from the refrigerator. Gently lift the parchment paper (with the bark) off the baking sheet and place it on a clean cutting board or countertop. Using a sharp knife, carefully cut the bark into squares or rectangles of your desired size. Alternatively, for a more rustic look that truly evokes the “bark” aesthetic, you can simply break it into irregular pieces with your hands. This is where the irresistible fun begins!
- Storage for Freshness: To keep your Irresistible Smores Bark Recipe For Sweet Nostalgia at its best, store it in an airtight container at room temperature for up to 3-4 days. If your kitchen is particularly warm, you might prefer to store it in the refrigerator. If refrigerating, allow it to sit at room temperature for about 10-15 minutes before serving for the best texture and flavor, as cold chocolate can be a bit too firm. The marshmallows will stay soft and chewy, and the chocolate will retain its snap.
Tips for the Best S’mores Bark Experience:
- Quality of Ingredients Matters: While you can use any chocolate, opting for good quality chocolate chips or baking bars will significantly improve the flavor and texture of your bark. Brands that melt smoothly without seizing are ideal.
- Don’t Overheat Chocolate: When melting chocolate, always go slow and low. Overheating chocolate causes it to seize and become grainy. If using a microwave, stir frequently. If using a double boiler, ensure no water gets into the chocolate.
- Even Spreading: Try to spread your chocolate evenly for a consistent thickness. This ensures every piece of bark has a good chocolate-to-topping ratio and sets at the same rate.
- Marshmallow Stickiness: Ensure you sprinkle the marshmallows while the chocolate is still wet and warm. This helps them adhere firmly and prevents them from falling off when you break the bark.
- Toasting Marshmallows Safely: If using a kitchen torch, always do so in a well-ventilated area and keep flammable materials away. If using a broiler, preheat it and watch the marshmallows constantly; they toast very quickly.
- Flaky Sea Salt: Don’t skip the flaky sea salt! It’s a simple addition that truly balances the sweetness and elevates the entire flavor profile.
- Patience with Chilling: Seriously, this is key. A fully set bark is a happy bark, easy to handle and with a satisfying snap.
Variations to Spark Your Creativity:
- Dark Chocolate Delight: For those who prefer a less sweet treat, use high-quality dark chocolate (60-70% cacao) for the entire chocolate base. The slight bitterness will beautifully complement the sweet marshmallows and graham crackers, creating a more sophisticated version of our classic Irresistible Smores Bark Recipe For Sweet Nostalgia.
- Peanut Butter Swirl: After swirling your milk and semi-sweet chocolates, dollop small amounts of melted creamy peanut butter over the top and swirl it in gently. The nutty, salty flavor of the peanut butter is a fantastic addition to the s’mores profile.
- Nutty Crunch: Before adding the marshmallows, sprinkle toasted chopped nuts (like pecans, walnuts, or almonds) over the chocolate layer. This adds another layer of texture and a rich, earthy flavor.
- Caramel Drizzle: Once the bark is assembled and the marshmallows are toasted, drizzle a little store-bought or homemade caramel sauce over the top before chilling. This adds an extra layer of gooey sweetness and indulgence.
- White Chocolate Wonderland: Use white chocolate as part of your base or as a drizzle over the top for a different flavor profile and a beautiful visual contrast. Just remember that white chocolate can be a bit trickier to melt and is sweeter, so adjust other ingredients accordingly.
- Seasonal Spices: During the fall, consider adding a pinch of cinnamon or pumpkin pie spice to your graham cracker mixture, or even a very light dusting over the chocolate. This can add a wonderfully cozy, autumnal twist to your nostalgic treat.
- Cookie Crumble Base: Instead of traditional graham crackers, consider using crushed chocolate cookies (like Oreos, with or without the cream filling) or shortbread cookies for a different kind of base. Adjust butter and sugar amounts as needed.
- Candy Bar Mix-Ins: Chop up your favorite mini candy bars (like Snickers, Reese’s cups, or Heath bars) and sprinkle them over the chocolate before adding marshmallows. This takes the indulgence to a whole new level!
Conclusion:
So, there you have it! We’ve journeyed through the simple magic of creating a treat that promises to bring smiles, warmth, and a delightful trip down memory lane. This isn’t just another dessert recipe; it’s a gateway to effortless joy. I truly believe that once you try this, you’ll understand why I’m so enthusiastic about the Irresistible Smores Bark Recipe For Sweet Nostalgia. It perfectly captures that quintessential campfire experience, condensed into a convenient, no-fuss form that can be enjoyed anytime, anywhere. Imagine the rich, smooth embrace of melted chocolate, the delightful crunch of graham cracker pieces, and the irresistibly chewy, lightly toasted mini marshmallows all coming together in one perfect bite. It’s a symphony of textures and flavors that are both familiar and incredibly satisfying, proving that sometimes, the simplest pleasures are truly the best.
What makes this recipe a true must-try isn’t just its incredible taste, but its sheer approachability. Forget the messy campfires, the smoke in your eyes, and the endless search for perfect roasting sticks. This bark delivers all the beloved elements of s’mores with minimal effort and maximum reward. It’s the ideal project for a lazy afternoon, a quick dessert for an impromptu gathering, or even a thoughtful homemade gift.
The Joy of Creation and Devouring
There’s a profound sense of accomplishment and immediate gratification that comes with whipping up something this delicious and visually appealing in such a short amount of time. It’s a recipe that builds confidence in the kitchen, proving that you don’t need to be a gourmet chef to create something truly spectacular and memorable. Each piece is a little square of happiness, begging to be savored.
Serving Suggestions to Elevate Your S’mores Bark Experience:
Once your glorious sheet of s’mores bark is cool and perfectly set, the possibilities for enjoyment are endless! I love breaking it into jagged, rustic pieces – it just adds to the charm, don’t you think? It’s absolutely perfect served alongside a hot cup of coffee or a tall glass of cold milk for a cozy afternoon treat. For a more decadent dessert presentation, try crumbling some over a scoop of vanilla ice cream or even a plain cheesecake for an instant texture and flavor boost. It also makes for an incredible addition to a dessert charcuterie board, adding that homemade touch everyone adores. Don’t forget about gifting! Placed in a cute cellophane bag tied with a ribbon, or nestled in a decorative tin, this bark makes a heartfelt and delicious present for friends, neighbors, or teachers. It’s a guaranteed crowd-pleaser for any potluck, picnic, or movie night, inviting everyone to partake in its nostalgic charm.
Unleash Your Inner Chef: Creative Variations You’ll Love:
While the classic combination is pure perfection, this recipe is wonderfully forgiving and encourages experimentation. Want to kick it up a notch? Feel free to play with different types of chocolate – a blend of milk and dark chocolate chips creates an even more complex flavor profile. You could also try a white chocolate base for a sweeter, creamier version. Think beyond the classic graham crackers too! Crushed digestive biscuits or even some broken pretzels could add a fun, salty crunch. For an extra layer of indulgence, sprinkle a handful of mini chocolate chips or a touch of flaky sea salt over the melted chocolate before chilling. A drizzle of caramel or a sprinkle of toasted coconut flakes before the marshmallows go on could transform it into something entirely new. Peppermint extract added to the melted chocolate during the holiday season, or a dash of almond extract for a nutty twist, are just a couple of ideas to spark your creativity. The beauty of bark is its adaptability; feel free to make it truly your own!
So, what are you waiting for? I sincerely hope you’re inspired to roll up your sleeves and give this incredibly satisfying recipe a try. It’s more than just making a sweet treat; it’s about creating moments, sharing joy, and indulging in a little bit of delicious nostalgia. I promise you, the smiles it brings to faces, including your own, will be worth every moment. Once you’ve made your batch (or two!), I’d absolutely love to hear about your experience. Did you stick to the classic? Did you venture into creative variations? Please, share your delicious triumphs and any unique twists you came up with! Your feedback and culinary adventures inspire me, and I can’t wait to see how you make this beloved treat your own. Happy baking, and happy indulging!
Irresistible Smores Bark Recipe: Sweet Nostalgia Treat
A delightful escape to childhood campfires, this incredibly easy-to-make bark perfectly encapsulates the gooey, chocolatey, crunchy magic of s’mores. It’s a crowd-pleasing, stress-free dessert perfect for any occasion, offering a journey back to simpler, sweeter times.
Ingredients
Instructions
Important Information
Nutrition Facts (Per Serving)
It is important to consider this information as approximate and not to use it as definitive health advice.
Allergy Information
Please check ingredients for potential allergens and consult a health professional if in doubt.

Leave a Comment