

Sticky Crispy Kipburger
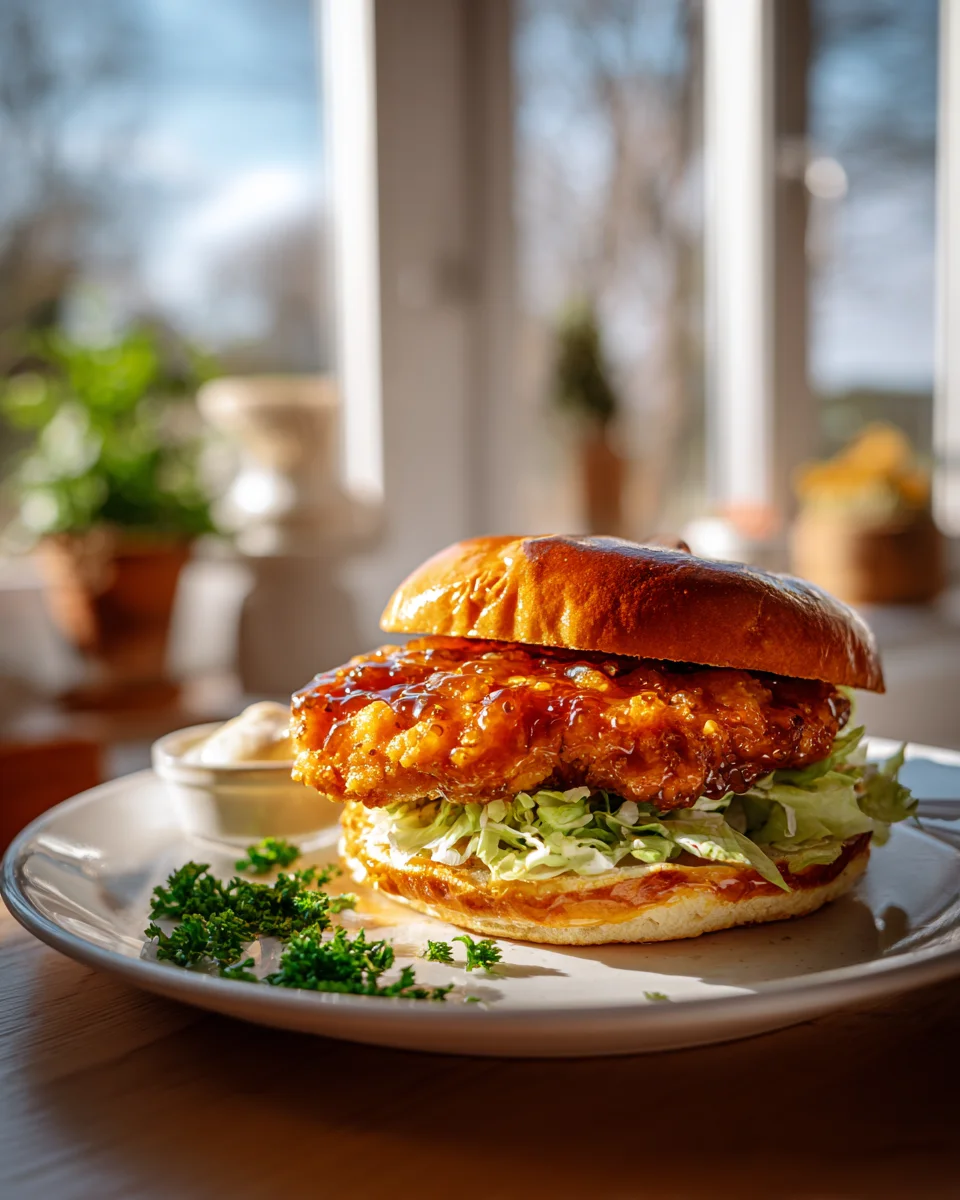
Oh my goodness, friends, prepare yourselves for a flavor and texture sensation that will redefine your idea of a chicken burger! The Sticky Crispy Kipburger isn’t just another dinner; it’s an experience. What makes this recipe truly special is the incredible contrast we achieve: a wonderfully crispy, golden-fried chicken patty that’s then generously coated in a shimmering, irresistibly sticky, sweet and savory glaze. It’s a harmonious blend that keeps your taste buds excited from the first bite to the last, making it utterly unforgettable.
I know you’re going to absolutely love this recipe because it takes a beloved classic and elevates it to gourmet status, right in your own kitchen! It’s the perfect dish for a fun weeknight meal, a weekend treat, or even a casual gathering where you want to impress without a ton of fuss. Every bite delivers that satisfying crunch, followed by an explosion of tangy, umami-rich stickiness that’s just begging for another bite. We’re talking about a perfectly seasoned, breaded chicken patty, drenched in a finger-licking homemade glaze, nestled in a soft bun with your favorite fresh toppings. Trust me, this burger is pure joy on a plate, and I can’t wait for you to try it!

Ingredient Notes
Hello, fellow food lovers! Today, we’re diving into my absolute favorite, the Sticky Crispy Kipburger. This isn’t just any chicken burger; it’s a symphony of textures and flavors – perfectly crispy chicken coated in a luscious, sticky glaze, all nestled in a soft bun. Let’s talk about what makes it truly special and what you’ll need.
The Star: Chicken
- Chicken Thighs or Breast: For the ultimate juicy and flavorful kipburger, I always lean towards boneless, skinless chicken thighs. They stay incredibly moist during frying, which is perfect for this recipe. If you prefer a leaner option, boneless, skinless chicken breasts work wonderfully too; just be mindful not to overcook them to keep them tender. You’ll want to slice them horizontally or pound them to about ½ inch thickness to ensure even cooking and a good burger shape.
For That Unbeatable Crispy Coating
- Flour & Cornstarch: This dynamic duo is my secret to an extra crispy coating. The flour provides the base, and the cornstarch makes it incredibly light and crunchy. I use all-purpose flour, but a gluten-free all-purpose blend can be substituted if needed.
- Eggs: Essential for helping the dry coating stick to the chicken. A couple of large eggs, lightly beaten, will do the trick.
- Panko Breadcrumbs: If you want truly next-level crispiness, panko is your friend. Its larger, flakier texture creates an airier, crunchier crust than regular breadcrumbs. If panko isn’t available, standard breadcrumbs are perfectly fine, or even crushed cornflakes for a unique crunch.
- Seasoning: Don’t forget to season your coating! A generous pinch of salt, black pepper, garlic powder, and paprika will infuse flavor right into the crisp crust.
The Irresistible Sticky Sauce
This is where the ‘sticky’ magic happens!
- Soy Sauce: The backbone of our savory and umami-rich glaze. I typically use regular soy sauce, but low-sodium is a great option for controlling saltiness. For a gluten-free alternative, coconut aminos or tamari work beautifully.
- Honey or Maple Syrup: For that beautiful sticky sweetness. Both work wonderfully, so pick your favorite or what you have on hand.
- Fresh Ginger & Garlic: Absolutely non-negotiable for depth of flavor. Freshly minced is key here; don’t skimp!
- Rice Vinegar: A touch of acidity balances the sweetness and richness of the sauce. Ensure it’s a non-alcohol variety.
- Cornstarch Slurry: A mix of cornstarch and a little water will thicken our sauce to that perfect glossy, clingy consistency.
- Optional Kick: A pinch of red pepper flakes adds a lovely warmth, but it’s entirely optional if you’re not into spice.
Burger Essentials
- Burger Buns: Brioche buns are my top choice for their soft texture and subtle sweetness, which complements the sticky chicken perfectly. Sesame seed buns or even whole wheat buns are also great. For a low-carb option, lettuce wraps make a fantastic alternative.
- Fresh Toppings: Crisp lettuce (like Romaine or butter lettuce), juicy tomato slices, and tangy pickle slices are classic companions.
- Mayonnaise or Sriracha Mayo: A creamy spread on the bun adds moisture and another layer of flavor.
- Cooking Oil: A neutral oil with a high smoke point, such as vegetable, canola, or sunflower oil, is best for frying the chicken.
Step-by-Step Instructions
Alright, let’s get down to the delicious details! Making this Sticky Crispy Kipburger is a rewarding experience, and I promise you the effort is absolutely worth it for the incredible flavor payoff.
Step 1: Prepare the Chicken
- Pound and Season: If you’re using chicken breasts, place each piece between two sheets of plastic wrap and pound it to an even ½-inch thickness. This ensures even cooking and helps form a nice burger shape. For thighs, simply pat them dry and gently flatten. Season both sides of your chicken pieces generously with salt and black pepper.
Step 2: Set Up Your Dredging Station
- This is crucial for that fantastic crispy crust. You’ll need three shallow dishes:
- In the first dish, combine the all-purpose flour, cornstarch, garlic powder, and paprika. Whisk well to ensure everything is evenly distributed.
- In the second dish, lightly beat the eggs.
- In the third dish, spread out your panko breadcrumbs.
Step 3: Coat the Chicken
- Working with one piece of chicken at a time, dredge it first in the seasoned flour mixture, ensuring it’s fully coated. Shake off any excess.
- Next, dip the chicken into the beaten egg, letting any excess drip off.
- Finally, generously coat the chicken in the panko breadcrumbs, pressing gently to make sure the panko adheres well to all surfaces. Place the coated chicken on a clean plate or wire rack and repeat with the remaining pieces.
Step 4: Fry the Crispy Chicken
- Heat the Oil: Pour about 1-2 inches of neutral cooking oil into a large, heavy-bottomed skillet or Dutch oven. Heat the oil over medium-high heat until it reaches about 350-375°F (175-190°C). If you don’t have a thermometer, a small piece of breadcrumb should sizzle immediately when dropped in.
- Fry the Chicken: Carefully place 1-2 pieces of coated chicken into the hot oil, ensuring you don’t overcrowd the pan (this can drop the oil temperature and lead to soggy chicken). Fry for about 4-6 minutes per side, or until the chicken is golden brown, crispy, and cooked through (internal temperature should be 165°F or 74°C).
- Drain: Using tongs, transfer the cooked chicken to a wire rack set over a baking sheet to drain any excess oil. Keep them warm in a low oven if frying in batches.
Step 5: Make the Sticky Sauce
- Sauté Aromatics: While the chicken is frying or immediately after, wipe out any excess oil from a clean skillet, leaving just a tablespoon or so. Add the minced ginger and garlic and sauté for about 30 seconds until fragrant (don’t let them burn!).
- Combine Liquids: Pour in the soy sauce, honey (or maple syrup), and non-alcohol rice vinegar. Add red pepper flakes now if you like a little heat. Bring the mixture to a gentle simmer, stirring occasionally.
- Thicken the Sauce: In a small bowl, whisk together 1 tablespoon of cornstarch with 2 tablespoons of cold water to create a slurry. Slowly pour the cornstarch slurry into the simmering sauce, whisking constantly until the sauce thickens to a glossy, syrupy consistency. Remove from heat.
Step 6: Coat the Chicken with Sauce
- Once all the chicken is fried, add the crispy chicken pieces directly into the skillet with the sticky sauce. Toss gently with tongs, ensuring each piece is beautifully coated in the glossy, sticky glaze.
Step 7: Assemble Your Kipburgers
- Toast Buns: Lightly toast your burger buns, either in a dry skillet, a toaster, or under the broiler. This adds texture and prevents them from getting soggy.
- Build the Burger: Spread a thin layer of mayonnaise or sriracha mayo on both halves of the toasted bun. On the bottom bun, layer some fresh lettuce, followed by a juicy slice of tomato. Place a glorious piece of sticky crispy chicken on top, add a few pickle slices, and crown it with the top bun.
Serve immediately and enjoy your incredible homemade Sticky Crispy Kipburger!
Tips & Suggestions
To truly elevate your Sticky Crispy Kipburger experience, I’ve gathered a few tips and tricks that I’ve learned along the way. These will help you achieve maximum crispness, perfect stickiness, and overall burger bliss.
For the Crispiest Chicken
- Double Dredge for Extra Crisp: If you want an even thicker, crispier crust, consider a double dredge. After the first egg and panko coating, you can dip the chicken back into the egg and then into the panko again. This creates a more substantial crust, but be mindful it also absorbs a bit more oil.
- Oil Temperature is Key: Invest in a good thermometer if you don’t have one. Maintaining an oil temperature of 350-375°F (175-190°C) is vital. Too cool, and your chicken will be greasy; too hot, and it will burn before cooking through.
- Don’t Overcrowd the Pan: This is a common mistake! Frying too many pieces at once drastically lowers the oil temperature, leading to less crispy (and often greasy) chicken. Work in batches and allow the oil to return to temperature between additions.
- Drain Properly: Always drain your fried chicken on a wire rack, not directly on paper towels. A wire rack allows air to circulate around all sides, preventing the bottom from steaming and becoming soggy.
Perfecting the Sticky Sauce
- Balance the Flavors: Taste your sauce as you go. You might prefer it a bit sweeter, tangier, or spicier. Adjust the honey/maple syrup, rice vinegar, or red pepper flakes to suit your preference.
- Don’t Over-thicken: The sauce should be syrupy and cling to a spoon, but not so thick it becomes pasty. If it gets too thick, you can thin it with a tablespoon of water or a splash of soy sauce.
- Coat Just Before Serving: To maintain the crispness of the chicken, toss it in the sticky sauce just before assembling and serving. The sauce will still cling beautifully, but the chicken will retain more of its crunch.
Assembly and Serving Suggestions
- Warm Buns Make a Difference: Toasting your buns isn’t just for texture; it also makes them warmer and more enjoyable. A lightly toasted brioche bun is pure heaven with this chicken.
- Get Creative with Toppings: While classic lettuce, tomato, and pickles are fantastic, feel free to experiment! Consider adding thinly sliced red onion, a dollop of creamy coleslaw, a sprinkle of toasted sesame seeds, or even some fresh cilantro for an extra burst of flavor.
- Spice it Up: If you’re a fan of heat, a drizzle of sriracha mayo or a few extra pinches of red pepper flakes in the sauce or on your burger will kick things up a notch.
- Serve Immediately: These burgers are best enjoyed hot and fresh, so have all your components ready to go for quick assembly.
Storage
While the Sticky Crispy Kipburger is undeniably at its best enjoyed fresh off the skillet, you might have leftovers or want to prep some components in advance. Here’s how I handle storage:
- Crispy Chicken: If you have leftover cooked chicken that hasn’t been tossed in the sauce, store it in an airtight container in the refrigerator for up to 2-3 days. To reheat and restore some crispness, I highly recommend using an air fryer at 350°F (175°C) for 5-8 minutes, or in an oven at 375°F (190°C) until heated through and crispy.
- Sticky Sauce: The sticky sauce can be made ahead of time! Store it in an airtight container in the refrigerator for up to a week. When ready to use, gently reheat it on the stovetop over low heat, adding a tiny splash of water if it’s become too thick.
- Assembled Burgers: I strongly advise against storing fully assembled burgers. The buns will become soggy, and the chicken will lose its crisp texture. It’s always best to assemble them right before serving.
Enjoy every sticky, crispy, glorious bite!
Final Thoughts
And there you have it! We’ve journeyed through crafting what I believe is truly a standout meal. The Sticky Crispy Kipburger isn’t just another item to put on your dinner rotation; it’s an experience waiting to happen. I genuinely hope you’ve enjoyed bringing this incredible dish to life in your own kitchen.
What makes the Sticky Crispy Kipburger a non-negotiable must-try? It’s that perfect harmony of textures – the irresistible crunch of the crispy chicken contrasting beautifully with the luscious, sweet-and-savory sticky sauce. Every single bite delivers an explosion of flavor that balances savory notes with a delightful tang, leaving you utterly satisfied and already planning your next batch. It’s a testament to how simple ingredients can create something truly extraordinary.
So, go ahead, gather your loved ones, and proudly serve up your homemade Sticky Crispy Kipburger. I’m confident that this recipe will become a cherished favorite, proving that a little effort results in a lot of deliciousness. Enjoy every sticky, crispy, glorious bite!

Irresistible Sticky Crispy Kipburger – Perfect Dinner!
- Total Time: 45 minutes
- Yield: 4 servings
Description
Prepare yourself for a flavor and texture sensation with the Sticky Crispy Kipburger! This gourmet chicken burger features a crispy, golden-fried patty coated in a sweet and savory glaze, making it an unforgettable dining experience.
Ingredients
- Chicken Thighs or Breast
- All-purpose flour
- Cornstarch
- Large eggs
- Panko breadcrumbs
- Salt
- Black pepper
- Garlic powder
- Paprika
- Soy sauce
- Honey or Maple syrup
- Fresh ginger
- Fresh garlic
- Rice vinegar
- Cornstarch slurry (cornstarch and water)
- Red pepper flakes (optional)
- Burger buns (brioche, sesame seed, whole wheat, or lettuce wraps)
- Fresh lettuce (like Romaine or butter lettuce)
- Juicy tomato slices
- Tangy pickle slices
- Mayonnaise or Sriracha mayo
- Neutral cooking oil (vegetable, canola, or sunflower oil)
Instructions
- Pound and season the chicken: If using chicken breasts, place each piece between two sheets of plastic wrap and pound to an even ½-inch thickness. For thighs, pat them dry and gently flatten. Season both sides with salt and black pepper.
- Set up your dredging station: In the first dish, combine all-purpose flour, cornstarch, garlic powder, and paprika. In the second dish, lightly beat the eggs. In the third dish, spread out the panko breadcrumbs.
- Coat the chicken: Dredge each piece of chicken in the seasoned flour mixture, then dip into the beaten egg, and finally coat in panko breadcrumbs, pressing gently to adhere.
- Fry the crispy chicken: Heat about 1-2 inches of neutral cooking oil in a large skillet over medium-high heat until it reaches 350-375°F (175-190°C). Fry 1-2 pieces of chicken for 4-6 minutes per side until golden brown and cooked through. Drain on a wire rack.
- Make the sticky sauce: Sauté minced ginger and garlic in a clean skillet for about 30 seconds. Add soy sauce, honey (or maple syrup), and rice vinegar. Bring to a simmer.
- Thicken the sauce: Whisk together cornstarch and cold water to create a slurry. Slowly pour into the simmering sauce, whisking until thickened. Remove from heat.
- Coat the chicken with sauce: Add the fried chicken pieces to the skillet with the sticky sauce and toss gently to coat.
- Assemble your kipburgers: Toast the burger buns, spread mayonnaise or sriracha mayo on both halves, layer with lettuce, tomato, and pickles, then add the sticky crispy chicken and top with the bun.
- Prep Time: 15 mins
- Cook Time: 30 mins
- Category: Dinner
- Method: Frying
- Cuisine: American
Nutrition
- Serving Size: 1 burger
- Calories: 550
- Sugar: 10 g
- Sodium: 800 mg
- Fat: 30 g
- Saturated Fat: 5 g
- Unsaturated Fat: 20 g
- Trans Fat: 0 g
- Carbohydrates: 45 g
- Fiber: 2 g
- Protein: 25 g
- Cholesterol: 70 mg
Keywords: For extra crispiness, consider double dredging the chicken. Maintain oil temperature for optimal frying, and always drain fried chicken on a wire rack to prevent sogginess.

Leave a Comment