

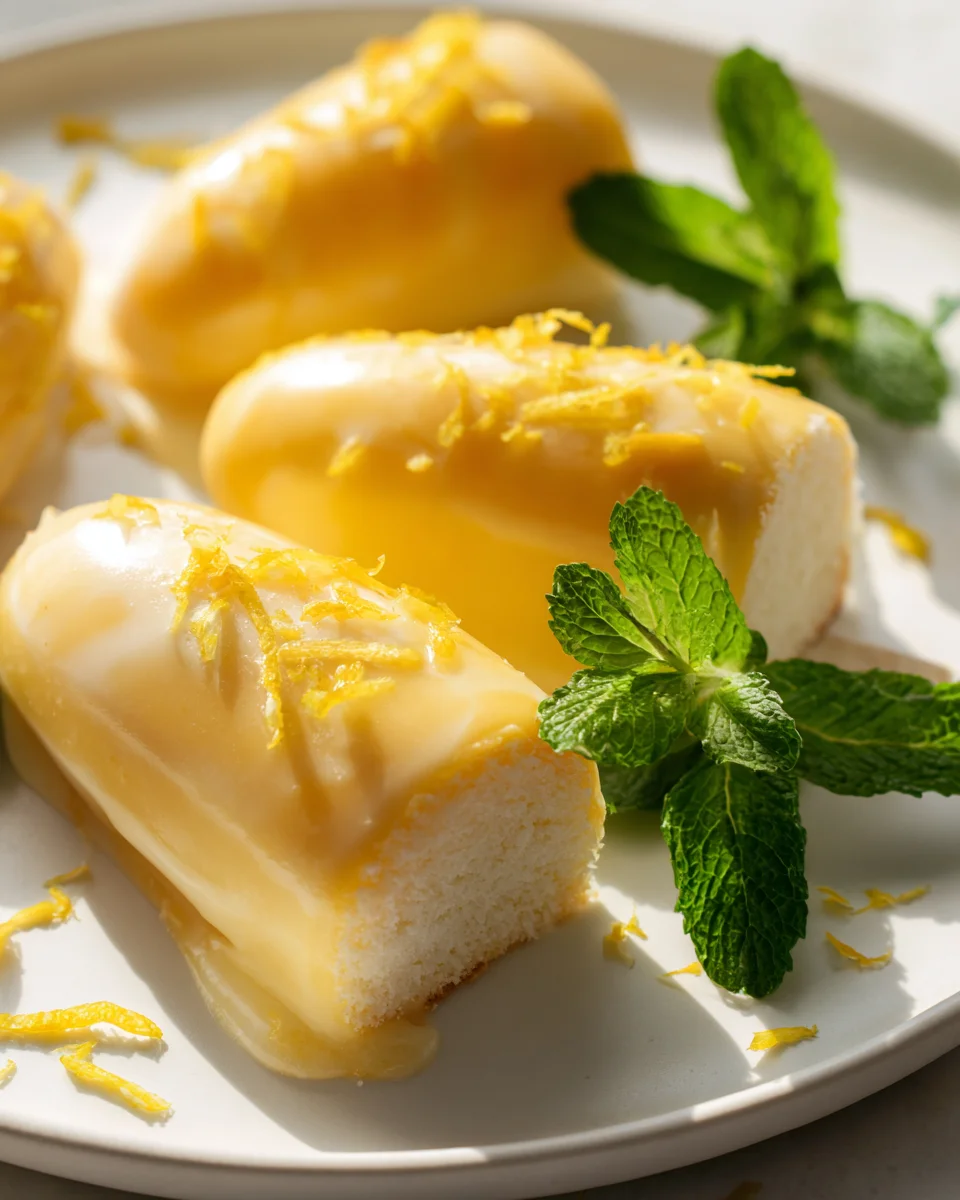
It was a sun-soaked afternoon, and I found myself in my grandmother’s kitchen, a space filled with the warm, inviting aroma of freshly baked goods. As she pulled a tray of lemon-scented cakes from the oven, I watched in awe as she drizzled a glossy lemon glaze over the warm treats. With each cake she dipped, I could hardly contain my excitement—those little bites of sunshine became our spring tradition. That memory inspired my own twist on her classic recipe, transforming her delightful cakes into vibrant Lemon Glazed Spring Cakesicles.
Imagine biting into one of these cakesicles: the soft cake gives way to a burst of bright lemon flavor, while the glaze adds a sweet, tangy finish that dances on your palate. Visually, they’re a feast for the eyes—drenched in a shimmering glaze and adorned with colorful sprinkles that mimic the lively blooms of spring. The combination of textures—the tender cake and the smooth glaze—creates a delightful experience with every bite.
What makes my version special is the use of fresh lemon zest and juice, which infuse the cakes with a vibrant brightness, perfectly capturing the essence of the season. Plus, they’re so easy to make and even more fun to share with friends and family. Ready to bring a little sunshine into your kitchen? Let me show you exactly how to make these delightful Lemon Glazed Spring Cakesicles!

Why You’ll Love This Recipe
- These Lemon Glazed Spring Cakesicles have a light and fluffy texture, making them the perfect sweet treat for any spring gathering.
- With a bright, zesty flavor that balances sweetness and tartness, each bite feels like a mini celebration of spring!
- Ready in just about 1 hour, these cakesicles require minimal prep and only one bowl for the cake batter, making clean-up a breeze.
- This recipe is budget-friendly, using common pantry ingredients while delivering a gourmet feel that impresses guests without breaking the bank.
- Perfect for both kids and adults, these cakesicles can be customized with different toppings and decorations, making them an ideal choice for any occasion.
Ingredients
- For the Lemon Cake:
- 1 ½ cups all-purpose flour
- 1 ½ tsp baking powder
- ½ tsp baking soda
- ¼ tsp salt
- ½ cup unsalted butter, softened (1 stick)
- 1 cup granulated sugar
- 2 large eggs
- 1 tsp pure vanilla extract
- Zest of 1 large lemon
- ½ cup whole milk
- ¼ cup fresh lemon juice (about 2 lemons)
- For the Lemon Glaze:
- 1 cup powdered sugar
- 2-3 tbsp fresh lemon juice
- Zest of 1 lemon (optional, for garnish)
- For Assembly:
- 1 cup white chocolate chips (for coating)
- Sprinkles (optional, for decoration)
- Popsicle sticks or cakesicle molds
Let’s dive into the key ingredients that make these Lemon Glazed Spring Cakesicles so special! First up is the all-purpose flour, which provides the structure and lightness we crave in a cake. If you need a gluten-free option, you can substitute it with a 1:1 gluten-free flour blend, often yielding similar results. Next, we have the unsalted butter, which adds richness and moisture. Always use softened butter to ensure easy creaming with sugar for that fluffy texture; if you’re in a pinch, you could also use coconut oil, though it will add a slight coconut flavor. The fresh lemon juice and zest are the stars of the show, delivering that signature tartness and fragrance. Freshly squeezed is ideal, but bottled lemon juice can work in a pinch if you’re short on time.
Step-by-Step Instructions
- Preheat the Oven: Start by preheating your oven to 350°F (175°C). This ensures your cakesicles bake evenly from the moment you place them in.
- Prepare the Baking Pan: Grease a 9×9 inch baking dish with non-stick spray or butter, and set it aside. This step is crucial to prevent sticking—no one likes a broken cakesicle!
- Mix Dry Ingredients: In a medium mixing bowl, whisk together 1 ½ cups all-purpose flour, 1 ½ teaspoons baking powder, ½ teaspoon baking soda, and ¼ teaspoon salt. This helps evenly distribute the leavening agents.
- Cream Butter and Sugar: In a large bowl, cream together ½ cup softened unsalted butter and 1 cup granulated sugar using an electric mixer on medium speed for about 3-5 minutes, until light and fluffy. This step is crucial for the cake’s texture; over-creaming can lead to a dense cake, so stop when the mixture is fluffy and pale.
- Add Eggs and Flavorings: Beat in 2 large eggs, one at a time, mixing well after each addition. Add in 1 teaspoon pure vanilla extract and the zest of 1 large lemon. Mix until combined, and the batter is smooth.
- Combine Wet and Dry Ingredients: Alternate adding the dry mixture and ½ cup whole milk into the butter mixture, starting and ending with the dry ingredients. Mix until just combined—over-mixing can lead to a tough cake.
- Add Lemon Juice: Gently fold in ¼ cup of fresh lemon juice until the batter is smooth. You should see a beautiful, zesty aroma wafting from your bowl at this point!
- Pour Batter: Pour the batter into your prepared baking dish and spread it evenly. Bake in the preheated oven for 25-30 minutes or until a toothpick inserted into the center comes out clean. The edges should just start to pull away from the sides of the pan.
- Cool the Cake: Once baked, let the cake cool in the pan for about 15 minutes, then transfer it to a wire rack to cool completely. Skipping this step can make it difficult to cut the cakesicles later.
- Make the Lemon Glaze: In a small bowl, whisk together 1 cup powdered sugar and 2-3 tablespoons of fresh lemon juice until smooth. Adjust the consistency to your liking by adding more lemon juice for a thinner glaze or more powdered sugar for a thicker one.
- Cut the Cake: Once cooled, cut the cake into rectangles that fit your cakesicle molds. Typically, 1×3 inch pieces work well, but you can customize the size based on your molds.
- Prepare for Coating: Melt 1 cup of white chocolate chips in a microwave-safe bowl in 30-second intervals, stirring in between until smooth. Be careful not to overheat, as the chocolate can seize up.
- Assemble Cakesicles: Dip each rectangle into the melted white chocolate until fully coated. Use a fork to lift them out and let excess chocolate drip off. Place them on parchment paper and add sprinkles if desired before the chocolate sets.
- Insert Sticks: Insert popsicle sticks into each cakesicle while the chocolate is still wet. Let the cakesicles cool and harden completely at room temperature for about 30 minutes.
- Enjoy! Once the chocolate has hardened, your Lemon Glazed Spring Cakesicles are ready to be enjoyed! Store them in an airtight container in the fridge if you have leftovers—or keep them for yourself!
Pro Tips for the Best Lemon Glazed Spring Cakesicles
- Don’t Overmix: One common mistake is overmixing the batter, which can lead to a dense cake. Mix just until combined after adding the dry ingredients.
- Use Quality Ingredients: For the best flavor, use high-quality vanilla extract and fresh lemons. The fresher the ingredients, the better the final product!
- Temperature Matters: Ensure your butter is softened to room temperature for proper creaming. If it’s too cold or too melted, it won’t incorporate air properly.
- Chill the Chocolate: If you find the melted chocolate is too thick for dipping, let it cool slightly before using; this can help achieve a smoother coating.
- Experiment with Molds: If you don’t have cakesicle molds, you can simply use popsicle sticks and a muffin tin. Just be sure to adjust the baking time as needed!
Variations & Serving Ideas
If you want to get creative with your Lemon Glazed Spring Cakesicles, try these variations:
- Berry-Infused: Add a handful of fresh blueberries or raspberries into the batter for a fruity twist.
- Coconut Lemon Cakesicles: Substitute half of the milk with coconut milk and add shredded coconut to the batter for a tropical flavor.
- Lavender Lemon: Infuse the batter with culinary lavender for a floral touch that complements the lemon beautifully.
For serving ideas, pair these cakesicles with a refreshing iced tea or lemonade to enhance the citrus notes. A light salad, such as a spinach and strawberry salad, can balance the sweetness, making for a delightful spring picnic spread. Finally, consider serving alongside a scoop of vanilla ice cream for an indulgent dessert experience!
Storage, Make-Ahead & Reheating
Your Lemon Glazed Spring Cakesicles can be stored in an airtight container in the refrigerator for up to 5 days. They actually taste better the next day as the flavors meld! You can also freeze them for up to 2 months—just wrap each cakesicle individually in plastic wrap and place them in a freezer-safe bag. When you’re ready to enjoy, simply let them thaw in the fridge for a few hours or at room temperature for about 30 minutes. Avoid reheating in the microwave, as it can make the chocolate coating lose its texture; enjoy them chilled or at room temperature instead!
Frequently Asked Questions
Can I make Lemon Glazed Spring Cakesicles ahead
Final Thoughts
These Lemon Glazed Spring Cakesicles are a delightful blend of zesty flavor and sweet indulgence, making them an irresistible treat for any spring gathering. The bright lemon glaze adds a refreshing finish that perfectly complements the moist cake inside, creating a satisfying bite that feels like sunshine on a stick.
This is the kind of recipe I come back to again and again, especially when I’m looking to add a touch of joy to a celebration or simply brighten a regular day. Whether you’re sharing them with friends or enjoying them solo, each cakesicle is a little moment of happiness.
I encourage you to try making these delightful treats and see for yourself how they can elevate your dessert game. Don’t forget to share your results or add your own creative twist—I can’t wait to see what you come up with!

Lemon Glazed Spring Cakesicles: Zesty Treats for Everyone
- Total Time: 45 minutes
- Yield: 12 cakesicles 1x
Description
These Lemon Glazed Spring Cakesicles are a delightful blend of zesty flavor and sweet indulgence, making them an irresistible treat for any spring gathering. The bright lemon glaze adds a refreshing finish that perfectly complements the moist cake inside, creating a satisfying bite that feels like sunshine on a stick.
Ingredients
- 1 ½ cups all-purpose flour
- 1 ½ tsp baking powder
- ½ tsp baking soda
- ¼ tsp salt
- ½ cup unsalted butter, softened (1 stick)
- 1 cup granulated sugar
- 2 large eggs
- 1 tsp pure vanilla extract
- Zest of 1 large lemon
- ½ cup whole milk
- ¼ cup fresh lemon juice (about 2 lemons)
- 1 cup powdered sugar
- 2–3 tbsp fresh lemon juice
- Zest of 1 lemon (optional, for garnish)
- 1 cup white chocolate chips (for coating)
- Sprinkles (optional, for decoration)
- Popsicle sticks or cakesicle molds
Instructions
- Preheat the Oven: Start by preheating your oven to 350°F (175°C). This ensures your cakesicles bake evenly from the moment you place them in.
- Prepare the Baking Pan: Grease a 9×9 inch baking dish with non-stick spray or butter, and set it aside. This step is crucial to prevent sticking—no one likes a broken cakesicle!
- Mix Dry Ingredients: In a medium mixing bowl, whisk together 1 ½ cups all-purpose flour, 1 ½ teaspoons baking powder, ½ teaspoon baking soda, and ¼ teaspoon salt. This helps evenly distribute the leavening agents.
- Cream Butter and Sugar: In a large bowl, cream together ½ cup softened unsalted butter and 1 cup granulated sugar using an electric mixer on medium speed for about 3-5 minutes, until light and fluffy. This step is crucial for the cake's texture; over-creaming can lead to a dense cake, so stop when the mixture is fluffy and pale.
- Add Eggs and Flavorings: Beat in 2 large eggs, one at a time, mixing well after each addition. Add in 1 teaspoon pure vanilla extract and the zest of 1 large lemon. Mix until combined, and the batter is smooth.
- Combine Wet and Dry Ingredients: Alternate adding the dry mixture and ½ cup whole milk into the butter mixture, starting and ending with the dry ingredients. Mix until just combined—over-mixing can lead to a tough cake.
- Add Lemon Juice: Gently fold in ¼ cup of fresh lemon juice until the batter is smooth. You should see a beautiful, zesty aroma wafting from your bowl at this point!
- Pour Batter: Pour the batter into your prepared baking dish and spread it evenly. Bake in the preheated oven for 25-30 minutes or until a toothpick inserted into the center comes out clean. The edges should just start to pull away from the sides of the pan.
- Cool the Cake: Once baked, let the cake cool in the pan for about 15 minutes, then transfer it to a wire rack to cool completely. Skipping this step can make it difficult to cut the cakesicles later.
- Make the Lemon Glaze: In a small bowl, whisk together 1 cup powdered sugar and 2-3 tablespoons of fresh lemon juice until smooth. Adjust the consistency to your liking by adding more lemon juice for a thinner glaze or more powdered sugar for a thicker one.
- Cut the Cake: Once cooled, cut the cake into rectangles that fit your cakesicle molds. Typically, 1×3 inch pieces work well, but you can customize the size based on your molds.
- Prepare for Coating: Melt 1 cup of white chocolate chips in a microwave-safe bowl in 30-second intervals, stirring in between until smooth. Be careful not to overheat, as the chocolate can seize up.
- Assemble Cakesicles: Dip each rectangle into the melted white chocolate until fully coated. Use a fork to lift them out and let excess chocolate drip off. Place them on parchment paper and add sprinkles if desired before the chocolate sets.
- Insert Sticks: Insert popsicle sticks into each cakesicle while the chocolate is still wet. Let the cakesicles cool and harden completely at room temperature for about 30 minutes.
- Enjoy: Once the chocolate has hardened, your Lemon Glazed Spring Cakesicles are ready to be enjoyed! Store them in an airtight container in the fridge if you have leftovers—or keep them for yourself!
- Prep Time: 15 mins
- Cook Time: 30 mins
- Category: Dessert
- Method: Baking
- Cuisine: American
Nutrition
- Serving Size: 1 cakesicle
- Calories: 180
- Sugar: 20 g
- Sodium: 150 mg
- Fat: 8 g
- Saturated Fat: 5 g
- Unsaturated Fat: 2 g
- Trans Fat: 0 g
- Carbohydrates: 25 g
- Fiber: 1 g
- Protein: 2 g
- Cholesterol: 40 mg
Keywords: For the best flavor, use high-quality vanilla extract and fresh lemons. The fresher the ingredients, the better the final product! If you need a gluten-free option, you can substitute all-purpose flour with a 1:1 gluten-free flour blend.

Leave a Comment