

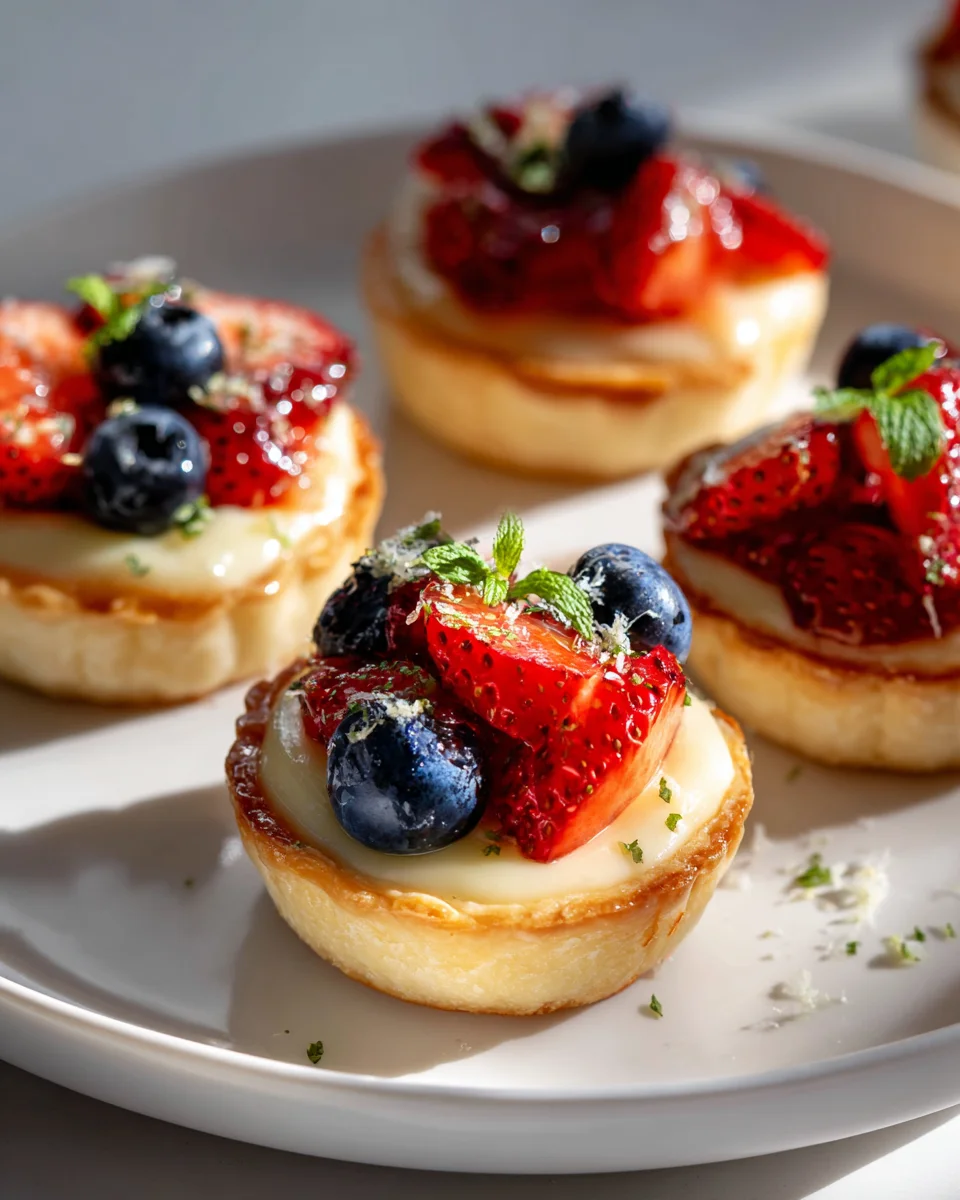
Mini Fruit Tarts
Mini Fruit Tarts are an absolute delight, and I’m so excited to share this recipe with you! What makes these little beauties truly special is their charming, individual size – they’re perfectly portioned for a sophisticated dessert at a party, a lovely addition to an afternoon tea, or simply a sweet, bright pick-me-up for yourself. You are going to love how these mini tarts combine a crisp, buttery crust with a velvety, smooth cream filling, all crowned with a vibrant array of the freshest seasonal fruits. Each bite offers a wonderful burst of textures and a delightful balance of sweet and tangy flavors. They’re not just incredibly delicious; they’re also absolute showstoppers, effortlessly brightening any dessert spread. Trust me, these mini fruit tarts are easier to make than they look and are guaranteed to impress everyone who tries them. Get ready to bake some sunshine!

Ingredient Notes
Creating delightful mini fruit tarts starts with understanding the building blocks, each playing a crucial role in the final texture and flavor. Here, I’ll share my insights on the key ingredients and some handy substitutions to ensure your tarts are always a hit.
Tart Shells
- My Preference: For mini fruit tarts, I usually lean towards ready-made mini phyllo shells or pre-baked shortbread tartlet shells. They save a lot of time and effort, especially when I’m making a batch for a party. The delicate crispness of phyllo is wonderful, contrasting beautifully with the creamy filling. Shortbread shells offer a richer, buttery base.
- Homemade Option: If I have the time and desire, I love making my own Pâte Sucrée (sweet shortcrust pastry). It’s a French classic that yields a wonderfully crumbly, buttery, and slightly sweet shell. If you go this route, remember to blind bake them until golden brown and let them cool completely before filling.
- Substitutions/Variations:
- Graham Cracker Crust: A simple crushed graham cracker crust, pressed into mini muffin tins and baked briefly, can offer a sweet, comforting alternative.
- Cookie Crust: Crushed digestive biscuits or vanilla wafers mixed with melted butter can also make a fantastic base, offering a different flavor profile.
Pastry Cream (Crème Pâtissière)
- The Heart of the Tart: This rich, silky, vanilla-infused custard is what truly makes a fruit tart special. I always use whole milk for maximum creaminess, as it contributes significantly to the body and texture of the cream. Egg yolks provide richness and color, while sugar adds sweetness. Cornstarch or all-purpose flour thickens the cream to the perfect consistency.
- Vanilla: For that classic flavor, I prefer using a good quality vanilla extract or, even better, vanilla bean paste for visible specks of vanilla. If you’re looking for a non-alcoholic option, vanilla bean paste is an excellent choice, or you can opt for imitation vanilla extract, which is widely available and alcohol-free.
- Substitutions/Variations:
- Lighter Fillings: For a less rich tart, whipped cream stabilized with a little gelatin or cream cheese frosting can be excellent alternatives.
- Lemon Curd: A zesty lemon curd can provide a bright, tangy contrast to the sweet fruit.
- Chocolate Ganache: For chocolate lovers, a smooth chocolate ganache makes for an indulgent twist.
- Flavor Boosters: A little lemon zest folded into the cream, or a touch of almond extract (non-alcoholic if preferred) can add another layer of flavor.
Fresh Fruit
- The Star of the Show: This is where you can let your creativity shine! I love using a vibrant mix of fresh berries like strawberries, blueberries, and raspberries. Sliced kiwi and mandarin segments also add beautiful color and a tangy counterpoint. The key is to choose ripe, fresh fruit that looks appealing and tastes great.
- Substitutions/Variations:
- Seasonal Fruits: Don’t limit yourself! Peaches, plums, or figs can be lovely when in season.
- Canned Fruit: If fresh fruit isn’t available, well-drained canned peaches or mandarin oranges can work in a pinch. Just make sure to pat them very dry to avoid making your tarts soggy.
- Frozen Fruit: While not ideal for raw presentation, thawed and very well-drained frozen berries can be used, especially if you plan to glaze them heavily. However, fresh is always best for visual appeal and texture.
Glaze
- For Shine and Freshness: An optional but highly recommended step! A light glaze not only makes your tarts sparkle but also helps to protect the fruit from drying out and can extend their freshness slightly. I typically use apricot jam or apple jelly, gently warmed and strained for a smooth finish.
- Substitutions/Variations:
- Simple Syrup: A basic simple syrup (equal parts sugar and water, simmered until dissolved, then cooled) can also be brushed over the fruit for a subtle shine.
- Pectin Glaze: For a professional finish, a clear pectin-based glaze is excellent, often found in specialty baking stores.
Step-by-Step Instructions
Assembling mini fruit tarts is a joyful process, especially once you have all your components ready. Here’s how I put together these adorable little desserts, making sure each one is picture-perfect and delicious.
Step 1: Prepare the Pastry Cream
This is where the magic begins! A smooth, well-chilled pastry cream is fundamental.
- In a medium saucepan, gently heat 2 cups whole milk over medium heat until it just begins to simmer around the edges. Keep an eye on it; you don’t want it to boil over.
- While the milk is heating, in a separate bowl, whisk together 4 large egg yolks, ½ cup granulated sugar, and ¼ cup cornstarch (or all-purpose flour) until the mixture is pale yellow and smooth. It should look like a thick ribbon falling from your whisk.
- Once the milk is hot, slowly temper the egg mixture by gradually whisking about half of the hot milk into the egg yolk mixture. This prevents the eggs from scrambling.
- Pour the tempered egg mixture back into the saucepan with the remaining hot milk.
- Return the saucepan to medium heat and whisk continuously until the mixture thickens considerably and comes to a gentle boil, bubbling for about 1 minute. It should be very thick, like a pudding.
- Remove from heat and stir in 1 teaspoon vanilla extract (or non-alcoholic vanilla bean paste).
- Pour the pastry cream into a clean, shallow bowl. Press a piece of plastic wrap directly onto the surface of the cream to prevent a skin from forming as it cools.
- Refrigerate for at least 3-4 hours, or preferably overnight, until completely chilled and firm. Once chilled, give it a good whisk or beat it with an electric mixer for a minute to make it silky smooth and easy to pipe or spoon.
Step 2: Prepare Your Tart Shells
Whether you’re using store-bought shells or homemade, this step is quick.
- If using pre-baked store-bought mini phyllo or shortbread shells, simply arrange them on a serving platter or a baking sheet for easy handling.
- If you’ve made homemade shells, ensure they are fully cooled before proceeding. Warm shells will melt the pastry cream.
Step 3: Prepare the Fresh Fruit
This is all about freshness and presentation.
- Gently wash all your chosen fresh fruits (e.g., strawberries, blueberries, raspberries, kiwi, mandarin segments).
- Pat them thoroughly dry with paper towels. Excess moisture can make your tarts soggy or dilute the glaze.
- Hull strawberries and slice them as desired – halves, quarters, or thin slices work well for decorative purposes. Peel and slice kiwi into thin rounds or wedges. If using mandarins, separate segments.
Step 4: Assemble the Mini Fruit Tarts
Now for the artistic part!
- Using a small spoon or a piping bag fitted with a round tip, fill each tart shell with the chilled and re-whisked pastry cream. Fill them almost to the top, leaving a little space for the fruit. I find using a piping bag gives a cleaner, more professional look.
- Arrange your prepared fresh fruit decoratively on top of the pastry cream. I like to create a mix of colors and textures – perhaps a large strawberry slice in the center, surrounded by blueberries, or a fan of kiwi slices with raspberries nestled in between. Don’t be afraid to experiment with patterns!
Step 5: Apply the Glaze (Optional but Recommended)
This adds that professional sheen and helps preserve the fruit.
- In a small microwave-safe bowl, warm about ¼ cup apricot jam or apple jelly for 10-20 seconds until it becomes more liquid.
- Strain the warmed jam or jelly through a fine-mesh sieve to remove any fruit bits or lumps, ensuring a smooth glaze.
- Using a small pastry brush, gently brush a thin layer of the warm glaze over the arranged fruit on each tart. Be delicate to avoid disturbing the fruit arrangement.
Once assembled, I like to pop them back into the refrigerator for at least 30 minutes to ensure everything is perfectly chilled before serving.
Tips & Suggestions
To truly elevate your mini fruit tarts from good to extraordinary, I’ve gathered some of my favorite tips and tricks that I’ve learned over the years. These pointers will help you achieve perfect results every time, ensuring your tarts are as beautiful as they are delicious.
- Ensure Pastry Cream is Thoroughly Chilled: This is perhaps my number one tip! The pastry cream must be completely cold and firm before you attempt to fill your shells. If it’s even slightly warm, it will be too runny, making your tarts messy and prone to collapse. After chilling, give it a vigorous whisk to smooth out any lumps and restore its silky texture. This also makes it much easier to pipe neatly.
- Dry Your Fruit Meticulously: I cannot stress this enough. After washing your fresh fruit, pat each piece thoroughly dry with paper towels. Any residual moisture can cause your pastry cream to weep, make your tart shells soggy, or dilute your glaze, leading to a less appealing finish.
- Fill Just Before Serving: While the pastry cream can be made ahead, and shells can be bought pre-made, I always recommend assembling the tarts with the fruit and glaze no more than a few hours before you plan to serve them. Fresh fruit, especially berries, can start to weep or soften over time, affecting both the appearance and texture.
- Prevent Soggy Shells (Especially Homemade): If you’re using homemade pastry shells or are concerned about store-bought ones becoming soggy, you can create a moisture barrier. Brush a very thin layer of melted white chocolate or even some of the warmed apricot jam (before straining) onto the inside of the cooled tart shells. Let it set before filling with pastry cream. This provides a barrier against the moisture from the cream.
- Arrange Fruit for Visual Appeal: Think like an artist! Start with a central piece of fruit, or work in concentric circles. Overlap slices slightly, and don’t be afraid to mix colors and shapes for a dynamic look. Strawberries cut into fans, blueberries clustered together, and kiwi slices fanned out all contribute to a stunning presentation.
- Don’t Over-Glaze: The glaze is meant to add a subtle sheen, not drown the fruit. Use a light touch with your pastry brush. Too much glaze can make the tarts overly sweet or sticky.
- Keep Them Chilled: Once assembled, these tarts are best served chilled. The cold enhances the crispness of the shell and the coolness of the pastry cream, providing a refreshing contrast to the sweet fruit.
- Personalize with Flavor: Feel free to experiment with additional flavors in your pastry cream. A hint of lemon zest, a dash of almond extract (non-alcoholic if preferred), or even a tiny bit of coffee extract can add a delightful twist.
- Garnish for a Flourish: For an extra touch, dust the finished tarts lightly with powdered sugar just before serving, or add a tiny fresh mint leaf to a few of them for a pop of green.
Storage
Understanding how to properly store your mini fruit tarts and their components is key to enjoying them at their best. Since they feature fresh ingredients, a little careful planning goes a long way.
Assembled Mini Fruit Tarts
Once your beautiful mini fruit tarts are fully assembled with pastry cream, fruit, and glaze, they are best enjoyed fresh. I always recommend serving them within 1-2 days of assembly. Here’s how I store them:
- Refrigeration is Essential: Because they contain dairy-based pastry cream and fresh fruit, assembled tarts must be stored in the refrigerator.
- Airtight Container: Arrange the tarts in a single layer in an airtight container. If you need to stack them, place a layer of parchment paper between them to prevent the fruit and glaze from sticking or getting damaged. This also helps to prevent them from absorbing odors from other foods in your fridge.
- Watch for Weeping: Over time, the fresh fruit may start to “weep” or release moisture, especially if it’s been glazed. This can make the tart shells a bit soft. While still safe to eat, the texture won’t be as crisp after the first day.
- Best Served Chilled: Always serve assembled fruit tarts directly from the refrigerator for the best taste and texture experience.
Unassembled Components
One of the great advantages of mini fruit tarts is that many of their components can be prepared in advance, allowing for quick assembly when you’re ready to serve.
- Pastry Cream:
- The prepared pastry cream can be stored in an airtight container in the refrigerator for up to 3-4 days.
- Make sure to press plastic wrap directly onto the surface of the cream to prevent a skin from forming.
- Before using, give it a good whisk or beat it briefly with an electric mixer to restore its smooth, creamy texture.
- Tart Shells:
- Store-bought shells: Follow the package instructions. Generally, they can be stored in their original packaging in a cool, dry place at room temperature until ready to use.
- Homemade Pâte Sucrée shells: Once baked and completely cooled, these can be stored in an airtight container at room temperature for up to 3 days, or frozen for up to 1 month. If frozen, let them come to room temperature before filling.
- Prepared Fruit:
- Washed and thoroughly dried fresh fruit can be stored in an airtight container lined with a paper towel in the refrigerator for 1-2 days. This paper towel will absorb any remaining moisture.
- However, for the freshest appearance, I prefer to slice and prepare fruit just before assembly.
Freezing
- Assembled Tarts: I generally do not recommend freezing fully assembled mini fruit tarts. The fresh fruit will become mushy and discolored upon thawing, and the delicate texture of the pastry cream can change, often becoming watery or grainy. The tart shell might also lose its crispness.
- Tart Shells (only): If you’ve made your own Pâte Sucrée shells, you can freeze the unbaked dough wrapped tightly in plastic wrap for up to 3 months, or the baked and cooled shells for up to 1 month in an airtight container.
Final Thoughts
There’s something truly magical about these Mini Fruit Tarts, isn’t there? I find myself constantly drawn to their vibrant colors and perfect, individual size. They’re more than just a dessert; they’re a little burst of joy, an edible work of art that brightens any table and delights every palate.
This recipe, crafted to make the process enjoyable and straightforward, ensures that even if you’re new to baking, you’ll achieve stunning results. The crisp, buttery crust paired with the creamy filling and a medley of fresh, seasonal fruit is a combination that simply can’t be beaten. I promise you, making these Mini Fruit Tarts will fill your kitchen with wonderful aromas and your heart with immense satisfaction.
So, go ahead, gather your ingredients and embark on creating these delightful treats. I just know you’ll love sharing them with friends and family, or simply enjoying one (or two, or three!) all to yourself. Happy baking, and enjoy every blissful bite!

Mini Fruit Tarts: Easy, Colorful & Delicious Dessert Recipe
- Total Time: 45 minutes
- Yield: 12 mini tarts 1x
Description
Mini Fruit Tarts are a delightful dessert that combines a crisp, buttery crust with a smooth cream filling and a vibrant array of fresh seasonal fruits. Perfect for parties or a sweet treat for yourself, these tarts are sure to impress!
Ingredients
- 2 cups whole milk
- 4 large egg yolks
- ½ cup granulated sugar
- ¼ cup cornstarch (or all-purpose flour)
- 1 teaspoon vanilla extract (or non-alcoholic vanilla bean paste)
- ready-made mini phyllo shells or pre-baked shortbread tartlet shells
- ¼ cup apricot jam or apple jelly
Instructions
- In a medium saucepan, gently heat 2 cups whole milk over medium heat until it just begins to simmer around the edges.
- While the milk is heating, in a separate bowl, whisk together 4 large egg yolks, ½ cup granulated sugar, and ¼ cup cornstarch (or all-purpose flour) until the mixture is pale yellow and smooth.
- Once the milk is hot, slowly temper the egg mixture by gradually whisking about half of the hot milk into the egg yolk mixture.
- Pour the tempered egg mixture back into the saucepan with the remaining hot milk.
- Return the saucepan to medium heat and whisk continuously until the mixture thickens considerably and comes to a gentle boil, bubbling for about 1 minute.
- Remove from heat and stir in 1 teaspoon vanilla extract (or non-alcoholic vanilla bean paste).
- Pour the pastry cream into a clean, shallow bowl. Press a piece of plastic wrap directly onto the surface of the cream to prevent a skin from forming as it cools.
- Refrigerate for at least 3-4 hours, or preferably overnight, until completely chilled and firm.
- If using pre-baked store-bought mini phyllo or shortbread shells, simply arrange them on a serving platter or a baking sheet.
- If you've made homemade shells, ensure they are fully cooled before proceeding.
- Gently wash all your chosen fresh fruits (e.g., strawberries, blueberries, raspberries, kiwi, mandarin segments).
- Pat them thoroughly dry with paper towels.
- Hull strawberries and slice them as desired – halves, quarters, or thin slices work well for decorative purposes.
- Using a small spoon or a piping bag fitted with a round tip, fill each tart shell with the chilled and re-whisked pastry cream.
- Arrange your prepared fresh fruit decoratively on top of the pastry cream.
- In a small microwave-safe bowl, warm about ¼ cup apricot jam or apple jelly for 10-20 seconds until it becomes more liquid.
- Strain the warmed jam or jelly through a fine-mesh sieve to remove any fruit bits or lumps.
- Using a small pastry brush, gently brush a thin layer of the warm glaze over the arranged fruit on each tart.
- Once assembled, refrigerate for at least 30 minutes before serving.
- Prep Time: 30 mins
- Cook Time: 15 mins
- Category: Dessert
- Method: Chilling and Assembling
- Cuisine: French
Nutrition
- Serving Size: 1 tart
- Calories: 150
- Sugar: 10 g
- Sodium: 50 mg
- Fat: 7 g
- Saturated Fat: 4 g
- Unsaturated Fat: 3 g
- Trans Fat: 0 g
- Carbohydrates: 20 g
- Fiber: 1 g
- Protein: 3 g
- Cholesterol: 80 mg
Keywords: Ensure the pastry cream is thoroughly chilled before filling the shells. Dry your fruit meticulously to avoid soggy tarts. Assemble the tarts no more than a few hours before serving for the best texture.
Leave a Comment