

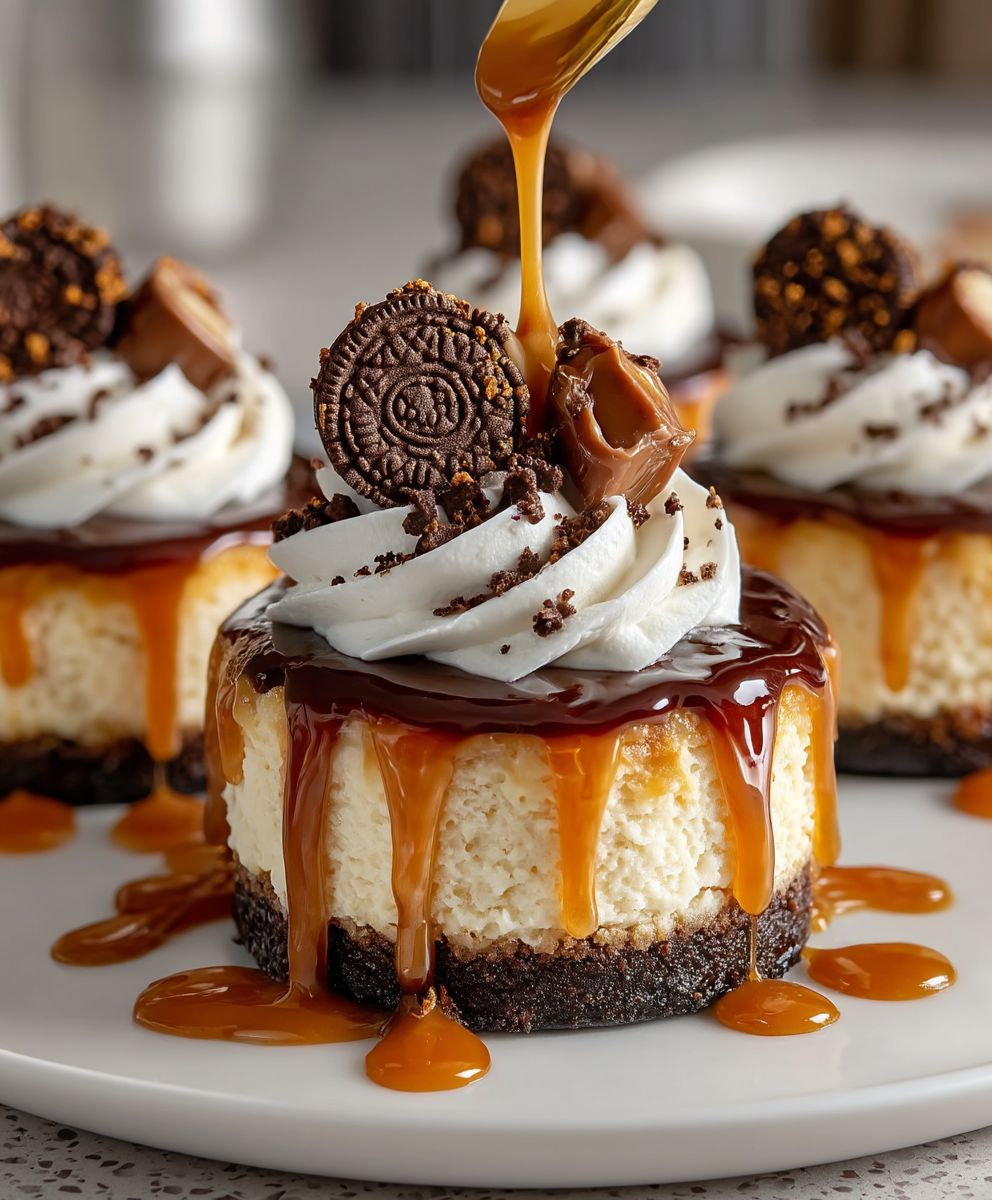
Mini Rolo Cheesecakes: Prepare to be utterly captivated by these bite-sized delights! Imagine a creamy, dreamy cheesecake filling nestled atop a buttery graham cracker crust, crowned with a luscious Rolo candy that melts into a caramel-chocolate swirl with every heavenly bite. These aren’t just desserts; they’re miniature masterpieces of flavor and texture, perfect for satisfying your sweet tooth or wowing guests at your next gathering.
While the exact origins of cheesecake are debated, its roots can be traced back to ancient Greece. However, the modern cheesecake, as we know and love it, truly blossomed in America. Adding the iconic Rolo candy elevates this classic dessert to a whole new level of indulgence. The combination of creamy cheesecake, crunchy crust, and the rich caramel-chocolate of the Rolo creates a symphony of flavors that’s simply irresistible.
People adore these Mini Rolo Cheesecakes for so many reasons. They’re incredibly easy to make, requiring minimal baking time and simple ingredients. The individual portions make them perfect for portion control and elegant presentation. But most importantly, it’s the taste! The smooth, tangy cheesecake filling perfectly complements the sweet, chewy Rolo, creating a harmonious balance that will leave you craving more. Whether you’re a seasoned baker or a kitchen novice, these mini cheesecakes are guaranteed to be a crowd-pleaser.

Ingredients:
- For the Crust:
- 1 ½ cups chocolate wafer crumbs (about 36 wafers)
- 5 tablespoons unsalted butter, melted
- 2 tablespoons granulated sugar
- For the Cheesecake Filling:
- 24 ounces cream cheese, softened to room temperature
- ¾ cup granulated sugar
- 2 large eggs
- 2 teaspoons vanilla extract
- ¼ cup heavy cream
- For the Topping:
- 48 Rolo candies, unwrapped
- Optional: Sea salt flakes, for sprinkling
Preparing the Crust:
- First, let’s get that delicious chocolate crust ready! Preheat your oven to 325°F (160°C). This lower temperature helps prevent the cheesecakes from cracking.
- In a medium bowl, combine the chocolate wafer crumbs, melted butter, and granulated sugar. Make sure everything is nicely mixed together. I like to use a fork to really get the butter incorporated evenly.
- Now, line a 24-cup mini muffin tin with paper liners. This makes removing the cheesecakes a breeze later on. If you don’t have paper liners, you can grease the muffin tin really well with cooking spray.
- Press about 1 tablespoon of the chocolate crumb mixture into the bottom of each muffin liner. Use the back of a spoon or your fingers to firmly pack the crumbs down. This creates a solid base for our cheesecake filling.
- Bake the crusts in the preheated oven for 5 minutes. This helps them set up and become nice and sturdy. After 5 minutes, remove the muffin tin from the oven and let the crusts cool slightly while you prepare the cheesecake filling.
Making the Cheesecake Filling:
- Now for the star of the show – the creamy cheesecake filling! In a large bowl, beat the softened cream cheese with an electric mixer until it’s smooth and creamy. This is really important, because any lumps in the cream cheese will show up in the final product. I usually beat it for about 2-3 minutes on medium speed.
- Gradually add the granulated sugar to the cream cheese, beating until well combined. Again, make sure everything is smooth and there are no sugar granules left.
- Add the eggs one at a time, beating well after each addition. Be careful not to overmix at this stage, as overmixing can incorporate too much air into the batter, which can cause the cheesecakes to puff up and then sink or crack.
- Stir in the vanilla extract and heavy cream. Mix until just combined. The heavy cream adds a richness and helps create a super smooth and creamy texture.
Assembling and Baking the Mini Cheesecakes:
- Pour the cheesecake filling over the cooled crusts, filling each liner almost to the top. I like to use a small cookie scoop to make sure each cheesecake gets an equal amount of filling.
- Bake the mini cheesecakes in the preheated oven for 15-18 minutes, or until the edges are set but the centers are still slightly jiggly. They will continue to set up as they cool.
- Remove the muffin tin from the oven and let the cheesecakes cool in the tin for about 15 minutes. This allows them to cool gradually and helps prevent cracking.
- After 15 minutes, transfer the cheesecakes to a wire rack to cool completely.
Adding the Rolo Topping:
- Once the cheesecakes are completely cool, it’s time to add the Rolo topping! Gently press one unwrapped Rolo candy into the center of each cheesecake.
- If you want to get that perfectly melted Rolo look, you can microwave the cheesecakes for a few seconds (literally, like 5-10 seconds) to soften the Rolos slightly. Be careful not to melt them completely! Alternatively, you can place the cheesecakes under a broiler for a very short time, watching them like a hawk to prevent burning.
- Let the Rolos cool and set up. If you’re feeling fancy, sprinkle a tiny pinch of sea salt flakes on top of each Rolo. The saltiness complements the sweetness of the chocolate and caramel perfectly!
Chilling and Serving:
- Refrigerate the mini Rolo cheesecakes for at least 2 hours before serving. This allows them to chill completely and the flavors to meld together.
- When you’re ready to serve, gently peel the paper liners away from the cheesecakes.
- Enjoy your delicious homemade mini Rolo cheesecakes! They’re perfect for parties, potlucks, or just a sweet treat for yourself.
Tips and Variations:
- Crust Variations: You can use graham cracker crumbs instead of chocolate wafer crumbs for a different flavor. Or, try using Oreo crumbs (with the filling removed) for an extra chocolatey kick!
- Filling Variations: Add a tablespoon of cocoa powder to the cheesecake filling for a chocolate cheesecake. Or, swirl in some caramel sauce for a caramel cheesecake.
- Topping Variations: Instead of Rolos, you can use other candies like Hershey’s Kisses, mini peanut butter cups, or even fresh berries.
- Make Ahead: These mini cheesecakes can be made up to 2 days in advance. Store them in an airtight container in the refrigerator.
- Freezing: You can also freeze these cheesecakes for up to 2 months. Wrap them individually in plastic wrap and then place them in a freezer-safe bag or container. Thaw them in the refrigerator overnight before serving.
Troubleshooting:
- Cracked Cheesecakes: To prevent cracking, make sure your cream cheese is softened to room temperature and don’t overmix the batter. Also, bake the cheesecakes at a lower temperature and let them cool gradually.
- Soggy Crust: To prevent a soggy crust, bake the crust for a few minutes before adding the filling. This helps it set up and become more resistant to moisture.
- Uneven Baking: To ensure even baking, make sure your oven is properly calibrated and that the muffin tin is placed in the center of the oven.
Conclusion:
These Mini Rolo Cheesecakes are truly irresistible, and I genuinely believe you need to try them. They’re the perfect balance of creamy, decadent cheesecake and that satisfying caramel-chocolate crunch from the Rolo. Seriously, what’s not to love? The individual portions make them ideal for parties, potlucks, or even just a special treat for yourself (because you deserve it!). But beyond the convenience, it’s the flavor combination that really elevates these little bites to something extraordinary. The richness of the cheesecake is perfectly offset by the sweetness of the caramel and the slight bitterness of the chocolate, creating a symphony of flavors that will have everyone begging for more.
Why are these a must-try? Because they’re incredibly easy to make, require minimal baking time, and deliver maximum flavor impact. You don’t need to be a seasoned baker to whip up a batch of these beauties. The recipe is straightforward, and the results are consistently delicious. Plus, they’re a guaranteed crowd-pleaser. I’ve never brought these to a gathering without them disappearing within minutes!
But the best part? They’re incredibly versatile! Feel free to experiment with different variations to suit your taste. For a richer, more intense chocolate flavor, try using dark chocolate Rolos. Or, if you’re a fan of nuts, add a sprinkle of chopped pecans or walnuts to the crust or the cheesecake filling. You could even swirl in a little peanut butter for a Reese’s-inspired twist!
Serving Suggestions and Variations:
* Serve them chilled for the best texture and flavor.
* Garnish with a dollop of whipped cream and a sprinkle of cocoa powder for an elegant presentation.
* Drizzle with melted chocolate or caramel sauce for an extra touch of indulgence.
* For a festive touch, add a sprinkle of edible glitter or colored sprinkles.
* Consider using different types of cookies for the crust, such as Oreos or graham crackers.
* If you’re feeling adventurous, try adding a layer of salted caramel to the bottom of each cheesecake.
I’m confident that once you try this recipe for Mini Rolo Cheesecakes, it will become a staple in your dessert repertoire. They’re the perfect combination of simplicity and indulgence, and they’re guaranteed to impress.
So, what are you waiting for? Gather your ingredients, preheat your oven, and get ready to create some magic in the kitchen! I’m so excited for you to experience the joy of these little cheesecakes.
And most importantly, I’d love to hear about your experience! Did you try any variations? Did you make them for a special occasion? Share your photos and stories in the comments below. Let me know what you think, and don’t forget to tag me in your social media posts! Happy baking! I can’t wait to see your creations. I hope you enjoy these as much as my family and friends do!
Mini Rolo Cheesecakes: The Ultimate Bite-Sized Dessert Recipe
Decadent mini chocolate cheesecakes with a creamy filling and a melty Rolo candy topping. Perfect for parties or a sweet treat!
Ingredients
Instructions
Recipe Notes
- Crust Variations: Use graham cracker crumbs or Oreo crumbs instead of chocolate wafer crumbs.
- Filling Variations: Add cocoa powder for chocolate cheesecake or swirl in caramel sauce for caramel cheesecake.
- Topping Variations: Use Hershey’s Kisses, mini peanut butter cups, or fresh berries instead of Rolos.
- Make Ahead: Can be made up to 2 days in advance. Store in an airtight container in the refrigerator.
- Freezing: Freeze for up to 2 months. Wrap individually in plastic wrap and then place them in a freezer-safe bag or container. Thaw in the refrigerator overnight before serving.
- Cracked Cheesecakes: Make sure your cream cheese is softened to room temperature and don’t overmix the batter. Also, bake the cheesecakes at a lower temperature and let them cool gradually.
- Soggy Crust: Bake the crust for a few minutes before adding the filling.
- Uneven Baking: Make sure your oven is properly calibrated and that the muffin tin is placed in the center of the oven.

Leave a Comment