

Mint Chocolate Puppy Chow is here to transform your snack game from mundane to magnificent! If you’ve ever craved a treat that perfectly balances decadent chocolate with a cool, refreshing burst of mint, then you’re in for an absolute delight. This isn’t just any snack; it’s a nostalgic journey for many, a staple at countless gatherings, and a guaranteed crowd-pleaser that disappears faster than you can say “more, please!”
Originating as a simple, no-bake confection, traditional Puppy Chow, also known as Muddy Buddies, has long been cherished across America for its irresistible combination of crispy cereal coated in peanut butter, chocolate, and powdered sugar. Our unique twist elevates this beloved classic by infusing it with vibrant mint, creating an unbelievably addictive flavor profile that’s both familiar and excitingly new.
People absolutely adore this dish not only for its incredible taste—that perfect harmony of rich cocoa and refreshing mint—but also for its delightful crunch and the sheer convenience of whipping up a batch in minutes. Get ready to fall head over heels for this incredible Mint Chocolate Puppy Chow recipe that promises to be the star of your next party or your new favorite indulgence.

Welcome, fellow snack enthusiasts! Today, we’re diving into the delightful world of Mint Chocolate Puppy Chow. This isn’t just any puppy chow; it’s a refreshing, chocolatey, minty masterpiece that’s perfect for parties, movie nights, or whenever you crave something utterly irresistible. I’m so excited to share my go-to recipe for this beloved treat, which I’ve perfected over countless batches to ensure maximum flavor and that perfect “chow” texture. Get ready to impress your taste buds!
Ingredients:
- 9 cups Rice Chex cereal: I always reach for Rice Chex because its light, airy, and crisp texture holds up beautifully to the coating without becoming soggy. The square shape also provides plenty of surface area for all that delicious chocolate and powdered sugar to cling to, ensuring every bite is a flavor explosion.
- 1½ cups semi-sweet chocolate chips: For that classic chocolate flavor, semi-sweet chips are my absolute favorite. They offer a rich, deep chocolate essence that isn’t overly sweet, creating a fantastic balance with the mint. You could also experiment with a blend of semi-sweet and milk chocolate for a slightly milder profile, but I find semi-sweet provides the best foundation for our minty adventure.
- ½ cup creamy peanut butter: Creamy peanut butter is absolutely essential here. It provides a smooth, rich base that binds the chocolate mixture together and adds a delightful nutty depth. Make sure it’s a standard, shelf-stable creamy peanut butter (like Jif or Skippy) rather than a natural, oil-separated variety, as the latter can sometimes affect the consistency of the coating. The emulsifiers in conventional peanut butter help create a perfectly smooth, stable sauce.
- ¼ cup (½ stick) unsalted butter: Unsalted butter allows us to control the overall saltiness of the dish, which is important for balancing the sweetness and mint. It contributes to the luxurious, smooth texture of our chocolate coating, adding richness and helping the mixture melt evenly. Make sure your butter is at room temperature or slightly softened for easier melting.
- 1 teaspoon pure mint extract: This is where the magic happens! I always opt for pure mint extract for a clean, authentic mint flavor that isn’t artificial. Start with one teaspoon, and if you’re a serious mint lover, you can certainly add a little more to taste, perhaps another half teaspoon. Just be cautious, as mint extract can be quite potent!
- ½ teaspoon green gel food coloring: To give our Mint Chocolate Puppy Chow that iconic, vibrant green hue, gel food coloring is the way to go. Gel colors are highly concentrated, so a little goes a long way and they won’t thin out your chocolate mixture like liquid food coloring might. You can adjust the amount to achieve your desired shade, from a subtle pastel to a bold emerald.
- 3 cups powdered sugar: This generous amount of powdered sugar is what gives puppy chow its signature dusty, snow-covered appearance and irresistible sweetness. It creates a delightful texture contrast and ensures that each piece of cereal is coated in a sweet, powdery blanket. Don’t skimp on this!
- Optional additions for garnish and extra flavor:
- ½ cup chopped Andes mints: These tiny mint chocolate candies are a match made in heaven for this recipe. Their distinct minty chocolate flavor and smooth texture elevate the puppy chow to a gourmet level. Chop them finely for even distribution.
- ¼ cup mini chocolate chips: A sprinkle of these adds extra chocolatey goodness and visual appeal.
- Chocolate sprinkles: For a festive touch and a bit of textural fun.
Phase 1: Crafting the Irresistible Mint Chocolate Base
- Measure and Prepare Your Workspace: Before we even think about melting, let’s get organized! Grab your largest mixing bowl – seriously, a really big one – and carefully measure out your 9 cups of Rice Chex cereal. Pour it into the large bowl and set it aside. This step is crucial because once our chocolate mixture is ready, we’ll want to work quickly and efficiently. Having the cereal waiting patiently means less stress and a more evenly coated final product. I always ensure my workspace is clear and I have all my ingredients measured and ready to go; it truly makes the entire process smoother and more enjoyable.
- Melt the Chocolatey Trio: Now for the heart of our Mint Chocolate Puppy Chow! In a medium, microwave-safe bowl, combine your 1½ cups of semi-sweet chocolate chips, ½ cup of creamy peanut butter, and ¼ cup (½ stick) of unsalted butter. I prefer the microwave for this step because it’s quick and easy, but you could also use a double boiler on the stovetop for a more controlled melt. If using the microwave, heat the mixture in 30-second intervals, stirring vigorously after each interval. It’s absolutely critical to stir well after each burst of heat to prevent the chocolate from seizing or scorching. You’ll notice the chocolate chips starting to soften and the butter melting into the peanut butter, creating a luscious, shiny pool. Continue this process until the mixture is entirely smooth and perfectly uniform, with no lumps of chocolate remaining. This usually takes about 1½ to 2 minutes total, depending on your microwave’s power. The goal here is a perfectly pourable, glossy base.
- Stir Until Silky Smooth: Once your chocolate, peanut butter, and butter have fully melted, give the mixture one last thorough stir with a spatula. We’re looking for a consistently smooth, flowing texture that’s almost like a thick, rich sauce. This ensures that when we add our flavors, they’ll be evenly distributed, and every piece of cereal will be coated beautifully. Don’t rush this step; a smooth base is key to a perfect puppy chow. The aroma at this stage is already heavenly, a rich blend of chocolate and peanut butter that hints at the deliciousness to come!
- Infuse with Mint and Color: Now for the “mint” in “Mint Chocolate Puppy Chow”! Carefully add 1 teaspoon of pure mint extract to your warm, smooth chocolate mixture. Next, incorporate ½ teaspoon of green gel food coloring. I prefer gel coloring because it’s concentrated and won’t thin out your precious chocolate mixture. Stir these additions in thoroughly until the mint extract is fully incorporated and the food coloring has transformed your chocolate base into a beautiful, vibrant shade of green. You can add a tiny bit more food coloring if you desire a deeper green, but remember, gel colors are potent! Stir until there are no streaks of unmixed color and the hue is uniform throughout. The delightful aroma of mint will now mingle with the rich chocolate, promising a treat for your senses.
Phase 2: Coating the Cereal – The Heart of Puppy Chow
- Prepare the Cereal for Coating: You should have your 9 cups of Rice Chex cereal patiently waiting in that wonderfully large mixing bowl from Step 1. Make sure it’s spread out a bit, forming a relatively even layer. This preparation helps ensure that when you pour over our glorious mint chocolate mixture, it has the best chance of coating as many pieces as possible from the get-go. A wide, shallow bowl works best, but any very large bowl will do. The more surface area, the better for the upcoming delicious coating!
- Generously Pour the Mint Chocolate Mixture: With your perfectly smooth, vibrant green mint chocolate mixture ready, it’s time for the moment of truth! Carefully pour the entire contents of your chocolate bowl over the measured Rice Chex cereal. Try to distribute it as evenly as you can over the top layer of cereal. Don’t worry if it doesn’t cover everything instantly; that’s what the next step is for. The sight of that glossy, green chocolate cascading over the crisp squares is truly satisfying and promises an incredible flavor experience. Ensure you scrape every last bit of that precious chocolate out of the bowl!
- Gently Coat Every Piece: Now for the delicate dance of coating! Using a large rubber spatula – or two, if you’re feeling ambitious – gently fold and stir the cereal. The key here is to be incredibly gentle to avoid crushing the delicate Rice Chex. Your goal is to coat every single piece of cereal with that beautiful green mint chocolate. It might seem like a lot of stirring, but take your time. I usually use a motion where I scrape from the bottom of the bowl and fold the cereal over the top, repeating this until all the cereal appears wet and uniformly covered. This process usually takes about 3 to 5 minutes of continuous, gentle folding. You’ll notice the cereal transforming from plain squares to sticky, chocolate-coated treasures. The aroma will be intensely minty and chocolatey, a true delight!
Phase 3: The Magical Powdered Sugar Shake
- Prepare the Powdered Sugar Station: This is where our “puppy chow” truly gets its signature look! Get out a very large, sturdy, sealable plastic bag – a 2-gallon freezer bag works wonderfully. If you don’t have one that large, you might need to divide your coated cereal into two smaller bags. Measure out your 3 cups of powdered sugar and pour about half of it into the bottom of the plastic bag. Spreading it out slightly will give our cereal a nice bed to land on and start the coating process immediately.
- Carefully Transfer the Coated Cereal: Now, using your spatula, carefully transfer all the mint chocolate-coated cereal from your large mixing bowl into the plastic bag with the powdered sugar. Try to do this gently to avoid any breakage or unnecessary mess. Once all the cereal is in, pour the remaining half of the powdered sugar over the top of the cereal inside the bag. This ensures that the cereal is completely surrounded by the powdery goodness, setting us up for an even and complete coating.
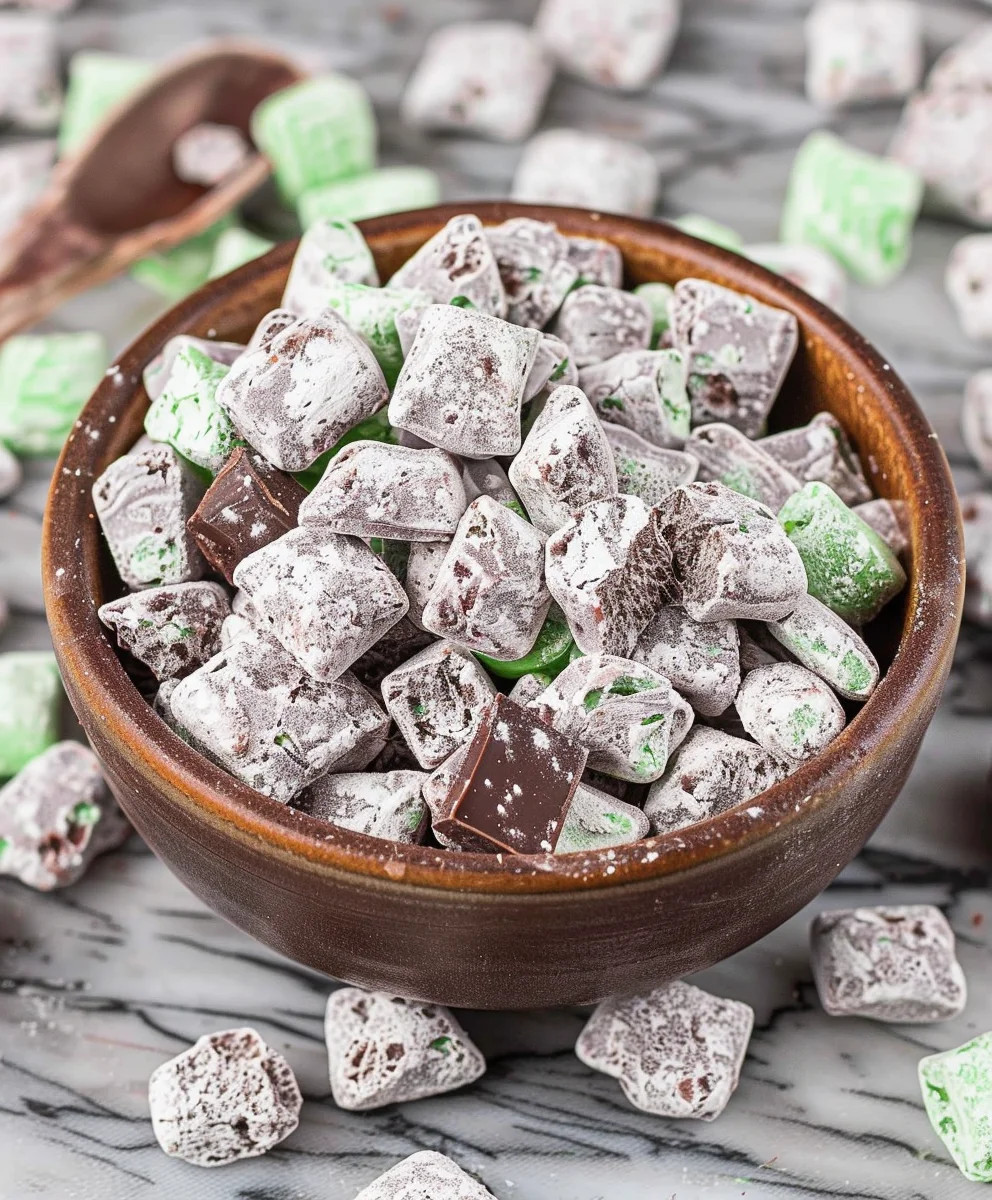
- Shake, Shake, Shake! The Puppy Chow Transformation: This is arguably the most fun part! Seal the bag tightly, making sure to remove as much air as possible while still leaving enough room for the cereal to move freely. Now, pick up the bag and gently shake, tumble, and turn it. The key is to shake with enthusiasm but not so vigorously that you crush the cereal. I like to gently rock the bag back and forth, turning it upside down, shaking it side to side, and rotating it to ensure every piece gets covered. Continue shaking for about 2 to 3 minutes, or until every single piece of cereal is completely coated in powdered sugar and no longer looks sticky or green. It’s like magic – the vibrant green chocolate disappears under a delightful snowy white blanket. When you open the bag, you’ll be greeted by beautifully coated, non-sticky Mint Chocolate Puppy Chow!
Phase 4: Setting, Garnishing, and Serving
- Spread and Set: Once your Mint Chocolate Puppy Chow is perfectly coated in powdered sugar, gently pour it out onto a large baking sheet lined with parchment paper or wax paper. Spread it out into a single layer. This step is important for allowing any remaining stickiness to dissipate and for the puppy chow to set completely, ensuring it’s not clumpy. You can let it set at room temperature for about 15-20 minutes, or if you’re eager to dig in, pop it into the refrigerator for 5-10 minutes. Allowing it to set properly will prevent sticking and make it easier to store.
- Add Optional Garnishes (If Desired): If you’re using any of the optional additions like chopped Andes mints, mini chocolate chips, or chocolate sprinkles, now is the perfect time to sprinkle them over the puppy chow as it sets. The slight warmth of the puppy chow will help the garnishes adhere slightly, adding both visual appeal and an extra layer of flavor and texture. I absolutely adore the crunch and extra minty kick that chopped Andes mints bring to this recipe!
- Store for Freshness: Once completely set and cooled, your Mint Chocolate Puppy Chow is ready to be devoured! For optimal freshness, store any leftovers in an airtight container at room temperature. It will stay wonderfully crisp and delicious for up to a week. If you prefer a chilled treat, you can store it in the refrigerator, but sometimes condensation can affect the powdery coating over time. I find it rarely lasts long enough to worry about storage, though!
- Serve and Enjoy!: Now for the best part – sharing (or not!) your glorious creation. Serve your Mint Chocolate Puppy Chow in a large bowl at your next gathering, or portion it out into small bags for individual treats. It’s absolutely perfect for holiday parties, game nights, or just a cozy evening in. This treat is a guaranteed crowd-pleaser and a fantastic conversation starter. Each bite offers that delightful crunch of cereal, rich chocolate, refreshing mint, and a lovely coating of sweet powdered sugar. It’s a truly addictive snack that you’ll want to make again and again! Enjoy every minty, chocolatey mouthful!

Conclusion:
Well, friends, we’ve reached the end of our culinary journey for today, but I truly hope this isn’t the end of your adventure with this absolutely incredible recipe! I genuinely believe that if there’s one snack you absolutely must add to your rotation, it’s this one. It’s more than just a treat; it’s an experience. The vibrant burst of refreshing mint perfectly balanced with the deep, rich notes of chocolate creates a flavor profile that is nothing short of addictive. Every single piece delivers that satisfying crunch, coated generously in that dreamy powdered sugar, making it impossible to stop at just one handful. It’s the kind of snack that brings a smile to everyone’s face, whether you’re making it for a special occasion or simply because you deserve a little indulgence on a Tuesday afternoon. The sheer simplicity of its preparation, requiring no baking and minimal fuss, makes it a true weeknight hero, perfect for last-minute gatherings or when you just need something utterly delicious without spending hours in the kitchen. It’s also incredibly forgiving, meaning even if you’re a novice in the kitchen, you’ll achieve stellar results every time. Trust me, the delightful combination of textures and tastes will make this a firm favorite in your household, just as it has become in mine. It’s a joyful, easy, and utterly irresistible way to satisfy those sweet cravings with a refreshing twist.
Now, let’s talk about how to truly make this recipe shine and how you can put your own spin on it. While it’s utterly perfect as is, there are so many fun ways to enjoy and adapt it. For serving, I love pouring a big bowl of this out for parties – it vanishes faster than you can say “more please!” But it’s also fantastic in individual snack bags for lunchboxes or on-the-go treats, preventing sticky fingers from diving into one communal bowl. For a slightly more elegant presentation, try layering it in small glass jars for a charming dessert option, perhaps even with a dollop of whipped cream on top. As for variations, the sky’s the limit! If you’re feeling adventurous, consider adding some mini chocolate chips to the mixture before coating it in powdered sugar for an extra chocolatey burst. A sprinkle of crushed peppermint candies (think candy canes during the holidays!) could elevate the mint factor even further, adding a delightful textural contrast. For a truly decadent experience, a drizzle of melted white chocolate over the finished Mint Chocolate Puppy Chow before the powdered sugar goes on creates another layer of flavor and visual appeal. You could even experiment with different types of chocolate, perhaps using dark chocolate for a more intense flavor or milk chocolate for a sweeter profile. Imagine serving this alongside a strong cup of coffee or a glass of cold milk – pure bliss! It’s robust enough to stand up to other flavors but delicate enough to remain refreshing. And don’t forget, this makes an absolutely wonderful homemade gift during the holidays or for a hostess present. Package it in a pretty bag with a ribbon, and you’ve got a thoughtful, delicious, and much-appreciated treat.
So, what are you waiting for? This isn’t just a recipe; it’s an invitation to create joy, to indulge a little, and to share something truly special with those you love. I wholeheartedly encourage you to give this amazing Mint Chocolate Puppy Chow a try. Dive into the simple process, revel in the incredible aromas that will fill your kitchen, and then, most importantly, savor every single glorious bite. I promise you won’t be disappointed. Once you’ve whipped up your batch, I would absolutely love to hear about your experience! Did you stick to the original recipe, or did you venture into some of the variations? What was your favorite part? Please share your photos and stories with me. Your feedback and creativity inspire me, and I genuinely enjoy seeing how you make these recipes your own. So, go forth, make some magic, and let’s keep the deliciousness going. Happy snacking, everyone!
Mint Chocolate Puppy Chow
An irresistible no-bake snack featuring crispy cereal coated in melted chocolate, minty Andes Mints, and powdered sugar. Perfect for parties or a delightful indulgence.
Ingredients
-
7 cups Rice Chex cereal
-
1 cup semi-sweet chocolate chips
-
1 cup Andes Mints, roughly chopped
-
1 tablespoon salted butter
-
2 cups powdered sugar
-
Optional: mint-flavored cookies, chopped
-
Optional: Andes mint candies or mint-flavored baking chunks
-
Optional: green M&Ms
Instructions
-
Step 1
Place 7 cups Rice Chex cereal into a large mixing bowl. Set aside. -
Step 2
In a medium microwave-safe bowl, combine 1 cup semi-sweet chocolate chips, 1 cup roughly chopped Andes Mints, and 1 tablespoon salted butter. Microwave in 30-second intervals, stirring vigorously after each, until the mixture is smooth and fully melted (approximately 1.5-2 minutes total). -
Step 3
Pour the melted mint chocolate mixture over the prepared Rice Chex cereal. Gently fold with a large rubber spatula until all cereal pieces are evenly coated. -
Step 4
Pour 2 cups powdered sugar into a large, sealable plastic bag (e.g., 2-gallon freezer bag). Add the chocolate-coated cereal to the bag. Seal the bag, removing excess air, then gently shake, tumble, and turn until all cereal pieces are thoroughly coated in powdered sugar. -
Step 5
Spread the Mint Chocolate Puppy Chow onto a parchment-lined baking sheet in a single layer to cool and set for 15-20 minutes at room temperature, or 5-10 minutes in the refrigerator. Optionally, sprinkle with chopped mint-flavored cookies, Andes mint candies, or green M&Ms for extra flavor and visual appeal. -
Step 6
Once set, serve immediately. Store any leftovers in an airtight container at room temperature for up to one week.
Important Information
Nutrition Facts (Per Serving)
It is important to consider this information as approximate and not to use it as definitive health advice.
Allergy Information
Please check ingredients for potential allergens and consult a health professional if in doubt.


Leave a Comment