

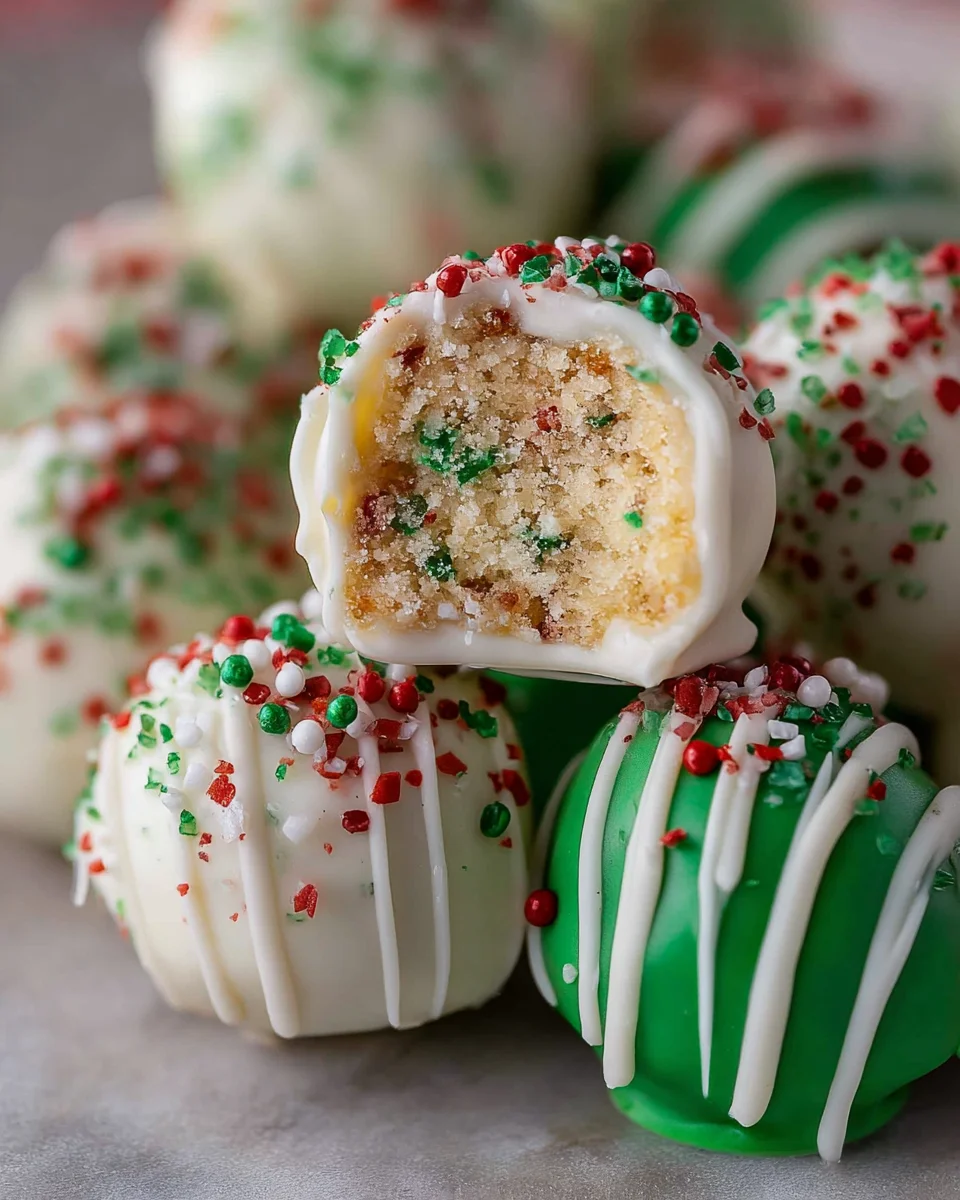
Little Debbie Christmas Tree Cakes Truffles are about to become your new favorite holiday tradition, transforming a nostalgic snack into an irresistible, elegant treat! I’m absolutely thrilled to guide you through making these delightful, no-bake bites that capture the magic of the season in every single morsel. For many of us, the sight of those iconic green-tree-decorated cakes appearing on grocery store shelves signals the true start of the Christmas season. They are more than just a snack; they are a taste of childhood, a warm hug of holiday nostalgia that instantly transports us back to simpler times.
Elevating a Holiday Classic
But what if we could elevate that beloved classic, turning its comforting sweetness into something even more special? That’s precisely what these truffles achieve. People adore this dish not only for its incredible convenience – it’s a no-bake wonder perfect for busy holiday schedules – but also for its heavenly combination of moist, cakey vanilla goodness, creamy filling, and a decadent chocolate shell. The contrast in textures, coupled with that unmistakably festive flavor, makes these Little Debbie Christmas Tree Cakes Truffles an absolute showstopper at any gathering. Get ready to impress everyone with how effortlessly you’ve created such a magical dessert!

Ingredients:
- 1 Box (12 Cakes) Little Debbie Christmas Tree Cakes: These are the star of our show, the very foundation of our delightful “Little Debbie Christmas Tree Cakes Truffles.” Make sure they are fresh for the best texture and flavor.
- 8 Ounces Cream Cheese: Full-fat cream cheese, softened at room temperature. This is crucial for creating that perfectly creamy, truffle-like consistency that binds our cakes together. Don’t use reduced-fat versions, as they can affect the texture and richness.
- 12 Ounces White Chocolate Melting Wafers or High-Quality White Chocolate Chips: I find that melting wafers or true couverture chocolate works best for a smooth, glossy coating without the need for tempering. If using chips, sometimes a teaspoon of coconut oil or vegetable shortening can help with melt consistency.
- 4-6 Ounces Green Candy Melts: This will be for our festive drizzle, adding that iconic Christmas tree color to our “Little Debbie Christmas Tree Cakes Truffles.” You might want a little extra if you plan on doing more intricate designs.
- 2 Tablespoons Coconut Oil or Vegetable Shortening (optional): This is incredibly helpful for thinning out the melted chocolate if it’s too thick for dipping, ensuring a smooth, even coat on your truffles.
- Assorted Christmas Sprinkles: Think red and green nonpareils, festive jimmies, tiny star sprinkles, or even edible glitter. These are for decorating and making your “Little Debbie Christmas Tree Cakes Truffles” truly sparkle!
- Parchment Paper or Wax Paper: Absolutely essential for lining your baking sheets, preventing your truffles from sticking as they chill and set.
- Cookie Scoop (1-inch or 1.5-inch): For consistent sizing, which makes for uniform and professional-looking “Little Debbie Christmas Tree Cakes Truffles.”
- Toothpicks or Dipping Tools: These are invaluable for easily dipping your truffle balls into the melted chocolate without making a mess of your fingers.
- Small Microwave-Safe Bowls: For melting your chocolates.
Preparing the Truffle Base
Alright, let’s get started on creating the magical core of our “Little Debbie Christmas Tree Cakes Truffles”! This first step is all about transforming those beloved holiday cakes into a rich, pliable truffle mixture. I promise, it’s easier and more fun than it sounds, and the aroma alone will put you in the festive spirit.
- Unwrap the Little Debbie Christmas Tree Cakes: Carefully unwrap all twelve of your Little Debbie Christmas Tree Cakes. Lay them out on a clean surface. Take a moment to appreciate their festive charm before they undergo their delicious transformation! It’s important to make sure all the paper backing is removed from each cake to avoid any unwanted bits in your truffles.
- Crumble the Cakes: Now for the fun part! Place all the unwrapped cakes into a large mixing bowl. Using your hands, a sturdy fork, or even a potato masher, begin to break down and crumble the cakes. Your goal here is to get them into very fine crumbs. We want to eliminate any large chunks, as these can make the truffle mixture uneven and harder to roll later on. Some people prefer to use a food processor for this step, and that’s perfectly fine! If you opt for a food processor, pulse the cakes until they are finely crumbled. Just be careful not to over-process them into a paste; we’re looking for crumbs, not dough. This step is key to getting that smooth, melt-in-your-mouth texture for your “Little Debbie Christmas Tree Cakes Truffles.”
- Add the Softened Cream Cheese: Once your cakes are beautifully crumbled, it’s time to introduce the cream cheese. Add the full 8 ounces of softened cream cheese to the bowl with the cake crumbs. It’s absolutely essential that your cream cheese is at room temperature. If it’s too cold, it will be difficult to incorporate smoothly, leading to lumps in your truffle mixture. You can tell it’s soft enough if you can easily press into it with your finger.
- Mix Until Well Combined: Now, using a sturdy spoon, a rubber spatula, or even your clean hands (which I find is the most effective way for this particular task), begin to mix the cake crumbs and cream cheese together. You’ll want to mix until the mixture is completely uniform and has the consistency of a soft dough or play-doh. There should be no visible streaks of cream cheese and no dry cake crumbs left. This may take a few minutes of good mixing. Don’t be afraid to get in there and really work it! The mixture will be dense and somewhat sticky, but it should hold together when pressed. This perfectly blended base is what will give your “Little Debbie Christmas Tree Cakes Truffles” their incredible texture and flavor.
Forming and Chilling the Truffles
With our delightful truffle base ready, the next phase is shaping it into individual treats and preparing them for their luscious chocolate coating. Precision and patience here will pay off with beautifully uniform “Little Debbie Christmas Tree Cakes Truffles.”
- Prepare Your Baking Sheets: Line one or two large baking sheets with parchment paper or wax paper. This is crucial for preventing your truffles from sticking during the chilling process and making them easy to pick up later for dipping.
- Scoop the Truffle Mixture: Using a 1-inch or 1.5-inch cookie scoop (I prefer the smaller size for bite-sized truffles, but it’s totally up to you!), scoop out portions of the cake and cream cheese mixture. A scoop ensures that all your “Little Debbie Christmas Tree Cakes Truffles” are roughly the same size, which helps them chill and coat evenly. If you don’t have a scoop, you can certainly use a tablespoon, just try to be consistent with the amounts.
- Roll into Balls: Take each scooped portion and gently roll it between the palms of your hands to form a smooth, round ball. If the mixture is too sticky, you can lightly dampen your hands or even lightly dust them with powdered sugar to help prevent sticking. Place the finished truffle balls onto the prepared baking sheets, leaving a small space between each one. This batch of “Little Debbie Christmas Tree Cakes Truffles” should yield between 24 and 36 truffles, depending on the size you make them.
- Chill the Truffles: Once all your truffle balls are formed and placed on the baking sheets, it’s time for them to firm up. Transfer the baking sheets to the refrigerator and chill for at least 30 minutes, or even up to an hour. This chilling step is absolutely non-negotiable! It allows the truffles to become firm enough to handle without falling apart when you dip them into the warm chocolate. If they’re not chilled enough, they might melt or lose their shape in the warm coating, and nobody wants sad, misshapen “Little Debbie Christmas Tree Cakes Truffles.”
Melting the Chocolate Coating
The coating is what truly elevates our “Little Debbie Christmas Tree Cakes Truffles” from simple cake balls to elegant, festive confections. Getting the chocolate just right is key for a smooth, beautiful finish. I’ll share my favorite methods for achieving perfection.
- Melt the White Chocolate:
Microwave Method (My Go-To for Ease):
Place your 12 ounces of white chocolate melting wafers (or chips) into a microwave-safe bowl. Microwave on 50% power for 30-second intervals, stirring thoroughly after each interval. White chocolate can seize easily if overheated, so low and slow is the name of the game. Continue microwaving and stirring until the chocolate is mostly melted and smooth. If you find it’s a little too thick for dipping, you can stir in 1-2 teaspoons of coconut oil or vegetable shortening until it reaches a perfect, pourable consistency. This trick makes a huge difference in achieving a thin, even coat on your “Little Debbie Christmas Tree Cakes Truffles.”
Double Boiler Method (Great for More Control):
If you prefer a more controlled melt, set up a double boiler. Fill a saucepan with about an inch or two of water and bring it to a gentle simmer. Place a heat-proof bowl on top of the saucepan, ensuring the bottom of the bowl does not touch the water. Add your white chocolate to the bowl. Stir continuously until the chocolate is completely melted and smooth. Again, if it’s too thick, a touch of coconut oil or shortening will help. This method provides a gentler heat, reducing the risk of scorching the chocolate, which is particularly useful when working with delicate white chocolate for your “Little Debbie Christmas Tree Cakes Truffles.”
- Melt the Green Candy Melts: In a separate small microwave-safe bowl, melt your green candy melts using the same low and slow microwave method as described for the white chocolate. You might not need any coconut oil for these, as candy melts are often formulated to be thinner, but have it ready just in case. We’ll use this for the decorative drizzle, giving our “Little Debbie Christmas Tree Cakes Truffles” that iconic Christmas tree flair. Keep both chocolates warm, but not hot, throughout the dipping process. If they start to thicken, give them another short burst in the microwave or place them back over the double boiler for a moment.
Coating and Decorating the Truffles
This is where your “Little Debbie Christmas Tree Cakes Truffles” really come to life! It’s a bit messy, but incredibly rewarding to see your creations transform into festive masterpieces.
- Dip the Truffles: Take your chilled truffle balls from the refrigerator, working with a few at a time to keep the rest cold. Using a toothpick or a specialized dipping tool, carefully insert it into a truffle ball. Submerge the truffle completely into the melted white chocolate. Make sure it’s fully coated. Lift the truffle out of the chocolate, gently tapping the toothpick or tool against the rim of the bowl to allow any excess chocolate to drip off. This helps create a smooth, even coating and prevents puddling at the base of your “Little Debbie Christmas Tree Cakes Truffles.”
- Transfer and Decorate Immediately: Once the excess chocolate has dripped off, carefully transfer the coated truffle to a clean piece of parchment paper on your baking sheet. Immediately, while the white chocolate is still wet, sprinkle generously with your chosen Christmas sprinkles. The chocolate sets relatively quickly, so you’ll need to work fast here. Repeat this process with the remaining truffle balls, ensuring each one gets a beautiful sprinkle finish. This instant decoration is what makes these “Little Debbie Christmas Tree Cakes Truffles” so appealing.
- Add the Green Drizzle: Once all your truffles are coated in white chocolate and adorned with sprinkles, it’s time for the festive green drizzle. If your green candy melts have cooled and thickened, give them a quick reheat. Transfer the melted green candy melts into a small piping bag, a Ziploc bag with a tiny corner snipped off, or even just use a fork. Drizzle the green chocolate back and forth over the tops of your white-chocolate-coated truffles. This creates that iconic Little Debbie Christmas Tree Cakes design on your homemade “Little Debbie Christmas Tree Cakes Truffles.” You can be as neat or as whimsical as you like with your drizzling – both look great!
Final Chill and Storage
Almost there! A final chill will ensure your “Little Debbie Christmas Tree Cakes Truffles” are perfectly set and ready to enjoy or share.
- Allow to Set: Once all your “Little Debbie Christmas Tree Cakes Truffles” are coated, sprinkled, and drizzled, place the baking sheets back into the refrigerator. Chill for at least 15-30 minutes, or until the chocolate coating is completely set and firm to the touch. This final chill ensures the truffles hold their shape and the coating has a satisfying snap when you bite into them.
- Serve and Store: Once fully set, your gorgeous “Little Debbie Christmas Tree Cakes Truffles” are ready to be devoured! You can gently remove them from the parchment paper using a small spatula if needed. Store any leftover truffles in an airtight container in the refrigerator. They will keep beautifully for up to a week. For the best flavor and texture, I recommend letting them sit out at room temperature for about 10-15 minutes before serving, just to soften the cake base slightly. These “Little Debbie Christmas Tree Cakes Truffles” are truly a delightful treat, perfect for holiday parties, gifting, or simply enjoying with a warm cup of cocoa. Happy indulging!
Conclusion:
Well, friends, we’ve reached the sweet end of our journey together, and I genuinely hope you’re feeling incredibly inspired to whip up a batch of these truly incredible truffles. What makes this particular recipe an absolute must-try, you ask? It’s wonderfully simple: we’ve taken a beloved, iconic holiday classic – the festive Little Debbie Christmas Tree Cake – and transformed it into a sophisticated, bite-sized confection that is utterly impossible to resist. These aren’t just any holiday treats; these are your secret weapon for becoming the star of any festive gathering, a true showstopper that combines nostalgia with an elegant new presentation.
The sheer ease of transforming something so familiar into something so utterly new and delightful is truly remarkable. I’m talking about minimal effort for maximum impact, a rare and wonderful combination, especially during the hustle and bustle of the holiday season. You’re getting all the creamy, dreamy vanilla cake and frosting goodness that we all adore, but in a richer, denser, and undeniably more elegant package. Every bite of these Little Debbie Christmas Tree Cakes Truffles is a little explosion of holiday cheer, a perfect blend of childhood memory and gourmet indulgence.
One of the best parts about making these truffles is the genuine joy they bring, not just to those who eat them, but also to the maker. From the moment you start crushing those festive cakes to the final drizzle of chocolate, every step is infused with holiday spirit. They are perfect for thoughtful gifting, ideal for adding a touch of magic to your dessert platters, and honestly, just a fantastic little treat to have on hand for yourself when that sweet craving hits. Their instantly recognizable festive appearance, complete with those iconic sprinkles, makes them an instant visual hit, and then, of course, the incredible taste seals the deal completely. They are wonderfully decadent, deeply satisfying, and carry that special, heartwarming flavor of childhood holidays, making them a true culinary hug.
Serving Suggestions & Creative Variations:
Now, let’s talk about how to present these beauties in the most appealing way, or even better, how to put your own unique spin on them to truly make them yours!
- Elegantly Plated: Imagine arranging your finished truffles on a beautiful holiday platter, perhaps alongside other festive cookies or candies. A delicate dusting of edible glitter or a few fresh mint leaves can really make them pop and add that extra touch of sophistication.
- Thoughtful Gifts: These truffles make the most charming, homemade gifts. Package a few truffles in small cellophane bags tied with festive ribbons, and they become perfect tokens of appreciation for neighbors, teachers, colleagues, or anyone deserving of a sweet treat. Who wouldn’t appreciate a heartfelt, handmade confection during the holidays?
- Dessert Bar Star: If you’re hosting a holiday party or gathering, these truffles are an absolute must-have for any dessert bar. For an interactive experience, you could even offer different coating options (we’ll get to that next!), allowing your guests to pick their favorite and customize their own sweet delight.
- Perfect Coffee Companion: There’s truly nothing quite like a rich, decadent truffle paired with a warm cup of freshly brewed coffee, a frothy latte, or even a cozy mug of hot cocoa on a chilly evening. The harmonious flavors complement each other beautifully, creating a moment of pure bliss.
And for those of you who absolutely love to get creative and experiment in the kitchen, here are some fantastic ideas to make these truffles uniquely yours and explore new flavor profiles:
- Chocolate Adventure: While classic milk chocolate is always a fantastic choice, don’t hesitate to venture out and experiment! Try using dark chocolate for a more intense, sophisticated flavor, or opt for creamy white chocolate for an even sweeter and richer profile. You could even use brightly colored candy melts in festive red or vibrant green for an extra pop of holiday cheer and visual appeal.
- Extract Extravaganza: A tiny drop of peppermint extract (remember to start small and taste as you go!) mixed into the cake base before rolling can transform these into a delightful, refreshing minty treat. Almond extract could add a subtle nutty complexity, or even a hint of rum extract could introduce a wonderfully sophisticated, boozy twist.
- Textural Delights: After dipping your truffles in chocolate, roll them in finely chopped nuts (pecans or walnuts would be incredibly delicious), toasted shredded coconut, crushed candy canes for a festive crunch, or even more holiday sprinkles for added texture and visual festivity.
- Miniature Masterpieces: For smaller, daintier bites that are perfect for a diverse dessert spread or a larger crowd, simply make the truffle balls a bit smaller. This is an excellent idea if you’re serving many guests or want to offer a wider variety of treats on your platter.
I truly believe this recipe is a game-changer for your holiday baking repertoire. It’s incredibly fun to make, surprisingly easy to execute, and the results are undeniably delicious and visually stunning. There’s a special kind of satisfaction that comes from creating something so delightful with your own hands, and then sharing that pure joy with friends and family. So please, don’t just read about it—roll up your sleeves, gather your ingredients, and give these delightful truffles a try. I promise you won’t be disappointed; in fact, I’m confident you’ll be absolutely thrilled with your sweet success!
Once you’ve experienced the magic of making and tasting these truffles, I would absolutely love to hear all about it! Did you try a fun variation that you loved? What was your favorite part of the process or the tasting? Share your experiences, your photos, and your triumphs with me. Your feedback and creativity inspire me and countless other home bakers to keep exploring new flavors and exciting ideas. Let’s make this holiday season the sweetest one yet, one utterly delicious truffle at a time!
No-Bake Little Debbie Christmas Tree Cakes Truffles
Little Debbie Christmas Tree Cakes Truffles are about to become your new favorite holiday tradition, transforming a nostalgic snack into an irresistible, elegant treat! These delightful, no-bake bites capture the magic of the season in every single morsel.
Ingredients
Instructions
Important Information
Nutrition Facts (Per Serving)
It is important to consider this information as approximate and not to use it as definitive health advice.
Allergy Information
Please check ingredients for potential allergens and consult a health professional if in doubt.

Leave a Comment