

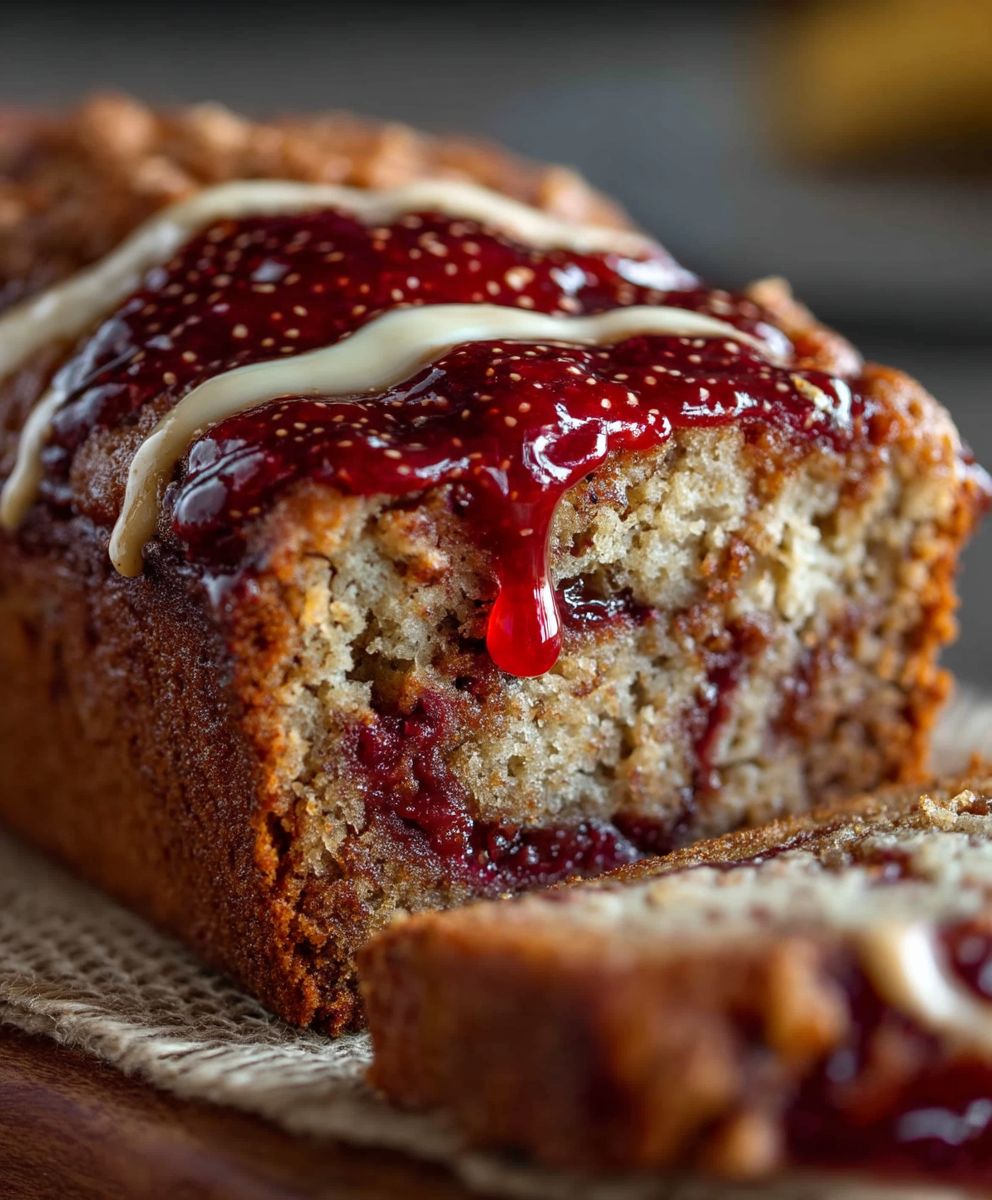
PB and Jelly Banana Bread: Prepare to have your taste buds transported back to childhood, but with a sophisticated twist! Imagine the comforting aroma of freshly baked banana bread mingling with the irresistible flavors of peanut butter and sweet, fruity jelly. This isn’t just banana bread; it’s a nostalgic hug in every slice.
While banana bread itself has a relatively modern history, gaining popularity in the early 20th century as a way to use overripe bananas, the addition of peanut butter and jelly elevates it to a whole new level of deliciousness. Think of it as a playful homage to the classic PB&J sandwich, a lunchtime staple for generations. It’s a delightful fusion of familiar flavors that brings a smile to your face.
People adore this PB and Jelly Banana Bread for its perfect balance of sweet and savory. The moist, tender crumb of the banana bread, combined with the creamy peanut butter swirls and pockets of gooey jelly, creates a textural masterpiece. It’s incredibly easy to make, requiring minimal effort and readily available ingredients. Whether you’re looking for a quick breakfast treat, a satisfying afternoon snack, or a unique dessert to impress your friends, this recipe is guaranteed to be a crowd-pleaser. The combination of flavors is simply irresistible, making it a comforting and utterly delicious treat that you’ll want to bake again and again.

Ingredients:
- 1 ½ cups all-purpose flour
- 1 teaspoon baking soda
- ½ teaspoon salt
- ½ cup (1 stick) unsalted butter, softened
- ¾ cup granulated sugar
- 2 large eggs
- 1 teaspoon vanilla extract
- 3 ripe bananas, mashed
- ½ cup peanut butter, creamy or chunky
- ½ cup grape jelly (or your favorite flavor)
- ¼ cup chopped peanuts (optional, for topping)
Preparing the Batter:
- First things first, let’s get our dry ingredients ready. In a medium bowl, whisk together the 1 ½ cups of all-purpose flour, 1 teaspoon of baking soda, and ½ teaspoon of salt. Whisking is key here – it helps to evenly distribute the baking soda and salt throughout the flour, ensuring a consistent rise and flavor in our final bread. Don’t skip this step!
- Now, for the creamy goodness! In a large bowl, cream together the ½ cup (1 stick) of softened unsalted butter and ¾ cup of granulated sugar until light and fluffy. This is where a stand mixer comes in handy, but a good old-fashioned hand mixer or even some elbow grease will do the trick. The goal is to incorporate air into the butter and sugar, which will contribute to a tender crumb. Creaming should take about 3-5 minutes, depending on your method. You’ll know it’s ready when the mixture is noticeably lighter in color and has a fluffy texture.
- Next, beat in the 2 large eggs one at a time, making sure each egg is fully incorporated before adding the next. After the eggs are in, stir in the 1 teaspoon of vanilla extract. Vanilla extract enhances the overall flavor profile of the bread, adding a warm and inviting aroma. Don’t overmix at this stage; just combine until everything is just incorporated. Overmixing can lead to a tough bread.
- Time for the bananas! Add the 3 mashed ripe bananas to the batter and mix until just combined. Ripe bananas are essential for this recipe. They provide moisture, sweetness, and that signature banana flavor. The riper the bananas, the sweeter and more flavorful your bread will be. If your bananas are a little underripe, you can microwave them for a minute or two to soften them up.
- Gradually add the dry ingredients to the wet ingredients, mixing until just combined. Be careful not to overmix! Overmixing develops the gluten in the flour, which can result in a tough bread. Mix until the flour streaks disappear, but don’t worry about a few small lumps.
Creating the Peanut Butter and Jelly Swirl:
- Now comes the fun part – creating that delicious peanut butter and jelly swirl! In a small bowl, combine the ½ cup of peanut butter and the ½ cup of grape jelly (or your favorite flavor). Mix well until the peanut butter and jelly are evenly combined. This mixture will be swirled into the banana bread batter, creating pockets of flavor throughout the bread.
- Pour half of the banana bread batter into a greased and floured 9×5 inch loaf pan. I like to use baking spray with flour already in it for easy release. Spread the batter evenly in the pan.
- Spoon half of the peanut butter and jelly mixture over the batter in the loaf pan. Use a knife or skewer to swirl the peanut butter and jelly mixture into the batter. Don’t over-swirl, as you want to maintain distinct pockets of flavor.
- Pour the remaining banana bread batter over the peanut butter and jelly swirl. Spread the batter evenly in the pan.
- Spoon the remaining peanut butter and jelly mixture over the top of the batter. Again, use a knife or skewer to swirl the peanut butter and jelly mixture into the batter. This time, you can be a little more generous with the swirling, creating a beautiful marbled effect on the top of the bread.
- If desired, sprinkle the ¼ cup of chopped peanuts over the top of the batter. The peanuts add a nice crunch and visual appeal to the bread.
Baking Process:
- Preheat your oven to 350°F (175°C). Make sure your oven is properly preheated before baking the bread. This ensures that the bread will bake evenly and rise properly.
- Bake for 50-60 minutes, or until a wooden skewer inserted into the center comes out clean. The baking time may vary depending on your oven, so it’s important to check the bread regularly. If the top of the bread starts to brown too quickly, you can tent it with aluminum foil to prevent it from burning.
- Let the bread cool in the pan for 10 minutes before transferring it to a wire rack to cool completely. Cooling the bread in the pan allows it to set properly and prevents it from sticking to the pan. Once the bread is completely cool, you can slice and serve it.
Tips and Variations:
- For a richer flavor: Use brown butter instead of regular butter. Brown butter adds a nutty and complex flavor to the bread. To make brown butter, melt the butter in a saucepan over medium heat. Continue cooking until the butter turns a golden brown color and has a nutty aroma. Be careful not to burn the butter.
- Add chocolate chips: Stir in ½ cup of chocolate chips to the batter for an extra touch of sweetness.
- Use different types of jelly: Experiment with different flavors of jelly, such as strawberry, raspberry, or blackberry.
- Make it gluten-free: Use a gluten-free all-purpose flour blend to make this bread gluten-free.
- Add spices: Add ½ teaspoon of cinnamon or nutmeg to the batter for a warm and cozy flavor.
- Storage: Store the bread in an airtight container at room temperature for up to 3 days or in the refrigerator for up to a week. You can also freeze the bread for up to 2 months.
Enjoy your delicious Peanut Butter and Jelly Banana Bread!
Conclusion:
This isn’t just banana bread; it’s a nostalgic hug in every slice! The unexpected twist of peanut butter and jelly elevates this classic treat to a whole new level of deliciousness. The moist, tender crumb of the banana bread perfectly complements the creamy peanut butter and the sweet, fruity jelly, creating a symphony of flavors that will have you reaching for seconds (and maybe thirds!). I truly believe this PB and Jelly Banana Bread is a must-try for anyone who loves banana bread, peanut butter, jelly, or simply delicious food. It’s the perfect way to use up those overripe bananas and create something truly special.
But the fun doesn’t stop there! This recipe is incredibly versatile, and I encourage you to experiment with different variations to find your perfect combination.
Serving Suggestions and Variations:
* For a decadent dessert: Serve warm with a scoop of vanilla ice cream and a drizzle of melted peanut butter. The warmth of the bread combined with the cold ice cream is simply divine!
* Breakfast on the go: Slice the bread and wrap individual portions for a quick and easy breakfast or snack. It’s a much healthier and more satisfying alternative to processed breakfast bars.
* Peanut Butter Power-Up: Use crunchy peanut butter for added texture and a more intense peanut butter flavor.
* Jelly Jamboree: Experiment with different jelly flavors! Grape, strawberry, raspberry, or even a mixed berry jam would all be fantastic. For a more sophisticated flavor, try using a fig jam or a homemade fruit preserve.
* Nutty Addition: Add chopped walnuts or pecans to the batter for extra crunch and nutty flavor.
* Chocolate Chips: Because who doesn’t love chocolate? Fold in some chocolate chips for an extra layer of sweetness and indulgence.
* Gluten-Free Option: Substitute the all-purpose flour with a gluten-free blend for a gluten-free version of this delicious bread. Just be sure to use a high-quality gluten-free blend for the best results.
* Mini Loaves: Bake the batter in mini loaf pans for individual servings that are perfect for gifting or portion control.
* Grilled PB&J Banana Bread: Spread softened butter on the outside of a slice and grill it in a pan until golden brown. This adds a delightful crispness and enhances the flavors.
I’ve poured my heart into perfecting this recipe, and I’m confident that you’ll love it as much as I do. It’s a crowd-pleaser that’s perfect for any occasion, from a casual brunch to a special celebration. The combination of familiar flavors and the ease of preparation make this recipe a winner in my book.
So, what are you waiting for? Gather your ingredients, preheat your oven, and get ready to bake a loaf of the most delicious PB and Jelly Banana Bread you’ve ever tasted! I can’t wait to hear about your baking adventures. Please, try this recipe and share your experience in the comments below! Let me know what variations you tried and how they turned out. Did you add chocolate chips? Did you use a different kind of jelly? I’m eager to learn from your experiences and see how you make this recipe your own. Happy baking!
PB and Jelly Banana Bread: The Ultimate Recipe Guide
A moist and flavorful twist on classic banana bread, swirled with peanut butter and your favorite jelly for a nostalgic treat.
Ingredients
Instructions
Recipe Notes
- For a richer flavor, use brown butter instead of regular butter.
- Add ½ cup of chocolate chips to the batter for an extra touch of sweetness.
- Experiment with different flavors of jelly, such as strawberry, raspberry, or blackberry.
- Use a gluten-free all-purpose flour blend to make this bread gluten-free.
- Add ½ teaspoon of cinnamon or nutmeg to the batter for a warm and cozy flavor.
- Storage: Store the bread in an airtight container at room temperature for up to 3 days or in the refrigerator for up to a week. You can also freeze the bread for up to 2 months.

Leave a Comment