

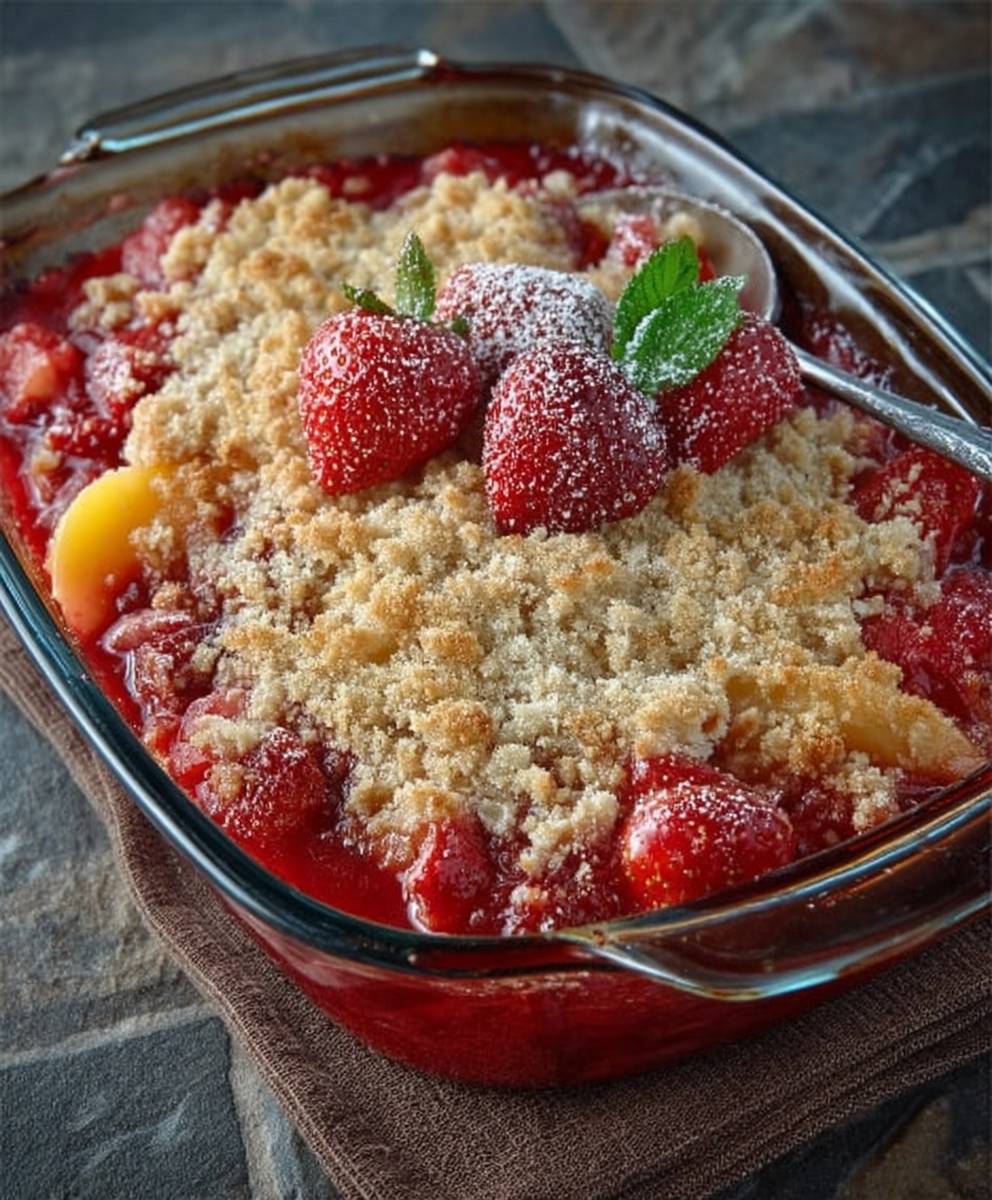
Peach Strawberry Crisp: Is there anything that screams summer quite like the sweet, juicy combination of peaches and strawberries baked into a warm, bubbly crisp? I think not! This delightful dessert is more than just a treat; it’s a celebration of seasonal flavors and a comforting hug in a bowl.
While crisps, crumbles, and cobblers have been gracing tables for centuries, their humble beginnings lie in resourcefulness. Originating in Britain, these baked fruit desserts were a way to use up leftover fruit, topped with a simple mixture of flour, butter, and sugar. Over time, they made their way across the pond and evolved into the beloved variations we enjoy today. My version of Peach Strawberry Crisp takes the best of tradition and adds a touch of modern flair.
What makes this dessert so irresistible? It’s the perfect balance of textures and tastes. The soft, yielding fruit filling, bursting with the sweetness of ripe peaches and strawberries, is beautifully contrasted by the crunchy, golden-brown topping. The buttery, slightly nutty crumble adds a satisfying textural element that keeps you coming back for more. Plus, it’s incredibly easy to make! Forget fussy pie crusts; this recipe is all about simplicity and deliciousness. Whether you’re serving it warm with a scoop of vanilla ice cream or enjoying it as a comforting afternoon treat, this Peach Strawberry Crisp is guaranteed to be a crowd-pleaser.

Ingredients:
- For the Filling:
- 6 cups fresh peaches, peeled and sliced (about 6-8 medium peaches)
- 2 cups fresh strawberries, hulled and halved or quartered if large
- 1/4 cup granulated sugar
- 2 tablespoons all-purpose flour
- 1 tablespoon lemon juice
- 1/2 teaspoon ground cinnamon
- 1/4 teaspoon ground nutmeg
- For the Crisp Topping:
- 1 cup all-purpose flour
- 1 cup rolled oats (not instant)
- 3/4 cup packed light brown sugar
- 1/2 teaspoon baking powder
- 1/4 teaspoon salt
- 1/2 cup (1 stick) cold unsalted butter, cut into small cubes
- 1/4 cup chopped pecans or walnuts (optional, but highly recommended!)
- Optional, for serving:
- Vanilla ice cream
- Whipped cream
Preparing the Fruit Filling
Okay, let’s get started with the heart of our crisp – the juicy, flavorful fruit filling! This is where the magic happens, and it’s surprisingly easy to put together.
- Prep the Peaches: First things first, we need to peel and slice those peaches. The easiest way to peel peaches is to blanch them. Bring a pot of water to a boil. Score an “X” on the bottom of each peach with a sharp knife. Drop the peaches into the boiling water for about 30-60 seconds, then immediately transfer them to an ice bath. The skins should slip right off! Once peeled, slice the peaches into about 1/4-inch thick slices. Don’t worry about them being perfectly uniform; rustic is the name of the game here.
- Prep the Strawberries: While the peaches are cooling slightly after their blanching, hull and halve (or quarter if they’re large) your strawberries. I love the combination of peaches and strawberries, but feel free to adjust the ratio to your liking. You could even add a handful of blueberries or raspberries for extra berry goodness!
- Combine the Fruit: In a large bowl, gently combine the sliced peaches and strawberries. We want to be careful not to bruise the fruit too much.
- Add the Dry Ingredients: Now, sprinkle the granulated sugar, all-purpose flour, cinnamon, and nutmeg over the fruit mixture. The flour will help to thicken the juices as the crisp bakes, preventing it from becoming too watery. The cinnamon and nutmeg add a warm, comforting spice that complements the peaches and strawberries perfectly.
- Lemon Juice: Drizzle the lemon juice over the fruit. The lemon juice not only brightens the flavors but also helps to prevent the fruit from browning.
- Gently Toss: Using a large spoon or spatula, gently toss everything together until the fruit is evenly coated with the sugar and spice mixture. Be careful not to overmix, as this can release too much juice from the fruit.
Making the Crisp Topping
Now for the star of the show – the buttery, crumbly crisp topping! This is what gives the crisp its signature texture and irresistible flavor. Don’t be intimidated; it’s super simple to make.
- Combine Dry Ingredients: In a separate medium bowl, whisk together the all-purpose flour, rolled oats, brown sugar, baking powder, and salt. Make sure everything is well combined. The baking powder will give the topping a little bit of lift, making it nice and light.
- Add the Cold Butter: This is the most important step for achieving that perfect crumbly texture. Add the cold, cubed butter to the dry ingredients. The butter needs to be cold so that it doesn’t melt before baking, which would result in a tough topping.
- Cut in the Butter: Using a pastry blender or your fingertips, cut the butter into the dry ingredients until the mixture resembles coarse crumbs. You want to see small pieces of butter throughout the mixture. If you’re using your fingertips, work quickly to prevent the butter from melting. You can also use a food processor for this step. Just pulse the ingredients together until the mixture resembles coarse crumbs. Be careful not to over-process, or you’ll end up with a paste.
- Add Nuts (Optional): If you’re using nuts, stir them into the crisp topping. I love the added crunch and nutty flavor that pecans or walnuts bring to the crisp.
Assembling and Baking the Crisp
We’re almost there! Now it’s time to put everything together and bake our delicious Peach Strawberry Crisp.
- Preheat Oven: Preheat your oven to 375°F (190°C). This temperature is perfect for baking the crisp evenly and ensuring that the topping gets nice and golden brown.
- Prepare Baking Dish: Grease a 9×13 inch baking dish (or a similar-sized dish) with butter or cooking spray. This will prevent the crisp from sticking to the dish.
- Pour in Filling: Pour the prepared fruit filling into the greased baking dish, spreading it out evenly.
- Sprinkle Topping: Sprinkle the crisp topping evenly over the fruit filling. Make sure to cover the entire surface of the fruit.
- Bake: Bake in the preheated oven for 35-45 minutes, or until the topping is golden brown and the fruit is bubbling. The baking time may vary depending on your oven, so keep an eye on it. If the topping starts to brown too quickly, you can tent it with foil to prevent it from burning.
- Cool Slightly: Remove the crisp from the oven and let it cool slightly before serving. This will allow the juices to thicken a bit and prevent you from burning your mouth!
Serving Suggestions
The best part – enjoying your homemade Peach Strawberry Crisp! Here are a few serving suggestions to take it to the next level:
- Vanilla Ice Cream: A scoop of vanilla ice cream is the classic pairing for a fruit crisp. The cold, creamy ice cream complements the warm, fruity crisp perfectly.
- Whipped Cream: If you’re not an ice cream person, whipped cream is another great option. A dollop of freshly whipped cream adds a light and airy touch to the crisp.
- Warm: Serve the crisp warm for the ultimate comfort food experience. The warm fruit and crumbly topping are simply irresistible.
- Dusting of Powdered Sugar: For a pretty presentation, dust the crisp with powdered sugar before serving.
Tips and Variations
Want to customize your Peach Strawberry Crisp? Here are a few tips and variations to try:
- Other Fruits: Feel free to experiment with other fruits in the filling. Blueberries, raspberries, blackberries, apples, or pears would all be delicious additions.
- Different Nuts: Try using different nuts in the topping, such as almonds, walnuts, or macadamia nuts.
- Spices: Add a pinch of ground ginger or cardamom to the filling for a different flavor profile.
- Gluten-Free: To make this crisp gluten-free, use a gluten-free all-purpose flour blend in both the filling and the topping. Make sure to use certified gluten-free oats as well.
- Vegan: To make this crisp vegan, use a vegan butter substitute in the topping. You can also use maple syrup or agave nectar instead of brown sugar.
- Make Ahead: You can assemble the crisp ahead of time and store it in the refrigerator for up to 24 hours before baking. Just add a few minutes to the baking time.
- Freezing: You can also freeze the unbaked crisp for up to 3 months. Thaw it overnight in the refrigerator before baking.
Troubleshooting
Sometimes things don’t go exactly as planned. Here are a few common problems and how to fix them:
- Topping is Too Brown: If the topping starts to brown too quickly, tent it with foil to prevent it from burning.
- Filling is Too Watery: If the filling is too watery, you can add a tablespoon or two of cornstarch to the filling mixture.
- Topping is Too Dry: If the topping is too dry, you can add a tablespoon or two of melted butter to the topping mixture.
- Crisp is Sticking to the Dish: Make sure to grease the baking dish well before adding the filling.
I hope you enjoy this Peach Strawberry Crisp recipe as
Conclusion:
This Peach Strawberry Crisp is more than just a dessert; it’s a symphony of summer flavors that will transport you to a sun-drenched orchard with every bite. The juicy sweetness of ripe peaches and strawberries, perfectly balanced by the buttery, crumbly topping, creates a textural and taste sensation that’s simply irresistible. I truly believe this recipe is a must-try for anyone who appreciates simple, wholesome ingredients transformed into something truly special.
But why is this particular crisp so special? It’s the ease of preparation, the readily available ingredients, and the sheer versatility of the dish. You don’t need to be a seasoned baker to achieve a perfect result. The recipe is forgiving, allowing for slight variations in fruit ratios and baking times. Plus, the aroma that fills your kitchen as it bakes is an experience in itself! It’s a guaranteed crowd-pleaser, perfect for summer barbecues, potlucks, or even a cozy weeknight treat.
Now, let’s talk serving suggestions and variations! While this Peach Strawberry Crisp is divine on its own, a scoop of vanilla ice cream or a dollop of freshly whipped cream elevates it to another level of indulgence. For a dairy-free option, try coconut whipped cream or a scoop of your favorite vegan ice cream. A sprinkle of chopped nuts, like pecans or almonds, adds a delightful crunch.
Feeling adventurous? Consider these variations:
* Add a touch of spice: A pinch of cinnamon or nutmeg in the fruit filling adds warmth and depth of flavor.
* Incorporate other fruits: Blueberries, raspberries, or even a few slices of nectarine would be delicious additions.
* Experiment with the topping: Use different types of oats, like quick-cooking or rolled oats, for varying textures. You can also add chopped nuts, shredded coconut, or even a sprinkle of brown sugar for extra sweetness.
* Individual servings: Bake the crisp in ramekins for individual portions, perfect for a more elegant presentation.
I’ve made this Peach Strawberry Crisp countless times, and it’s always a hit. I’ve served it warm, straight from the oven, and chilled, the next day. Both ways are equally delicious! I’ve even been known to sneak a spoonful (or two!) straight from the baking dish.
I truly hope you’ll give this recipe a try. It’s a simple yet satisfying dessert that’s sure to become a family favorite. And when you do, please share your experience! I’d love to hear about your variations, your serving suggestions, and, most importantly, how much you enjoyed it. Tag me in your photos on social media, or leave a comment below. I can’t wait to see your creations! Happy baking, and enjoy every delicious bite of this summer classic! I am confident that this Peach Strawberry Crisp will become a staple in your recipe collection.
Peach Strawberry Crisp: A Delicious Summer Dessert Recipe
Easy Peach Strawberry Crisp with a buttery oat topping, perfect for summer!
Ingredients
Instructions
Recipe Notes
- For easier peach peeling, blanch them in boiling water for 30-60 seconds, then transfer to an ice bath.
- Use cold butter for the topping to create a crumbly texture.
- Adjust baking time based on your oven. Tent with foil if the topping browns too quickly.
- Feel free to experiment with other fruits, nuts, or spices.
- For gluten-free, use gluten-free flour and oats.
- For vegan, use vegan butter and maple syrup or agave nectar instead of brown sugar.
- The crisp can be assembled ahead of time and stored in the refrigerator for up to 24 hours before baking.
- The unbaked crisp can be frozen for up to 3 months. Thaw overnight in the refrigerator before baking.
- If the topping starts to brown too quickly, tent it with foil to prevent it from burning.
- If the filling is too watery, you can add a tablespoon or two of cornstarch to the filling mixture.
- If the topping is too dry, you can add a tablespoon or two of melted butter to the topping mixture.
- Make sure to grease the baking dish well before adding the filling.


Leave a Comment