

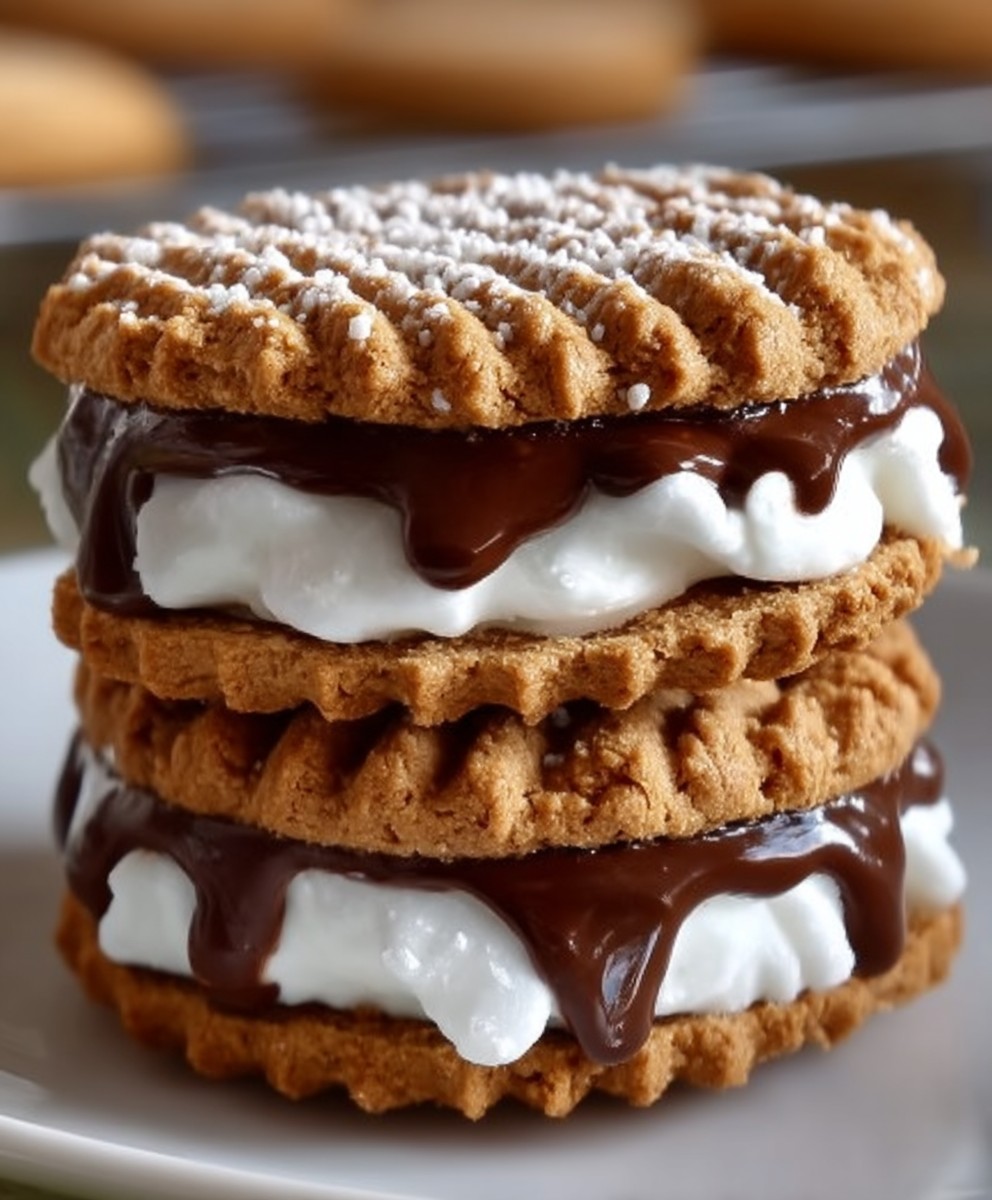
Peanut Butter Smores Sandwich Cookies: Prepare to embark on a flavor adventure that will redefine your definition of “delicious”! Imagine the gooey, campfire-kissed goodness of a s’more, the creamy, nutty comfort of peanut butter, and the satisfying chew of a perfectly baked cookie, all harmoniously combined into one unforgettable treat. This isn’t just a cookie; it’s a nostalgic hug in every bite.
S’mores, with their roots deeply embedded in American camping culture, have always been about sharing moments and creating memories around a crackling fire. The simple combination of graham crackers, chocolate, and toasted marshmallows has transcended generations. But what if we could elevate this classic treat, infusing it with the irresistible allure of peanut butter? That’s precisely what these Peanut Butter Smores Sandwich Cookies achieve!
People adore s’mores for their delightful textural contrast – the crisp graham cracker, the melty chocolate, and the pillowy marshmallow. Adding peanut butter introduces a creamy richness and a salty-sweet balance that takes these cookies to a whole new level. The convenience of enjoying all these flavors in a single, portable cookie makes them perfect for picnics, parties, or simply a cozy night in. Get ready to experience a symphony of flavors and textures that will leave you craving more!

Ingredients:
- For the Peanut Butter Cookies:
- 1 cup (2 sticks) unsalted butter, softened
- 1 cup creamy peanut butter
- 1 cup granulated sugar
- 1 cup packed brown sugar
- 2 large eggs
- 1 teaspoon vanilla extract
- 2 1/2 cups all-purpose flour
- 1 teaspoon baking soda
- 1 teaspoon baking powder
- 1/2 teaspoon salt
- For the Chocolate Ganache:
- 8 ounces semi-sweet chocolate, finely chopped
- 1/2 cup heavy cream
- 1 tablespoon unsalted butter
- For the S’mores Assembly:
- 1 package (10 oz) large marshmallows
Making the Peanut Butter Cookies:
- Cream Together Butter and Sugars: In a large bowl, or the bowl of your stand mixer, cream together the softened butter, peanut butter, granulated sugar, and brown sugar until light and fluffy. This usually takes about 3-5 minutes. Make sure to scrape down the sides of the bowl occasionally to ensure everything is evenly mixed. I like to use a stand mixer for this, but a hand mixer works just as well!
- Add Eggs and Vanilla: Beat in the eggs one at a time, then stir in the vanilla extract. Make sure each egg is fully incorporated before adding the next. This helps to create a smooth and consistent batter.
- Combine Dry Ingredients: In a separate medium bowl, whisk together the flour, baking soda, baking powder, and salt. Whisking helps to evenly distribute the baking soda and baking powder, which is crucial for a good cookie texture.
- Gradually Add Dry Ingredients to Wet Ingredients: Gradually add the dry ingredients to the wet ingredients, mixing on low speed until just combined. Be careful not to overmix the dough, as this can lead to tough cookies. Overmixing develops the gluten in the flour, which can make the cookies chewy instead of soft.
- Chill the Dough: Cover the dough with plastic wrap and chill in the refrigerator for at least 30 minutes. Chilling the dough helps to prevent the cookies from spreading too much during baking. It also allows the flavors to meld together, resulting in a more flavorful cookie. You can chill the dough for longer, even overnight, if you prefer.
- Preheat Oven and Prepare Baking Sheets: Preheat your oven to 375°F (190°C). Line baking sheets with parchment paper or silicone baking mats. Parchment paper or silicone mats prevent the cookies from sticking to the baking sheet and make cleanup a breeze.
- Scoop and Bake: Scoop rounded tablespoons of dough onto the prepared baking sheets, leaving about 2 inches between each cookie. I like to use a cookie scoop to ensure that all the cookies are the same size, which helps them bake evenly.
- Bake: Bake for 9-11 minutes, or until the edges are lightly golden brown. The centers of the cookies may still look slightly soft, but they will continue to set as they cool.
- Cool: Let the cookies cool on the baking sheets for a few minutes before transferring them to a wire rack to cool completely. This prevents the cookies from breaking apart while they are still warm and soft.
Making the Chocolate Ganache:
- Chop the Chocolate: Finely chop the semi-sweet chocolate and place it in a heatproof bowl. Finely chopping the chocolate ensures that it melts evenly and smoothly.
- Heat the Cream: In a small saucepan, heat the heavy cream over medium heat until it just begins to simmer. Be careful not to boil the cream, as this can cause it to scorch.
- Pour Cream Over Chocolate: Pour the hot cream over the chopped chocolate. Let it sit for about a minute to allow the heat to melt the chocolate.
- Stir Until Smooth: Gently stir the mixture until the chocolate is completely melted and the ganache is smooth and glossy. If there are any stubborn pieces of chocolate that won’t melt, you can microwave the mixture in 15-second intervals, stirring in between, until the chocolate is completely melted.
- Add Butter: Stir in the butter until it is melted and fully incorporated into the ganache. The butter adds richness and shine to the ganache.
- Let Cool Slightly: Let the ganache cool slightly before assembling the cookies. This will help it to thicken up a bit and prevent it from running off the cookies.
Assembling the S’mores Sandwich Cookies:
- Prepare Marshmallows: You have a couple of options here. You can either toast the marshmallows using a kitchen torch, or you can broil them in the oven.
- Toasting with a Kitchen Torch: If using a kitchen torch, carefully toast each marshmallow until it is golden brown and slightly charred. Be careful not to burn the marshmallows.
- Broiling in the Oven: If broiling in the oven, place the marshmallows on a baking sheet lined with parchment paper. Broil for a few seconds, watching closely, until they are golden brown and slightly charred. Be very careful, as marshmallows can burn quickly under the broiler.
- Spread Ganache: Spread a generous amount of chocolate ganache on the bottom of half of the peanut butter cookies.
- Add Marshmallow: Place a toasted marshmallow on top of the ganache on each of those cookies.
- Top with Cookie: Top with the remaining peanut butter cookies to create a sandwich. Gently press down to secure the sandwich.
- Serve: Serve immediately and enjoy the gooey, chocolatey, peanut buttery goodness! These are best enjoyed fresh, while the marshmallows are still warm and gooey.
Tips and Variations:
- Peanut Butter: I prefer using creamy peanut butter for these cookies, but you can also use chunky peanut butter for added texture.
- Chocolate: You can use milk chocolate or dark chocolate instead of semi-sweet chocolate for the ganache, depending on your preference.
- Marshmallows: If you don’t have large marshmallows, you can use mini marshmallows instead. Just pile them on top of the ganache.
- Storage: Store the cookies in an airtight container at room temperature for up to 3 days. The marshmallows may become a bit sticky over time, but the cookies will still taste delicious.
- Make Ahead: You can make the peanut butter cookie dough and the chocolate ganache ahead of time and store them in the refrigerator until you are ready to assemble the cookies.
Conclusion:
Okay, friends, let’s be honest: you’ve read this far because the idea of a Peanut Butter Smores Sandwich Cookie is already dancing in your head, right? And trust me, they’re even better than they sound. This isn’t just another cookie recipe; it’s a flavor explosion, a nostalgic trip back to campfire nights, and a guaranteed crowd-pleaser all rolled into one delightful bite. The combination of the chewy peanut butter cookies, the gooey marshmallow filling, and the satisfying crunch of the graham cracker is simply irresistible. It’s the kind of treat that makes you close your eyes and savor every single morsel.
But why is this recipe a must-try? Because it’s easy! Seriously, even if you’re not a seasoned baker, you can totally nail this. The cookie dough comes together quickly, the marshmallow filling is a breeze to whip up, and the assembly is actually kind of fun. Plus, it’s a fantastic way to use up leftover marshmallows from your last camping trip (or, you know, an excuse to buy a new bag!). More importantly, it’s a recipe that sparks joy. It’s the perfect treat to bake with kids, bring to a potluck, or simply enjoy on a cozy night in with a glass of milk.
Serving Suggestions & Variations:
Now, let’s talk about how to take these cookies to the next level. While they’re absolutely divine as is, there are tons of ways to customize them to your liking. For a richer, more decadent experience, try using dark chocolate graham crackers instead of the regular ones. Or, if you’re feeling adventurous, add a sprinkle of sea salt to the top of the cookies before baking to enhance the sweetness and bring out the peanut butter flavor. You could also experiment with different types of peanut butter – crunchy, honey-roasted, or even a swirl of chocolate peanut butter would be amazing!
As for serving suggestions, these cookies are fantastic on their own, but they also pair perfectly with a scoop of vanilla ice cream for an extra-indulgent dessert. You could also crumble them over a bowl of yogurt or oatmeal for a sweet and satisfying breakfast treat. And if you’re hosting a party, why not create a “cookie bar” with different toppings and fillings so your guests can customize their own Peanut Butter Smores Sandwich Cookies? The possibilities are endless!
Don’t be afraid to get creative and make this recipe your own. Maybe you want to add a layer of Nutella, or sprinkle some chopped peanuts on top. Perhaps you want to use homemade marshmallows for an extra-special touch. The beauty of this recipe is that it’s incredibly versatile and forgiving, so feel free to experiment and have fun with it!
I Can’t Wait to Hear From You!
So, what are you waiting for? Preheat that oven, gather your ingredients, and get ready to bake up a batch of these incredible Peanut Butter Smores Sandwich Cookies. I promise you won’t regret it! And more importantly, I want to hear all about your experience. Did you try any variations? Did you make them for a special occasion? Did your family and friends love them as much as I do? Share your photos and stories in the comments below – I can’t wait to see what you create! Happy baking!
Peanut Butter Smores Sandwich Cookies: The Ultimate Recipe
Peanut butter cookies with chocolate ganache and toasted marshmallows. A twist on the classic campfire treat!
Ingredients
- 1 cup (2 sticks) unsalted butter, softened
- 1 cup creamy peanut butter
- 1 cup granulated sugar
- 1 cup packed brown sugar
- 2 large eggs
- 1 teaspoon vanilla extract
- 2 1/2 cups all-purpose flour
- 1 teaspoon baking soda
- 1 teaspoon baking powder
- 1/2 teaspoon salt
- 8 ounces semi-sweet chocolate, finely chopped
- 1/2 cup heavy cream
- 1 tablespoon unsalted butter
- 1 package (10 oz) large marshmallows
Instructions
- Cream Together Butter and Sugars: In a large bowl, or the bowl of your stand mixer, cream together the softened butter, peanut butter, granulated sugar, and brown sugar until light and fluffy. This usually takes about 3-5 minutes. Make sure to scrape down the sides of the bowl occasionally to ensure everything is evenly mixed.
- Add Eggs and Vanilla: Beat in the eggs one at a time, then stir in the vanilla extract. Make sure each egg is fully incorporated before adding the next.
- Combine Dry Ingredients: In a separate medium bowl, whisk together the flour, baking soda, baking powder, and salt.
- Gradually Add Dry Ingredients to Wet Ingredients: Gradually add the dry ingredients to the wet ingredients, mixing on low speed until just combined. Be careful not to overmix the dough.
- Chill the Dough: Cover the dough with plastic wrap and chill in the refrigerator for at least 30 minutes.
- Preheat Oven and Prepare Baking Sheets: Preheat your oven to 375°F (190°C). Line baking sheets with parchment paper or silicone baking mats.
- Scoop and Bake: Scoop rounded tablespoons of dough onto the prepared baking sheets, leaving about 2 inches between each cookie.
- Bake: Bake for 9-11 minutes, or until the edges are lightly golden brown.
- Cool: Let the cookies cool on the baking sheets for a few minutes before transferring them to a wire rack to cool completely.
- Chop the Chocolate: Finely chop the semi-sweet chocolate and place it in a heatproof bowl.
- Heat the Cream: In a small saucepan, heat the heavy cream over medium heat until it just begins to simmer.
- Pour Cream Over Chocolate: Pour the hot cream over the chopped chocolate. Let it sit for about a minute to allow the heat to melt the chocolate.
- Stir Until Smooth: Gently stir the mixture until the chocolate is completely melted and the ganache is smooth and glossy.
- Add Butter: Stir in the butter until it is melted and fully incorporated into the ganache.
- Let Cool Slightly: Let the ganache cool slightly before assembling the cookies.
- Prepare Marshmallows: Toast the marshmallows using a kitchen torch or broil them in the oven until golden brown and slightly charred.
- Spread Ganache: Spread a generous amount of chocolate ganache on the bottom of half of the peanut butter cookies.
- Add Marshmallow: Place a toasted marshmallow on top of the ganache on each of those cookies.
- Top with Cookie: Top with the remaining peanut butter cookies to create a sandwich. Gently press down to secure the sandwich.
- Serve: Serve immediately and enjoy!
Notes
- Peanut Butter: Creamy peanut butter is preferred, but chunky can be used.
- Chocolate: Milk or dark chocolate can be substituted for semi-sweet in the ganache.
- Marshmallows: Mini marshmallows can be used if large ones are unavailable.
- Storage: Store in an airtight container at room temperature for up to 3 days.
- Make Ahead: Cookie dough and ganache can be made ahead and stored in the refrigerator.


Leave a Comment