

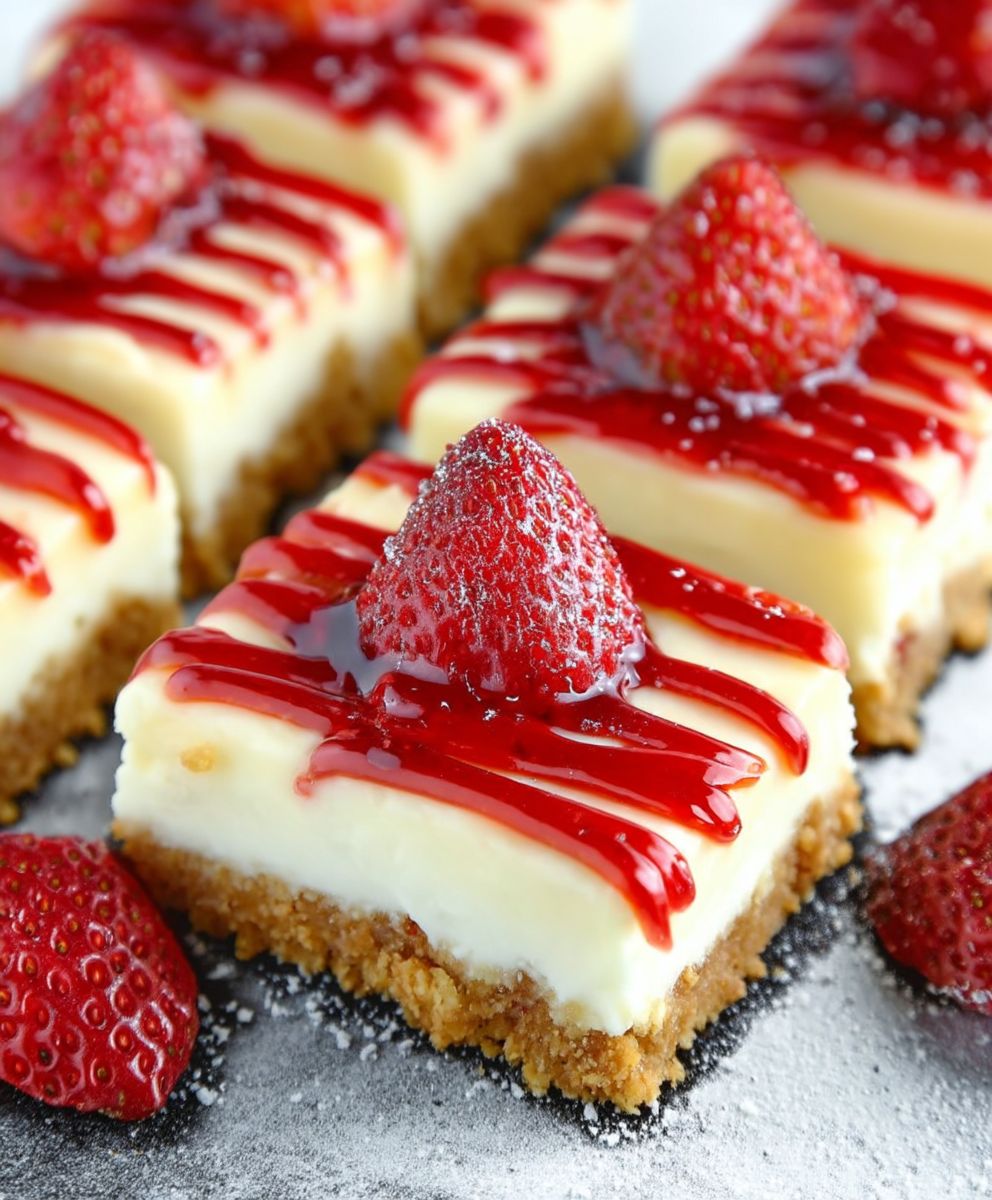
Philadelphia Cheesecake Bars: Prepare to be captivated by a dessert that perfectly balances creamy indulgence with effortless preparation! These aren’t just cheesecake bars; they’re a slice of pure, unadulterated joy, baked into a convenient and utterly irresistible form. Forget spending hours meticulously crafting a full-sized cheesecake – with this recipe, you can enjoy that classic cheesecake flavor in a fraction of the time and with minimal fuss.
While the exact origins of cheesecake are debated, its roots can be traced back to ancient Greece. However, the creamy, rich version we know and love today owes much to the innovation of American cheesemakers, particularly those in Philadelphia. It’s no surprise, then, that Philadelphia Cheesecake Bars have become a beloved dessert staple, perfect for potlucks, parties, or simply a delightful treat on a cozy evening.
What makes these bars so universally appealing? It’s the symphony of textures and flavors! The buttery, crumbly crust provides a delightful contrast to the smooth, tangy, and unbelievably creamy cheesecake filling. People adore the convenience of these bars – they’re easy to slice, serve, and transport. Plus, the rich, decadent flavor satisfies even the most discerning sweet tooth. So, are you ready to dive into the world of creamy, dreamy goodness? Let’s get baking!

Ingredients:
- For the Crust:
- 1 1/2 cups graham cracker crumbs
- 1/3 cup granulated sugar
- 6 tablespoons (3 ounces) unsalted butter, melted
- For the Cheesecake Filling:
- 24 ounces cream cheese, softened to room temperature
- 1 cup granulated sugar
- 1 teaspoon vanilla extract
- 2 large eggs
- 1/4 cup sour cream
- Optional Toppings:
- Fresh berries (strawberries, blueberries, raspberries)
- Chocolate sauce
- Caramel sauce
- Whipped cream
Preparing the Crust:
- Preheat your oven to 350°F (175°C). This is crucial for ensuring the crust bakes evenly and doesn’t burn.
- In a medium bowl, combine the graham cracker crumbs, granulated sugar, and melted butter. Mix well until all the crumbs are moistened and the mixture resembles wet sand. This is the foundation of our delicious cheesecake bars, so make sure it’s well combined!
- Press the graham cracker mixture firmly and evenly into the bottom of a 9×13 inch baking pan. I like to use the bottom of a measuring cup to really pack it down. This will give you a nice, solid crust that won’t crumble when you cut the bars.
- Bake the crust for 8-10 minutes, or until lightly golden brown. Keep a close eye on it to prevent burning. Once baked, remove from the oven and let it cool slightly while you prepare the cheesecake filling.
Making the Cheesecake Filling:
- In a large bowl, beat the softened cream cheese with an electric mixer until smooth and creamy. This is the most important step for a lump-free cheesecake. Make sure your cream cheese is truly at room temperature – it makes a world of difference! I usually leave mine out for at least an hour.
- Gradually add the granulated sugar and continue to beat until well combined and smooth. Scrape down the sides of the bowl as needed to ensure everything is incorporated.
- Add the vanilla extract and mix until combined. Vanilla adds a lovely depth of flavor to the cheesecake.
- Add the eggs one at a time, beating well after each addition. Be careful not to overmix at this stage, as overmixing can incorporate too much air and cause the cheesecake to crack.
- Stir in the sour cream until just combined. Sour cream adds a tangy richness to the cheesecake. Again, don’t overmix!
Baking the Cheesecake Bars:
- Pour the cheesecake filling over the cooled graham cracker crust, spreading it evenly.
- Bake in the preheated oven for 25-30 minutes, or until the edges are set and the center is just slightly jiggly. The cheesecake will continue to set as it cools.
- Turn off the oven and let the cheesecake bars cool in the oven with the door slightly ajar for about an hour. This helps prevent cracking by allowing the cheesecake to cool gradually.
- Remove the cheesecake bars from the oven and let them cool completely at room temperature.
- Cover the baking pan with plastic wrap and refrigerate for at least 4 hours, or preferably overnight, to allow the cheesecake to fully set. This is crucial for achieving that perfect cheesecake texture.
Cutting and Serving:
- Once the cheesecake bars are thoroughly chilled, lift them out of the baking pan using the edges of the parchment paper (if you lined the pan). If you didn’t line the pan, you can carefully cut around the edges with a knife to loosen them.
- Cut the cheesecake into bars using a sharp knife. For clean cuts, run the knife under hot water and wipe it clean between each cut.
- Serve the cheesecake bars plain or with your favorite toppings, such as fresh berries, chocolate sauce, caramel sauce, or whipped cream. The possibilities are endless!
Tips and Tricks for Perfect Cheesecake Bars:
- Room Temperature Ingredients: As mentioned before, using room temperature cream cheese is essential for a smooth, lump-free cheesecake filling. Make sure your eggs and sour cream are also at room temperature for best results.
- Don’t Overmix: Overmixing the cheesecake filling can incorporate too much air, which can cause the cheesecake to crack during baking. Mix until just combined.
- Water Bath (Optional): For an even more decadent and crack-free cheesecake, you can bake the bars in a water bath. Wrap the bottom of the baking pan tightly with aluminum foil to prevent water from seeping in. Place the wrapped pan in a larger baking pan and add hot water to the larger pan until it reaches about halfway up the sides of the cheesecake pan. Bake as directed.
- Cooling Process: The cooling process is just as important as the baking process. Allowing the cheesecake to cool gradually in the oven helps prevent cracking.
- Storage: Store leftover cheesecake bars in an airtight container in the refrigerator for up to 5 days.
- Variations: Feel free to experiment with different flavors and toppings. You can add lemon zest to the filling for a lemon cheesecake, swirl in some melted chocolate for a chocolate cheesecake, or top with your favorite fruit preserves.
Troubleshooting:
- Cracked Cheesecake: If your cheesecake cracks, don’t worry! It’s still delicious. You can cover the cracks with whipped cream or fruit toppings. To prevent cracking in the future, try baking in a water bath or cooling the cheesecake gradually in the oven.
- Lumpy Filling: If your cheesecake filling is lumpy, it’s likely because the cream cheese wasn’t soft enough. Make sure your cream cheese is at room temperature before mixing. You can also try using a food processor to blend the cream cheese until smooth.
- Soggy Crust: If your crust is soggy, it could be because you didn’t pack it down firmly enough or because the filling was too wet. Make sure to press the graham cracker mixture firmly into the pan and avoid overmixing the filling.
Serving Suggestions:
- Dessert Platter: These cheesecake bars are a perfect addition to any dessert platter. Serve them alongside other treats like cookies, brownies, and fruit tarts.
- Party Favors: Wrap individual cheesecake bars in cellophane bags and tie with a ribbon for a cute and delicious party favor.
- Gift Giving: Cheesecake bars make a thoughtful and homemade gift for friends and family.
Nutritional Information (Approximate):
Please note that the nutritional information is an estimate and may vary depending on the specific ingredients used.
- Calories: Approximately 300-400 per bar
- Fat: 20-30 grams
- Saturated Fat: 12-18 grams
- Cholesterol: 100-150 mg
- Sodium: 150-250 mg
- Carbohydrates: 25-35 grams
- Sugar: 20-25 grams
- Protein: 5-7 grams
Enjoy!
I hope you enjoy making and eating these delicious Philadelphia Cheesecake Bars! They’re a crowd-pleaser and perfect for any occasion. Happy baking!
Conclusion:
And there you have it! These Philadelphia Cheesecake Bars are truly a must-try for anyone who loves a creamy, decadent dessert that’s surprisingly easy to make. Forget spending hours slaving over a complicated cheesecake – these bars deliver all the satisfying flavor and texture in a fraction of the time and with minimal fuss. The buttery graham cracker crust provides the perfect foundation for the rich, tangy cheesecake filling, creating a symphony of flavors that will have everyone reaching for seconds (and maybe even thirds!).
But what truly sets these bars apart is their versatility. While they’re absolutely divine served chilled as is, there are so many ways to customize them to your liking. Feeling fruity? Top them with fresh berries like strawberries, raspberries, or blueberries for a burst of summery sweetness. A drizzle of chocolate sauce or caramel adds an extra layer of indulgence that’s simply irresistible. For a more sophisticated touch, try a sprinkle of chopped nuts like pecans or walnuts.
If you’re looking to get even more creative, consider swirling in a spoonful of your favorite jam or fruit preserves into the cheesecake batter before baking. Raspberry or cherry preserves would be particularly delicious! You could also add a hint of lemon or orange zest to the batter for a bright, citrusy twist. And for the chocolate lovers out there, a handful of chocolate chips or a swirl of melted chocolate ganache would take these bars to a whole new level of chocolatey goodness.
These Philadelphia Cheesecake Bars are also perfect for any occasion. They’re elegant enough to serve at a dinner party, yet casual enough to bring to a potluck or picnic. They’re also a great make-ahead dessert, as they actually taste even better after chilling in the refrigerator for a few hours (or even overnight!). This makes them ideal for busy weeknights or when you need a dessert that’s ready to go at a moment’s notice.
I truly believe that this recipe will become a staple in your dessert repertoire. It’s simple, satisfying, and endlessly adaptable. Plus, who can resist the allure of a creamy, dreamy cheesecake bar?
So, what are you waiting for? Gather your ingredients, preheat your oven, and get ready to bake up a batch of these irresistible Philadelphia Cheesecake Bars. I promise you won’t be disappointed!
And most importantly, I want to hear about your experience! Did you try any of the variations I suggested? Did you add your own special touch? Share your photos and stories in the comments below. I can’t wait to see what you create! Happy baking! I am confident that this recipe for Philadelphia Cheesecake Bars will become a family favorite. Don’t forget to rate the recipe once you’ve tried it! Your feedback helps other bakers discover this delicious treat. Enjoy!
Philadelphia Cheesecake Bars: The Ultimate Guide to Baking Perfection
Easy, delicious Philadelphia Cheesecake Bars with a graham cracker crust and creamy filling. Perfect for any occasion!
Ingredients
- 1 1/2 cups graham cracker crumbs
- 1/3 cup granulated sugar
- 6 tablespoons (3 ounces) unsalted butter, melted
- 24 ounces cream cheese, softened to room temperature
- 1 cup granulated sugar
- 1 teaspoon vanilla extract
- 2 large eggs
- 1/4 cup sour cream
- Fresh berries (strawberries, blueberries, raspberries)
- Chocolate sauce
- Caramel sauce
- Whipped cream
Instructions
- Preheat oven to 350°F (175°C).
- In a medium bowl, combine graham cracker crumbs, granulated sugar, and melted butter. Mix well.
- Press the mixture firmly and evenly into the bottom of a 9×13 inch baking pan.
- Bake the crust for 8-10 minutes, or until lightly golden brown. Remove from oven and let it cool slightly.
- In a large bowl, beat the softened cream cheese with an electric mixer until smooth and creamy.
- Gradually add the granulated sugar and continue to beat until well combined and smooth.
- Add the vanilla extract and mix until combined.
- Add the eggs one at a time, beating well after each addition. Be careful not to overmix.
- Stir in the sour cream until just combined. Don’t overmix!
- Pour the cheesecake filling over the cooled graham cracker crust, spreading it evenly.
- Bake in the preheated oven for 25-30 minutes, or until the edges are set and the center is just slightly jiggly.
- Turn off the oven and let the cheesecake bars cool in the oven with the door slightly ajar for about an hour.
- Remove the cheesecake bars from the oven and let them cool completely at room temperature.
- Cover the baking pan with plastic wrap and refrigerate for at least 4 hours, or preferably overnight, to allow the cheesecake to fully set.
- Once the cheesecake bars are thoroughly chilled, lift them out of the baking pan.
- Cut the cheesecake into bars using a sharp knife. For clean cuts, run the knife under hot water and wipe it clean between each cut.
- Serve the cheesecake bars plain or with your favorite toppings.
Notes
- Room Temperature Ingredients: Use room temperature cream cheese, eggs, and sour cream for best results.
- Don’t Overmix: Overmixing the cheesecake filling can cause cracking. Mix until just combined.
- Water Bath (Optional): For an even more decadent and crack-free cheesecake, you can bake the bars in a water bath.
- Cooling Process: Allowing the cheesecake to cool gradually in the oven helps prevent cracking.
- Storage: Store leftover cheesecake bars in an airtight container in the refrigerator for up to 5 days.
- Variations: Experiment with different flavors and toppings.
- Cracked Cheesecake: If your cheesecake cracks, don’t worry! It’s still delicious. You can cover the cracks with whipped cream or fruit toppings.
- Lumpy Filling: If your cheesecake filling is lumpy, it’s likely because the cream cheese wasn’t soft enough.
- Soggy Crust: If your crust is soggy, it could be because you didn’t pack it down firmly enough or because the filling was too wet.

Leave a Comment