

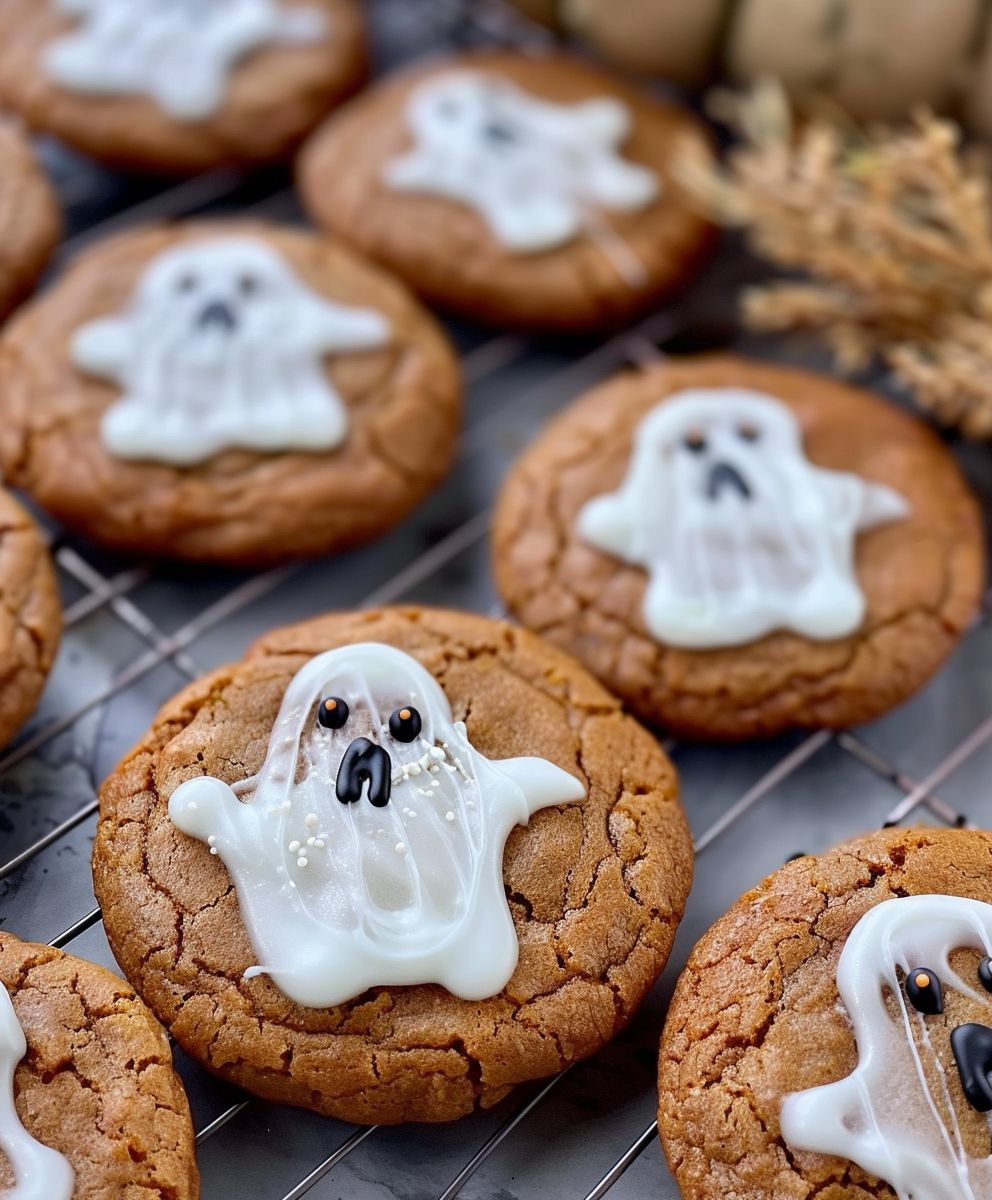
Pumpkin Ghost Cookies
Pumpkin Ghost Cookies: Are you ready to conjure up some seriously spooky-delicious treats this Halloween? Forget the same old store-bought sweets; this year, I’m sharing my family’s treasured recipe for Pumpkin Ghost Cookies – a delightful blend of autumnal spice and playful Halloween charm. These aren’t just cookies; they’re miniature edible masterpieces, perfect for sharing with friends, family, or even your trick-or-treaters.
While the precise origins of ghost-shaped cookies are a bit hazy, lost somewhere in the mists of Halloween history, the tradition of creating whimsical shapes with festive baked goods certainly has deep roots. Think gingerbread men, Christmas stars, and of course, the ever-popular Halloween cookie. My recipe for Pumpkin Ghost Cookies puts a unique spin on this classic, incorporating the warm, comforting flavors of pumpkin spice into a delightfully crisp and melt-in-your-mouth cookie.
What makes these cookies so irresistible? It’s the perfect harmony of textures and tastes. The subtly sweet pumpkin spice dough offers a comforting warmth, perfectly balanced by the creamy, slightly tangy white chocolate “ghosts” that adorn each cookie. They’re incredibly easy to make, even for novice bakers, and the adorable ghost designs add a touch of festive fun that’s guaranteed to delight everyone. Whether you’re hosting a Halloween party or simply looking for a delicious and festive treat to enjoy with a warm beverage, these Pumpkin Ghost Cookies are sure to become a new family favorite.

Ingredients:
- 1 cup (2 sticks) unsalted butter, softened
- 1 ¾ cups granulated sugar
- 2 large eggs
- 1 teaspoon vanilla extract
- 4 cups all-purpose flour
- 1 teaspoon baking soda
- 1 teaspoon ground cinnamon
- ½ teaspoon ground ginger
- ½ teaspoon ground cloves
- 1 teaspoon salt
- 1 ½ cups pumpkin puree
- 1 cup semi-sweet chocolate chips
- White candy melts or white chocolate
- Black food-safe marker or edible black icing pen
- Optional: Mini chocolate chips for eyes (if not using a marker)
Preparing the Batter
- Preheat your oven to 375°F (190°C). Line baking sheets with parchment paper. This prevents sticking and makes cleanup a breeze!
- In a large bowl, cream together the softened butter and granulated sugar until the mixture is light and fluffy. I usually use my stand mixer for this, but a hand mixer works perfectly too. Make sure you get it really fluffy – it makes a difference in the texture of the cookies!
- Beat in the eggs one at a time, then stir in the vanilla extract. Scrape down the sides of the bowl to ensure everything is well combined.
- In a separate bowl, whisk together the flour, baking soda, cinnamon, ginger, cloves, and salt. This helps ensure the spices are evenly distributed throughout the batter.
- Gradually add the dry ingredients to the wet ingredients, mixing on low speed until just combined. Be careful not to overmix; a few lumps are okay. Overmixing can lead to tough cookies.
- Stir in the pumpkin puree and chocolate chips until evenly distributed. I like to use a spatula for this part to make sure I don’t have any dry pockets of flour.
Baking the Cookies
- Drop rounded tablespoons of cookie dough onto the prepared baking sheets, leaving about 2 inches between each cookie. They will spread a bit as they bake.
- Bake for 10-12 minutes, or until the edges are lightly golden brown. Keep a close eye on them, as oven temperatures can vary. Start checking for doneness around the 10-minute mark.
- Remove the baking sheets from the oven and let the cookies cool on the sheets for a few minutes before transferring them to a wire rack to cool completely. This prevents them from becoming soggy.
Decorating the Ghost Cookies
- Once the cookies are completely cool, it’s time for the fun part! Melt the white candy melts or white chocolate according to the package directions. I usually do this in the microwave in 30-second intervals, stirring in between, until it’s smooth and melted.
- Transfer the melted white chocolate to a piping bag or a zip-top bag with a small corner snipped off. This makes it easier to control the flow of the chocolate.
- Pipe a generous amount of melted white chocolate onto the top of each cookie to create the ghost’s body. Don’t worry about making it perfect; a slightly uneven shape adds to the charm!
- Important Tip: Let the white chocolate set for a few minutes before adding the details. This prevents the details from smudging.
- Once the white chocolate is slightly set, use the black food-safe marker or edible black icing pen to draw two small dots for eyes and a simple curved line for a mouth. If you’re using mini chocolate chips for eyes, gently press them onto the white chocolate before it sets completely.
- Let the decorated cookies sit for another 10-15 minutes to allow the white chocolate to fully set. Then, carefully transfer them to an airtight container for storage. These cookies are best enjoyed within 3-4 days for optimal freshness.
Troubleshooting Tips
Cookies are too flat:
This usually means your butter wasn’t cold enough. Make sure your butter is well-chilled before creaming it with the sugar. Also, avoid overmixing the dough.
Cookies are too dry:
This could be due to overbaking. Next time, check for doneness a minute or two earlier. Also, ensure your baking powder and baking soda are fresh.
Cookies are too crumbly:
This might indicate that you didn’t add enough liquid. Double-check your measurements and ensure your pumpkin puree is well-mixed.
Storage:
Store your finished Pumpkin Ghost Cookies in an airtight container at room temperature for up to 3-4 days. For longer storage, you can freeze them for up to 2 months. Just make sure to wrap them well to prevent freezer burn.
Conclusion:
So there you have it – my recipe for deliciously spooky Pumpkin Ghost Cookies! I truly believe this recipe is a must-try for several reasons. First, the flavor is simply incredible. The warm spices of pumpkin pie blend perfectly with the subtle sweetness of the cookie dough, creating a truly autumnal treat that’s both comforting and exciting. The ghosts themselves are incredibly fun to make, a perfect activity for a family baking session or a fun Halloween party. It’s a recipe that’s both delicious and visually appealing, making it a winner on all fronts.
Beyond the amazing taste and festive presentation, these Pumpkin Ghost Cookies are also incredibly versatile. I’ve found that they hold up beautifully for a few days in an airtight container, making them perfect for baking ahead of time for parties or gatherings. And the possibilities for variations are endless!
Serving Suggestions:
These cookies are delightful on their own, but they can be elevated even further with a few simple additions. Serve them alongside a glass of cold milk or a warm cup of spiced cider for the ultimate autumnal experience. They also pair wonderfully with a scoop of vanilla ice cream or a dollop of whipped cream for an extra touch of indulgence. For a truly spooky presentation, consider arranging them on a platter with dry ice for a dramatic, smoky effect (always supervise children around dry ice!).
Variations to Try:
Want to put your own spin on these Pumpkin Ghost Cookies? Feel free to experiment! Try adding chopped pecans or walnuts to the dough for added texture and crunch. You could also incorporate a swirl of white chocolate into the dough for an extra layer of flavor and visual interest. For a more intense pumpkin flavor, try adding a teaspoon of pumpkin pie spice to the recipe. If you prefer a less sweet cookie, reduce the amount of sugar by a tablespoon or two. The possibilities are truly endless!
Perhaps you’d like to try using different colored candies for the ghost eyes and mouths – think orange, purple, or even green for a truly unique look! Or, get creative with the shapes – instead of ghosts, you could use cookie cutters to create pumpkins, bats, or other Halloween-themed shapes. The key is to have fun and let your creativity shine through!
Don’t Forget to Share!
I genuinely hope you enjoy making these Pumpkin Ghost Cookies as much as I do. They’re a recipe that’s close to my heart, and I’m so excited to share it with you. Once you’ve had a chance to bake them, I’d love to hear about your experience! Share your photos and feedback on social media using the hashtag #PumpkinGhostCookies – I can’t wait to see your spooky creations!
So, what are you waiting for? Gather your ingredients, preheat your oven, and get ready to bake up a batch of these hauntingly delicious Pumpkin Ghost Cookies. They’re guaranteed to be a hit with everyone, from the youngest trick-or-treaters to the most seasoned Halloween enthusiast. Happy baking, and happy haunting!
Remember to share your baking journey with us! We can’t wait to see your delicious Pumpkin Ghost Cookies.
Pumpkin Ghost Cookies: Spooky & Delicious Halloween Treats
Easy pumpkin cookies decorated as adorable ghosts for Halloween.
Ingredients
Instructions
Recipe Notes
- For fluffier cookies, make sure your butter is softened but not melted.
- Don’t overmix the dough, or the cookies will be tough.
- Keep a close eye on the cookies while baking, as oven temperatures can vary.
- Store cookies in an airtight container at room temperature for up to 3-4 days, or freeze for up to 2 months.
Leave a Comment