

Pumpkin Patch Deviled Eggs are here to revolutionize your fall entertaining! Forget everything you thought you knew about this classic appetizer, because I’m absolutely thrilled to introduce you to a vibrant, festive, and utterly delicious twist that will have your guests clamoring for the recipe. Historically, deviled eggs have graced tables for centuries, evolving from simple seasoned egg yolks to the beloved creamy concoction we know today, cherished for their effortless elegance and universally appealing flavor profile. They are a timeless party staple, a testament to their enduring appeal.
What makes this particular rendition so special, you ask? It’s not just their stunning, autumnal hue, achieved through a natural ingredient that adds a subtle sweetness; it’s the perfect balance of savory and subtly spiced flavors, all wrapped in that undeniably smooth, rich texture we all adore. I find that people absolutely adore deviled eggs because they are the quintessential finger food – easy to pick up, impossible to resist, and a guaranteed hit at any gathering, no matter the occasion. This season, elevate your appetizer game and discover why these Pumpkin Patch Deviled Eggs are destined to become your new holiday staple, bringing a delightful burst of color and flavor to every plate.

Ingredients:
- 12 large eggs, preferably a week or two old for easier peeling
- ½ cup mayonnaise, high-quality full-fat recommended for creaminess and richness
- 1 ½ tablespoons Dijon mustard, or a grainy mustard if you prefer a slight texture and a more robust mustard flavor
- 1 teaspoon white vinegar, apple cider vinegar also works well to add a subtle tang and brightness to the yolk mixture
- ¼ teaspoon salt, plus more to taste – crucial for balancing flavors
- ⅛ teaspoon black pepper, freshly ground is always best for superior aroma and taste
- Pinch of cayenne pepper (optional, for a tiny, warming kick that enhances other flavors without making it spicy)
- 2-3 drops orange food coloring, gel food coloring is highly preferred for vibrant results without adding excess liquid to the filling
- 1 teaspoon smoked paprika, divided (½ teaspoon for flavor in the yolk mixture, ½ teaspoon reserved for garnish and a finishing touch)
- For Garnish:
- Fresh chives, finely chopped (about 2 tablespoons) or small sprigs of fresh parsley – these will act as the “pumpkin stems”
- Extra sprinkle of smoked paprika or a tiny dash of regular paprika for additional color and visual appeal
- Optional: A few tiny pieces of black olive or capers for “seeds” (if you want to get extra creative and add another layer of detail!)
Preparation Phase: Achieving the Perfect Hard-Boiled Eggs
The absolute foundation of any spectacular deviled egg recipe, especially our festive and visually delightful Pumpkin Patch Deviled Eggs, truly lies in perfectly cooked and easily peelable hard-boiled eggs. This crucial first step often causes the most frustration for home cooks, but I’m here to guide you to consistent success and eliminate peeling nightmares!
-
Carefully Place Eggs in a Pot: Begin by gently arranging your 12 large eggs in a single layer at the bottom of a heavy-bottomed saucepan. It’s important not to overcrowd the pot, as this can lead to uneven cooking and increase the risk of cracking. I always recommend using eggs that are at least a week old, if at all possible. Fresher eggs tend to cling much more stubbornly to their internal membrane and shell, making peeling a frustrating and often shell-shattering endeavor. If you only have very fresh eggs, don’t despair – just be extra gentle during the peeling process, and really lean into the ice bath step.
-
Cover with Cold Water: Next, pour cold water over the eggs until they are completely covered by at least an inch. This ensures that all parts of the eggs are submerged and will cook evenly. Adding eggs directly to hot water can cause them to crack immediately due to the sudden temperature shock, and starting with cold water allows for a more gradual and gentle temperature increase, significantly reducing the risk of breakage during the initial cooking phase.
-
Bring to a Rolling Boil: Place the pot on the stovetop over high heat. Bring the water to a rapid, rolling boil. You’ll see large, active bubbles breaking the surface with enthusiasm. As soon as the water reaches this vigorous, full boil, watch it very closely – this precise moment is your key timing indicator, so don’t wander off!
-
Remove from Heat and Cover: Once the water is at a full, undeniable boil, immediately turn off the heat. Do not remove the pot from the burner; simply switch off the heat source. Quickly cover the pot tightly with a lid. This traps the residual heat effectively within the pot and allows the eggs to cook gently through residual heat, preventing them from being aggressively boiled further, which is a common culprit for rubbery egg whites and that unappetizing green-grey ring around the yolk.
-
Let Them Sit: Allow the eggs to sit undisturbed in the hot water, still covered tightly, for exactly 10-12 minutes. For a slightly softer, creamier yolk texture, aim for the 10-minute mark. For a firmer, fully set yolk that is easier to mash uniformly, which is ideal for the smooth filling of our Pumpkin Patch Deviled Eggs, go for 12 minutes. Consistency is key here for perfect results every time.
-
Prepare an Ice Bath: While your eggs are patiently sitting in the hot water, prepare a large bowl filled generously with ice water. This ice bath is an absolutely non-negotiable step for achieving easily peelable eggs! The sudden and drastic temperature change from hot to cold causes the egg proteins to rapidly contract and pull away from the shell membrane, making the subsequent peeling process dramatically easier and less frustrating. Don’t skip this critical step!
-
Transfer Eggs to Ice Bath: After the precise 10-12 minute sitting time has elapsed, carefully and completely drain the hot water from the pot. Immediately transfer the cooked eggs to the prepared ice bath using a slotted spoon, handling them gently to avoid cracking. Let them sit in the ice bath for at least 5-10 minutes, or until they are completely cool to the touch. This step is doubly critical for not only stopping the cooking process dead in its tracks but also for facilitating that elusive easy peeling.
-
Peel the Eggs: Once thoroughly cooled, gently tap each egg on a hard surface (like your countertop) to crack the shell all over. I find it helpful to start at the wider end of the egg, where the air pocket usually resides. Roll the egg between your hands with light pressure to further loosen the shell, then carefully peel under a gentle stream of cold running water. The water helps to wash away tiny shell fragments and can sometimes even slip under the membrane, significantly aiding in the smooth peeling process. Take your time here – a beautifully peeled egg sets the perfect stage for an aesthetically pleasing deviled egg base.
Pro Tip for Peeling: Don’t try to remove the entire shell in one gigantic piece. Instead, remove small pieces at a time, patiently. If you encounter a particularly stubborn spot where the shell is clinging, try peeling directly under running water or, if desperate, using the spoon technique (gently sliding a small spoon under the membrane to separate it from the egg white).
Crafting the Pumpkin-Colored Yolk Filling
Now comes the truly fun and creative part where we transform those perfectly golden yolks into a vibrant, distinctly autumn-hued filling, perfectly suited for our delightful Pumpkin Patch Deviled Eggs!
-
Halve and Scoop the Yolks: Using a very sharp knife, carefully slice each peeled hard-boiled egg in half lengthwise. You want clean, precise cuts for the best possible presentation. Gently scoop out the bright yellow yolks into a medium-sized mixing bowl. Take care to get every single bit of yolk, leaving the egg white halves as clean and intact as possible. These perfectly scooped egg white “boats” are the ideal vessels for our charming pumpkin-themed filling.
-
Mash the Yolks: Using a sturdy fork, thoroughly mash the yolks until they are completely smooth and entirely free of any large lumps or clumps. I personally find a robust fork works best for this, as you can press the yolks effectively against the side of the bowl. The smoother and creamier your mashed yolks are, the more luxurious and effortlessly pipable your final filling will be.
-
Add the Wet Ingredients: To the perfectly mashed yolks, add the mayonnaise, Dijon mustard, and white vinegar. These are the core binding and flavoring agents that collectively give classic deviled eggs their signature tangy, rich, and irresistible character. Start with the specified amounts, as we will carefully adjust for both taste and ideal consistency shortly.
-
Season the Mixture: Generously sprinkle in the initial ¼ teaspoon of salt, ⅛ teaspoon of freshly ground black pepper, and the optional pinch of cayenne pepper (if you’ve opted for it). The cayenne adds a very subtle, underlying warmth without making the eggs overtly spicy, beautifully enhancing the overall flavor profile without overwhelming it. If you’re a devoted fan of a little more zing, feel free to add a tiny dash more to suit your preference.
-
Introduce the Pumpkin Color: Now for the artistic magic! Add 2-3 drops of orange gel food coloring to the yolk mixture. Remember that gel food coloring is highly concentrated, so always start with fewer drops and add more incrementally if needed to achieve your desired shade of true pumpkin orange. Stir vigorously and thoroughly until the color is uniformly distributed throughout the entire yolk mixture. You’re aiming for a lovely, warm, and inviting orange hue that truly evokes the vibrant spirit of a fresh pumpkin patch.
Color Intensity Tip: Always remember this golden rule: you can always add more color, but it’s impossible to take it away once added. Mix thoroughly after each single drop to accurately assess the current shade before daring to add any more. Patience here will pay off with perfect pumpkin tones.
-
Incorporate Smoked Paprika for Depth: Add ½ teaspoon of the smoked paprika to the beautifully colored yolk mixture. Smoked paprika not only contributes wonderfully to that lovely autumnal color, deepening the orange, but it also imparts a fantastic smoky, earthy depth of flavor that complements the inherent richness of the yolks and mayonnaise absolutely perfectly. It’s a truly key ingredient that profoundly elevates these beyond ordinary deviled eggs, giving them an unmistakable gourmet touch.
-
Mix Until Smooth and Creamy: Using a spoon or a flexible rubber spatula, mix all the ingredients together thoroughly until the filling is completely smooth, homogenous, and beautifully creamy. Make sure to scrape down the sides of the bowl diligently to ensure every last bit is well combined. Taste the mixture at this crucial point. This is your prime opportunity to adjust the seasonings to perfection! Do you sense a need for a little more salt? A dash more pepper? Perhaps another tiny drop of vinegar for an extra layer of tang? Or maybe a bit more Dijon if you particularly enjoy a mustard-forward flavor? Trust your discerning taste buds implicitly here – they are your best guide!
Achieving the Perfect Consistency: The finished filling should be firm enough to confidently hold its shape when piped, but still undeniably soft, luscious, and spreadable. If it unexpectedly seems too thick, you can gently incorporate another tiny spoonful of mayonnaise. If it happens to be a bit too runny (which is less likely with these precise measurements), you might consider adding a touch more mashed yolk from another egg if you have one available, or simply chill it for a while to allow it to firm up slightly. Chilling often works wonders!
Assembling and Decorating Your “Pumpkin Patch” Deviled Eggs
This is the moment where our Pumpkin Patch Deviled Eggs truly come to life and proudly earn their wonderfully descriptive name! The decorative touches are delightfully simple but make all the enchanting difference, transforming a simple appetizer into a festive masterpiece.
-
Prepare for Piping: Carefully transfer the vibrant pumpkin-colored yolk mixture into a sturdy piping bag. For that classic, beautiful deviled egg swirl that mimics a pumpkin’s roundness, I highly recommend fitting the bag with a medium open star tip (such as a Wilton 1M or similar). A round tip also works well if you prefer a smoother mound. If you don’t happen to have a piping bag, don’t fret – you can easily use a sturdy Ziploc bag with one corner snipped off, or simply use two small spoons to carefully fill the egg whites. However, for that visually appealing, swirled pumpkin top, a piping bag with a star tip is unquestionably recommended for best results.
-
Fill the Egg White Halves: Gently and carefully pipe or spoon the prepared yolk mixture back into the empty egg white halves. For a truly visually appealing “pumpkin” shape, pipe the filling in a graceful swirling motion, building it up slightly higher in the very center to create a distinctly rounded, mounded effect. This perfectly mimics the charming, plump shape of a small pumpkin. Aim for consistency in size and shape across all the halves for a professional and uniform presentation.
-
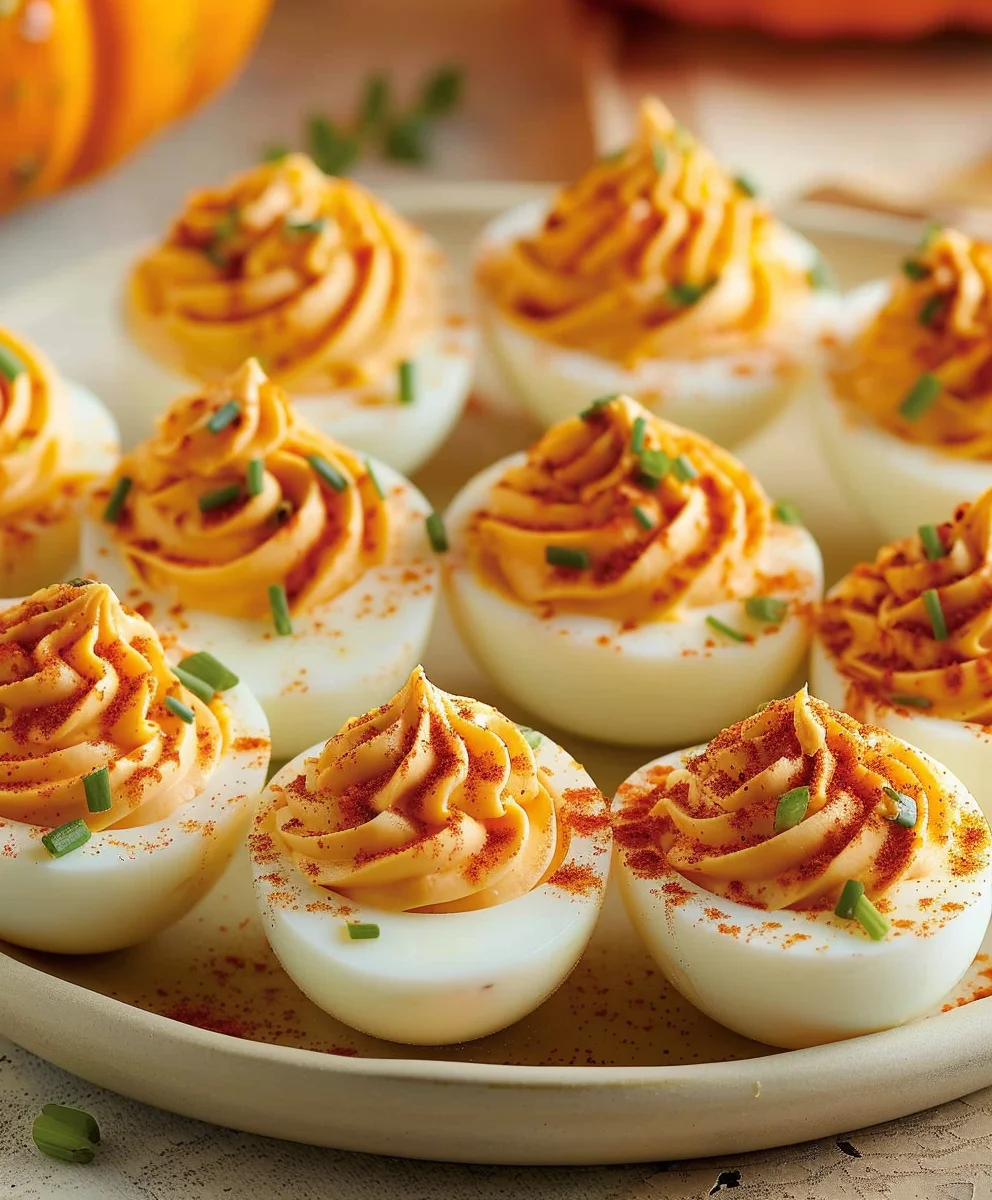
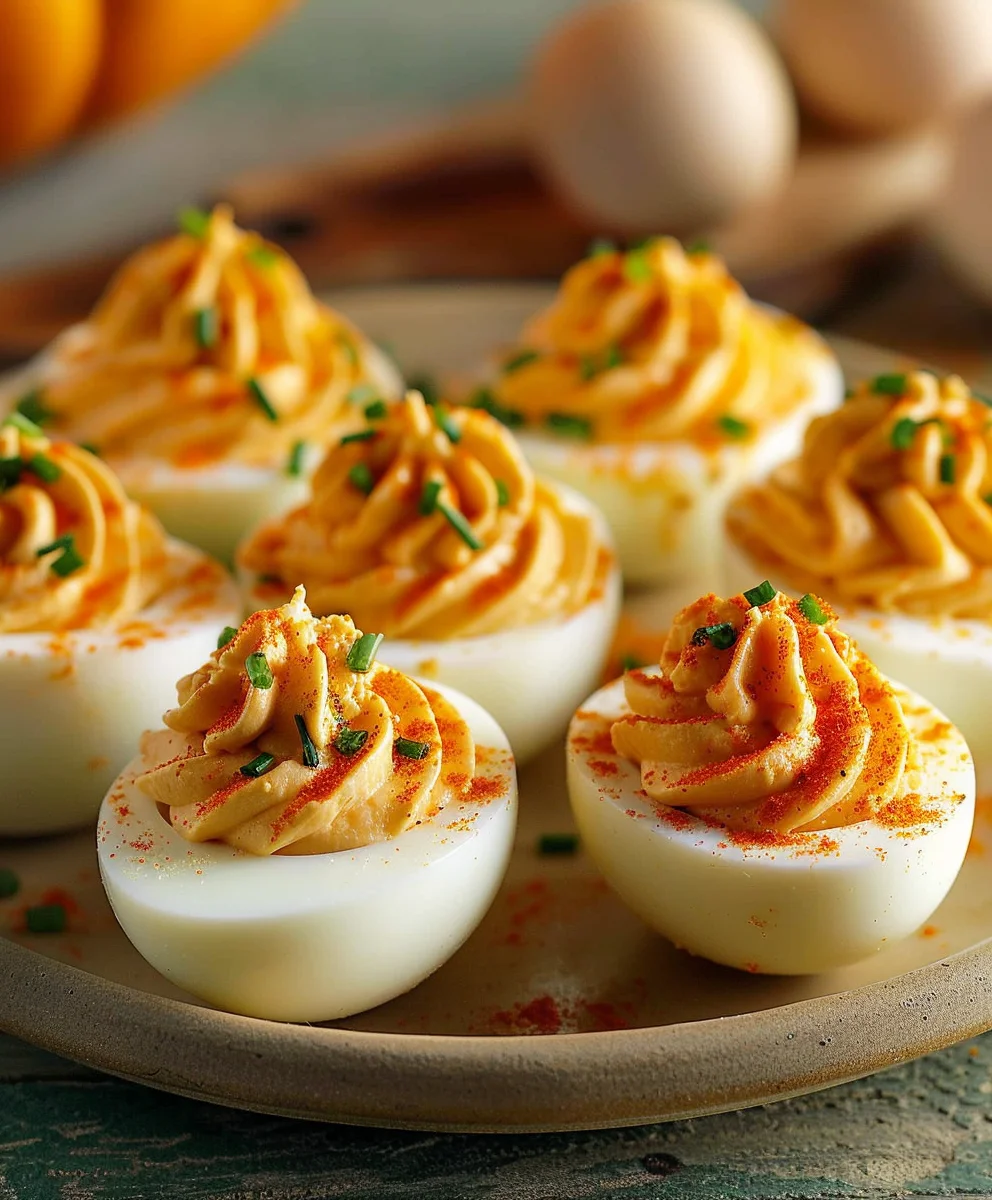
Create the “Pumpkin Lines”: Once the filling is beautifully piped, gently drag the very tip of a clean toothpick or the dull edge of a butter knife from the very center of the mound, moving outwards down towards the edge of the egg white. Repeat this delicate motion several times, ensuring they are evenly spaced around the entire “pumpkin” to create subtle, realistic ridges or lines. This specific detail further enhances the pumpkin resemblance and truly sells the adorable Pumpkin Patch Deviled Eggs aesthetic. It’s a small effort with a big visual impact!
-
Dust with Smoked Paprika: Take the remaining ½ teaspoon of smoked paprika and, using a small, fine-mesh sieve or simply a pinch of your fingers, lightly and evenly dust the top of each piped yolk. This step adds another layer of warm, earthy color, intensifying the pumpkin effect, and creates a lovely visual texture that subtly resembles the skin of a pumpkin. You can certainly use regular sweet paprika for just color, but the smoked variety always adds that extra layer of complex flavor depth, making it my preferred choice.
-
Add the “Stem” Garnish: Now for the final, charming touch – the “stem” that truly completes our pumpkin illusion! Carefully place a small, perfectly sized piece of finely chopped chive or a tiny, fresh sprig of parsley directly into the very center top of each deviled egg “pumpkin.” Chives offer a delicate, fresh oniony flavor and provide a perfect, natural-looking green stem. Parsley, on the other hand, provides a classic, vibrant green contrast. This small, thoughtful touch is incredibly effective and brings the entire “pumpkin patch” vision to life!
-
Chill Before Serving: Arrange your beautiful and festive Pumpkin Patch Deviled Eggs artfully on a serving platter. Cover them loosely with plastic wrap to prevent them from drying out and refrigerate for at least 30 minutes, or ideally for an hour. Chilling allows all the delightful flavors to meld together more deeply and allows the filling to firm up ever so slightly, making them even more delicious, refreshing, and easier to handle. These eggs are unequivocally best served chilled, making them a wonderfully refreshing appetizer.
-
Final Inspection and Serving: Before presenting them to your eager guests, take a moment to admire your fantastic handiwork! Conduct a quick final inspection: check if any garnishes need a slight adjustment or if a final, delicate sprinkle of paprika is desired for extra flair. Your homemade Pumpkin Patch Deviled Eggs are now perfectly ready to be the undeniable star of your autumn gathering, a charming addition to any Halloween party, or an utterly delightful appetizer for your Thanksgiving feast. They’re not just a dish; they’re a delightful conversation starter and a testament to your festive culinary creativity. Enjoy watching your guests marvel at these adorable, delicious, and truly memorable treats!
These incredibly detailed and thorough steps ensure that every single aspect of preparing your festive Pumpkin Patch Deviled Eggs is meticulously covered, from achieving perfectly cooked eggs to their charming and unforgettable presentation. Enjoy the process of creating and sharing this uniquely delightful and visually stunning recipe!
Conclusion:
So there you have it! We’ve journeyed through the creation of what I truly believe is one of the most delightful and visually striking appetizers you’ll ever make. These aren’t just any deviled eggs; they’re an experience, a conversation starter, and a true testament to how much fun we can have with our food, especially during the vibrant autumn season. I poured my heart into crafting this recipe, and I’m so excited for you to discover the magic these little culinary creations hold.
Why You Absolutely Must Try These!
What makes these Pumpkin Patch Deviled Eggs an undeniable must-try? It’s the perfect harmony of creamy, savory, and a subtle whisper of fall sweetness that will completely surprise and delight your palate. I promise you, the moment you take that first bite, you’ll understand. The rich, velvety yolk filling, infused with just the right amount of seasonal spice, melts in your mouth, leaving you craving another. The texture is divine, a smooth, luscious bite that is utterly satisfying. Beyond the incredible taste, the visual appeal is simply unmatched. Imagine a platter adorned with these adorable, vibrant, miniature “pumpkins,” each one a tiny work of art. They immediately elevate any spread from ordinary to extraordinary, instantly adding a touch of whimsy and festive charm that your guests will adore and remember long after the last one is gone. They are surprisingly easy to make, offering maximum impact with minimal fuss, making them a fantastic way to impress without spending hours in the kitchen. In my experience, these beautiful and unique deviled eggs are always the first to disappear from any buffet table, a sure sign of their irresistible appeal.
Serving Suggestions & Creative Variations
Now that you’re armed with this fantastic recipe, let’s talk about how to make these showstoppers truly shine and how to adapt them to your unique tastes. These deviled eggs are the quintessential appetizer for any fall gathering – think Halloween parties, Thanksgiving feasts, harvest potlucks, or even a cozy autumn brunch. Serve them chilled on a rustic wooden board, perhaps nestled among some actual small gourds, colorful fall leaves, or sprigs of fresh rosemary for an even more immersive “pumpkin patch” aesthetic. For a delightful pairing, consider a crisp hard cider, a warm mug of spiced apple cider, or a smoky bourbon cocktail for the ultimate autumnal experience. They also make a wonderful addition to a charcuterie board, offering a creamy counterpoint to sharp cheeses and savory cured meats, adding both color and texture.
But don’t stop there! The true beauty of this recipe lies in its incredible adaptability, allowing you to personalize them to your heart’s content. Want to add a little extra kick? A tiny pinch of cayenne pepper or a dash of your favorite hot sauce stirred into the filling will do the trick, adding a subtle warmth. For an extra layer of savory crunch and depth, try garnishing with finely crumbled crispy bacon or perfectly toasted pepitas (pumpkin seeds). A sprinkle of fresh chives or finely chopped cilantro can introduce a bright, herbaceous note that beautifully contrasts the rich filling. Feeling adventurous and craving a delightful sweet-and-savory surprise? Experiment with a tiny drizzle of pure maple syrup or a delicate sprinkle of brown sugar over the top just before serving – it’s an unexpected twist that is absolutely divine and truly enhances the autumnal theme. You could even explore incorporating a tiny bit of finely mashed roasted sweet potato puree into the yolk mixture for an even deeper, sweeter autumnal flavor profile, though be mindful of the consistency to maintain that perfect creaminess. The possibilities for customization are truly endless, encouraging you to make them uniquely yours and a reflection of your own culinary creativity.
Your Turn to Create & Share!
My biggest hope is that you feel inspired to bring this incredible recipe to life in your own kitchen. There’s something truly magical about transforming simple ingredients into something so festive and delicious, and I genuinely believe these deviled eggs will become a beloved staple in your fall entertaining repertoire for years to come. Don’t be shy; embrace the joy of cooking and the delight of sharing your culinary creations with friends and family. The smiles and compliments you’ll receive will be your best reward. I would absolutely love to hear about your experience! Did you stick to the recipe, or did you put your own unique spin on it? What garnishes did you choose? Did your guests rave about them as much as mine do? Please, once you’ve whipped up your batch and enjoyed the fruits of your labor, come back and share your stories, your photos, and any brilliant variations you came up with. Your feedback and creativity not only inspire me but also help other home cooks discover new and exciting ways to enjoy and personalize these delightful treats. So go ahead, gather your ingredients, put on some festive music, and prepare to create some truly memorable moments with these special deviled eggs. Happy cooking, my friends, and enjoy every delicious bite!
Pumpkin Patch Deviled Eggs: A Festive Fall Favorite
Revolutionize your fall entertaining with Pumpkin Patch Deviled Eggs! This vibrant, festive, and utterly delicious twist on a classic appetizer features a stunning autumnal hue, a perfect balance of savory and subtly spiced flavors, and that beloved smooth, rich texture. These are destined to become your new holiday staple, bringing a delightful burst of color and flavor to any gathering.
Ingredients
-
6 large eggs
-
1/4 cup mayonnaise
-
1 teaspoon yellow mustard
-
1/4 teaspoon salt
-
1/8 teaspoon black pepper
-
1/2 teaspoon paprika, plus more for dusting
-
A tiny dash of orange food coloring (optional, for vibrant pumpkin color)
-
2 tablespoons fresh chives, finely chopped (for stems and garnish)
Instructions
-
Step 1
Place eggs in a single layer in a pot and cover with cold water by at least an inch. Bring to a rolling boil over high heat, then immediately turn off heat, cover tightly, and let sit for 10-12 minutes. -
Step 2
While eggs sit, prepare a large bowl with ice water. Transfer cooked eggs to the ice bath and let them cool completely for 5-10 minutes. -
Step 3
Gently tap and roll each cooled egg to crack the shell. Peel carefully under cold running water, starting from the wider end. -
Step 4
Slice each peeled egg in half lengthwise. Scoop out the yolks into a medium bowl and mash thoroughly with a fork until completely smooth. -
Step 5
To the mashed yolks, add mayonnaise, yellow mustard, salt, black pepper, and the tiny dash of orange food coloring (if desired). Add 1/2 teaspoon paprika. Mix until smooth, creamy, and uniformly colored. Taste and adjust seasonings as needed. -
Step 6
Transfer the yolk mixture to a piping bag fitted with a medium open star tip (or use spoons). Pipe or spoon the filling back into the empty egg white halves, creating a rounded, mounded shape to resemble a pumpkin. -
Step 7
Gently drag the tip of a toothpick or dull edge of a knife from the center of the piped yolk outwards, down towards the edge of the egg white, to create subtle pumpkin-like ridges. -
Step 8
Lightly dust the top of each deviled egg with additional paprika. Place a small piece of finely chopped chive in the very center of each for a ‘stem’. -
Step 9
Arrange on a platter, cover loosely, and refrigerate for at least 30 minutes (ideally an hour) to allow flavors to meld and the filling to firm up. Serve chilled and enjoy!
Important Information
Nutrition Facts (Per Serving)
It is important to consider this information as approximate and not to use it as definitive health advice.
Allergy Information
Please check ingredients for potential allergens and consult a health professional if in doubt.


Leave a Comment