

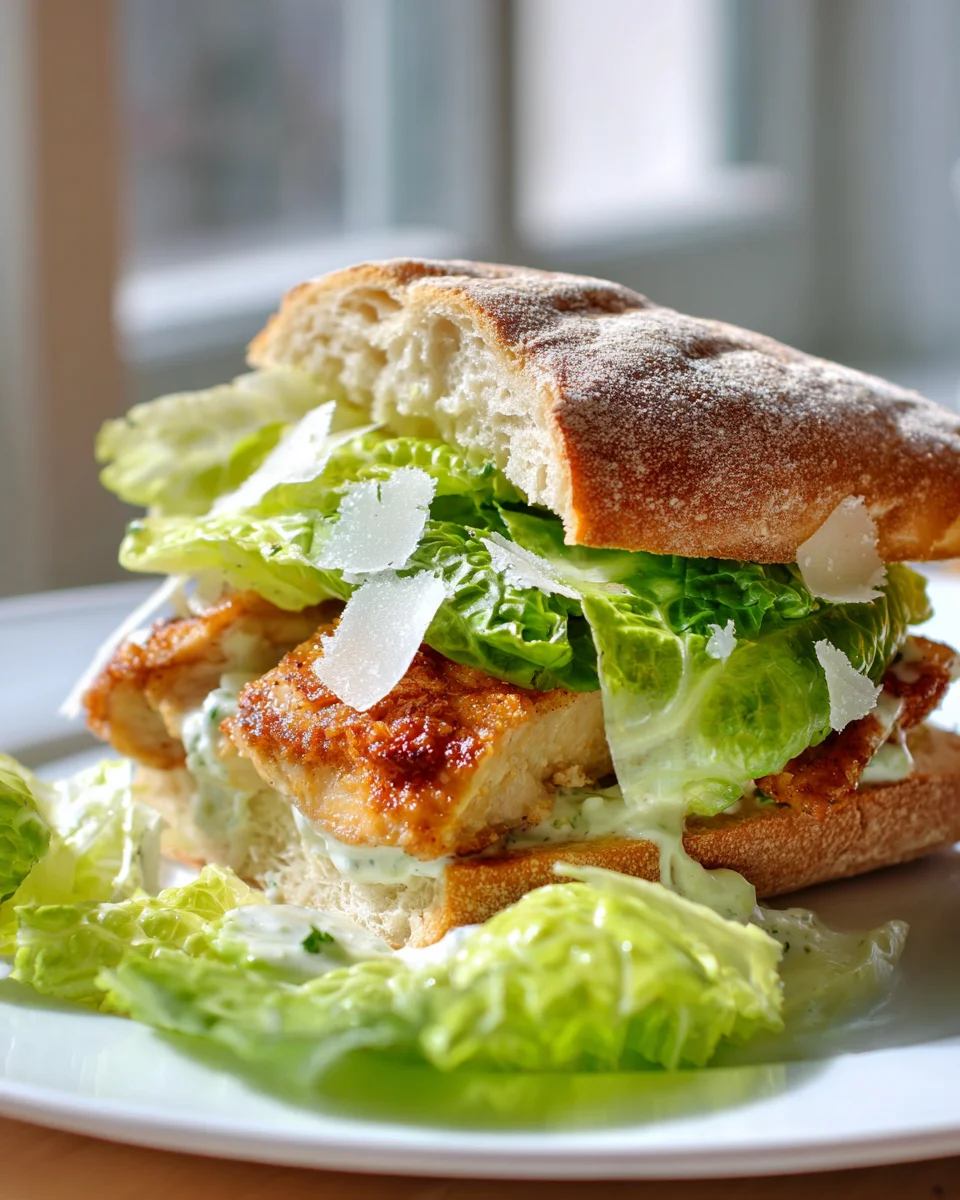
One Pan Crispy Chicken Caesar Sandwich
Oh, prepare yourselves, because I’ve cracked the code to your new favorite weeknight meal, and it all starts with the incredibly satisfying One Pan Crispy Chicken Caesar Sandwich! What makes this recipe a game-changer? Well, for starters, the “One Pan” part isn’t just a catchy name—it’s a promise of minimal cleanup, which means more time for you to actually enjoy your meal instead of scrubbing pots and pans. That alone makes it a winner in my book!
You’re going to absolutely adore this dish because it takes everything you love about a classic Caesar salad – that creamy, garlicky, Parmesan-packed goodness, the refreshing crunch of romaine – and transforms it into the most unbelievably delicious and satisfying sandwich. But wait, there’s more! We’re not just slapping plain chicken in there. We’re talking perfectly seasoned, golden-brown, and delightfully crispy chicken, all cooked right alongside everything else. The texture contrast with the fresh greens and soft bread is just chef’s kiss.
Imagine this: tender, juicy chicken with an irresistible crispy crust, nestled between your favorite bread (toasted to perfection, of course!), slathered with a rich Caesar dressing, and piled high with crisp romaine and generous shavings of Parmesan. It’s a full-flavor experience, a hearty meal, and an absolute breeze to prepare. This isn’t just a sandwich; it’s a culinary triumph that’s ready to become a regular star in your kitchen rotation. Get ready to fall in love with easy, delicious dinners all over again!

Ingredient Notes
Crafting the perfect One Pan Crispy Chicken Caesar Sandwich starts with understanding each component, ensuring every bite is a symphony of flavor and texture. Here’s what you’ll need and why it’s important:
- Chicken: I typically reach for boneless, skinless chicken breasts for this recipe, though boneless, skinless chicken thighs would also work wonderfully if you prefer a richer flavor. The key here is to pound them thin, about 1/2 to 3/4 inch thick. This not only ensures quick, even cooking but also maximizes the surface area for that incredible crispiness we’re aiming for. Before cooking, I season my chicken generously with salt, freshly ground black pepper, a touch of garlic powder, and sometimes a pinch of smoked paprika for an extra layer of flavor.
- Bread: This isn’t just any sandwich; it needs a sturdy foundation! My top picks are ciabatta rolls, focaccia bread, or a good quality baguette sliced lengthwise. These types of bread have enough structure to hold up to the juicy chicken, crisp lettuce, and creamy dressing without becoming soggy. Plus, they toast beautifully in the pan, adding another layer of texture. If you’re looking for a gluten-free option, a robust gluten-free artisan roll would be an excellent choice.
- Caesar Dressing: The heart of our Caesar sandwich! You can absolutely use your favorite store-bought Caesar dressing for convenience – there are many fantastic options out there. However, if you’re feeling adventurous, a homemade Caesar dressing takes this sandwich to the next level. Look for dressings that are creamy, tangy, and rich with notes of Parmesan, garlic, lemon, and a hint of anchovy (often optional, but I find it adds that authentic depth). For a homemade version, feel free to use non-alcohol white wine vinegar or apple cider vinegar if a recipe calls for wine.
- Romaine Lettuce: Fresh, crisp romaine lettuce is non-negotiable. Its natural crunch provides a wonderful textural contrast to the crispy chicken and soft bread, and its slightly bitter notes perfectly balance the richness of the dressing. Make sure to wash and thoroughly dry your lettuce before tearing or chopping it.
- Parmesan Cheese: A Caesar sandwich isn’t complete without it! I prefer freshly shaved or shredded Parmesan cheese rather than the pre-grated kind. The fresh cheese has a nuttier, more nuanced flavor and a better texture that melts slightly with the warmth of the chicken.
- Oil for Cooking: Olive oil is my go-to for pan-frying the chicken and toasting the bread. You could also use avocado oil or another high-heat neutral oil if you prefer.
- Optional Add-ins: While not strictly necessary, I sometimes like to add a thin slice of ripe tomato for freshness, some thinly sliced red onion for a gentle bite, or even a few crispy beef bacon strips (cooked separately) for an extra savory punch.
Step-by-Step Instructions
Let’s get cooking! The beauty of this One Pan Crispy Chicken Caesar Sandwich is its simplicity, making it perfect for a quick weeknight meal or a weekend treat. Follow these steps for a perfectly crispy, flavorful experience:
- Prepare the Chicken: First things first, let’s get our chicken ready. Place your boneless, skinless chicken breasts between two pieces of parchment paper or plastic wrap. Using a meat mallet or a heavy rolling pin, pound them evenly until they are about 1/2 to 3/4 inch thick. This ensures they cook quickly and evenly, and get super crispy. Once pounded, pat the chicken dry with paper towels (this is crucial for crispiness!). Season both sides generously with salt, freshly ground black pepper, garlic powder, and any other seasonings you love.
- Crisp the Chicken: Heat 1-2 tablespoons of olive oil in a large, heavy-bottomed skillet (this is our “one pan” hero!) over medium-high heat. You want the pan to be nice and hot, but not smoking. Once the oil is shimmering, carefully place the chicken breasts in the pan. Don’t overcrowd the pan; cook in batches if necessary. Let the chicken cook undisturbed for 4-6 minutes per side, or until it’s golden brown, beautifully crispy, and cooked through (internal temperature should reach 165°F or 74°C). The trick to crispiness is not moving it too much while it’s searing. Once cooked, remove the chicken from the pan and let it rest on a cutting board for a few minutes. This allows the juices to redistribute, keeping the chicken tender.
- Prepare and Toast the Bread: While the chicken is resting, it’s time to get our bread ready. Carefully wipe out any excess oil or burnt bits from your skillet, leaving just a thin layer of residual oil or a clean pan. Slice your chosen bread (ciabatta, focaccia, or baguette) lengthwise. If your pan is dry, you can add another small drizzle of olive oil. Place the bread cut-side down in the skillet. Toast for 2-3 minutes over medium heat, or until golden brown and slightly crispy. This toasted bread acts as a barrier against sogginess and adds a delightful crunch. Remove the toasted bread from the pan.
- Assemble Your Sandwich: Now for the best part – assembly! Lay your toasted bread halves flat. On one or both sides of the bread, spread a generous layer of your Caesar dressing.
- Layer the Goodness: Slice your rested, crispy chicken against the grain into thick strips or leave it whole if you prefer. Place the crispy chicken onto the bottom half of your dressed bread.
- Add the Freshness: Top the chicken with a generous handful of fresh, crisp romaine lettuce. Lightly drizzle a bit more Caesar dressing directly over the lettuce, if desired, and then sprinkle generously with shaved or shredded Parmesan cheese.
- Close and Serve: Place the top half of the bread over the fillings, gently press down, and serve your One Pan Crispy Chicken Caesar Sandwich immediately. Prepare for a truly satisfying meal!
Tips & Suggestions
Making a truly memorable One Pan Crispy Chicken Caesar Sandwich is all about the details. Here are some of my favorite tips and suggestions to elevate your sandwich game:
- Achieving Peak Chicken Crispy-ness:
- Pat Dry: Always, always pat your chicken dry with paper towels before seasoning and cooking. Excess moisture is the enemy of crispiness.
- Pound Thin: As mentioned in the ingredients, pounding the chicken to an even thickness helps it cook faster and ensures more surface area gets that golden, crispy crust.
- Hot Pan, Not Overcrowded: Make sure your pan is properly heated before adding the chicken, and don’t overcrowd it. If you add too much chicken, the pan temperature will drop, and the chicken will steam rather than sear, resulting in a less crispy outcome. Cook in batches if necessary.
- Don’t Disturb: Once the chicken hits the hot pan, resist the urge to move it around. Let it cook undisturbed for several minutes until a deep golden-brown crust forms before flipping.
- Preventing a Soggy Sandwich:
- Toast the Bread: Toasting your bread in the pan is not just for flavor; it creates a slight barrier that helps prevent the dressing and chicken juices from making the bread soggy too quickly.
- Dress Sparingly on Lettuce: While you want flavor, don’t drench your romaine lettuce in dressing. A light coating is enough, and you can always add more to the bread itself.
- Assemble Just Before Eating: For the absolute best experience, assemble your sandwich right before you plan to eat it. The crispy chicken and fresh lettuce are at their prime when just put together.
- Bread Choice Matters: Don’t skimp on the bread! A sturdy bread like ciabatta, focaccia, or a thick-cut artisanal loaf will hold up much better to the fillings than standard sandwich bread.
- Customize Your Caesar: Feel free to get creative with your Caesar dressing. If you’re making it from scratch, play with the amount of garlic, lemon juice, or Parmesan. For a creamier dressing, you could add a little Greek yogurt or a touch of mayonnaise.
- Amp Up the Flavor:
- Garlic Butter Bread: For an extra layer of flavor, before toasting, spread a thin layer of garlic butter on your bread.
- Add-ins: Consider adding a few thin slices of roasted red bell pepper, sun-dried tomatoes, or even some caramelized onions for extra depth. Crispy beef bacon strips are also a fantastic addition!
- Serving Suggestion: This sandwich is quite hearty on its own, but it pairs wonderfully with a simple side salad, a bowl of tomato soup, or some homemade potato chips.
Storage
The One Pan Crispy Chicken Caesar Sandwich is truly best enjoyed immediately after assembly, when the chicken is at its crispiest, the lettuce is at its freshest, and the bread is perfectly toasted. However, if you find yourself with components left over, or if you’re planning ahead, here’s how to store them:
- Assembled Sandwich: I strongly advise against storing a fully assembled sandwich. The moisture from the dressing and lettuce, combined with the warmth from the chicken, will quickly turn your beautifully crispy bread and chicken soggy. It just won’t be the same experience. Trust me on this one!
- Cooked Chicken: Your cooked crispy chicken can be stored separately. Once it has cooled completely, transfer it to an airtight container and refrigerate for up to 3-4 days. When you’re ready to enjoy it again, I recommend reheating the chicken in a hot skillet or in an oven/air fryer at around 375°F (190°C) for 5-10 minutes. This helps to re-crisp the exterior, bringing back some of that delicious texture. Avoid reheating in the microwave, as it will make the chicken rubbery and lose its crispness.
- Caesar Dressing: If you’ve used a store-bought dressing, simply store it according to the package directions, typically in the refrigerator. If you’ve made your own homemade Caesar dressing, it can be stored in an airtight jar or container in the refrigerator for up to 5-7 days.
- Romaine Lettuce: Fresh, un-dressed romaine lettuce should be washed, thoroughly dried, and stored in the crisper drawer of your refrigerator, perhaps wrapped in a paper towel within a plastic bag or container. It will stay crisp for several days.
- Parmesan Cheese: Shaved or shredded Parmesan cheese can be kept in an airtight container in the refrigerator for up to a week.
When you’re ready for another sandwich, simply reheat your chicken, toast fresh bread, and assemble all the chilled components. This way, you can enjoy a delicious “freshly made” sandwich experience every time!
Final Thoughts
There you have it! I truly believe that the One Pan Crispy Chicken Caesar Sandwich is more than just a meal; it’s a brilliant solution for a quick, delicious, and satisfying bite. The genius of having everything come together in a single pan means less fuss and more time to savor those incredible flavors. That perfectly crispy chicken, combined with the vibrant Caesar dressing and all the classic trimmings, tucked into a warm, crunchy sandwich – it’s an experience that’s truly hard to beat.
I wholeheartedly encourage you to try this One Pan Crispy Chicken Caesar Sandwich. It’s incredibly easy, delivers big on taste, and will quickly become a go-to in your recipe collection. Get ready to enjoy a fantastic, no-fuss meal that brings all the joy of a classic Caesar, elevated into a delightful sandwich!

Quick One Pan Crispy Chicken Caesar Sandwich: Easy Recipe!
- Total Time: 45 minutes
- Yield: 4 servings
Description
This One Pan Crispy Chicken Caesar Sandwich combines the classic flavors of a Caesar salad into a satisfying sandwich, all while minimizing cleanup. Enjoy perfectly seasoned, crispy chicken nestled between toasted bread and fresh romaine, topped with rich Caesar dressing.
Ingredients
- Boneless, skinless chicken breasts
- Salt
- Freshly ground black pepper
- Garlic powder
- Smoked paprika (optional)
- Ciabatta rolls, focaccia bread, or baguette
- Caesar dressing
- Fresh romaine lettuce
- Freshly shaved or shredded Parmesan cheese
- Olive oil (for cooking)
- Ripe tomato (optional)
- Thinly sliced red onion (optional)
- Crispy beef bacon strips (optional)
Instructions
- Prepare the Chicken: Place your boneless, skinless chicken breasts between two pieces of parchment paper or plastic wrap. Pound them evenly until they are about 1/2 to 3/4 inch thick. Pat the chicken dry with paper towels and season both sides generously with salt, freshly ground black pepper, garlic powder, and any other seasonings you love.
- Crisp the Chicken: Heat 1-2 tablespoons of olive oil in a large, heavy-bottomed skillet over medium-high heat. Once the oil is shimmering, carefully place the chicken breasts in the pan. Cook undisturbed for 4-6 minutes per side, or until golden brown and cooked through. Remove the chicken from the pan and let it rest.
- Prepare and Toast the Bread: Wipe out excess oil from your skillet, leaving a thin layer. Slice your chosen bread lengthwise and place it cut-side down in the skillet. Toast for 2-3 minutes over medium heat until golden brown. Remove the toasted bread from the pan.
- Assemble Your Sandwich: Lay your toasted bread halves flat. On one or both sides of the bread, spread a generous layer of your Caesar dressing.
- Layer the Goodness: Slice your rested, crispy chicken into thick strips or leave it whole. Place the crispy chicken onto the bottom half of your dressed bread.
- Add the Freshness: Top the chicken with a generous handful of fresh, crisp romaine lettuce. Drizzle a bit more Caesar dressing over the lettuce, if desired, and sprinkle generously with shaved or shredded Parmesan cheese.
- Close and Serve: Place the top half of the bread over the fillings, gently press down, and serve your One Pan Crispy Chicken Caesar Sandwich immediately.
- Prep Time: 15 mins
- Cook Time: 30 mins
- Category: Dinner
- Method: Pan-frying
- Cuisine: American
Nutrition
- Serving Size: 1 sandwich
- Calories: 550
- Sugar: 2 g
- Sodium: 800 mg
- Fat: 25 g
- Saturated Fat: 6 g
- Unsaturated Fat: 15 g
- Trans Fat: 0 g
- Carbohydrates: 45 g
- Fiber: 3 g
- Protein: 35 g
- Cholesterol: 90 mg
Keywords: For the best crispy chicken, always pat it dry before seasoning and cooking. Toasting the bread helps prevent sogginess, and assembling the sandwich just before eating ensures maximum freshness.


Leave a Comment