

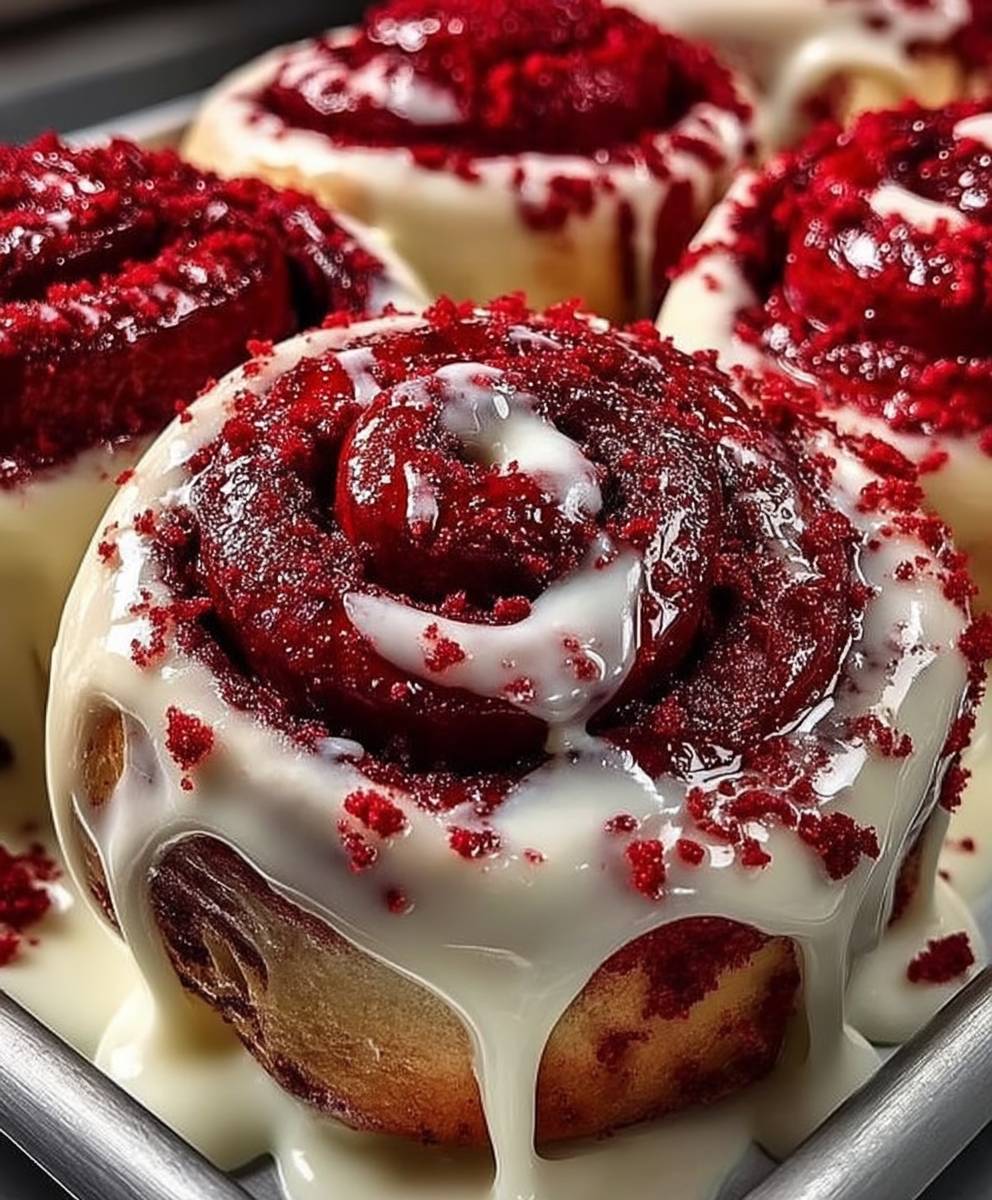
Red Velvet Cinnamon Rolls: Prepare to be utterly captivated! Imagine the tangy, subtly chocolatey delight of red velvet cake swirled into the warm, comforting embrace of a classic cinnamon roll. It’s a dessert mashup of epic proportions, and trust me, your taste buds will thank you. This isn’t just breakfast; it’s a statement.
While the exact origins of red velvet cake are debated, its popularity soared in the mid-20th century, often associated with upscale hotels and bakeries. The vibrant red hue, traditionally achieved through a chemical reaction between cocoa powder, buttermilk, and vinegar, adds a touch of elegance and intrigue. Cinnamon rolls, on the other hand, boast a much longer history, with variations found across Europe for centuries. Combining these two beloved treats creates a symphony of flavors and textures that’s simply irresistible.
People adore this dish for its perfect balance of sweet and tangy, its soft, pillowy texture, and the sheer indulgence it offers. The cream cheese frosting, a hallmark of both red velvet cake and many cinnamon roll recipes, ties everything together in a luscious, decadent finish. Plus, these Red Velvet Cinnamon Rolls are surprisingly easy to make, making them perfect for weekend brunches, holiday gatherings, or any occasion that calls for a little bit of magic. Get ready to experience a truly unforgettable treat!

Ingredients:
- For the Dough:
- 3 cups all-purpose flour, plus more for dusting
- 1/4 cup granulated sugar
- 1 teaspoon salt
- 1 packet (2 1/4 teaspoons) active dry yeast
- 1 cup milk, warmed to 110-115°F
- 1/4 cup unsalted butter, melted
- 1 large egg, lightly beaten
- 1 teaspoon vanilla extract
- 1 tablespoon red food coloring
- 1 tablespoon unsweetened cocoa powder
- For the Filling:
- 1/2 cup unsalted butter, softened
- 1 cup packed brown sugar
- 2 tablespoons unsweetened cocoa powder
- 1 tablespoon ground cinnamon
- 1/2 teaspoon ground nutmeg
- For the Cream Cheese Frosting:
- 8 ounces cream cheese, softened
- 1/2 cup unsalted butter, softened
- 3 cups powdered sugar
- 1 teaspoon vanilla extract
- 2-4 tablespoons milk, or more as needed for consistency
Preparing the Red Velvet Dough:
- Combine Dry Ingredients: In a large bowl, whisk together the flour, sugar, salt, and yeast. Make sure the yeast is evenly distributed throughout the flour mixture. This ensures proper activation and even rising of the dough.
- Combine Wet Ingredients: In a separate bowl, whisk together the warm milk, melted butter, egg, vanilla extract, red food coloring, and cocoa powder. The milk temperature is crucial; too hot, and you’ll kill the yeast; too cold, and it won’t activate properly. Aim for that sweet spot between 110-115°F.
- Combine Wet and Dry: Gradually add the wet ingredients to the dry ingredients, mixing with a wooden spoon or dough hook attachment on your stand mixer until a shaggy dough forms. Don’t dump it all in at once! Adding it gradually helps the flour absorb the liquid evenly.
- Knead the Dough: Turn the dough out onto a lightly floured surface and knead for 6-8 minutes, or until smooth and elastic. Alternatively, knead with a dough hook in your stand mixer for 5-7 minutes. The dough should be slightly tacky but not sticky. If it’s too sticky, add a tablespoon of flour at a time until it reaches the right consistency. Proper kneading develops the gluten, which gives the rolls their structure and chewiness.
- First Rise: Place the dough in a lightly greased bowl, turning to coat. Cover with plastic wrap or a clean kitchen towel and let rise in a warm place for 1-1.5 hours, or until doubled in size. Patience is key here! A good rise is essential for light and fluffy cinnamon rolls. The warmer the environment, the faster the dough will rise.
Making the Red Velvet Filling:
- Soften the Butter: Ensure your butter is softened to room temperature. This is crucial for easy spreading and even distribution of the filling. If it’s too cold, it will be difficult to work with; if it’s melted, it will make the filling too runny.
- Combine Filling Ingredients: In a medium bowl, combine the softened butter, brown sugar, cocoa powder, cinnamon, and nutmeg. Mix well until everything is thoroughly combined and forms a smooth, spreadable paste. The brown sugar adds a lovely molasses flavor that complements the red velvet perfectly.
Assembling and Baking the Cinnamon Rolls:
- Roll Out the Dough: Once the dough has doubled in size, gently punch it down to release the air. Turn it out onto a lightly floured surface and roll it into a large rectangle, about 12×18 inches. Try to keep the rectangle as even as possible for uniform rolls.
- Spread the Filling: Evenly spread the red velvet filling over the entire surface of the dough, leaving a small border along one of the long edges. This border will help seal the rolls when you roll them up.
- Roll Up the Dough: Starting from the long edge opposite the border, tightly roll the dough into a log. Try to keep the roll as tight as possible to prevent gaps and ensure even baking.
- Cut the Rolls: Using a sharp serrated knife or unflavored dental floss, cut the log into 12 equal slices. Dental floss is a great trick for clean cuts without squishing the rolls! Simply slide the floss under the log, cross the ends over the top, and pull to slice.
- Second Rise: Arrange the rolls in a greased 9×13 inch baking dish. Cover loosely with plastic wrap or a clean kitchen towel and let rise in a warm place for another 30-45 minutes, or until puffy. This second rise is important for achieving that extra-soft texture.
- Bake the Rolls: Preheat your oven to 350°F (175°C). Bake the cinnamon rolls for 25-30 minutes, or until golden brown and cooked through. A toothpick inserted into the center of a roll should come out clean. If the tops are browning too quickly, you can tent them with foil during the last 10 minutes of baking.
- Cool Slightly: Let the cinnamon rolls cool in the baking dish for about 10-15 minutes before frosting. This allows them to set slightly and prevents the frosting from melting completely.
Preparing the Cream Cheese Frosting:
- Soften the Cream Cheese and Butter: Make sure your cream cheese and butter are softened to room temperature. This is absolutely essential for a smooth, lump-free frosting. If they’re too cold, you’ll end up with clumps; if they’re melted, the frosting will be too thin.
- Cream Together: In a large bowl, beat the softened cream cheese and butter together with an electric mixer until light and fluffy. This usually takes about 2-3 minutes.
- Add Powdered Sugar: Gradually add the powdered sugar, one cup at a time, beating on low speed until combined. Be careful not to add it all at once, or you’ll end up with a cloud of powdered sugar!
- Add Vanilla and Milk: Stir in the vanilla extract and then add the milk, one tablespoon at a time, until the frosting reaches your desired consistency. You may need more or less milk depending on the humidity and the consistency of your cream cheese and butter. The frosting should be smooth, creamy, and easily spreadable.
Frosting and Serving:
- Frost the Rolls: Generously spread the cream cheese frosting over the warm cinnamon rolls. Don’t be shy with the frosting! It’s what makes these rolls truly decadent.
- Serve Immediately: Serve the red velvet cinnamon rolls warm and enjoy! They are best enjoyed fresh, but can be stored in an airtight container in the refrigerator for up to 3 days. Reheat gently in the microwave or oven before serving.
Tips for Success:
- Yeast Activation: Always check the expiration date on your yeast. If it’s old, it may not activate properly. To test your yeast, combine it with the warm milk and a teaspoon of sugar. If it foams up within 5-10 minutes, it’s good to go.
- Dough Temperature: The temperature of your dough is important for rising. If your kitchen is cold, you can create a warm environment by placing the dough in a slightly warmed oven (turned off!) or near a warm appliance.
- Don’t Overbake: Overbaking will result in dry, tough cinnamon rolls. Keep a close eye on them during the last few minutes of baking and remove them from the oven as soon as they are golden brown and cooked through.
- Frosting Consistency: Adjust the amount of milk in the frosting to achieve your desired consistency. For a thicker frosting, use less milk; for a thinner frosting, use more.
- Make Ahead: You can prepare the cinnamon rolls up to the second rise the night before. Cover them tightly with plastic wrap and refrigerate. In the morning, let them come to room temperature for about 30 minutes before baking.
Variations:
- Nuts: Add chopped pecans or walnuts to the filling for extra flavor and texture.
- Chocolate Chips: Sprinkle chocolate chips over the filling before rolling up the dough.
- Orange Zest: Add orange zest to the filling or frosting for a bright, citrusy flavor.
- Different Frosting: If

Conclusion:
So there you have it! These Red Velvet Cinnamon Rolls are more than just a dessert; they’re an experience. The vibrant color, the decadent cream cheese frosting, and that comforting cinnamon swirl all combine to create something truly special. I know, I know, you might be thinking, “Red velvet AND cinnamon rolls? Is that too much?” Trust me, it’s not. It’s the perfect amount of indulgence, a delightful twist on a classic that will have everyone begging for more.
Why is this recipe a must-try? Because it’s surprisingly easy to make, even if you’re not a seasoned baker. The dough comes together beautifully, and the red velvet flavor is achieved with simple ingredients you probably already have in your pantry. Plus, the visual appeal is undeniable. Imagine presenting a tray of these gorgeous, swirled rolls at your next brunch or holiday gathering. They’re guaranteed to be a showstopper!
But the best part? The taste! The slight tang of the red velvet cake complements the warm spice of the cinnamon filling perfectly. And then there’s the cream cheese frosting – rich, tangy, and oh-so-creamy. It’s the perfect finishing touch that elevates these rolls to a whole new level of deliciousness.
Now, let’s talk serving suggestions and variations. While these rolls are amazing on their own, there are plenty of ways to customize them to your liking. For a truly decadent experience, try serving them warm with a scoop of vanilla ice cream. The contrast between the warm roll and the cold ice cream is simply divine. Or, if you’re feeling adventurous, you could drizzle them with a chocolate ganache for an extra layer of richness.
Another fun variation is to add chopped pecans or walnuts to the cinnamon filling for a bit of crunch. You could also experiment with different extracts, such as almond or vanilla, to enhance the flavor of the dough. And if you’re looking for a lighter option, you can reduce the amount of sugar in the frosting or use a low-fat cream cheese.
For a festive touch, especially around the holidays, sprinkle some red and green sprinkles on top of the frosting. Or, for a more elegant presentation, dust them with a light coating of powdered sugar. The possibilities are endless!
I truly believe that these Red Velvet Cinnamon Rolls are a recipe that everyone should try at least once. They’re perfect for special occasions, weekend brunches, or even just a cozy night in. They’re a guaranteed crowd-pleaser that will leave everyone feeling happy and satisfied.
So, what are you waiting for? Grab your apron, gather your ingredients, and get baking! I promise you won’t regret it. And when you do, please, please, please share your experience with me! I’d love to hear what you think of the recipe, what variations you tried, and how much everyone loved them. You can leave a comment below, tag me on social media, or even send me an email. I can’t wait to see your creations! Happy baking! I hope you enjoy this recipe for Red Velvet Cinnamon Rolls as much as I do!
Red Velvet Cinnamon Rolls: The Ultimate Guide to Baking Perfection
Decadent red velvet cinnamon rolls with a rich cocoa-cinnamon filling and a tangy cream cheese frosting. A perfect treat for breakfast, brunch, or dessert!
Ingredients
- 3 cups all-purpose flour, plus more for dusting
- 1/4 cup granulated sugar
- 1 teaspoon salt
- 1 packet (2 1/4 teaspoons) active dry yeast
- 1 cup milk, warmed to 110-115°F
- 1/4 cup unsalted butter, melted
- 1 large egg, lightly beaten
- 1 teaspoon vanilla extract
- 1 tablespoon red food coloring
- 1 tablespoon unsweetened cocoa powder
- 1/2 cup unsalted butter, softened
- 1 cup packed brown sugar
- 2 tablespoons unsweetened cocoa powder
- 1 tablespoon ground cinnamon
- 1/2 teaspoon ground nutmeg
- 8 ounces cream cheese, softened
- 1/2 cup unsalted butter, softened
- 3 cups powdered sugar
- 1 teaspoon vanilla extract
- 2-4 tablespoons milk, or more as needed for consistency
Instructions
- In a large bowl, whisk together the flour, sugar, salt, and yeast. Make sure the yeast is evenly distributed throughout the flour mixture.
- In a separate bowl, whisk together the warm milk, melted butter, egg, vanilla extract, red food coloring, and cocoa powder. The milk temperature is crucial; aim for 110-115°F.
- Gradually add the wet ingredients to the dry ingredients, mixing with a wooden spoon or dough hook attachment until a shaggy dough forms.
- Turn the dough out onto a lightly floured surface and knead for 6-8 minutes, or until smooth and elastic. Alternatively, knead with a dough hook in your stand mixer for 5-7 minutes.
- Place the dough in a lightly greased bowl, turning to coat. Cover with plastic wrap or a clean kitchen towel and let rise in a warm place for 1-1.5 hours, or until doubled in size.
- Ensure your butter is softened to room temperature.
- In a medium bowl, combine the softened butter, brown sugar, cocoa powder, cinnamon, and nutmeg. Mix well until everything is thoroughly combined and forms a smooth, spreadable paste.
- Once the dough has doubled in size, gently punch it down to release the air. Turn it out onto a lightly floured surface and roll it into a large rectangle, about 12×18 inches.
- Evenly spread the red velvet filling over the entire surface of the dough, leaving a small border along one of the long edges.
- Starting from the long edge opposite the border, tightly roll the dough into a log.
- Using a sharp serrated knife or unflavored dental floss, cut the log into 12 equal slices.
- Arrange the rolls in a greased 9×13 inch baking dish. Cover loosely with plastic wrap or a clean kitchen towel and let rise in a warm place for another 30-45 minutes, or until puffy.
- Preheat your oven to 350°F (175°C). Bake the cinnamon rolls for 25-30 minutes, or until golden brown and cooked through.
- Let the cinnamon rolls cool in the baking dish for about 10-15 minutes before frosting.
- Make sure your cream cheese and butter are softened to room temperature.
- In a large bowl, beat the softened cream cheese and butter together with an electric mixer until light and fluffy.
- Gradually add the powdered sugar, one cup at a time, beating on low speed until combined.
- Stir in the vanilla extract and then add the milk, one tablespoon at a time, until the frosting reaches your desired consistency.
- Generously spread the cream cheese frosting over the warm cinnamon rolls.
- Serve the red velvet cinnamon rolls warm and enjoy! They are best enjoyed fresh, but can be stored in an airtight container in the refrigerator for up to 3 days. Reheat gently in the microwave or oven before serving.
Notes
- Yeast Activation: Always check the expiration date on your yeast. To test your yeast, combine it with the warm milk and a teaspoon of sugar. If it foams up within 5-10 minutes, it’s good to go.
- Dough Temperature: The temperature of your dough is important for rising. If your kitchen is cold, you can create a warm environment by placing the dough in a slightly warmed oven (turned off!) or near a warm appliance.
- Don’t Overbake: Overbaking will result in dry, tough cinnamon rolls. Keep a close eye on them during the last few minutes of baking and remove them from the oven as soon as they are golden brown and cooked through.
- Frosting Consistency: Adjust the amount of milk in the frosting to achieve your desired consistency. For a thicker frosting, use less milk; for a thinner frosting, use more.
- Make Ahead: You can prepare the cinnamon rolls up to the second rise the night before. Cover them tightly with plastic wrap and refrigerate. In the morning, let them come to room temperature for about 30 minutes before baking.

Leave a Comment