

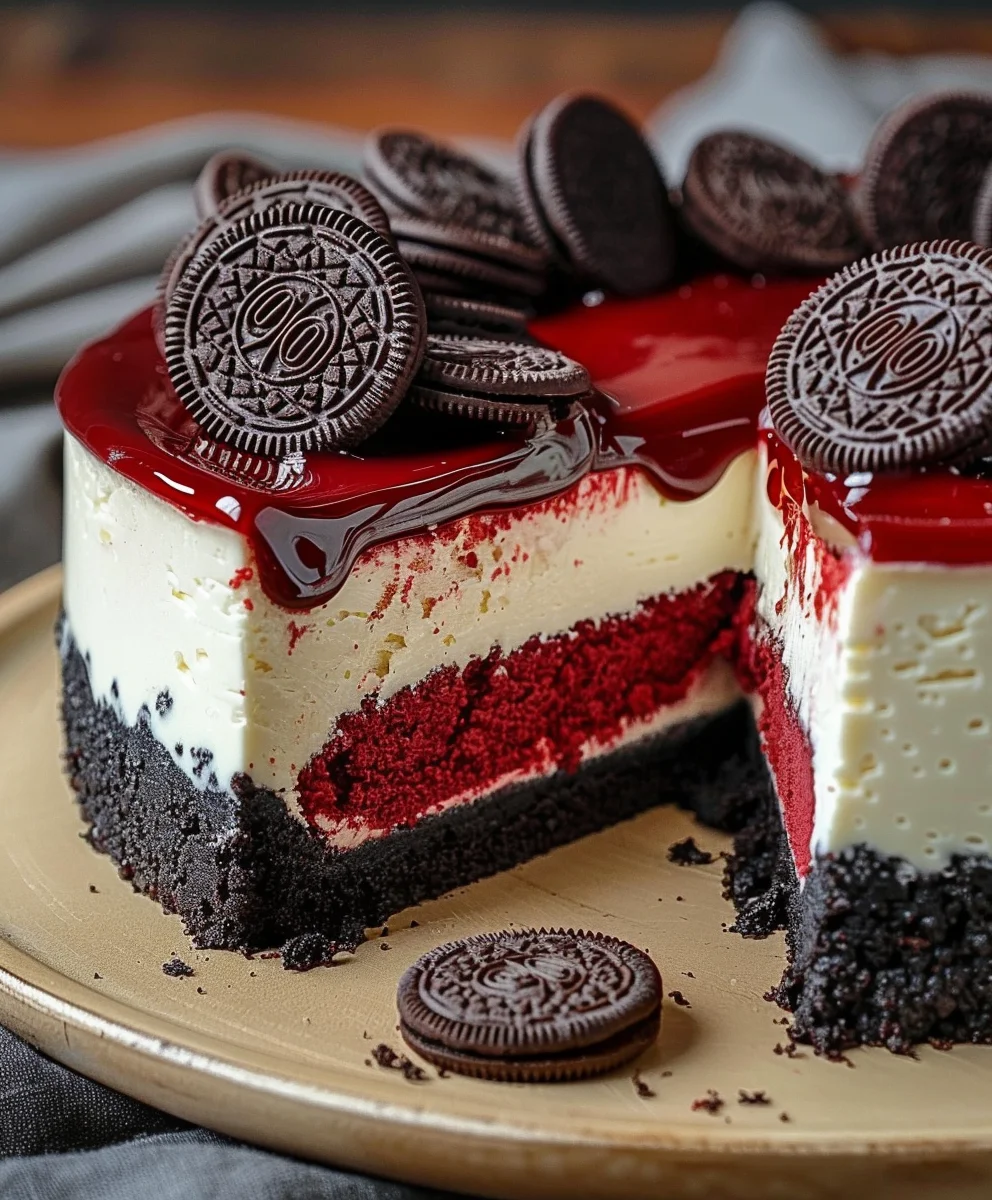
Red Velvet Oreo Cheesecake – just hearing those words together conjures up images of pure dessert bliss, doesn’t it? I’m absolutely thrilled to share with you today a recipe that takes three beloved classics and melds them into an unforgettable culinary masterpiece. Prepare to amaze your taste buds and impress your guests with a dessert that is as stunning to look at as it is delightful to eat.
Originating from the elegant kitchens of the American South, Red Velvet cake has long been cherished for its distinctive crimson hue and subtly tangy, cocoa-kissed velvet texture. Pair that with the universally adored, crumbly crunch of an Oreo cookie crust – a true American icon – and layer it all beneath a luscious, creamy cheesecake, a dessert with roots stretching back to ancient Greece but perfected in the bustling bakeries of New York. This isn’t just a dessert; it’s a celebration of iconic flavors coming together in perfect harmony.
People absolutely adore this Red Velvet Oreo Cheesecake for so many reasons. It offers an incredible symphony of textures: the tender, moist red velvet cake, the smooth, rich cheesecake, and the delightful crunch of the Oreo crust. Each bite delivers a complex yet perfectly balanced flavor profile – the slight tang of cream cheese, the subtle chocolate notes, and the sweet familiarity of Oreos. It’s the ultimate showstopper for any gathering, a truly decadent treat that caters to every sweet tooth. I promise you, once you taste this creation, you’ll understand why it’s become such a sensation.

Ingredients:
-
For the Oreo Crust:
- 24 full-sized Oreo cookies: I always use the classic ones, but feel free to experiment with Double Stuffed for an even richer crust. Make sure to choose a brand you love, as their flavor will really shine through.
- 6 tablespoons (85g) unsalted butter: Melted. Unsalted butter gives us control over the saltiness, allowing the sweet flavors to truly pop.
- 1 pinch of salt: Just a tiny pinch, about 1/8 teaspoon, helps to balance the sweetness of the Oreos and butter, enhancing the overall flavor profile of the crust.
-
For the Red Velvet Cheesecake Batter:
- 32 ounces (900g) full-fat cream cheese: Very important to use full-fat and ensure it’s softened to room temperature. This is crucial for a smooth, lump-free cheesecake batter. Believe me, cold cream cheese is a recipe for a chunky disaster!
- 1 ¾ cups (350g) granulated sugar: Provides the perfect sweetness and contributes to the cheesecake’s tender texture.
- 2 tablespoons (14g) unsweetened cocoa powder: I prefer natural unsweetened cocoa powder for a classic red velvet flavor that isn’t too dark. It gives that subtle chocolatey depth.
- 2 tablespoons (16g) all-purpose flour: A little bit of flour helps to prevent cracks in your cheesecake, providing a bit of structure and stability. It’s my secret weapon for a beautiful, smooth top.
- 5 large eggs: Also at room temperature. Room temperature eggs emulsify better with the other ingredients, leading to a much smoother, more uniform batter.
- 1 large egg yolk: This extra yolk adds richness and helps to create an even creamier texture in the cheesecake. It’s a small addition that makes a big difference.
- ½ cup (120g) full-fat sour cream: Room temperature, please! Sour cream adds moisture, tang, and contributes to the signature creamy texture of a perfect cheesecake. Don’t skip it!
- 1 tablespoon pure vanilla extract: The real deal, not imitation. Vanilla is essential for enhancing all the other flavors in the red velvet and cheesecake.
- 1-2 ounces (30-60ml) red food coloring: Liquid or gel. I usually start with 1 ounce of gel food coloring for a deep, vibrant red. Adjust to achieve your desired shade of red velvet. Gel colors tend to be more potent and less likely to thin your batter.
- ½ teaspoon white vinegar: This small amount helps activate the cocoa powder, enhancing its red hue and contributing to the classic red velvet tang.
-
For the Cream Cheese Frosting Topping:
- 8 ounces (225g) full-fat cream cheese: Softened to room temperature. Again, room temperature is key for a smooth frosting.
- ½ cup (113g) unsalted butter: Softened to room temperature. Just like the cream cheese, soft butter is crucial for a perfectly creamy, lump-free frosting.
- 4 cups (480g) powdered sugar: Sifted. Sifting helps prevent lumps and ensures a smooth, ethereal frosting.
- 1 teaspoon pure vanilla extract: For that classic cream cheese frosting flavor.
- 1-2 tablespoons milk or heavy cream: Use as needed to achieve your desired consistency for the frosting. I usually start with one tablespoon and add more if it’s too thick.
-
For the Garnish:
- 6-8 full-sized Oreo cookies: Crushed, for decorating the top. These will add extra crunch and visual appeal.
- Reserved red velvet cake crumbs (optional): If you happen to be baking a red velvet cake alongside this (or have some scraps), a few crumbs can add a beautiful touch.
Preparing the Oreo Crust
- Preheat Your Oven: First things first, let’s get that oven ready. Preheat your oven to 350°F (175°C). While it’s heating, grab a 9-inch springform pan. I always wrap the bottom and sides of my springform pan tightly with heavy-duty aluminum foil. This isn’t just for show; it’s essential if you’re planning on using a water bath (which I highly recommend for a crack-free cheesecake!), preventing any leaks. Make sure you use at least two layers of foil to be safe.
-
Crush the Oreos: Now for the fun part! Take your 24 full-sized Oreo cookies and get them into fine crumbs. You have a couple of options here:
- Food Processor Method: This is my preferred method for speed and consistency. Toss the Oreos, filling and all, into a food processor. Pulse until you have very fine, uniform crumbs. This usually takes about 30-60 seconds.
- Ziploc Bag Method: If you don’t have a food processor, no worries! Place the Oreos in a large, heavy-duty Ziploc bag. Seal it, pressing out as much air as possible. Then, use a rolling pin or the bottom of a heavy skillet to crush the cookies until they are fine crumbs. This takes a little more muscle, but it’s very therapeutic!
Once crushed, transfer the Oreo crumbs to a medium-sized mixing bowl.
- Melt the Butter and Combine: In a microwave-safe bowl, melt your 6 tablespoons of unsalted butter. Be careful not to overheat it, just until it’s fully liquid. Pour the melted butter over the Oreo crumbs in the bowl. Add your small pinch of salt. Using a spoon or your hands (which I find works best for even distribution), mix everything together until the crumbs are thoroughly moistened and resemble wet sand. Every single crumb should be coated in butter.
- Press into the Pan: Now, evenly press the buttered Oreo mixture into the bottom of your prepared 9-inch springform pan. I like to use the bottom of a flat-bottomed glass or a measuring cup to firmly press the crumbs down, creating a compact and even crust. Make sure it’s packed tightly, especially around the edges, so it doesn’t crumble when you cut into your cheesecake.
- Bake the Crust (Optional but Recommended): For an extra sturdy and flavorful crust, I always recommend a quick bake. Place the pan with the crust in your preheated oven for 8-10 minutes. This helps to set the crust, making it less likely to crumble. Once baked, remove it from the oven and set it aside to cool slightly while you prepare the cheesecake batter. You can also just chill it for 30 minutes if you prefer a no-bake crust, but baking truly makes a difference in texture.
Making the Red Velvet Cheesecake Batter
- Prepare the Cream Cheese: In the bowl of a stand mixer fitted with the paddle attachment (or a large bowl with a hand mixer), place your 32 ounces of softened full-fat cream cheese. It’s absolutely essential that your cream cheese is at room temperature. If it’s cold, you’ll end up with lumps, and no one wants a lumpy cheesecake! Beat the cream cheese on medium speed for about 2-3 minutes, scraping down the sides of the bowl frequently, until it is completely smooth and creamy with no lumps whatsoever.
- Add Sugar, Cocoa, and Flour: Reduce the mixer speed to low. Gradually add the 1 ¾ cups of granulated sugar, then the 2 tablespoons of unsweetened cocoa powder, and finally the 2 tablespoons of all-purpose flour. Mix on low speed until just combined, about 1-2 minutes, again scraping down the sides of the bowl to ensure everything is incorporated. Do not overmix at this stage; we don’t want to incorporate too much air.
- Incorporate Eggs and Yolk: With the mixer still on low speed, add the 5 large eggs one at a time, allowing each egg to be fully incorporated before adding the next. Then, add the single egg yolk. This step is crucial for maintaining a smooth batter. Make sure to scrape down the bowl after each egg addition. This is another critical point where overmixing can introduce too much air, which can cause cracks in your finished cheesecake. Mix only until the eggs are just combined into the batter.
- Mix in Wet Ingredients for Flavor and Color: In a separate small bowl, whisk together your ½ cup of room temperature sour cream, 1 tablespoon of pure vanilla extract, the 1-2 ounces of red food coloring (start with 1 ounce and add more if you want a deeper red), and ½ teaspoon of white vinegar. Once thoroughly combined, pour this mixture into the cream cheese batter. Mix on low speed until just combined and uniformly colored. Scrape down the bowl one last time to ensure everything is perfectly blended. The batter should be a beautiful, vibrant red velvet color and perfectly smooth.
Baking the Red Velvet Oreo Cheesecake
- Prepare the Water Bath (Bain-Marie): This is arguably the most important step for a creamy, crack-free cheesecake, especially one as magnificent as a Red Velvet Oreo Cheesecake. Place your foil-wrapped springform pan inside a larger roasting pan. Carefully pour the prepared red velvet cheesecake batter over the cooled (or chilled) Oreo crust in the springform pan. Now, pour hot water into the larger roasting pan, being very careful not to get any water into the cheesecake batter itself. The water should come about halfway up the sides of the springform pan. Why a water bath? It provides a moist environment, which prevents the cheesecake from drying out and cracking. It also helps the cheesecake to cook evenly and slowly, resulting in that signature silky texture.
- Bake the Cheesecake: Carefully transfer the roasting pan with the water bath and cheesecake to your preheated 350°F (175°C) oven. Bake for 60-75 minutes. The cheesecake is done when the edges are set and lightly golden, but the center still has a slight wobble when gently shaken. It should look firm but not completely solid. Each oven is different, so start checking around the 60-minute mark.
-
Cooling Process (Critical for Preventing Cracks):
- Part 1 – In the Oven: Once the cheesecake is baked, turn off the oven, but leave the cheesecake inside with the oven door slightly ajar (I usually prop it open with a wooden spoon) for 1 hour. This slow cooling prevents drastic temperature changes that can lead to cracking.
- Part 2 – On the Counter: After 1 hour in the cooling oven, carefully remove the roasting pan from the oven. Very carefully remove the springform pan from the water bath (the water will still be hot!). Place the cheesecake, still in its foil-wrapped springform pan, on a wire rack to cool completely to room temperature. This can take another 2-3 hours.
Patience is your best friend during the cooling process for a perfect Red Velvet Oreo Cheesecake.
- Chill Thoroughly: Once completely cooled to room temperature, cover the springform pan loosely with plastic wrap. Transfer the cheesecake to the refrigerator and chill for at least 6-8 hours, but ideally overnight. This chilling time is non-negotiable! It allows the cheesecake to fully set and develop its rich flavor and incredibly creamy texture. Trying to cut it too soon will result in a messy, unset cheesecake.
Crafting the Cream Cheese Frosting Topping
- Cream Butter and Cream Cheese: In the bowl of a stand mixer fitted with the paddle attachment (or a large bowl with a hand mixer), combine the 8 ounces of softened cream cheese and the ½ cup of softened unsalted butter. Beat on medium speed for 2-3 minutes, scraping down the sides of the bowl frequently, until the mixture is incredibly light, fluffy, and completely smooth. There should be absolutely no lumps of cream cheese or butter remaining. This creates the perfect base for our rich topping.
- Add Powdered Sugar and Vanilla: Reduce the mixer speed to low. Gradually add the 4 cups of sifted powdered sugar, about ½ cup at a time, allowing each addition to be incorporated before adding more. Once all the sugar is in, add the 1 teaspoon of pure vanilla extract.
- Achieve Perfect Consistency: Increase the mixer speed to medium-high and beat for another 2-3 minutes until the frosting is light, airy, and fluffy. If the frosting seems too thick, add milk or heavy cream, 1 tablespoon at a time, mixing until you reach your desired spreadable consistency. I like my frosting thick enough to hold its shape but soft enough to spread easily. Taste it and adjust sweetness if desired, though I find this ratio to be just right!
Assembling and Garnish
- Remove from Springform Pan: Once your Red Velvet Oreo Cheesecake is thoroughly chilled, carefully remove the plastic wrap. Unlock and remove the sides of the springform pan. If you baked the crust, you can carefully slide the cheesecake off the bottom of the springform pan onto a serving platter or cake stand using a large, thin spatula, or simply leave it on the base for serving.
- Frost the Cheesecake: Using an offset spatula or a knife, spread the prepared cream cheese frosting evenly over the top of the chilled cheesecake. You can go for a rustic swirl or a perfectly smooth finish, depending on your preference. I love a rustic swirl as it adds a homemade touch.
- Garnish and Serve: Finally, for that irresistible finish, sprinkle the crushed 6-8 Oreo cookies over the top of the frosting. If you have any red velvet cake crumbs, you can scatter those around as well for an extra pop of color and texture.
- Enjoy Your Masterpiece: Slice with a sharp knife (running it under hot water and wiping it clean between slices will give you super neat cuts!) and serve immediately. Store any leftover Red Velvet Oreo Cheesecake in an airtight container in the refrigerator for up to 5 days. I promise you, this cheesecake will be the star of any dessert table! Enjoy every glorious bite of your homemade creation!
Conclusion:
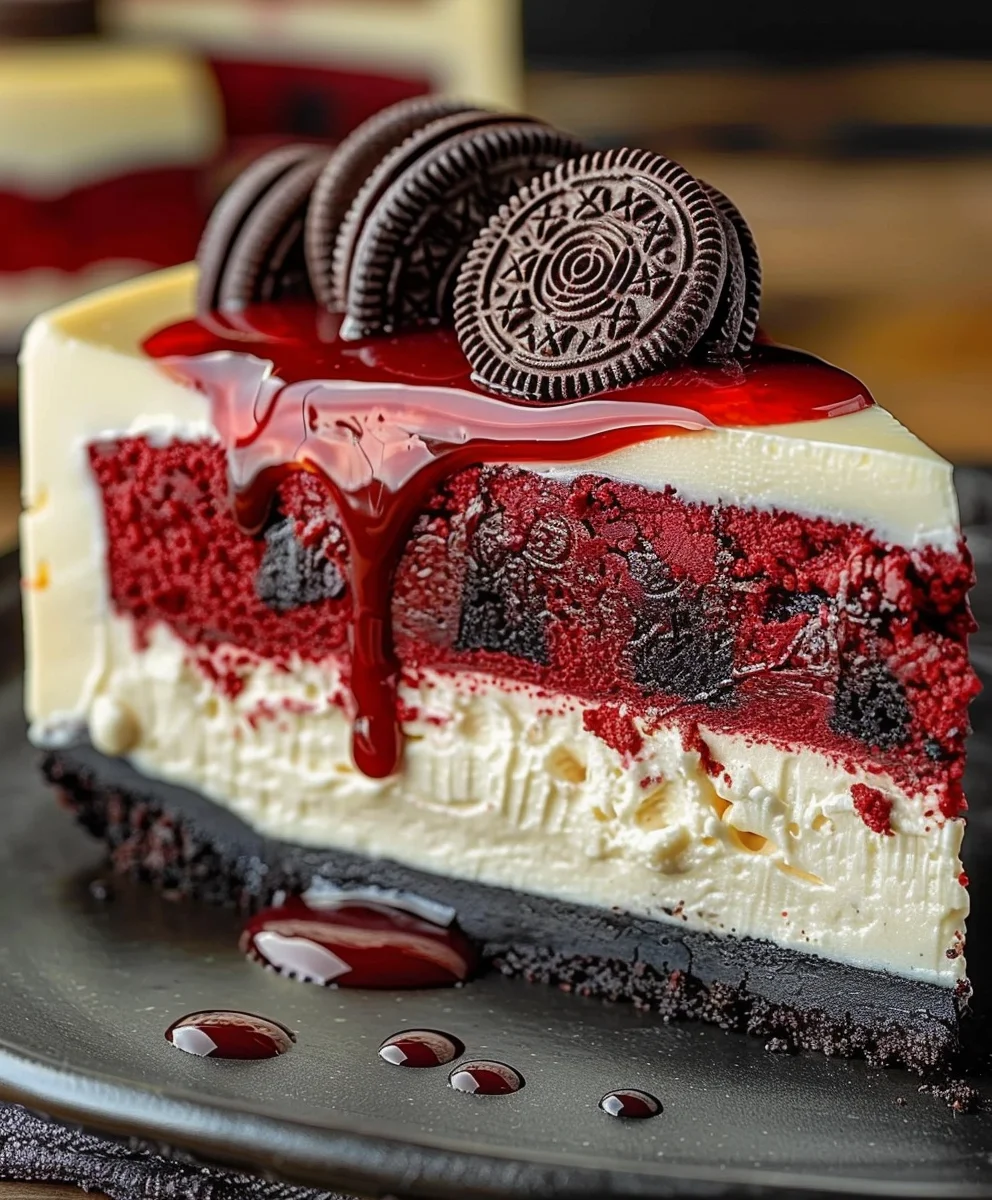
Well, my friends, we’ve reached the sweet finale of our culinary journey, and I genuinely hope you’re feeling as excited as I am about what we’ve created. If there’s one recipe I could implore you to try this year, it truly is this magnificent creation. We’re not just talking about any dessert here; we’re talking about an experience, a symphony of flavors and textures that come together in a way you simply have to taste to believe. This isn’t just a cheesecake; it’s a celebration on a plate, a dessert that perfectly marries the rich, tender crumb of classic red velvet cake with the creamy, tangy indulgence of cheesecake, all elevated by the irresistible crunch and chocolatey goodness of Oreo cookies. The sheer elegance of its deep red hue, contrasted with the stark white of the filling and the dark specks of cookie, makes it a visual masterpiece before you even take the first bite. Every forkful delivers that signature tang from the cream cheese, followed by the subtle cocoa notes of the red velvet, and then, the delightful surprise of crushed Oreos weaving through both the crust and the filling. It’s a dessert that speaks volumes, promising comfort, luxury, and an undeniable moment of pure bliss. It stands out in a crowd, not just for its stunning appearance, but for its unparalleled taste profile that manages to be both familiar and utterly unique.
Now that you’re convinced this is a must-make, let’s talk about how to make it even more special. This Red Velvet Oreo Cheesecake is incredibly versatile, perfect for practically any occasion. Imagine serving a generous slice after a cozy family dinner, or presenting it as the showstopper at your next holiday gathering or birthday celebration. It pairs beautifully with a steaming mug of strong coffee, a delicate cup of tea, or even a glass of chilled milk for that ultimate comfort food experience. For an extra touch of elegance, consider garnishing each slice with a dollop of fresh whipped cream and a sprinkle of chocolate shavings, or perhaps a few fresh raspberries to add a burst of fruity brightness that cuts through the richness beautifully. If you’re feeling adventurous, don’t hesitate to play with variations. You could try incorporating white chocolate chips into the filling for an even creamier, sweeter note, or perhaps swirl in a raspberry coulis just before baking for a vibrant fruity twist. For individual servings, bake them in smaller ramekins or a muffin tin lined with cupcake wrappers to create charming mini cheesecakes – perfect for parties or portion control! The possibilities are truly endless once you master this fantastic base recipe.
So, my dear fellow bakers and dessert enthusiasts, I implore you, don’t let this recipe be just another bookmark in your browser. Take the leap! Gather your ingredients, clear your schedule for a little baking magic, and treat yourself, your family, and your friends to the pure delight of this amazing Red Velvet Oreo Cheesecake. Trust me when I say that the smiles it will bring to everyone’s faces are absolutely priceless. There’s something profoundly satisfying about creating something so spectacular from scratch, and even more so when that creation is met with oohs and aahs of genuine appreciation. Don’t be intimidated; the steps are laid out to guide you every whisk and stir of the way, ensuring a successful and utterly delicious outcome. Once you’ve baked it, tasted it, and shared its wonders, I would absolutely love to hear about your experience. Did you add a unique garnish? Did you serve it for a special occasion? Did it disappear faster than you could say “cheesecake”? Please, share your stories, your photos, and your triumphs! Tag me on your favorite social media platform, or simply tell a friend about your incredible baking achievement. Your feedback and your joy in baking are what truly inspire me. This isn’t just a recipe; it’s an invitation to create, to share, and to savor. Go forth and bake!
Red Velvet Oreo Cheesecake
An indulgent and easy recipe combining the classic flavors of red velvet cake, creamy cheesecake, and a crunchy Oreo crust. Perfect for any celebration, this dessert features a tender red velvet cheesecake layer on an Oreo base, topped with a luscious cream cheese frosting.
Ingredients
-
2 ½ cups Oreo cookie crumbs
-
5 tbsp unsalted butter, melted
-
16 oz (2 blocks) cream cheese, softened (for cheesecake batter)
-
¾ cup granulated sugar (for cheesecake batter)
-
¼ cup sour cream (for cheesecake batter)
-
2 large eggs
-
1 ½ tbsp cocoa powder
-
1 ½ tsp vanilla extract (for cheesecake batter)
-
1 tbsp red food coloring
-
16 oz (2 blocks) cream cheese, softened (for frosting topping)
-
¾ cup granulated sugar (for frosting topping)
-
¼ cup sour cream (for frosting topping)
-
1 ½ tsp vanilla extract (for frosting topping)
-
½ cup heavy cream
-
6-8 full-sized Oreo cookies, crushed (for garnish)
Instructions
-
Step 1
Preheat oven to 350°F (175°C). Wrap the bottom and sides of a 9-inch springform pan tightly with heavy-duty aluminum foil. Combine 2 ½ cups Oreo cookie crumbs with 5 tbsp melted unsalted butter. Press mixture firmly into the bottom of the prepared pan. -
Step 2
Bake the crust for 8-10 minutes. Remove from oven and let cool while preparing the cheesecake batter. -
Step 3
In a stand mixer, beat 16 oz softened cream cheese until smooth. Gradually add ¾ cup granulated sugar and 1 ½ tbsp cocoa powder; mix on low speed until just combined. Add 2 large eggs one at a time, mixing only until each is incorporated. Do not overmix. -
Step 4
In a separate small bowl, whisk together ¼ cup sour cream, 1 ½ tsp vanilla extract, and 1 tbsp red food coloring. Pour this mixture into the cream cheese batter and mix on low speed until just combined and uniformly colored. -
Step 5
Pour the cheesecake batter over the cooled Oreo crust in the foil-wrapped springform pan. Place the springform pan inside a larger roasting pan. Carefully pour hot water into the roasting pan, ensuring it comes halfway up the sides of the springform pan. Bake at 350°F (175°C) for 60-75 minutes, or until the edges are set and the center has a slight wobble. -
Step 6
Once baked, turn off the oven, leave the cheesecake inside with the oven door slightly ajar for 1 hour. Carefully remove the springform pan from the water bath and place it on a wire rack to cool completely to room temperature (2-3 hours). Cover loosely with plastic wrap. -
Step 7
Transfer the cheesecake to the refrigerator and chill for at least 6-8 hours, or ideally overnight, to fully set. -
Step 8
In a stand mixer, beat 16 oz softened cream cheese with ¾ cup granulated sugar until light and fluffy. Mix in ¼ cup sour cream and 1 ½ tsp vanilla extract. Gradually add ½ cup heavy cream, beating until the frosting is light, airy, and reaches your desired spreadable consistency. -
Step 9
Once the cheesecake is thoroughly chilled, remove the sides of the springform pan. Spread the prepared cream cheese frosting evenly over the top of the cheesecake. Garnish with crushed 6-8 Oreo cookies. Slice with a sharp knife and serve immediately. -
Step 10
Store any leftover Red Velvet Oreo Cheesecake in an airtight container in the refrigerator for up to 5 days.
Important Information
Nutrition Facts (Per Serving)
It is important to consider this information as approximate and not to use it as definitive health advice.
Allergy Information
Please check ingredients for potential allergens and consult a health professional if in doubt.
Leave a Comment