

Simple Apple Crum extractble Apple Crisp is more than just a dessert; it’s a warm embrace in a bowl, a classic comfort food that instantly conjures images of cozy autumn evenings and bustling family gatherings. I find there’s nothing quite like the inviting aroma of cinnamon and baked apples wafting from the oven to instantly uplift spirits and signal that something truly special is on its way. This delightful dessert, often seen as a charming cousin to the traditional apple pie, gained popularity as a more straightforward, yet equally satisfying, alternative. Its humble origins, especially during times when pastry-making seemed too intricate or ingredients were scarce, contribute to its universal appeal, making it a beloved staple across generations.
People absolutely adore this dish for countless reasons. The tender, spiced apple filling, bursting with natural sweetness and a hint of tartness, perfectly complements the irresistible, golden-brown crumb topping. That satisfying crunch and buttery richness provide a textural contrast that is simply divine. Furthermore, its incredible simplicity makes preparing a Simple Apple Crum extractble Apple Crisp an absolute joy, requiring minimal effort for maximum deliciousness. It’s a versatile treat, wonderful on its own, with a scoop of vanilla ice cream, or a dollop of fresh whipped cream. Get ready to create some truly delicious memories!

Ingredients:
- 6-8 medium-sized apples (about 2.5-3 pounds), I love using a mix of Granny Smith for tartness and Honeycrisp or Fuji for sweetness and texture.
- ½ cup (100g) granulated sugar, for the filling. Adjust to your apple’s sweetness!
- ¼ cup (50g) packed light brown sugar, also for the filling, adding a lovely depth of flavor.
- 1 teaspoon ground cinnamon, essential for that warm, cozy apple pie spice.
- ¼ teaspoon ground nutmeg, just a hint to complement the cinnamon.
- Pinch of ground cloves (optional, but highly recommended for an extra layer of warmth).
- 1 tablespoon fresh lemon juice, to brighten the apple flavor and prevent browning.
- 2 tablespoons all-purpose flour OR cornstarch, for thickening the apple juices.
- ¼ cup (55g) unsalted butter, melted, for tossing with the apples to enrich the flavor.
- 1 ½ cups (180g) old-fashioned rolled oats (not instant), these are key for the crisp texture.
- 1 cup (120g) all-purpose flour, for the topping.
- ¾ cup (150g) packed light brown sugar, for the topping, giving it a rich, caramelized sweetness.
- ½ cup (100g) granulated sugar, also for the topping, to balance the sweetness.
- 1 teaspoon ground cinnamon, for a consistent spice profile in the topping.
- ½ teaspoon salt, to balance all the sweet flavors in the topping. Don’t skip this!
- ¾ cup (170g) unsalted butter, very cold and cut into ½-inch cubes, crucial for a truly crumbly topping.
Preparing the Apple Filling:
- Choose and Prepare Your Apples: First things first, let’s get those apples ready. I always start by washing my apples thoroughly under cool running water. Then, with a sturdy vegetable peeler, carefully peel all of your apples. It’s a bit of a meditative process, I find. Once peeled, you’ll need to core them. An apple corer makes this super easy, but you can also carefully cut around the core with a knife. Finally, slice your apples into ½-inch thick pieces. I like to aim for uniform slices so they cook evenly, but don’t stress too much – a little rustic charm is part of a homemade Simple Apple Crisp! Place all the sliced apples into a large mixing bowl.
- Add the Flavor Enhancers: Now for the magic! To your bowl of sliced apples, add the granulated sugar, light brown sugar, ground cinnamon, ground nutmeg, and that optional but wonderful pinch of ground cloves. These spices are what give this Simple Apple Crisp its classic, comforting aroma and taste.
- Introduce Lemon Juice and Thickener: Next, pour in the fresh lemon juice. This isn’t just to prevent the apples from browning; it also adds a lovely brightness that cuts through the sweetness and really makes the apple flavor sing. Then, sprinkle in the all-purpose flour (or cornstarch, if you prefer). This is our secret weapon for a perfectly thickened filling – no watery apple crisp here!
- Toss and Coat Evenly: With a large spoon or your clean hands (my preferred method for ensuring everything is well coated), gently toss the apples with all the added ingredients. You want every single apple slice to be glistening with sugar, spice, and lemon juice. Keep tossing until the apples are evenly coated. This step is crucial for distributing all those wonderful flavors throughout the entire filling.
- Melted Butter for Richness: In a separate small bowl, melt the ¼ cup of unsalted butter. Once melted, pour it over the seasoned apple slices. Give them another gentle toss to ensure the butter coats them. This melted butter adds a rich, velvety mouthfeel to the filling and helps the apples caramelize beautifully as they bake, truly elevating the Simple Apple Crisp.
- Set Aside: Let the apples sit for about 10-15 minutes while you prepare the topping. This brief resting period allows the sugars to start drawing out some of the apple’s natural juices, creating a delicious syrupy base for our Simple Apple Crisp. It also gives the flavors a little extra time to meld together.
Crafting the Irresistible Crisp Topping:
- Combine Dry Ingredients: In a separate, medium-sized mixing bowl, combine the old-fashioned rolled oats, all-purpose flour, light brown sugar, granulated sugar, ground cinnamon, and salt. I always take a moment to whisk these dry ingredients together thoroughly. You want to make sure all the sugars, flour, and spices are evenly distributed before adding the butter. This ensures every bite of your Simple Apple Crisp topping is perfectly seasoned.
- Add the Cold Butter: This is where the magic of a truly crispy topping happens! Take your very cold, ½-inch cubed unsalted butter and add it to the dry ingredients. It’s essential that the butter is as cold as possible; this prevents it from melting too quickly and allows for those wonderful pockets of steam that create a flaky, crumbly texture.
-
Incorporate the Butter (The Key Technique): Now, you need to work the butter into the dry mixture. You have a few options here:
- Using a Pastry Blender: This is my go-to method. Cut the butter into the mixture until it resembles coarse crumbs, with some pea-sized pieces of butter remaining. Don’t overmix; those little butter pieces are what will melt in the oven and create a deliciously tender yet crisp topping for your Simple Apple Crisp.
- Using Your Fingertips: If you don’t have a pastry blender, your fingertips work wonderfully. Quickly rub the butter into the flour mixture. Work efficiently to avoid warming the butter too much with the heat from your hands. Again, aim for a coarse, crumbly texture with some visible butter chunks.
- Using a Food Processor: For a super-fast approach, you can pulse the ingredients in a food processor a few times until the mixture forms coarse crumbs. Be careful not to over-process, as you don’t want to create a paste.
The Goal: No matter your method, the end result should be a crumbly mixture that holds together slightly when you press it in your hand but easily crumbles apart. This is the secret to a perfectly textural Simple Apple Crisp topping.
- Ensure Proper Texture: Double-check the consistency. You should see a delightful mix of fine crumbs and slightly larger, pea-sized clumps of butter coated in the oat and flour mixture. This varied texture is what gives a good crisp its character. The oats will toast beautifully, and the butter will melt to create a rich, golden-brown crust.
- Chilling (Optional but Recommended): If you have time, I highly recommend popping the bowl of topping mixture into the refrigerator for 15-20 minutes. This re-chills the butter, making the topping even more likely to achieve that desired crispiness during baking and preventing it from spreading too much. It’s a small step that makes a noticeable difference in the final Simple Apple Crisp texture.
Assembling and Baking Your Simple Apple Crisp:
- Preheat Your Oven: Before anything else, preheat your oven to 375°F (190°C). It’s important to give your oven ample time to reach and maintain the correct temperature. I usually place an oven rack in the center position, as this ensures even baking for our Simple Apple Crisp.
- Prepare Your Baking Dish: Lightly butter a 9×13-inch baking dish (or an equivalent 3-quart oven-safe dish). This step helps prevent sticking and also contributes a little extra flavor to the crust that forms around the edges of the filling.
- Transfer the Apple Filling: Carefully pour the prepared apple filling into the buttered baking dish. Spread the apple mixture evenly across the bottom of the dish using a spoon or spatula. You want an even layer so that all the apples cook uniformly. Make sure to scrape out all those delicious juices from the mixing bowl; they will form the base of your rich, spiced apple syrup as the Simple Apple Crisp bakes.
- Distribute the Crisp Topping: Now for the grand finale of the assembly! Take your prepared crisp topping and generously sprinkle it over the apple filling. Try to distribute it as evenly as possible across the entire surface. Don’t press it down; simply let it rest lightly on top of the apples. The loose, crumbly nature of the topping is what will bake into that wonderful, golden-brown crust. Ensure full coverage so every bite of your Simple Apple Crisp has that perfect crunchy counterpoint.
-
Bake to Perfection: Place the baking dish on the center rack of your preheated oven. Bake for approximately 45-60 minutes. The baking time can vary depending on your oven and the type of apples you’ve used.
What to Look For:- The topping should be beautifully golden brown and look delightfully crispy.
- You should see the apple filling bubbling up around the edges of the dish. This is a clear sign that the apples are softening and the juices are thickening.
- To be absolutely sure the apples are tender, you can gently insert a thin knife or skewer into the apple filling (through a gap in the topping, if possible). It should slide in with very little resistance.
If you notice the topping browning too quickly before the apples are fully tender, you can loosely tent the dish with aluminum foil for the last 15-20 minutes of baking. This protects the topping while allowing the apples to finish cooking. This attention to detail ensures your Simple Apple Crisp is cooked perfectly.
- Allow to Cool and Set: Once baked, carefully remove the Simple Apple Crisp from the oven and place it on a wire rack. This is arguably the hardest part – you need to let it cool for at least 15-20 minutes before serving. During this resting period, the hot apple filling will continue to thicken and set, and the topping will become even crispier. Serving it piping hot directly from the oven can result in a slightly runny filling, so patience is key for the best Simple Apple Crisp experience.
Serving Suggestions and Storage Tips:
-
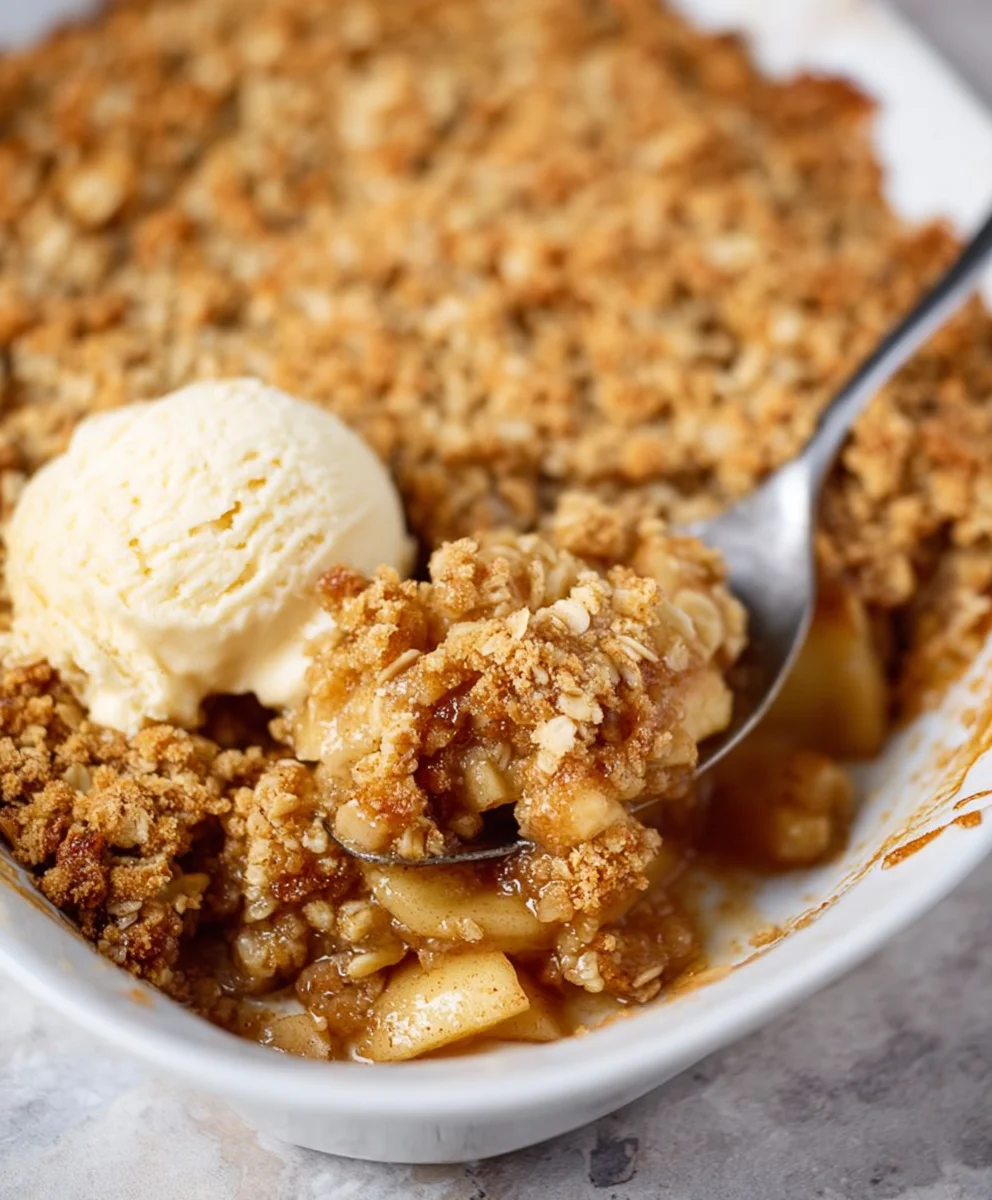
Serving Your Warm Simple Apple Crisp: Oh, the moment we’ve all been waiting for! Once your Simple Apple Crisp has had a chance to cool slightly and set, it’s ready to be devoured. I love to scoop generous portions directly from the dish and serve it warm.
- The Classic Companion: My absolute favorite way to enjoy this Simple Apple Crisp is with a big scoop of vanilla bean ice cream. The cold, creamy ice cream melting into the warm, spiced apples and crunchy topping is truly a match made in heaven.
- Whipped Cream Dream: For something a little lighter, a dollop of freshly whipped cream adds a wonderful richness and airiness. A sprinkle of cinnamon on top of the cream is a lovely touch.
- Just As It Is: Honestly, this Simple Apple Crisp is so flavorful and satisfying on its own, it needs no embellishment. A simple bowl with just the crisp is a perfect treat.
Presentation Tip: If you’re feeling fancy, garnish with a fresh mint sprig or a light dusting of powdered sugar.
- Storing Leftovers: Should you be so lucky as to have any leftovers of your delicious Simple Apple Crisp, cover the baking dish tightly with plastic wrap or aluminum foil. You can store it at room temperature for up to 1 day, especially if your kitchen isn’t too warm. For longer storage, I recommend refrigerating it for up to 3-4 days. The topping might lose a little bit of its crispness in the fridge, but the flavors will still be fantastic.
-
Reheating for Freshness: To bring your refrigerated Simple Apple Crisp back to life, you have a couple of options:
- Oven Method (Recommended): For the best results, reheat individual portions or the whole dish in a preheated oven at 300°F (150°C) for about 15-25 minutes, or until warmed through and the topping crisps up again. Covering it loosely with foil for the first part of reheating can help prevent over-browning.
- Microwave Method (Quick and Easy): For a quick reheat, you can microwave individual portions for 30-60 seconds, or until warm. Just be aware that the topping won’t get as crispy this way, but it’s perfect if you’re in a hurry.
No matter how you enjoy it, this Simple Apple Crisp is a guaranteed crowd-pleaser and a perfect dessert for any occasion, offering comfort and warmth in every single bite.
Conclusion:
Ah, we’ve reached the sweet end of our journey through this delightful recipe, and I hope by now you’re feeling inspired, perhaps even a little hungry, and definitely ready to preheat your oven! What we’ve explored together isn’t just another dessert; it’s an invitation to pure, unadulterated comfort and joy. I truly believe that every kitchen deserves the warm, welcoming aroma of baking apples, and this particular recipe delivers that experience with an elegance that belies its incredible simplicity. It’s more than just a dish; it’s a moment of culinary bliss waiting to happen, a promise of warmth and happiness wrapped up in a golden, crumbly package.
This isn’t merely a dessert you make; it’s an experience you create. From the moment the apples begin to soften and release their sweet, tangy juices beneath that golden, buttery, crumbly topping, your home will be filled with a fragrance that evokes cherished memories, cozy evenings, and the promise of something truly special. The magic lies in that perfect contrast: the tender, warm fruit base, fragrant with cinnamon and a hint of spice, meeting the satisfying crunch of the topping. It’s a symphony of textures and flavors that dance on your palate, making each bite an absolute delight. We’ve designed this specifically to be a truly approachable and rewarding bake, making it the perfect candidate for anyone looking to whip up something impressive without the fuss. It’s truly a must-try for both novice bakers and seasoned pros who appreciate deliciousness without unnecessary complexity, offering a dependable and utterly satisfying outcome every single time.
Now, let’s talk about how to elevate this already fantastic creation. While it’s absolutely divine served warm, straight from the oven, there are countless ways to make it your own or enhance the experience. My personal favorite, and a classic for a reason, is a generous scoop of good quality vanilla bean ice cream. The cold, melting creaminess against the warm, fruit-filled crisp is simply transcendent. The way the ice cream slowly pools into the crevices of the topping and mingles with the apple juices? Pure bliss! Alternatively, a dollop of freshly whipped cream, lightly sweetened, adds a cloud-like lightness that’s equally appealing. For something a little richer, consider a warm drizzle of homemade caramel sauce or a generous pour of creamy custard. A dusting of powdered sugar or a final sprinkle of cinnamon just before serving can also add a beautiful touch and an extra layer of aroma, making it even more appealing to the eyes and the palate.
But why stop there? This recipe is wonderfully versatile, practically begging for your creative touch! If you’re feeling adventurous, consider swapping out some of the apples for other seasonal fruits. Pears, peaches, or even a handful of mixed berries can introduce new dimensions of flavor and color. Imagine a luscious peach and apple crisp in the height of summer, or a festive pear and cranberry version perfect for the holidays! You could also play with the spices in the fruit filling; a touch of nutmeg, a whisper of cardamom, or even a hint of ground ginger could transform the flavor profile into something uniquely yours. For the topping, think about adding chopped nuts like pecans or walnuts for an extra layer of crunch and nutty flavor. A sprinkle of shredded coconut, either mixed into the topping or toasted and sprinkled over the finished crisp, also adds a lovely tropical note. For those with dietary considerations, simple swaps like using gluten-free oats and flour, or a plant-based butter alternative, can easily make this a vegan or gluten-free delight without sacrificing any of its wonderful characteristics. Don’t be afraid to experiment! This recipe is incredibly forgiving and open to your personal interpretations, ensuring success with every imaginative twist you add.
This truly is a dessert that brings people together, whether you’re sharing it with family around the dinner table, bringing it to a potluck with friends, or simply enjoying a quiet moment of indulgence by yourself. It’s a hug in a bowl, a comforting embrace that reminds us of the simple pleasures in life. It’s why I so passionately advocate for giving this particular recipe, the “Simple Apple Crum extractble Apple Crisp,” a prominent place in your baking repertoire. Its ease and incredible flavor make it a consistent crowd-pleaser and a reliable source of culinary satisfaction. I promise you, the joy of pulling that golden-brown dish from the oven, smelling the intoxicating aroma, and taking that first warm, sweet bite, is an experience you won’t soon forget. It’s more than just a recipe; it’s a gateway to creating cherished memories and enjoying truly delicious, homemade goodness.
So, what are you waiting for? I genuinely hope you feel empowered and excited to try your hand at this wonderful apple crisp. It’s a recipe that yields immense satisfaction with minimal effort, and I truly believe it will become a cherished favorite in your home, one you’ll return to again and again. Once you’ve made it (or even while it’s baking!), I would absolutely love to hear from you. Please, share your experience in the comments below! Did you stick to the original, or did you venture into exciting new variations? What was your favorite part of making it? Don’t hesitate to tell me about your serving choices or any clever twists you added. Your feedback and stories are invaluable, and they inspire me, and countless other readers, to keep baking and exploring new flavors. Let’s build a little community around this delicious dessert. Snap a picture and share it with us! I can’t wait to see your beautiful creations and hear all about your adventures with this truly magnificent, simple apple crisp.

Simple Apple Crumble Apple Crisp
A warm and comforting dessert featuring tender, spiced apples beneath an irresistible golden-brown oat crisp topping. Easy to make and perfect for any occasion.
Ingredients
-
6 apples, peeled, cored, and sliced
-
1 Tbsp white sugar
-
2 Tbsp brown sugar
-
¼ tsp cinnamon
-
¼ tsp grated nutmeg
-
1 Tbsp all-purpose flour (for filling)
-
Juice of half a lemon
-
1 cup porridge oats
-
1 cup all-purpose flour (for topping)
-
1 cup light brown sugar
-
¼ tsp salt
-
125g butter, cold and cubed
Instructions
-
Step 1
Peel, core, and slice 6 apples. In a large bowl, toss apples with 1 Tbsp white sugar, 2 Tbsp brown sugar, ¼ tsp cinnamon, ¼ tsp grated nutmeg, 1 Tbsp all-purpose flour, and juice of half a lemon until evenly coated. -
Step 2
In a separate bowl, combine 1 cup porridge oats, 1 cup all-purpose flour, 1 cup light brown sugar, and ¼ tsp salt. Cut in 125g cold, cubed butter until mixture resembles coarse crumbs. -
Step 3
Preheat oven to 375°F (190°C). Lightly butter a 9×13-inch baking dish. Pour apple filling into the dish, spreading evenly. Evenly sprinkle crisp topping over apples. -
Step 4
Bake for 45-60 minutes, until topping is golden brown, filling is bubbly, and apples are tender. Tent with foil if topping browns too quickly. Cool for 15-20 minutes before serving.
Important Information
Nutrition Facts (Per Serving)
It is important to consider this information as approximate and not to use it as definitive health advice.
Allergy Information
Please check ingredients for potential allergens and consult a health professional if in doubt.


Leave a Comment