

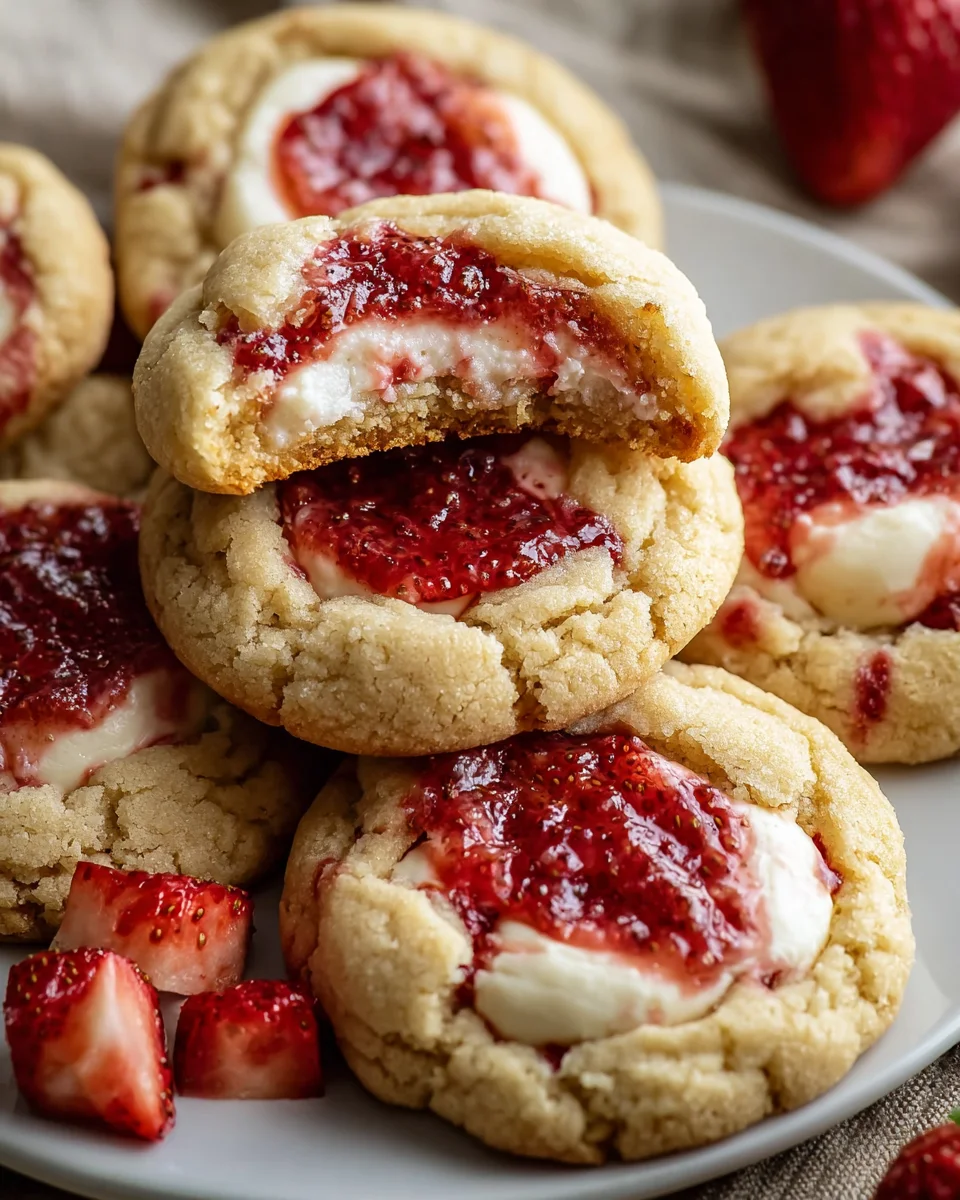
Strawberry Cheesecake Cookies are about to revolutionize your dessert game, bringing together two of the most adored treats into one irresistible bite. Imagine the luscious, creamy tang of a classic strawberry cheesecake, now nestled within a perfectly soft and chewy cookie. It’s a culinary mashup that truly takes the best of both worlds, offering an experience that’s both comforting and delightfully sophisticated.
While the concept of combining cheesecake and cookies might seem like a modern marvel, the history of cheesecake itself dates back to ancient Greece, evolving through centuries to become the beloved dessert we know today. The genius of these cookies lies in their ability to capture that rich heritage and vibrant flavor profile in a convenient, shareable format. People adore these creations not just for their stunning taste and texture – the delicate chewiness, the burst of sweet strawberry, and the creamy cheesecake notes – but also for the pure joy they evoke. They offer all the complexity of a decadent dessert without the fuss of baking an entire cheesecake. Each Strawberry Cheesecake Cookie is a miniature masterpiece, promising a perfect balance of sweet and tangy in every delightful mouthful. I’m incredibly excited for you to discover the magic within this recipe.

Ingredients:
Here’s what you’ll need to create these truly magical Strawberry Cheesecake Cookies. I always recommend having all your ingredients measured and ready before you begin – it makes the entire baking process so much smoother and more enjoyable!
For the Irresistible Strawberry Cheesecake Cookie Dough:
- 1 cup (2 sticks or 226g) unsalted butter, softened to true room temperature. This is crucial for achieving that light, fluffy texture when you cream it with the sugars. I usually leave mine out for at least an hour, or two if it’s a bit chilly in the kitchen.
- 4 ounces (113g) full-fat cream cheese, also softened to room temperature. Make sure it’s block cream cheese, not the spreadable kind from a tub, as the block has less water content and will give you a better consistency.
- ¾ cup (150g) granulated sugar. This provides sweetness and helps create a crisp edge.
- ¼ cup (50g) packed light brown sugar. The molasses in brown sugar adds a lovely depth of flavor and contributes to a chewy texture.
- 1 large egg, at room temperature. A room temperature egg emulsifies better with the other ingredients, leading to a smoother batter.
- 1 teaspoon pure vanilla extract. Always use good quality vanilla; it makes a surprising difference!
- 2 ½ cups (300g) all-purpose flour. When measuring flour, spoon it into your measuring cup and then level it off with a straight edge. Don’t scoop directly from the bag, as this can compact the flour and lead to a dry, dense cookie.
- 1 teaspoon baking powder. This leavening agent helps your cookies rise and become delightfully soft.
- ½ teaspoon salt. Salt balances the sweetness and enhances all the other flavors. Don’t skip it!
- ½ cup (about 15-20g) freeze-dried strawberries, crushed into a fine powder. You can easily do this in a food processor or by hand in a bag with a rolling pin. These deliver an incredible burst of natural strawberry flavor and a beautiful pink hue without adding extra moisture, which is key for cookie texture.
For the Creamy Cheesecake Filling:
- 8 ounces (226g) full-fat cream cheese, softened to room temperature. Again, block cream cheese is your best friend here.
- ½ cup (60g) powdered sugar (confectioners’ sugar), sifted. Sifting helps prevent lumps, ensuring a silky-smooth filling.
- ½ teaspoon pure vanilla extract. More vanilla for that classic cheesecake aroma and taste!
For the Optional Garnish:
- Additional powdered sugar, for dusting. A light dusting just before serving adds a professional touch and a hint of extra sweetness.
- Fresh strawberry slices or small whole strawberries, for decoration.
Phase 1: Preparing the Irresistible Cheesecake Filling
-
Step 1: Get Your Cream Cheese Ready
First things first, let’s prepare the luscious cheesecake filling. Ensure your 8 ounces of full-fat cream cheese for the filling are at a true room temperature. This means it should be soft enough that you can easily press an indentation into it with your finger. If it’s too cold, you’ll end up with lumps in your filling, and nobody wants that! Place the softened cream cheese in a medium-sized mixing bowl.
-
Step 2: Incorporate the Sweetness and Flavor
To the softened cream cheese, add the ½ cup of sifted powdered sugar and the ½ teaspoon of pure vanilla extract. Sifting the powdered sugar is a small extra step, but it really pays off by ensuring your filling is incredibly smooth and lump-free.
-
Step 3: Whip it to Perfection
Using an electric hand mixer or a stand mixer fitted with the paddle attachment, beat the cream cheese mixture on medium speed until it is completely smooth and creamy. This should take about 2-3 minutes. Make sure to scrape down the sides and bottom of the bowl periodically to ensure everything is thoroughly combined. You want a consistency that is light, airy, and uniform. This smooth texture is vital for a delightful surprise inside your cookies.
-
Step 4: Chill Out!
Once the filling is perfectly smooth, cover the bowl tightly with plastic wrap and place it in the refrigerator. We need this filling to be nice and firm, almost solid, before we try to stuff it into our cookie dough. I recommend chilling it for at least 1-2 hours, or even longer. For easier handling later, you can also scoop the chilled filling into small, roughly 1-teaspoon sized balls and place them on a parchment-lined plate or baking sheet. Then, pop those back into the freezer for about 15-20 minutes while you prepare the cookie dough. This extra chilling step for the individual balls will make the assembly much, much simpler, helping them hold their shape as you encase them in the dough. A well-chilled filling prevents it from oozing out during assembly and baking.
Phase 2: Crafting the Vibrant Strawberry Cookie Dough
-
Step 5: Prepare Your Strawberry Powder
If you haven’t already, take your ½ cup of freeze-dried strawberries and crush them into a fine powder. I find that a small food processor or spice grinder works wonders for this, creating a vibrant, flavorful dust. If you don’t have one, place the strawberries in a sturdy zip-top bag, remove the air, and crush them with a rolling pin until they are a fine powder. Set this aside; we’ll add it in shortly.
-
Step 6: Creaming for Cookie Perfection
In the bowl of a stand mixer fitted with the paddle attachment (or a large mixing bowl with an electric hand mixer), combine the 1 cup (2 sticks) of softened unsalted butter and the 4 ounces of softened cream cheese (both for the cookie dough). Beat on medium speed for about 1-2 minutes until smooth and well combined. Then, add the ¾ cup granulated sugar and ¼ cup packed light brown sugar. Continue beating on medium-high speed for another 3-4 minutes, scraping down the sides of the bowl as needed. You want this mixture to become light, fluffy, and noticeably pale in color. This creaming process incorporates air into the butter and sugars, which is the secret to a soft, tender cookie texture. Don’t rush this step; it’s fundamental to the cookie’s final texture.
-
Step 7: The Wet Ingredients Come Together
Reduce the mixer speed to low and add the 1 large room temperature egg and 1 teaspoon of pure vanilla extract to the creamed butter and sugar mixture. Beat until just combined, scraping down the sides of the bowl once more to ensure everything is fully incorporated. Be careful not to overmix once the egg is added.
-
Step 8: Whisking the Dry Essentials
In a separate medium bowl, whisk together the 2 ½ cups of all-purpose flour, 1 teaspoon of baking powder, and ½ teaspoon of salt. Make sure to whisk them thoroughly so the leavening agent and salt are evenly distributed throughout the flour. This ensures a consistent rise and flavor in every bite.
-
Step 9: Combining Wet and Dry (and Strawberry!)
With the mixer on low speed, gradually add the dry ingredient mixture to the wet ingredients, mixing only until just combined. As soon as you see no more streaks of flour, stop mixing! Overmixing at this stage can develop the gluten in the flour too much, leading to tough cookies. Now, add your vibrant freeze-dried strawberry powder to the dough. Mix on low speed for just another 15-30 seconds, or until the strawberry powder is evenly distributed and the dough takes on a beautiful light pink hue. Scrape down the sides of the bowl one last time to ensure everything is perfectly blended.
-
Step 10: The Essential Chill
Cover the bowl of strawberry cookie dough tightly with plastic wrap and refrigerate it for at least 1 hour, or up to 2 hours. Chilling the dough helps firm up the butter and cream cheese, preventing the cookies from spreading too much in the oven. It also allows the flavors to meld beautifully, intensifying that delightful strawberry taste. This chilling period is non-negotiable for perfectly shaped and textured cookies. While the dough chills, gather your chilled cheesecake filling balls from the freezer if you prepared them that way, or prepare to scoop directly from the chilled bowl.
Phase 3: Assembling and Baking Your Strawberry Cheesecake Cookies
-
Step 11: Preheat and Prepare
Once your dough and filling are thoroughly chilled, it’s time to get ready for baking! Preheat your oven to 375°F (190°C). Line two large baking sheets with parchment paper or silicone baking mats. This prevents sticking and makes cleanup a breeze.
-
Step 12: Portioning the Cookie Dough
Remove the chilled cookie dough from the refrigerator. Using a medium cookie scoop (about 1.5 to 2 tablespoons) or by hand, scoop out portions of the dough. For each cookie, you’ll need approximately 2 tablespoons of dough. Roll each portion into a smooth ball between your palms. Work quickly, as the warmth of your hands can start to soften the dough.
-
Step 13: Creating the Dough Pocket
Now for the fun part: stuffing the cookies! Take one dough ball and gently flatten it into a disc about 2 ½ to 3 inches in diameter and about ¼ inch thick. Don’t make it too thin, or it might tear when you try to seal it. Try to keep the edges slightly thicker than the center if possible.
-
Step 14: Adding the Creamy Heart
Retrieve your well-chilled cheesecake filling. If you pre-rolled the filling into small balls (about 1 teaspoon each) and froze them, now is when they shine. Place one frozen filling ball directly in the center of your flattened strawberry cookie dough disc. If you didn’t pre-roll, scoop about 1 teaspoon of the firm cheesecake filling and carefully place it in the center. The firmness of the filling is critical here for easy handling.
-
Step 15: Expertly Sealing the Cookie
This step requires a little patience and a gentle touch, but it’s totally worth it for that incredible surprise center. Carefully bring the edges of the cookie dough disc up and over the cheesecake filling, pinching and sealing the dough completely around the filling to form a seamless ball. Ensure there are no cracks or gaps where the filling could escape during baking. If the dough gets a little sticky or too soft, you can pop it back into the fridge for a few minutes. If any small cracks appear, gently pinch them together to seal. You want a perfectly smooth, sealed ball of dough encasing the cheesecake filling.
Tip for Seamless Sealing:
Once you’ve sealed the dough, gently roll the stuffed ball between your palms again for a few seconds. This helps to smooth out any seams and ensures a perfectly round cookie, ready for baking. Don’t overwork it, though!
-
Step 16: Arrange for Baking
Place the assembled cookie dough balls onto your prepared baking sheets, leaving about 2 inches of space between each cookie. They will spread slightly, and you want to ensure even airflow around them for consistent baking.
-
Step 17: Bake to Golden Perfection
Bake one sheet at a time in your preheated oven for 10-12 minutes. The exact baking time can vary depending on your oven, so keep an eye on them. You’re looking for the edges to be lightly golden and the centers to appear set but still slightly soft. The tops of the cookies might have very faint cracks, which is perfectly normal and shows off the delightful stuffing. Do not overbake these cookies, as they will continue to set as they cool, and overbaking can lead to a dry texture. They should still look a little “puffy” and soft when you pull them out.
-
Step 18: Cool and Transfer
Once baked, remove the baking sheets from the oven and let the cookies cool on the sheets for about 5 minutes. This brief cooling period on the hot sheet helps them firm up enough to be transferred without breaking. After 5 minutes, carefully transfer the warm cookies to a wire rack to cool completely.
Phase 4: The Finishing Touch and Storage
-
Step 19: The Optional, Yet Recommended, Garnish
Once the Strawberry Cheesecake Cookies have cooled completely, you can add a beautiful finishing touch. Lightly dust them with additional powdered sugar using a fine-mesh sieve. For an extra flourish and to highlight the strawberry flavor, you can place a tiny fresh strawberry slice or a small whole strawberry on top of each cookie. This not only makes them visually stunning but also adds a lovely fresh contrast.
-
Step 20: Patience, My Friend, Patience!
It’s crucial to allow these cookies to cool completely before storing them, or even before enjoying them for the best experience. While warm cookies are delicious, the cheesecake filling needs time to fully set and achieve its intended creamy, luscious texture. This can take an hour or two at room temperature.
-
Step 21: Storage for Freshness
Because these cookies contain a cream cheese filling, they need to be stored properly to maintain their freshness and safety. Once completely cooled, place your Strawberry Cheesecake Cookies in an airtight container. Store them in the refrigerator for up to 3-4 days. You can enjoy them chilled directly from the fridge, or let them come to room temperature for about 15-20 minutes before serving, if you prefer a softer cookie and a more yielding filling. Always keep these delicious treats refrigerated! They can also be frozen for longer storage (up to 2-3 months) in an airtight container or freezer bag. Thaw them in the refrigerator overnight before serving.
Conclusion:
Well, my friends, we’ve reached the sweet finale, and I truly hope you’re feeling as excited as I am about these incredible treats. If there’s one recipe I could urge you to add to your baking repertoire this season, it would undoubtedly be this one. These aren’t just any ordinary cookies; they are a delightful culinary innovation that perfectly marries the creamy, tangy indulgence of classic cheesecake with the comforting chewiness of a homemade cookie. Imagine biting into that perfect texture – soft and slightly chewy on the inside, with just the right amount of golden crispness at the edges, all while your taste buds dance with the vibrant sweetness of fresh strawberries balanced by that signature rich cream cheese flavor. It’s a symphony of textures and tastes, designed to bring sheer joy with every single mouthful. These Strawberry Cheesecake Cookies truly deliver a gourmet dessert experience without any of the fuss associated with baking an entire cheesecake.
The beauty of this recipe extends beyond its incredible taste. It’s also remarkably versatile in how you can enjoy and serve it. While they are absolutely divine straight out of the oven, perhaps after cooling for just a few minutes, allowing the flavors to meld beautifully, they also hold up wonderfully at room temperature. For a truly elevated experience, try warming a couple of cookies ever so slightly in the microwave for about 10-15 seconds, then serve them alongside a scoop of premium vanilla bean ice cream. The warm cookie and cold ice cream combination is simply heavenly! They also make an ideal accompaniment to your morning coffee, a comforting afternoon tea, or a tall, frosty glass of milk. Thinking of a charming gift? Stack a few in a pretty box or cellophane bag, tie it with a ribbon, and you have a thoughtful, homemade present that anyone would adore. They are fantastic for potlucks, picnics, or simply as a special treat to brighten your own day.
And speaking of versatility, don’t be afraid to make these cookies your own! While the strawberry and cream cheese combination is a match made in heaven, the base recipe is incredibly forgiving and open to creative variations. Instead of strawberries, why not try fresh raspberries or blueberries for a different berry twist? For an added layer of decadence, you could fold in a handful of white chocolate chips or even some chopped pistachios for a lovely crunch and nutty flavor. If you want to lean even further into the ‘cheesecake’ aspect, consider whipping up a simple lemon cream cheese glaze – just a little softened cream cheese, powdered sugar, a touch of milk, and a squeeze of lemon juice – and drizzle it over the cooled cookies. A simple dusting of powdered sugar also adds an elegant touch.
Don’t hesitate to experiment with different extracts or even a hint of lemon zest in the cookie dough itself to truly personalize your batch.
The possibilities are endless, and that’s what makes baking so much fun!
I genuinely believe that once you try these, they will become an instant favorite in your household. There’s something so satisfying about creating such a delightful treat from scratch, and the compliments you’ll receive are just an added bonus. So, please, gather your ingredients, set aside a little time, and dive into the delicious world of these cookies. I am so eager to hear about your baking adventures! Please, don’t keep your delicious creations a secret; share your experience, your photos, and any inventive variations you come up with. Did you serve them with a special drink? Did you add a unique topping? Let me know! Your feedback and shared joy are what make this community so wonderful. Happy baking, and I can’t wait to hear how much you love your freshly baked Strawberry Cheesecake Cookies!
Strawberry Cheesecake Cookies
Strawberry Cheesecake Cookies combine the luscious, creamy tang of classic strawberry cheesecake with a perfectly soft, chewy cookie. This irresistible culinary mashup offers a comforting and sophisticated dessert experience in one delightful bite.
Ingredients
Instructions
Important Information
Nutrition Facts (Per Serving)
It is important to consider this information as approximate and not to use it as definitive health advice.
Allergy Information
Please check ingredients for potential allergens and consult a health professional if in doubt.

Leave a Comment