

Strawberry cheesecake protein balls: the guilt-free indulgence you didn’t know you needed! Imagine sinking your teeth into a bite-sized treat that perfectly captures the creamy, tangy essence of a classic strawberry cheesecake, but without the sugar crash and added calories. Sounds too good to be true? It’s not! These little powerhouses are packed with protein, making them the ideal snack for pre- or post-workout fuel, an afternoon pick-me-up, or even a healthy dessert.
While the exact origins of protein balls are somewhat modern, the inspiration clearly comes from our collective love of convenient and nutritious snacks. Think of them as the evolved cousin of energy bars, offering a customizable and often more delicious alternative. The strawberry cheesecake flavor profile, of course, draws on the timeless appeal of cheesecake, a dessert with roots stretching back to ancient Greece. The Greeks were known to serve a honey-sweetened cheese cake to athletes during the Olympic games, providing them with a source of energy and sustenance.
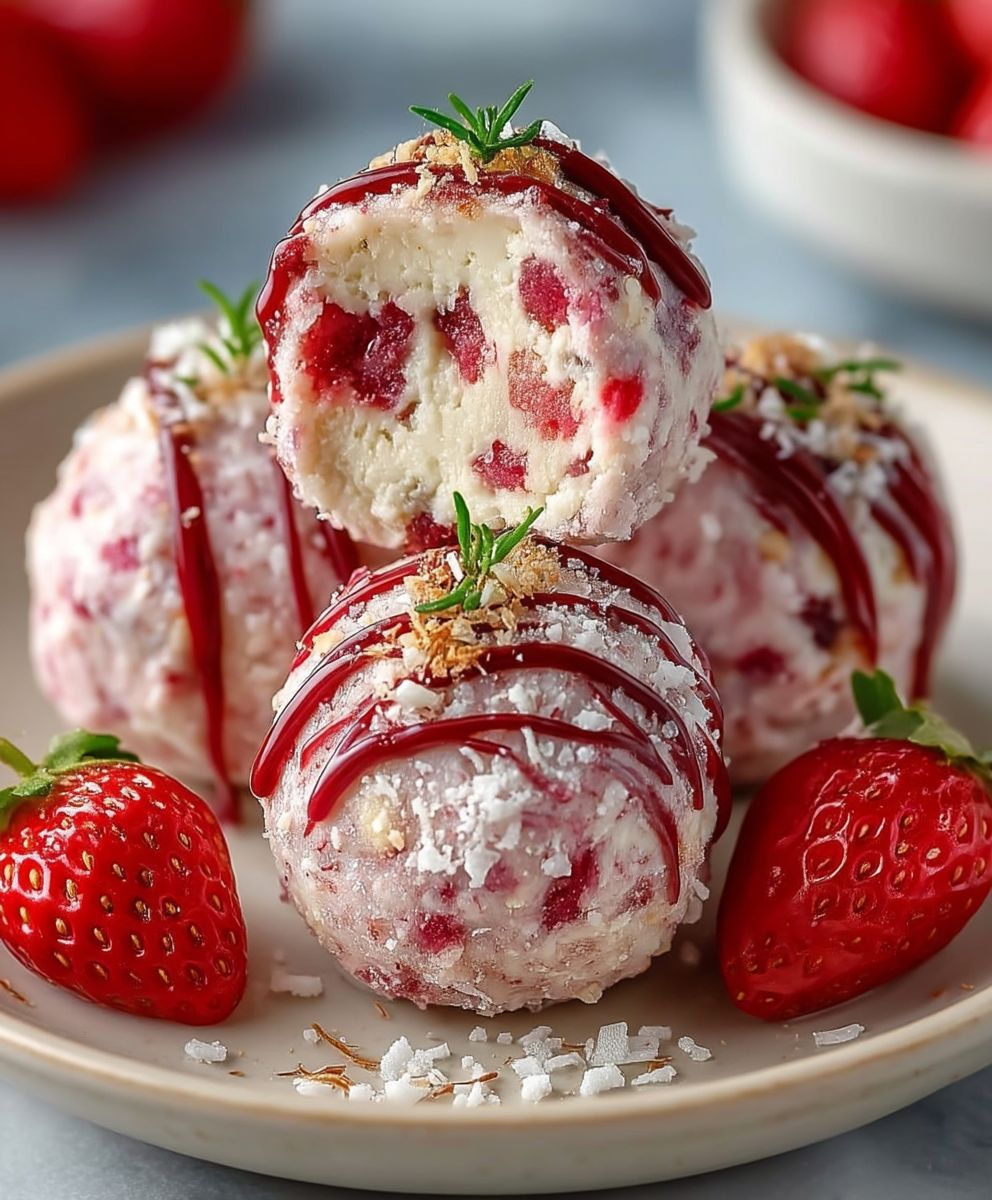
What makes these strawberry cheesecake protein balls so irresistible? It’s the delightful combination of flavors and textures. The creamy smoothness of the “cheesecake” filling, the burst of fresh strawberry flavor, and the satisfying chewiness all come together in perfect harmony. Plus, they’re incredibly easy to make, requiring no baking and minimal ingredients. Whether you’re a seasoned athlete, a busy professional, or simply someone looking for a healthier way to satisfy your sweet tooth, these protein balls are guaranteed to become a new favorite.

Ingredients:
- 1 cup rolled oats
- 1/2 cup vanilla protein powder (whey or plant-based)
- 1/4 cup freeze-dried strawberries, crushed
- 1/4 cup cream cheese, softened
- 2 tablespoons honey or maple syrup
- 1 tablespoon coconut oil, melted
- 1/4 cup unsweetened almond milk (or any milk)
- 1/4 teaspoon vanilla extract
- Pinch of salt
- Optional: 1/4 cup shredded coconut for rolling
Preparing the Base:
Alright, let’s get started! First, we’re going to create the foundation for our delicious strawberry cheesecake protein balls. This part is super easy and sets the stage for all the yummy flavors to come.
- Combine Dry Ingredients: In a large mixing bowl, add the rolled oats, vanilla protein powder, crushed freeze-dried strawberries, and a pinch of salt. Make sure to use a bowl that’s big enough to comfortably mix everything without making a mess. I like to use a whisk to combine these dry ingredients really well. This ensures that the protein powder and strawberry bits are evenly distributed throughout the oats.
- Softening the Cream Cheese: This is a crucial step! You absolutely need to make sure your cream cheese is softened. If it’s straight from the fridge, it will be clumpy and difficult to incorporate smoothly. I usually take mine out about an hour before I start, but if you’re in a hurry, you can microwave it for about 15-20 seconds. Just be careful not to melt it!
- Adding the Wet Ingredients: Now, add the softened cream cheese, honey (or maple syrup), melted coconut oil, vanilla extract, and almond milk to the bowl with the dry ingredients. The coconut oil should be melted but not hot, so let it cool slightly after melting it.
- Mixing it All Together: This is where the magic happens! Use a sturdy spoon or spatula to mix all the ingredients together until they are well combined. It might take a little elbow grease, but keep stirring until you have a fairly uniform mixture. Don’t worry if it seems a little sticky – that’s perfectly normal.
- Checking the Consistency: The mixture should be moist enough to hold its shape when you roll it into balls, but not so wet that it’s a sticky mess. If it seems too dry, add a tablespoon of almond milk at a time until you reach the desired consistency. If it’s too wet, add a tablespoon of rolled oats or protein powder.
Rolling and Coating:
Now comes the fun part – shaping our protein balls! This is where you get to be a little creative and make them look as good as they taste.
- Chilling the Dough: Before we start rolling, it’s a good idea to chill the dough for about 15-20 minutes in the refrigerator. This will help it firm up and make it easier to handle. Trust me, it makes a big difference!
- Preparing Your Work Station: While the dough is chilling, prepare your work station. If you’re using shredded coconut for rolling, pour it into a shallow dish. This will make it easy to coat the protein balls evenly. You’ll also need a plate or baking sheet lined with parchment paper to place the finished protein balls on.
- Rolling the Balls: Take the dough out of the refrigerator. Using a spoon or your hands, scoop out about a tablespoon of the mixture at a time. Roll it between your palms to form a smooth, round ball. I find that slightly dampening my hands helps prevent the dough from sticking.
- Coating (Optional): If you’re using shredded coconut, roll each protein ball in the coconut until it’s completely coated. Gently press the coconut into the ball to help it adhere. If you’re not using coconut, you can skip this step. You could also use other toppings like chopped nuts, cocoa powder, or even more crushed freeze-dried strawberries!
- Placing on Baking Sheet: Place the finished protein balls on the prepared baking sheet. Make sure to leave a little space between each ball so they don’t stick together.
Chilling and Storing:
Almost there! A final chill in the fridge helps these protein balls set up perfectly. Proper storage will also keep them fresh and delicious for days.
- Final Chill: Place the baking sheet with the protein balls in the refrigerator for at least 30 minutes. This will help them firm up even more and prevent them from becoming too soft at room temperature. You can even chill them for longer if you want – they’ll just get firmer!
- Storing: Once the protein balls are chilled, you can transfer them to an airtight container. They will keep in the refrigerator for up to a week. You can also freeze them for longer storage – they’ll stay good in the freezer for up to a month. Just let them thaw in the refrigerator before eating.
Tips and Variations:
Want to customize your strawberry cheesecake protein balls? Here are a few ideas to get you started!
- Different Protein Powder: Feel free to experiment with different flavors of protein powder. Chocolate, strawberry, or even cookies and cream would all be delicious!
- Nut Butter: Add a tablespoon or two of your favorite nut butter (peanut butter, almond butter, cashew butter) for extra flavor and healthy fats.
- Chocolate Chips: Stir in a handful of mini chocolate chips for a touch of sweetness.
- Lemon Zest: Add a teaspoon of lemon zest for a brighter, more citrusy flavor.
- Different Fruit: Substitute the freeze-dried strawberries with other freeze-dried fruits like raspberries, blueberries, or even mango.
- Sweetener Options: If you don’t have honey or maple syrup, you can use other sweeteners like agave nectar, stevia, or even a sugar-free syrup. Just adjust the amount to your liking.
- Vegan Option: To make these protein balls vegan, use a plant-based protein powder, maple syrup instead of honey, and a vegan cream cheese alternative.
Troubleshooting:
Sometimes things don’t go exactly as planned. Here are a few common issues and how to fix them:
- Protein Balls are Too Dry: Add a tablespoon of almond milk or water at a time until you reach the desired consistency.
- Protein Balls are Too Wet: Add a tablespoon of rolled oats or protein powder at a time until you reach the desired consistency.
- Protein Balls are Not Holding Their Shape: Chill the dough for a longer period of time. You can also add a tablespoon of coconut flour to help absorb excess moisture.
- Protein Balls are Too Sweet: Reduce the amount of honey or maple syrup. You can also add a squeeze of lemon juice to balance the sweetness.
Nutritional Information (Approximate):
Please note that the nutritional information is an estimate and may vary depending on the specific ingredients you use.
- Serving Size: 1 protein ball
- Calories: Approximately 80-100
- Protein: 6-8 grams
- Carbohydrates: 8-10 grams
- Fat: 3-5 grams
Enjoy your homemade strawberry cheesecake protein balls! They’re a delicious and healthy way to satisfy your sweet cravings and get a boost of protein.
Conclusion:
And there you have it! These Strawberry Cheesecake Protein Balls are truly a game-changer. They’re not just a snack; they’re a delicious, guilt-free way to satisfy your sweet cravings while packing in a protein punch. I know, I know, it sounds too good to be true, but trust me, one bite and you’ll be hooked!
What makes these protein balls a must-try? First and foremost, the flavor profile is incredible. The creamy, tangy cheesecake base perfectly complements the sweet burst of strawberry, creating a symphony of flavors that will dance on your taste buds. Forget those chalky, bland protein snacks you’ve tried in the past. These are a completely different ball game (pun intended!).
Beyond the taste, these protein balls are incredibly convenient. They’re quick and easy to make, requiring minimal ingredients and effort. Perfect for busy mornings, post-workout fuel, or an afternoon pick-me-up, they’re a grab-and-go snack that you can feel good about eating. Plus, they’re easily customizable to suit your dietary needs and preferences.
Looking for serving suggestions? I love enjoying these chilled straight from the fridge for a refreshing treat. They’re also fantastic crumbled over yogurt or oatmeal for added flavor and protein. For a more decadent experience, try dipping them in melted dark chocolate or drizzling them with a light glaze.
And speaking of variations, the possibilities are endless! If you’re not a fan of strawberries, feel free to substitute them with other berries like raspberries, blueberries, or blackberries. You could also add a touch of lemon zest for a brighter, more citrusy flavor. For a richer, more indulgent treat, try adding a tablespoon of cream cheese to the mixture. If you are vegan, you can substitute the whey protein with a plant-based protein powder and the cream cheese with a vegan cream cheese alternative.
Don’t be afraid to experiment and get creative! The beauty of this recipe is that it’s incredibly versatile and forgiving. You can adjust the ingredients and proportions to create your own unique version of these delicious protein balls.
I truly believe that these Strawberry Cheesecake Protein Balls will become a staple in your healthy snacking routine. They’re the perfect combination of flavor, convenience, and nutrition, making them a winner in my book.
So, what are you waiting for? Head to your kitchen, gather your ingredients, and whip up a batch of these amazing protein balls today! I promise you won’t be disappointed.
And most importantly, I want to hear about your experience! Did you try the recipe? Did you make any modifications? What did you think? Share your thoughts, photos, and creations in the comments below. I can’t wait to see what you come up with! Let’s spread the love for these delicious and healthy treats together. Happy snacking! I am sure you will love this Strawberry Cheesecake Protein Balls recipe.
Strawberry Cheesecake Protein Balls: The Ultimate Healthy Snack
Delicious and healthy strawberry cheesecake protein balls, perfect for a quick snack or post-workout treat. Packed with protein and bursting with strawberry flavor!
Ingredients
- 1 cup rolled oats
- 1/2 cup vanilla protein powder (whey or plant-based)
- 1/4 cup freeze-dried strawberries, crushed
- 1/4 cup cream cheese, softened
- 2 tablespoons honey or maple syrup
- 1 tablespoon coconut oil, melted
- 1/4 cup unsweetened almond milk (or any milk)
- 1/4 teaspoon vanilla extract
- Pinch of salt
- Optional: 1/4 cup shredded coconut for rolling
Instructions
- Combine Dry Ingredients: In a large mixing bowl, add the rolled oats, vanilla protein powder, crushed freeze-dried strawberries, and a pinch of salt. Whisk to combine.
- Soften Cream Cheese: Ensure cream cheese is softened. Microwave for 15-20 seconds if needed, but be careful not to melt.
- Add Wet Ingredients: Add the softened cream cheese, honey (or maple syrup), melted coconut oil, vanilla extract, and almond milk to the bowl with the dry ingredients.
- Mix it All Together: Mix all ingredients until well combined. The mixture should be fairly uniform and slightly sticky.
- Check Consistency: If too dry, add almond milk, 1 tablespoon at a time. If too wet, add rolled oats or protein powder, 1 tablespoon at a time.
- Chill the Dough: Chill the dough for 15-20 minutes in the refrigerator.
- Prepare Work Station: If using shredded coconut, pour it into a shallow dish. Line a plate or baking sheet with parchment paper.
- Roll the Balls: Scoop out about a tablespoon of the mixture at a time. Roll it between your palms to form a smooth, round ball. Dampen hands to prevent sticking.
- Coating (Optional): Roll each protein ball in the shredded coconut until completely coated. Gently press the coconut into the ball.
- Place on Baking Sheet: Place the finished protein balls on the prepared baking sheet, leaving space between each ball.
- Final Chill: Place the baking sheet with the protein balls in the refrigerator for at least 30 minutes.
- Storing: Transfer to an airtight container. Keep in the refrigerator for up to a week or freeze for up to a month. Thaw in the refrigerator before eating.
Notes
- Protein Powder: Experiment with different flavors like chocolate or strawberry.
- Nut Butter: Add 1-2 tablespoons of your favorite nut butter for extra flavor.
- Chocolate Chips: Stir in a handful of mini chocolate chips.
- Lemon Zest: Add a teaspoon of lemon zest for a brighter flavor.
- Different Fruit: Substitute freeze-dried strawberries with other fruits like raspberries or blueberries.
- Sweetener Options: Use agave nectar, stevia, or sugar-free syrup instead of honey or maple syrup.
- Vegan Option: Use plant-based protein powder, maple syrup, and vegan cream cheese alternative.
- Too Dry: Add almond milk or water, 1 tablespoon at a time.
- Too Wet: Add rolled oats or protein powder, 1 tablespoon at a time.
- Not Holding Shape: Chill the dough longer or add coconut flour.
- Too Sweet: Reduce honey or maple syrup, add lemon juice.


Leave a Comment