

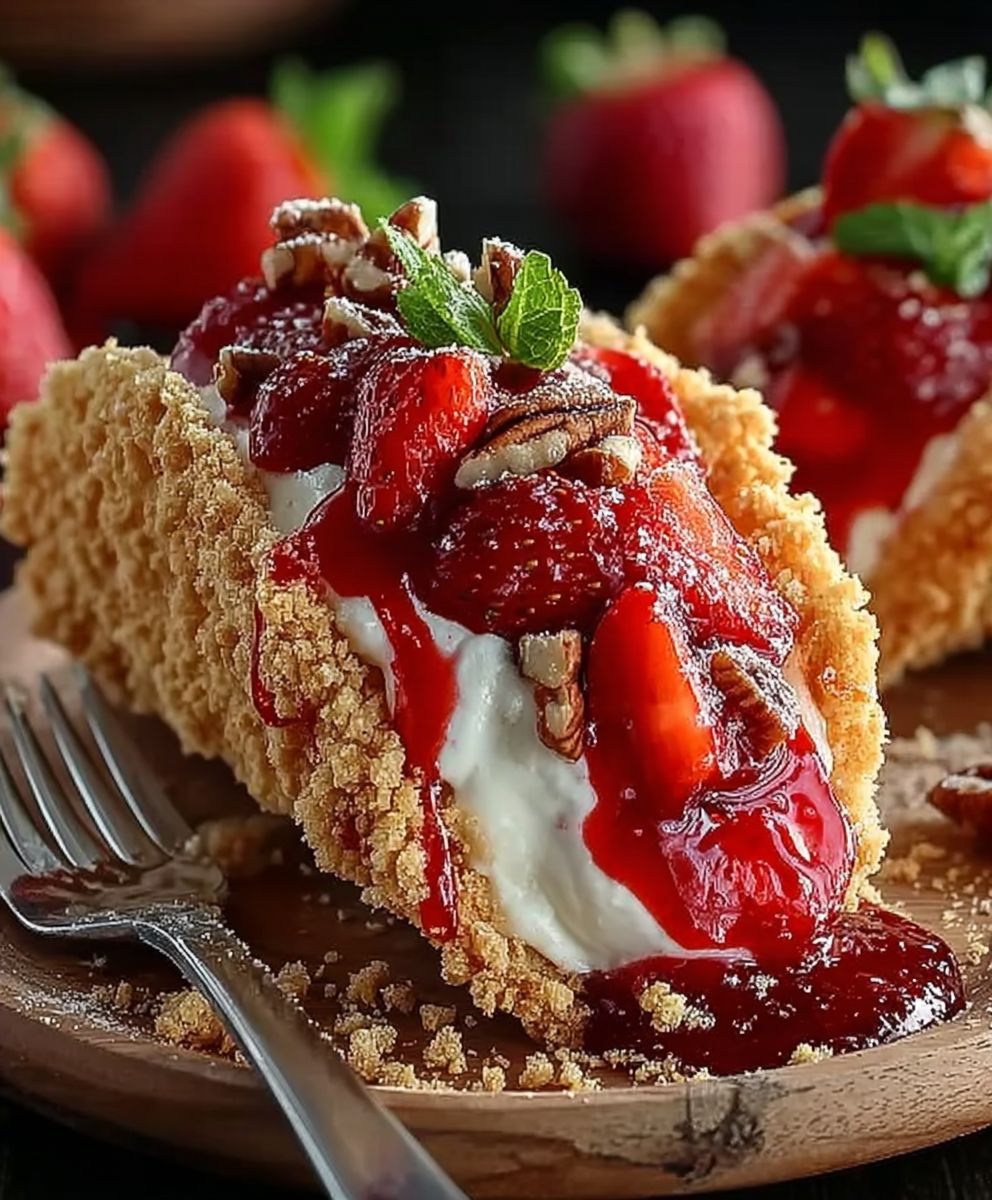
Strawberry Crunch Cheesecake Tacos: Prepare to have your dessert world turned upside down! Imagine the creamy, dreamy indulgence of cheesecake, the sweet burst of fresh strawberries, and the satisfying crunch of a golden taco shell – all in one delightful bite. This isn’t just a recipe; it’s an experience, a playful twist on classic flavors that will leave you craving more.
While not steeped in centuries of tradition, the Strawberry Crunch Cheesecake Taco is a modern marvel, born from the desire to push culinary boundaries and create something truly unique and Instagram-worthy. It’s a testament to the power of fusion cuisine, blending the beloved flavors of American cheesecake with the fun, handheld format of a Mexican taco.
What makes these Strawberry Crunch Cheesecake Tacos so irresistible? It’s the symphony of textures and tastes. The creamy, tangy cheesecake filling melts in your mouth, perfectly complemented by the juicy sweetness of ripe strawberries. And then there’s the crunch – oh, that glorious crunch! The golden-brown taco shell provides the perfect vessel for this decadent treat, adding a satisfying textural contrast that elevates the entire experience. Plus, they’re incredibly fun to eat! Who can resist a handheld dessert that’s both delicious and visually stunning? Get ready to impress your friends and family with this show-stopping dessert that’s surprisingly easy to make.

Ingredients:
- For the Cheesecake Filling:
- 8 ounces cream cheese, softened
- 1/2 cup granulated sugar
- 1 teaspoon vanilla extract
- 1/4 cup heavy cream
- For the Strawberry Crunch Coating:
- 1 cup Golden Oreo cookies, finely crushed
- 1/4 cup freeze-dried strawberries, finely crushed
- 1/4 cup melted butter
- For the “Taco Shells”:
- 6 large flour tortillas
- 2 tablespoons melted butter, for brushing
- 2 tablespoons granulated sugar, for sprinkling
- For the Strawberry Topping (Optional):
- 1 cup fresh strawberries, sliced
- 2 tablespoons granulated sugar
- 1 tablespoon lemon juice
Preparing the Strawberry Crunch Coating
- Crush the Golden Oreos: In a food processor, pulse the Golden Oreos until they are finely crushed into crumbs. If you don’t have a food processor, you can place the cookies in a resealable bag and crush them with a rolling pin. Make sure there are no large chunks remaining. The finer the crumbs, the better the coating will adhere to the cheesecake filling.
- Crush the Freeze-Dried Strawberries: Similarly, crush the freeze-dried strawberries into a fine powder. A food processor works best for this, but you can also use a resealable bag and a rolling pin. Freeze-dried strawberries add an intense strawberry flavor and a beautiful pink color to the crunch coating.
- Combine the Crumbs: In a medium bowl, combine the crushed Golden Oreo crumbs and the crushed freeze-dried strawberries. Mix them thoroughly to ensure an even distribution of strawberry flavor and color.
- Add Melted Butter: Pour the melted butter over the crumb mixture. Stir well until all the crumbs are evenly moistened. The butter will help the crumbs bind together and create a delicious, crunchy texture. The mixture should resemble wet sand.
- Set Aside: Set the strawberry crunch coating aside while you prepare the cheesecake filling. This will allow the flavors to meld together.
Making the Cheesecake Filling
- Soften the Cream Cheese: Ensure your cream cheese is completely softened to room temperature. This is crucial for a smooth and creamy cheesecake filling. If the cream cheese is not soft enough, you may end up with lumps in your filling.
- Cream the Cream Cheese and Sugar: In a large bowl, beat the softened cream cheese with an electric mixer until smooth and creamy. Gradually add the granulated sugar and continue beating until the mixture is light and fluffy. Be careful not to overbeat, as this can incorporate too much air into the filling.
- Add Vanilla Extract: Stir in the vanilla extract. Vanilla extract enhances the flavor of the cheesecake filling and adds a touch of warmth.
- Incorporate Heavy Cream: Gradually add the heavy cream, mixing on low speed until just combined. The heavy cream adds richness and helps to create a smooth and creamy texture. Be careful not to overmix, as this can cause the filling to become too thin.
- Chill the Filling: Cover the bowl with plastic wrap and refrigerate the cheesecake filling for at least 30 minutes. This will help the filling to firm up slightly, making it easier to work with when assembling the tacos. Chilling also allows the flavors to meld together.
Preparing the “Taco Shells”
- Cut Tortillas into Circles: Using a large cookie cutter (about 6-8 inches in diameter) or a sharp knife, cut out circles from the flour tortillas. You should be able to get at least one circle from each tortilla, maybe two if you are careful. These circles will form the “taco shells.”
- Brush with Melted Butter: Brush both sides of each tortilla circle with melted butter. This will help them crisp up in the oven and give them a golden-brown color.
- Sprinkle with Sugar: Sprinkle both sides of each buttered tortilla circle with granulated sugar. The sugar will caramelize in the oven, adding a touch of sweetness and a crispy texture.
- Shape into Taco Shells: Gently fold each tortilla circle in half to create a taco shell shape. You can use a toothpick to secure the edges if needed, but they should hold their shape fairly well after baking.
- Bake the Taco Shells: Preheat your oven to 350°F (175°C). Place the taco shells on a baking sheet lined with parchment paper. Bake for 8-10 minutes, or until they are golden brown and crispy. Keep a close eye on them to prevent burning.
- Cool Completely: Remove the taco shells from the oven and let them cool completely on a wire rack. As they cool, they will become even crispier.
Assembling the Strawberry Crunch Cheesecake Tacos
- Fill the Taco Shells: Once the taco shells are completely cool, spoon the chilled cheesecake filling into each shell. Be generous with the filling, but don’t overfill them, or they will be difficult to handle.
- Coat with Strawberry Crunch: Gently press the filled taco shells into the strawberry crunch coating, ensuring that the cheesecake filling is completely covered. You can use your hands to help the crumbs adhere to the filling.
- Chill Before Serving: Place the assembled tacos on a plate or tray and refrigerate for at least 15 minutes before serving. This will help the cheesecake filling to firm up and prevent the tacos from becoming too messy.
Optional Strawberry Topping
- Prepare the Strawberries: Wash and hull the fresh strawberries. Slice them into thin slices.
- Combine with Sugar and Lemon Juice: In a medium bowl, combine the sliced strawberries, granulated sugar, and lemon juice. Gently toss to coat. The sugar will draw out the natural juices from the strawberries, creating a delicious syrup. The lemon juice will add a touch of acidity and enhance the strawberry flavor.
- Let Macerate: Let the strawberry mixture sit for at least 15 minutes, or longer if desired, to allow the flavors to meld together.
- Top the Tacos: Just before serving, spoon the strawberry topping over the strawberry crunch-coated cheesecake tacos. This will add a burst of fresh strawberry flavor and a beautiful presentation.
Tips and Variations
- Different Oreo Flavors: Feel free to experiment with different Oreo flavors for the crunch coating. Chocolate Oreos, peanut butter Oreos, or even birthday cake Oreos would all be delicious.
- Other Freeze-Dried Fruits: You can also use other freeze-dried fruits, such as raspberries or blueberries, in the crunch coating.
- Chocolate Drizzle: For an extra touch of indulgence, drizzle the finished tacos with melted chocolate.
- Whipped Cream: Top the tacos with a dollop of whipped cream for added richness and flavor.
- Make Ahead: The taco shells and strawberry crunch coating can be made ahead of time and stored in airtight containers. The cheesecake filling can also be made ahead of time and stored in the refrigerator. Assemble the tacos just before serving.
Enjoy!
These Strawberry Crunch Cheesecake Tacos are a fun and delicious dessert that is sure to impress your friends and family. They are perfect for parties, potlucks, or any special occasion. Enjoy the combination of creamy cheesecake filling, crunchy strawberry coating, and crispy taco shells!
Conclusion:
This isn’t just a dessert; it’s an experience! The Strawberry Crunch Cheesecake Tacos are a symphony of textures and flavors that will leave you and your guests utterly delighted. From the crispy, cinnamon-sugar taco shell to the creamy, tangy cheesecake filling, and the burst of fresh strawberry crunch, every bite is a celebration. I truly believe this recipe is a must-try because it’s unexpectedly delicious, surprisingly easy to make, and guaranteed to be a crowd-pleaser. Forget boring desserts; this is where the party’s at!
But the fun doesn’t stop there! Think of this recipe as a canvas for your culinary creativity. Want to elevate your presentation? Drizzle melted white chocolate over the finished tacos for an extra touch of elegance. For a more decadent experience, try adding a layer of Nutella or dulce de leche to the inside of the taco shell before filling it with the cheesecake mixture. If you’re feeling adventurous, experiment with different fruit combinations. Imagine a blueberry cheesecake taco with a lemon zest crumble, or a raspberry version with a dark chocolate ganache. The possibilities are endless!
Serving suggestions? These Strawberry Crunch Cheesecake Tacos are perfect for any occasion. They make a fantastic dessert for a summer barbecue, a delightful treat for a birthday party, or even just a fun weekend project with the kids. Serve them chilled for a refreshing treat on a hot day, or slightly warmed for a cozy indulgence on a cool evening. You can also get creative with the presentation. Arrange them artfully on a platter, garnish them with fresh mint leaves, or serve them with a scoop of vanilla ice cream for an extra special touch.
And speaking of special, let’s talk about the Strawberry Crunch topping. It’s the star of the show, adding that irresistible crunch and burst of strawberry flavor that takes these tacos to the next level. Don’t skimp on the freeze-dried strawberries – they’re essential for achieving that perfect texture and intense flavor.
I’ve poured my heart into perfecting this recipe, and I’m so excited for you to try it. I’m confident that you’ll love the combination of textures and flavors, and I can’t wait to hear about your experience. So, gather your ingredients, put on your apron, and get ready to create some magic in the kitchen!
Ready to make some magic?
Don’t be afraid to experiment and make this recipe your own. After all, cooking is all about having fun and creating something delicious that you can share with the people you love.
Once you’ve tried the recipe, I’d absolutely love to hear what you think! Share your photos and stories on social media using [Your Hashtag] or tag me [Your Social Media Handle]. Let me know what variations you tried, what your family and friends thought, and any tips or tricks you discovered along the way. Your feedback is invaluable, and it helps me continue to create and share recipes that you’ll love.
So, go ahead, give these Strawberry Crunch Cheesecake Tacos a try. I promise you won’t be disappointed. Happy baking!
Strawberry Crunch Cheesecake Tacos: A Delicious & Easy Recipe
Creamy cheesecake filling meets crunchy strawberry coating in crispy, sweet taco shells for a fun and delicious dessert.
Ingredients
Instructions
Recipe Notes
- Feel free to experiment with different Oreo flavors for the crunch coating. Chocolate Oreos, peanut butter Oreos, or even birthday cake Oreos would all be delicious.
- You can also use other freeze-dried fruits, such as raspberries or blueberries, in the crunch coating.
- For an extra touch of indulgence, drizzle the finished tacos with melted chocolate.
- Top the tacos with a dollop of whipped cream for added richness and flavor.
- The taco shells and strawberry crunch coating can be made ahead of time and stored in airtight containers. The cheesecake filling can also be made ahead of time and stored in the refrigerator. Assemble the tacos just before serving.
- Make sure the cream cheese is fully softened for a smooth filling.
- Don’t overmix the cheesecake filling after adding the heavy cream.
- Keep a close eye on the taco shells while baking to prevent burning.

Leave a Comment