

Stuffed Mushroom Eyeballs – a name that might first evoke a shiver, but I promise you, it’s quickly followed by an irresistible craving! As a host, I’m always looking for dishes that combine undeniable deliciousness with a touch of playful creativity, and these certainly hit the mark. While their “gory” moniker hints at a perfect addition to your Halloween festivities or any spooky-themed gathering, the truth is, these savory bites are so incredibly tasty, they transcend seasonal novelty.
Why These Stuffed Mushroom Eyeballs Are a Party Favorite
I’ve found that guests simply adore the clever visual appeal, but it’s the rich, earthy flavor of the tender mushrooms, expertly filled with a creamy, herbed cheese mixture, that truly wins hearts. They offer a delightful contrast of textures and a deeply satisfying umami punch that makes them incredibly moreish. Forget the trick; this is all treat! They’re surprisingly easy to prepare, making them my go-to appetizer for impressing without the stress. Whether you’re aiming to spook your friends with a ghoulish gourmet delight or simply seeking an extraordinarily flavorful and convenient appetizer, these Stuffed Mushroom Eyeballs are guaranteed to be a conversation starter and a crowd-pleaser.

Ingredients:
- Large Cremini Mushrooms: Approximately 24-30 count (about 2 pounds total), chosen for their nice, round shape – these will be our perfect “eyeballs.” If cremini aren’t available, large button mushrooms work wonderfully too.
- Good Quality Olive Oil: 3 tablespoons, plus a little extra for brushing the mushroom caps.
- Fresh Garlic: 4-5 medium-sized cloves, finely minced. We want that aromatic punch!
- Shallot: 1 large, or 2 small ones, very finely minced. A shallot offers a milder, sweeter onion flavor than a regular onion, which I find perfect for this delicate filling.
- Cream Cheese: 8 ounces, full-fat and softened at room temperature. This is the base for our creamy, dreamy filling, so don’t skimp on the fat here for the best texture.
- Freshly Grated Parmesan Cheese: 1/2 cup, plus an optional extra tablespoon or two for a light sprinkle on top before baking. Freshly grated makes all the difference!
- Shredded Mozzarella Cheese: 1/2 cup, part-skim or full-fat, for that lovely melt.
- Fresh Parsley: 1/4 cup, finely chopped. Adds a burst of fresh flavor and color.
- Dried Oregano: 1 teaspoon. A classic herb that complements mushrooms beautifully.
- Smoked Paprika: 1/2 teaspoon (optional, but highly recommended for a subtle depth and warmth to the filling).
- Kosher Salt: 1 teaspoon, or to taste. Always taste and adjust!
- Freshly Ground Black Pepper: 1/2 teaspoon, or to taste.
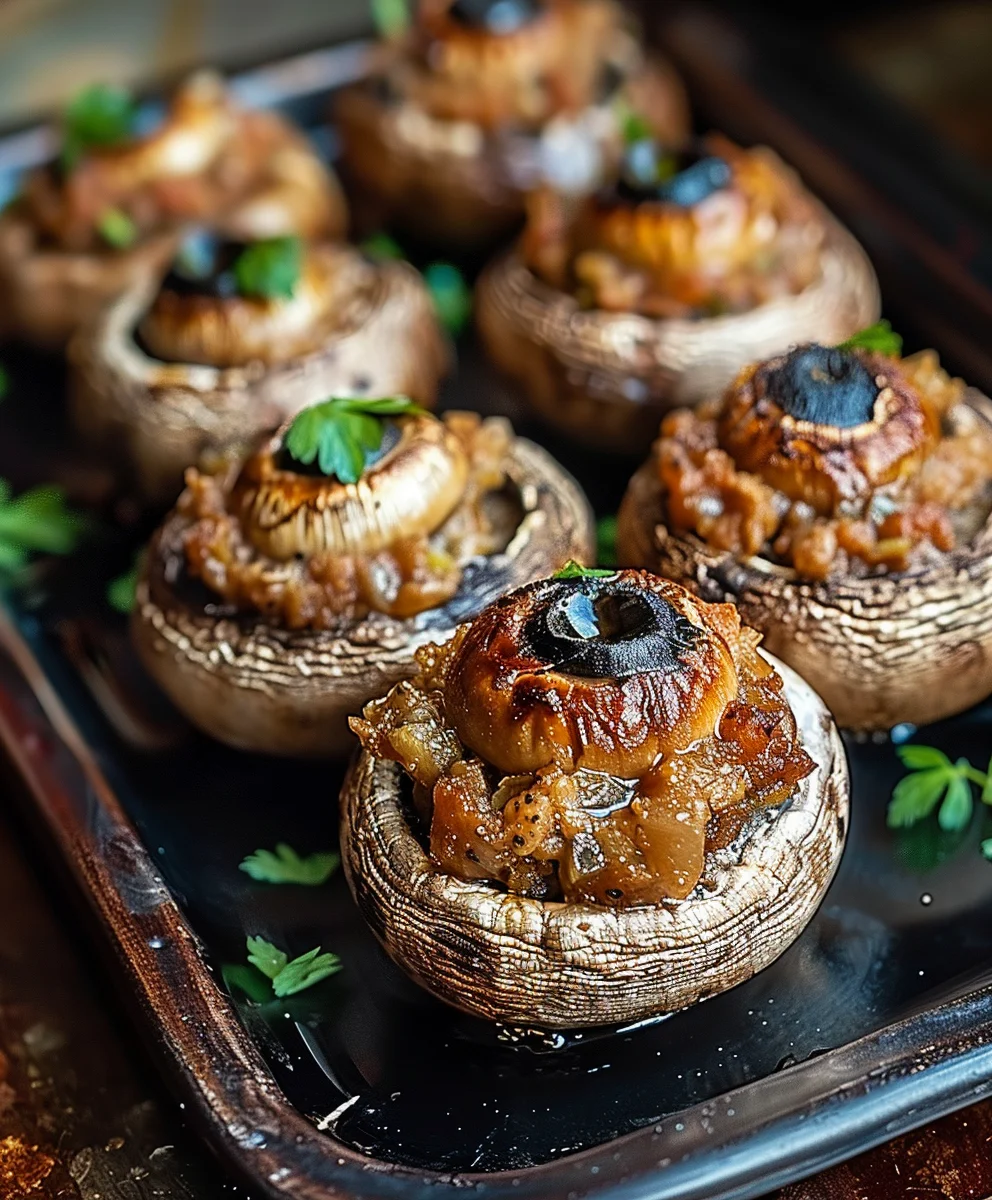
- Pimento-Stuffed Green Olives: 24-30 pieces, sliced into thin rounds. These will brilliantly form the vibrant “iris” of our Stuffed Mushroom Eyeballs.
- Small Black Olives: 1 small can (2.25 oz), drained and very finely chopped or sliced into tiny slivers. These will be the “pupils.”
- Red Bell Pepper: 1 small, very thinly sliced into tiny, irregular strips or slivers. This is for the “bloodshot” veins, adding that extra spooky detail. Alternatively, a small bottle of Sriracha or hot sauce with a fine tip can be used for drawing the veins.
Phase 1: Preparing Our Mushroom “Eyeballs” for Their Spooky Transformation
1. Cleaning the Mushrooms: The first step in creating our delightful Stuffed Mushroom Eyeballs is to get our main canvas ready. Gently take each mushroom cap and wipe it clean with a slightly damp paper towel. I always recommend avoiding rinsing mushrooms directly under water, as they are like little sponges and can absorb too much moisture, leading to a watery filling or a less firm texture after baking. We want firm, perfectly prepped caps for our spooky treats!
2. Hollowing the Caps: Next, carefully twist or gently pull out the stems from each mushroom cap. You’ll notice a natural cavity form. For a more substantial filling, which is exactly what we want for our Stuffed Mushroom Eyeballs, you might need to use a small spoon or even a melon baller to gently scrape out some of the dark gills from the inside of the cap. Be mindful not to dig too deep or break through the mushroom wall – we’re creating a cozy little cup for our savory mixture, not a hole! Place all the hollowed caps, gill-side up, on a large baking sheet that I’ve lined with parchment paper. This will make cleanup a breeze and prevent sticking.
3. Prepping the Stems: Now, those mushroom stems aren’t going to waste! They are packed with flavor and texture, and they’ll be a fantastic addition to our filling. Take all the stems you just removed and finely chop them. We want them small enough to blend seamlessly into our creamy mixture. Set them aside; they’re patiently waiting for their moment to shine in our delicious stuffing.
4. A Quick Brush and Seasoning: To ensure our mushroom caps bake up beautifully with a lovely golden hue and don’t dry out, I like to lightly brush the outside of each cap with a little olive oil. You can also sprinkle a tiny pinch of salt and black pepper inside each cap’s cavity at this stage. This initial seasoning helps build layers of flavor right from the start, ensuring every bite of our Stuffed Mushroom Eyeballs is perfectly seasoned.
Phase 2: Crafting the Spooky Savory Filling – The Brains of Our Operation!
1. Sautéing the Aromatics: In a large skillet, heat 2 tablespoons of olive oil over medium heat. Once shimmering, add the finely minced shallot (or onion). Cook, stirring occasionally, for about 2-3 minutes until the shallot softens and becomes beautifully translucent. You’ll start to smell its sweet, gentle aroma filling your kitchen – a sign of good things to come for our Stuffed Mushroom Eyeballs!
2. Adding Mushroom Stems and Garlic: Now, it’s time to add our finely chopped mushroom stems to the skillet. Continue to cook for another 5-7 minutes, stirring periodically. You want the stems to release their moisture and start to brown slightly, concentrating their earthy flavor. Then, stir in the minced garlic. Cook for just 1 minute more until the garlic becomes fragrant. Be very careful not to let the garlic burn, as burnt garlic can taste bitter and detract from the otherwise perfect filling. Once fragrant, remove the skillet from the heat and let this savory mixture cool slightly. It’s important for it to cool before mixing with the cheeses to prevent premature melting.
3. Mixing the Cheesy Base: In a medium-sized mixing bowl, combine the softened cream cheese, freshly grated Parmesan cheese, and shredded mozzarella cheese. I always ensure my cream cheese has been sitting out at room temperature for at least 30 minutes to an hour. This makes it incredibly easy to mix and ensures a wonderfully smooth, creamy, and lump-free base for our Stuffed Mushroom Eyeballs filling. A smooth base means a smooth and luxurious bite!
4. Incorporating Flavors: Add the cooled mushroom and aromatic mixture from the skillet to the cheese blend. Stir in the finely chopped fresh parsley, dried oregano, smoked paprika (if you’re using it for that extra layer of flavor), 1 teaspoon of kosher salt, and 1/2 teaspoon of freshly ground black pepper. Mix everything together thoroughly until all the ingredients are well combined and you have a rich, savory, and beautifully textured filling. This is a critical moment – taste the filling! Adjust any seasonings as needed. Perhaps you like a bit more pepper, or a touch more salt? Make it perfect for your palate, as this is the heart and soul of our Stuffed Mushroom Eyeballs flavor profile.
Phase 3: Assembling Our Ocular Delights – Bringing the Eyeballs to Life!
1. Stuffing the Mushroom Caps: Now for the fun part – stuffing! Using a small spoon, or even your clean fingers, generously fill each prepared mushroom cap with our savory cream cheese mixture. Don’t be shy here; we want plump, full Stuffed Mushroom Eyeballs. Gently mound the filling, creating a slightly domed surface. This dome will form the “white” of our eyeball, providing a perfect canvas for the decorative elements. Ensure each cap is well-filled so that every bite is packed with that delicious, creamy goodness.
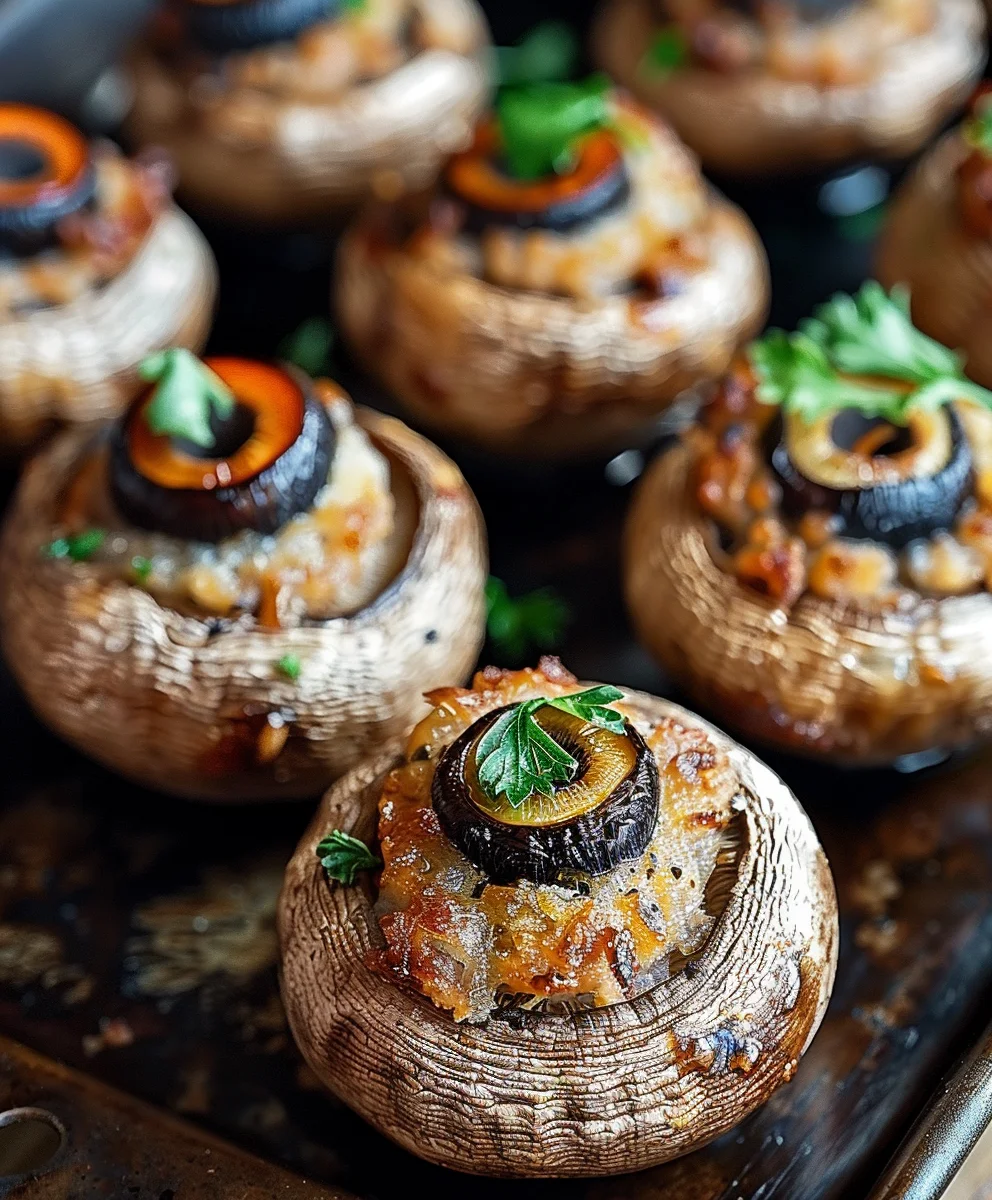
2. Creating the Iris: This is where our Stuffed Mushroom Eyeballs truly begin to take on their eerie and fun appearance! Take one of the pimento-stuffed green olive slices – you know, the ones with the little red dot in the middle – and carefully place it right in the center of the cheese filling on top of each mushroom. Press it down just slightly to secure it into the creamy mixture. The vibrant green of the olive against the creamy white filling creates a striking contrast, making for a very convincing “iris,” and the red pimento is just the perfect pop of color.
3. Adding the Pupil: To complete the “eye” effect, take a tiny piece of black olive (either a small, finely chopped piece or a very thin sliver) and gently place it directly in the very center of the green olive “iris.” Again, press it down ever so slightly to make sure it stays put. At this point, you’ll really see the fantastic transformation happening! Your baking sheet will be filled with an army of perfectly formed Stuffed Mushroom Eyeballs, ready for the oven. Arrange them neatly on your parchment-lined baking sheet, ensuring there’s a little space between each one for even baking.
Phase 4: Baking Our Ghoulish Goodies to Golden Perfection
1. Preheating the Oven: Before we slide our beautiful Stuffed Mushroom Eyeballs into the heat, make sure your oven is properly preheated to 375°F (190°C). A consistently heated oven is key to ensuring that the mushrooms cook evenly, become tender, and the filling gets that delightful golden-brown crust we’re aiming for.
2. Baking Time: Carefully transfer the baking sheet, laden with our eager Stuffed Mushroom Eyeballs, into the preheated oven. Bake for approximately 20-25 minutes. During this time, the mushroom caps will soften beautifully, the savory filling will heat through completely, and the cheese on top will turn a gorgeous, light golden brown, bubbling enticingly around the edges. You want the mushrooms themselves to be tender but not mushy, and the filling to be perfectly melted and warmed through.
3. Checking for Doneness: I always like to perform a quick check to ensure everything is perfect. Gently poke one of the mushrooms with a fork – it should feel tender, indicating it’s cooked through. The filling should also be visibly hot and bubbling. If you prefer a slightly crispier, more deeply golden topping, you can carefully turn on your broiler for the last 1-2 minutes. However, if you choose this option, it’s absolutely crucial to watch them very closely. Broilers can go from perfect to burnt in a blink of an eye, and we definitely don’t want to char our carefully crafted Stuffed Mushroom Eyeballs!
Phase 5: The Finishing Touches – Bloodshot Details and Presentation for Maximum Spookiness!
1. Adding Bloodshot Veins (Option 1: Red Bell Pepper): Once your perfectly baked Stuffed Mushroom Eyeballs are out of the oven, it’s time for the truly spectacular, and slightly creepy, final detail. Take your very thinly sliced red bell pepper. Using a small, sharp knife or even a pair of clean kitchen shears, carefully cut tiny, irregular slivers or incredibly thin strips of the red bell pepper. The more irregular, the more authentic the “bloodshot” look! Gently arrange these tiny red strips around the green olive “iris” and radiating outwards over the creamy white cheese filling. The residual heat from the warm mushroom will help to slightly soften the bell pepper, making it cling nicely and adding a fantastic pop of color. This step truly sells the “eyeball” illusion!
2. Adding Bloodshot Veins (Option 2: Sriracha/Hot Sauce): If you’re looking for a quicker method or prefer a little spicy kick, grab a squeeze bottle of Sriracha or your favorite red hot sauce with a fine tip. With a very steady hand, gently squeeze tiny, delicate lines that radiate outwards from the green olive “iris” across the white cheese filling. Think of drawing tiny spider veins! Be sparing with the sauce; a little goes a long way both for the visual effect and for the heat. This method is wonderfully efficient for creating a batch of spooky Stuffed Mushroom Eyeballs.
3. Final Presentation: Your incredible Stuffed Mushroom Eyeballs are now complete and ready to impress! Carefully arrange them on a festive serving platter. For an extra touch of visual drama, you might place them on a bed of fresh spinach leaves, some shredded red cabbage, or even a sprinkle of chopped fresh parsley, creating a vibrant backdrop. While these are absolutely divine served warm, allowing that cheesy filling to remain soft and gooey, I’ve found they are also incredibly delicious at room temperature, making them a perfect make-ahead appetizer for a party or gathering. The combination of earthy, tender mushrooms, the rich and creamy savory cheese filling, and the briny pop of the olives creates an unforgettable flavor experience that is both comforting and wonderfully fun to behold. Enjoy watching your guests marvel at your culinary creativity and the perfectly spooky appearance of your Stuffed Mushroom Eyeballs!
Conclusion:
And there you have it, my friends! We’ve reached the delicious culmination of our culinary adventure, and I truly hope you’re as excited to try this recipe as I was to share it with you. What makes these particular treats an absolute must-try isn’t just their undeniably charming and spooky appearance, though let’s be honest, that’s a huge part of their appeal. It’s the incredible combination of flavors and textures that truly sets them apart. Imagine biting into a perfectly tender mushroom cap, bursting with a creamy, savory filling that’s rich with herbs and a subtle hint of garlic. It’s comfort food meets festive fun, all in one delightful bite. These aren’t just any appetizers; they are conversation starters, palate pleasers, and quite frankly, show-stoppers that will have everyone reaching for more, even after the initial surprise of their ghoulishly good looks wears off. They strike that perfect balance between being incredibly impressive to serve, yet surprisingly straightforward to prepare, making them a fantastic addition to any home cook’s repertoire, whether you’re a seasoned chef or just starting your culinary journey.
I can confidently say that these Stuffed Mushroom Eyeballs are destined to become a staple at your gatherings, especially when you’re looking to add a touch of whimsy and deliciousness to the spread. Their versatility is another reason I adore them. While they shine as a standalone appetizer, particularly during spooky season parties or Halloween festivities, don’t limit their potential! Think of them as the perfect accompaniment to a hearty autumn soup, a vibrant salad, or even as a unique side dish alongside a roasted chicken or a slow-cooked pot roast. If you’re hosting a tapas night, they fit right in, offering a savory, earthy counterpoint to other small plates. For a more sophisticated twist, consider pairing them with a crisp white wine, like a Sauvignon Blanc or a Pinot Grigio, which would beautifully complement the earthy notes of the mushrooms and the creamy richness of the filling. For non-alcoholic options, a sparkling cider or a spiced cranberry juice would also be a fantastic match.
Elevate Your Stuffed Mushroom Eyeballs: Serving & Variation Inspirations
Now, let’s talk about how you can make these even more ‘you’! The beauty of a great recipe lies in its adaptability, and these Stuffed Mushroom Eyeballs are incredibly forgiving when it comes to personalization. Don’t be afraid to experiment with the filling. For instance, if you’re a cheese lover, try incorporating different varieties: a smoky gouda would add depth, a sharp cheddar a delightful tang, or a crumbled goat cheese a creamy, slightly tart elegance. Feel free to stir in some finely diced cooked bacon for a smoky, salty crunch, or sautéed spinach for an extra boost of greens and a touch of color. A pinch of red pepper flakes can introduce a subtle warmth, while a medley of fresh herbs like thyme, rosemary, or chives can elevate the aromatic profile. For those looking to make them vegan, swap out the dairy cream cheese and Parmesan for plant-based alternatives – there are fantastic cashew-based creams and nutritional yeast options available that perform beautifully. You could even play with different mushroom varieties; while button mushrooms are perfect for the ‘eyeball’ look, larger cremini or even smaller portobello caps could be used for a heartier, more substantial appetizer, though you might need to adjust baking times slightly. Imagine these served on a bed of fresh arugula or alongside a vibrant dipping sauce like a roasted red pepper coulis or a zesty aioli – the possibilities are truly endless!
Your Culinary Adventure Awaits!
So, what are you waiting for? I wholeheartedly encourage you to roll up your sleeves, gather your ingredients, and give these fantastic Stuffed Mushroom Eyeballs a try. There’s an immense satisfaction that comes from creating something both visually stunning and incredibly delicious, and I promise you, this recipe delivers on both fronts. Whether you’re making them for a special occasion, a casual get-together, or just because you fancy a truly delightful snack, I guarantee you won’t be disappointed. But don’t keep all that deliciousness to yourself! I absolutely love hearing about your culinary adventures. Once you’ve whipped up your batch, please come back and share your experience. Did you make any fun variations? What did your guests think? Did they get a kick out of the “eyeball” presentation? Snap a photo and share it! Your feedback, your stories, and your unique twists inspire me and our entire community of food lovers. Let’s celebrate the joy of cooking and the magic of sharing good food together. Happy cooking, everyone!
Stuffed Mushroom Eyeballs
These Stuffed Mushroom Eyeballs are a spooky and delicious appetizer, perfect for Halloween or themed parties. Tender mushrooms are filled with a creamy, herbed cheese and beef mixture, topped with an olive ‘pupil,’ and can be finished with optional ‘bloodshot’ details for a fun, ghoulish gourmet treat.
Ingredients
-
16 large white or cremini mushrooms
-
8 oz cream cheese, softened
-
1/2 cup cooked beef, crumbled
-
1/4 cup grated Parmesan cheese
-
1 clove garlic, minced
-
1 tablespoon fresh parsley, chopped
-
1/4 teaspoon salt
-
1/4 teaspoon black pepper
-
16 small olives, pitted
-
Cooking spray or olive oil
Instructions
-
Step 1
Gently wipe mushrooms clean. Carefully remove stems; finely chop stems. Lightly scrape gills from caps. Lightly brush caps with olive oil or cooking spray; season inside with a pinch of salt and pepper. -
Step 2
In a bowl, combine softened cream cheese, cooked crumbled beef, Parmesan cheese, minced garlic, chopped mushroom stems, parsley, salt, and black pepper. Mix thoroughly until well combined. -
Step 3
Generously fill each mushroom cap with the savory mixture, mounding slightly. Press one pitted small olive into the center of the filling of each mushroom to form the “pupil.” -
Step 4
Preheat oven to 375°F (190°C). Arrange stuffed mushrooms on a baking sheet. Bake for 20-25 minutes, or until mushrooms are tender and filling is golden and bubbling. -
Step 5
(Optional) For a “bloodshot” effect, add tiny slivers of red bell pepper or delicate lines of Sriracha around the olive. Serve warm or at room temperature.
Important Information
Nutrition Facts (Per Serving)
It is important to consider this information as approximate and not to use it as definitive health advice.
Allergy Information
Please check ingredients for potential allergens and consult a health professional if in doubt.

Leave a Comment