

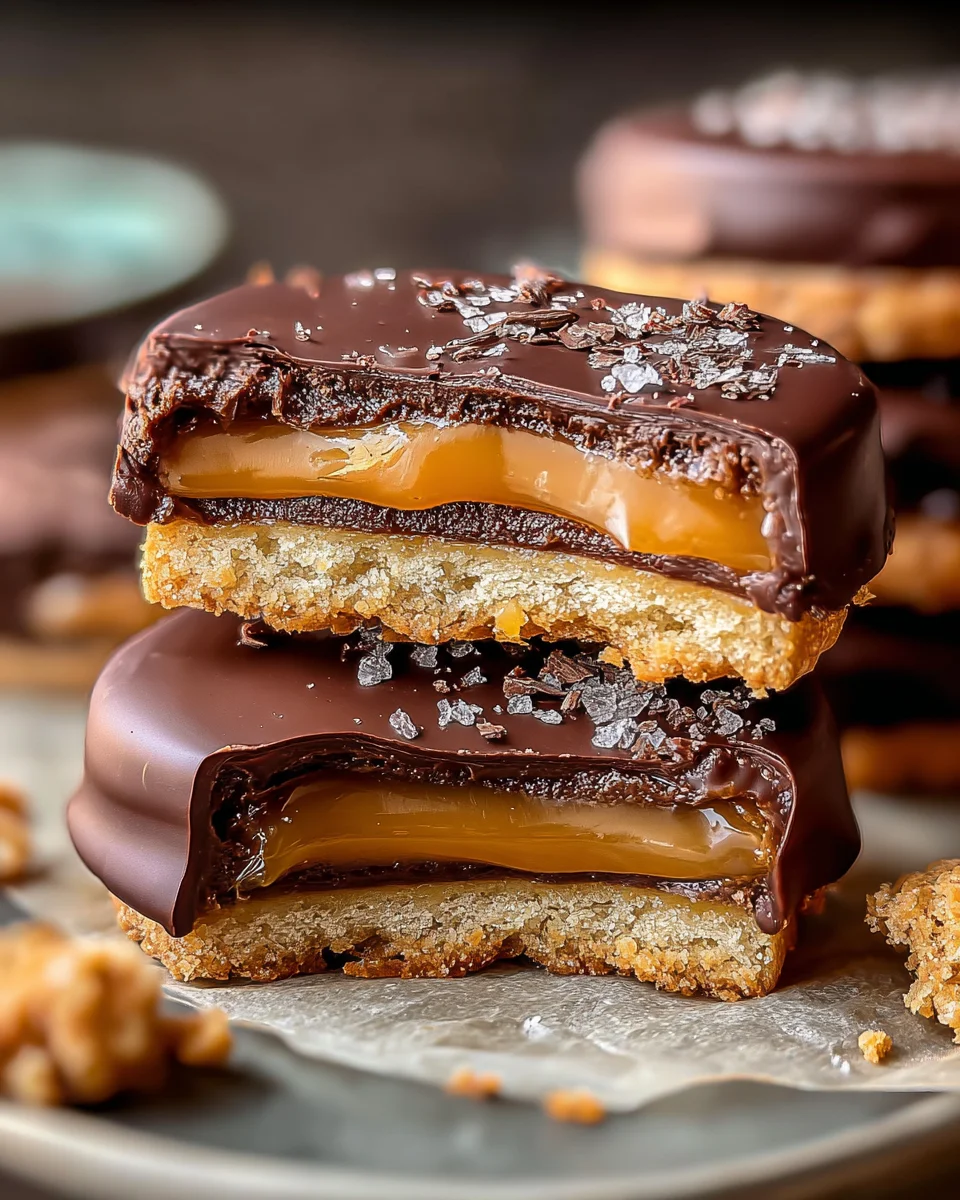
Ultimate Twix Style Cookies are more than just a dessert; they are a homemade revolution in your kitchen, promising to transport you straight back to your favorite candy aisle with every single bite. Have you ever wished you could capture the iconic crunch of shortbread, the luscious pull of caramel, and the snap of rich chocolate all in one perfect, homemade treat? Well, prepare yourselves, because your wish is about to come true!
While the classic candy bar has graced our shelves for decades, becoming a beloved staple in lunchboxes and movie nights, there’s an undeniable magic in recreating beloved confections from scratch. This recipe taps into that nostalgia, elevating the familiar flavors and textures into something truly extraordinary. It’s a testament to the simple joy of baking, transforming humble ingredients into a symphony of taste and texture. People adore this dish not just for its incredible flavor profile – that buttery shortbread base, the chewy, golden caramel, and the smooth chocolate ganache – but also for the sheer satisfaction of crafting such a delightful treat right in their own homes. These Ultimate Twix Style Cookies offer the perfect trifecta of sweet, salty, and satisfying, making them an instant favorite for potlucks, parties, or a cozy evening indulgence.

Welcome, fellow baking enthusiasts! Get ready to embark on a delightful culinary journey as we craft the most incredible, homemade treats that perfectly capture the essence of a classic candy bar. Today, we’re diving deep into creating the Ultimate Twix Style Cookies – a symphony of buttery shortbread, gooey caramel, and rich chocolate that will undoubtedly become your new favorite indulgence. Forget those store-bought bars; once you taste these, you’ll understand why taking the time to layer these flavors is absolutely worth it. I promise, the joy of seeing these come together, and then savoring each bite, is a truly special experience.
Ingredients:
Before we begin our delicious adventure, let’s gather all our components. Quality ingredients are the cornerstone of any truly exceptional bake, and these Ultimate Twix Style Cookies are no exception. Make sure your butter is softened, your cream is warm, and your chocolate is ready for melting to ensure the smoothest process.
For the Buttery Shortbread Base:
- 1 cup (226g) unsalted butter, very soft and at room temperature. This is crucial for achieving that light, tender shortbread texture.
- 1/2 cup (60g) powdered sugar (also known as confectioners’ sugar). This sweetens the shortbread without adding granularity.
- 2 cups (240g) all-purpose flour, sifted. Sifting ensures no lumps and a lighter crumb.
- 1/2 teaspoon fine sea salt. A little salt balances the sweetness and enhances the buttery flavor.
- 1 teaspoon pure vanilla extract. For that comforting, classic shortbread aroma.
For the Golden Caramel Layer:
- 1 cup (200g) granulated sugar. The foundation of our sweet, chewy caramel.
- 1/4 cup (60ml) water. Helps dissolve the sugar initially.
- 1/2 cup (120ml) heavy cream, warmed. Crucial for preventing the caramel from seizing when added. You can warm it gently in the microwave or a small saucepan.
- 4 tablespoons (56g) unsalted butter, at room temperature, cut into small pieces. Adds richness and a smooth texture to the caramel.
- 1/2 teaspoon fine sea salt. A touch of salt elevates the caramel, giving it that irresistible salted caramel appeal.
- 1 teaspoon pure vanilla extract. Enhances the overall flavor profile of the caramel.
- Optional: 2 tablespoons light corn syrup or golden syrup. This addition helps prevent crystallization and makes the caramel extra smooth and glossy, though it’s not strictly necessary for a delicious result.
For the Luxurious Chocolate Coating:
- 12 ounces (340g) good quality chocolate. I love to use a mix of milk chocolate and semi-sweet dark chocolate chips or chopped bars for the best flavor balance, mimicking that classic Twix taste. Choose a brand you enjoy eating on its own!
- 1 tablespoon coconut oil or vegetable shortening. This helps the chocolate melt smoothly, adds a lovely shine, and makes for a snappier coating when set.
Now that we have everything laid out, let’s get our hands (a little bit) dirty and start creating these incredible Ultimate Twix Style Cookies!
Crafting the Perfect Shortbread Base
The shortbread is the backbone of our Ultimate Twix Style Cookies, providing that satisfying crumbly, buttery foundation. Getting this right is key to the entire experience.
- Prepare Your Pan: First things first, generously grease and flour a 9×13 inch baking pan, or line it with parchment paper, leaving an overhang on the sides. The parchment paper method is my absolute favorite because it makes lifting the baked shortbread out of the pan a breeze, which is super helpful for cutting later.
- Cream the Butter and Sugar: In a large mixing bowl, using an electric mixer (either a stand mixer with a paddle attachment or a hand mixer), beat your very soft room temperature butter and powdered sugar together. You want to beat this mixture on medium-high speed until it’s wonderfully light, pale, and fluffy, typically about 2-3 minutes. This step is incredibly important as it incorporates air, which contributes to the shortbread’s tender texture. Don’t rush this!
- Introduce Vanilla: Scrape down the sides of the bowl and add the vanilla extract. Beat for another 30 seconds until just combined, infusing that lovely aroma throughout the butter and sugar mixture.
- Incorporate Dry Ingredients: With the mixer on low speed, gradually add the sifted all-purpose flour and salt to the wet ingredients. Mix just until the flour is incorporated and a soft, crumbly dough forms. Be careful not to overmix, as overmixing can develop the gluten in the flour, leading to tough shortbread instead of that melt-in-your-mouth texture we’re aiming for. The dough might seem a bit dry at first, but it will come together.
- Press into Pan: Transfer the dough to your prepared 9×13 inch baking pan. Using your hands or the bottom of a flat glass, firmly and evenly press the dough into the bottom of the pan. Make sure it’s compacted and forms an even layer from edge to edge. An even thickness ensures even baking.
- Chill the Dough: Cover the pan with plastic wrap and refrigerate the shortbread dough for at least 30 minutes. Chilling helps to firm up the butter, which prevents the shortbread from spreading excessively in the oven and helps achieve that signature crisp texture. It also makes for cleaner cuts later on.
- Preheat and Bake: While the dough chills, preheat your oven to 325°F (160°C). Once chilled, remove the plastic wrap and poke holes all over the surface of the dough with a fork. This prevents air bubbles from forming and helps the shortbread bake evenly. Bake for 25-30 minutes, or until the edges are lightly golden and the center is set. The top should appear dry and firm.
- Cool Completely: Remove the shortbread from the oven and let it cool completely in the pan on a wire rack. It’s crucial that it’s fully cooled before adding the caramel, otherwise, the caramel will melt into the shortbread, creating a mess. Once cool, you can use the parchment overhang to gently lift the shortbread out of the pan and place it on a cutting board if desired, though I often leave it in the pan for the next steps.
Crafting the Golden, Gooey Caramel Layer
This caramel layer is truly the star of our Ultimate Twix Style Cookies, providing that signature chew and decadent sweetness. While it might seem intimidating, I promise you can do this! Just pay close attention and don’t be afraid.
- Prepare Your Ingredients: Before you start cooking, make sure your heavy cream is warmed (a quick zap in the microwave for 30 seconds works perfectly) and your butter is cut into small pieces and at room temperature. Have your salt and vanilla extract ready to go. Having everything prepped ensures a smooth process once the sugar starts cooking.
- Dissolve the Sugar: In a medium-sized, heavy-bottomed saucepan (this is important for even heat distribution), combine the granulated sugar and water (and corn syrup/golden syrup, if using). Stir gently over medium-low heat until the sugar completely dissolves. It’s important not to rush this stage; you want to make sure all the sugar crystals are gone before the mixture comes to a boil. If you see crystals clinging to the sides of the pan, you can use a pastry brush dipped in water to gently brush them down.
- Cook the Sugar Syrup: Once the sugar is dissolved, increase the heat to medium-high. Do NOT stir the syrup from this point onward. Swirl the pan occasionally to ensure even cooking. We are looking for a beautiful, rich amber color, similar to the color of a penny or dark maple syrup. This will take anywhere from 8-15 minutes, depending on your stove and pan. Keep a close eye on it, as caramel can go from perfect to burnt very quickly! If you have a candy thermometer, you’re aiming for about 340-350°F (170-177°C).
- Add Warm Cream and Butter: Once your sugar syrup reaches that perfect amber color, immediately and very carefully remove it from the heat. Slowly pour the warm heavy cream into the hot sugar, stirring continuously with a whisk. Be extremely cautious as the mixture will bubble up violently and release a lot of steam – this is normal! Continue whisking until the mixture is smooth. Then, add the room temperature butter pieces and whisk until they are fully melted and incorporated, creating a luxurious, glossy caramel.
- Finish the Caramel: Return the saucepan to low heat. Add the salt and vanilla extract. Stir constantly for another 2-3 minutes, allowing the caramel to thicken slightly. If you’re using a candy thermometer, you want the caramel to reach approximately 240-245°F (115-118°C), which is the soft-ball stage. If you don’t have a thermometer, you can test it by dropping a small amount into a glass of cold water; it should form a soft, pliable ball that holds its shape but is still chewy.
- Cool and Spread: Remove the caramel from the heat and let it cool in the saucepan for about 10-15 minutes. It should still be pourable but slightly thicker. This waiting period allows it to cool just enough to prevent it from soaking into the shortbread. While the shortbread is still in its pan (or carefully returned to it), pour the warm caramel evenly over the cooled shortbread base. Use an offset spatula or the back of a spoon to spread it out smoothly to the edges.
- Chill to Set: Place the pan with the shortbread and caramel in the refrigerator for at least 1-2 hours, or until the caramel is completely firm to the touch. This step is non-negotiable for achieving clean cuts and ensuring the chocolate coating adheres properly to our Ultimate Twix Style Cookies.
Applying the Luxurious Chocolate Coating
The final glorious layer brings all the elements of our Ultimate Twix Style Cookies together, providing that signature snap and decadent chocolate flavor. This step is about perfection and presentation!
- Prepare for Cutting: Once the caramel is completely firm, remove the entire slab from the pan using the parchment paper overhang and place it on a large cutting board. Using a sharp, large knife, trim off the slightly uneven edges to create a perfectly rectangular slab. Then, carefully cut the slab into individual “Twix-style” bars. The size is entirely up to you – think classic candy bar shape. I usually go for about 2-inch by 1-inch bars. Wipe your knife clean after each cut for the cleanest edges. Place these individual bars on a parchment-lined baking sheet.
- Melt the Chocolate: Now for the grand finale! In a microwave-safe bowl, combine your chopped chocolate and coconut oil (or shortening). Microwave in 30-second intervals, stirring well after each interval, until the chocolate is mostly melted and smooth. Be careful not to overheat it. Alternatively, you can melt the chocolate using a double boiler method: place the chocolate and oil in a heatproof bowl set over a saucepan of simmering water, ensuring the bottom of the bowl does not touch the water. Stir gently until completely smooth and melted. The coconut oil helps to create a thinner, more pourable chocolate that sets with a beautiful shine and a satisfying snap, which is ideal for these Ultimate Twix Style Cookies.
- Coat the Bars: There are a couple of ways to coat your bars:
- Dipping Method (my preferred for full coverage): Using a fork or a dipping tool, gently lower one shortbread-caramel bar into the melted chocolate, ensuring it’s fully submerged. Lift it out, tapping the fork against the side of the bowl to allow any excess chocolate to drip off. Carefully slide the coated bar onto your parchment-lined baking sheet.
- Pouring/Spreading Method (good for a rustic look): If you prefer, you can also place the cut bars close together on a wire rack set over a parchment-lined baking sheet. Pour the melted chocolate generously over the bars, using an offset spatula to smooth it over the tops and sides. You’ll get more variation in thickness with this method, but it’s quicker.
Work quickly, as the cold bars will cause the chocolate to start setting. Repeat with all remaining bars.
- Final Chill to Set: Once all the bars are coated, place the baking sheet back into the refrigerator for at least 30 minutes, or until the chocolate is completely firm and set. This final chill ensures that signature crisp chocolate shell.
And there you have it! Your incredible, homemade Ultimate Twix Style Cookies are ready to be devoured. Each bite offers that perfect trifecta of crunchy shortbread, chewy caramel, and snappy chocolate. These are fantastic for sharing (or not, no judgment here!), perfect for parties, or simply as a well-deserved treat after a long day. Store them in an airtight container at room temperature for up to a week, or in the refrigerator if you prefer them extra firm and cold. Enjoy every single glorious morsel!
Conclusion:
So, there you have it! I truly believe that what we’ve explored together is more than just a recipe; it’s an invitation to create something truly magical in your kitchen. These aren’t just any cookies; they are an extraordinary journey for your taste buds, a perfect symphony of buttery shortbread, luscious caramel, and rich chocolate, all harmoniously layered to create an experience that transcends the ordinary. I can confidently say that these Ultimate Twix Style Cookies are a game-changer, offering that coveted combination of crunch, chew, and melt-in-your-mouth delight in every single bite. They truly embody indulgence, making them an absolute essential for anyone who appreciates homemade treats with a gourmet twist. Each cookie is a testament to the fact that a little effort can yield truly spectacular results, transforming simple ingredients into something truly memorable and profoundly satisfying.
Serving Suggestions to Savor:
Now, let’s talk about enjoying your magnificent creations! While I find these cookies utterly irresistible straight off the cooling rack, still slightly warm with the caramel just yielding, their versatility truly shines. Imagine pairing them with a tall, frosty glass of cold milk – it’s a classic combination for a reason, cutting through the sweetness beautifully and offering a nostalgic touch. For the coffee lovers among us, a strong espresso or a creamy latte makes an exquisite companion, the slight bitterness of the coffee perfectly balancing the cookie’s rich, layered sweetness. Beyond a simple snack, consider these a showstopper for your next dessert platter. Arranged artfully, perhaps alongside some fresh berries for a burst of tartness, or a dollop of freshly whipped cream, they effortlessly elevate any gathering, from a casual coffee morning to a sophisticated dinner party. I’ve even gone so far as to crumble them slightly over a scoop of high-quality vanilla bean ice cream for an impromptu sundae, and let me tell you, the textural contrast and flavor explosion were absolutely divine – a true testament to their versatility. For a more sophisticated touch, consider serving them after dinner with a small glass of dessert wine, or even a shot of Irish cream for an indulgent treat. They also make truly thoughtful gifts; imagine wrapping a small stack in pretty parchment and ribbon for a friend, neighbor, or a loved one – it’s a gesture that speaks volumes of care and effort, far more personal than anything store-bought.
Unleash Your Creativity with Variations:
But the fun doesn’t have to stop there! One of the things I adore most about baking is the freedom to experiment and make a recipe truly your own, tailoring it to your personal preferences or the occasion. While the core structure of these cookies is perfect as is, don’t hesitate to play around with variations to add your unique signature. For the chocolate layer, consider swapping out the classic milk chocolate for a richer dark chocolate (70% cocoa or higher) for a more intense, less sweet profile that adult palates often appreciate, or perhaps a creamy white chocolate for a distinct, buttery flavor. You could even swirl in some mini peanut butter chips or a spoonful of hazelnut spread into the melted chocolate for a delightful nutty twist! When it comes to the caramel, a sprinkle of flaky sea salt over the top of the caramel layer just before the chocolate sets can really enhance and deepen the flavor, creating that universally loved salted caramel effect. Alternatively, experiment with different caramel base ingredients – maybe try a homemade dulce de leche for a slightly different texture and flavor profile, or even incorporate a hint of cinnamon into your caramel. And for the shortbread base itself, imagine incorporating a hint of almond extract or even a touch of finely grated orange or lemon zest into the dough before baking; these small aromatic additions can add incredible depth and a layer of unexpected brightness. For a bit of extra flair, before the chocolate fully sets, you could sprinkle on some finely chopped toasted pecans, mini chocolate chips, or even a tiny dusting of edible glitter for a truly festive and eye-catching look. These cookies are wonderfully adaptable, inviting your creativity to shine through and allowing you to put your personal stamp on an already outstanding treat.
I genuinely hope that creating these magnificent cookies brings you as much joy and satisfaction as it brings me. There’s something incredibly rewarding about transforming simple ingredients into a show-stopping treat, and these Ultimate Twix Style Cookies deliver that satisfaction in spades. Don’t be intimidated by the layers; each step is straightforward and incredibly rewarding, building towards a truly impressive final product. I promise you, the heavenly aroma filling your kitchen alone will be worth every moment of effort, and the first bite? Pure, unadulterated bliss that will make you proud of your accomplishment. So, go ahead, gather your ingredients, clear your counter, and embark on this delicious baking adventure. And please, once you’ve baked your batch and shared them (or not, I won’t judge you for keeping them all to yourself!), I would absolutely love to hear about your experience. Did you try a fun variation? What was your favorite part of the process? Share your stories and photos with me and our vibrant baking community – let’s celebrate the joy of homemade goodness together! Happy baking, my friends!
Ultimate Twix Style Cookies
Capture the iconic crunch of a cookie base, the luscious pull of caramel, and the snap of rich chocolate all in one perfect, homemade treat. These Twix-style cookies are a delightful indulgence for any occasion.
Ingredients
Instructions
Important Information
Nutrition Facts (Per Serving)
It is important to consider this information as approximate and not to use it as definitive health advice.
Allergy Information
Please check ingredients for potential allergens and consult a health professional if in doubt.

Leave a Comment