

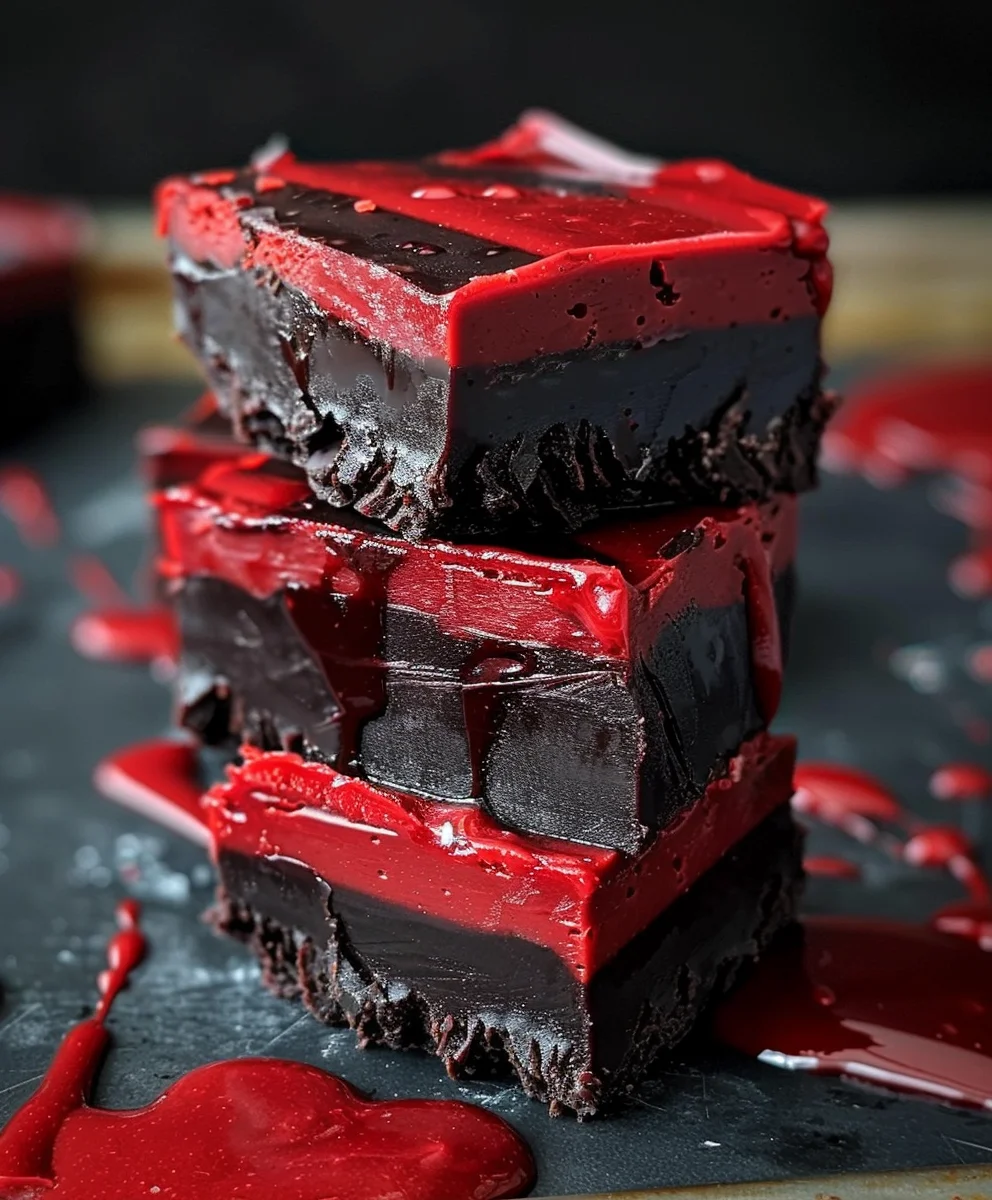
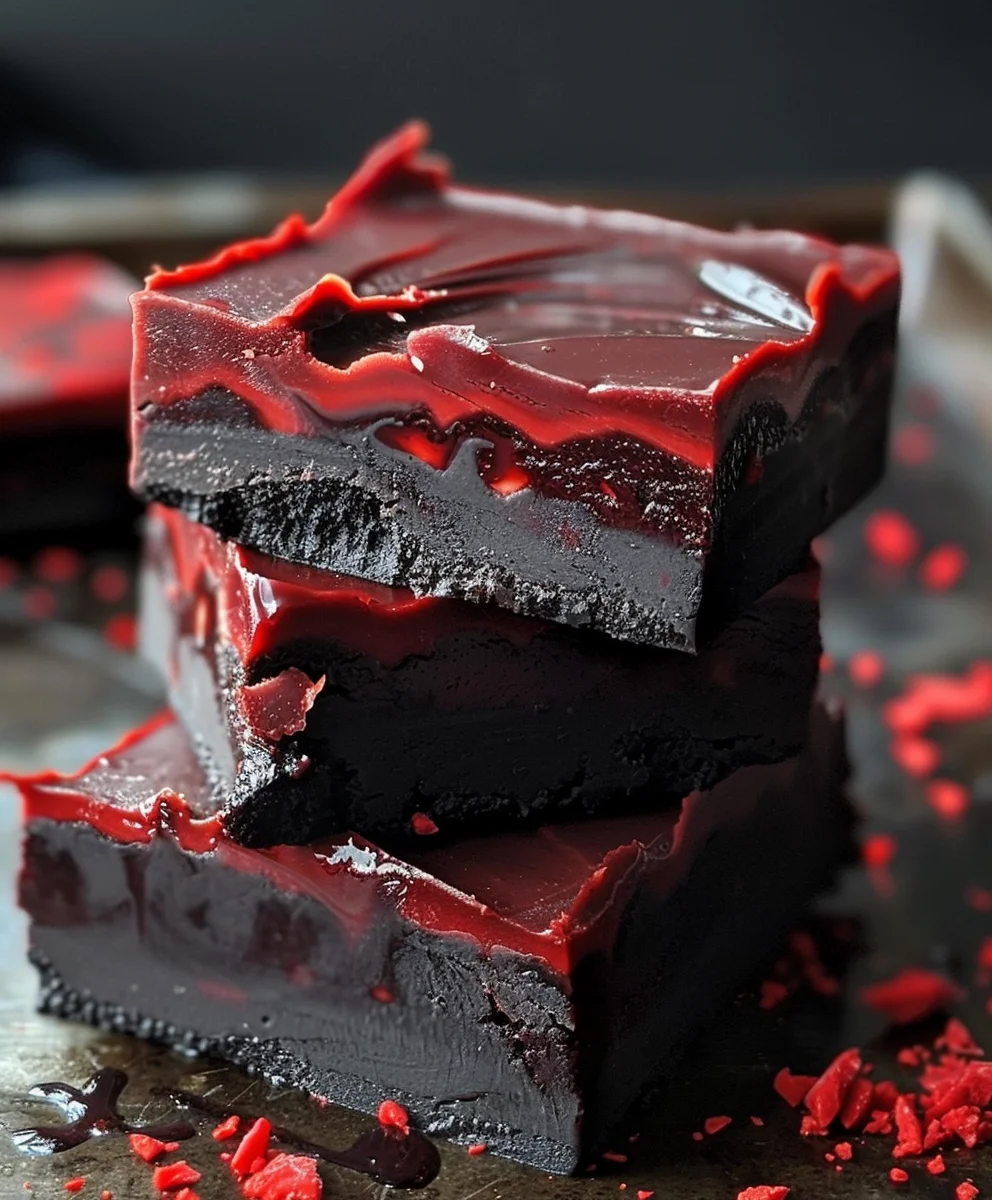
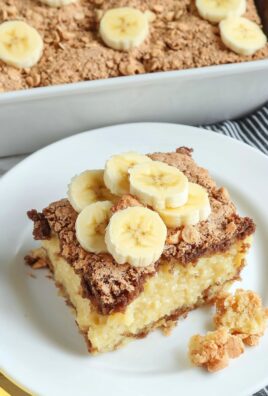
Recipe:vampire Fudge Recipe?utm_source=pinzk – a title that promises a touch of mystery and a whole lot of deliciousness! I am absolutely thrilled to unveil a confection that is as enchanting to behold as it is delightful to devour. Imagine a rich, velvety fudge, deep as twilight, with a surprise burst of crimson, hinting at the fantastical. This isn’t just any treat; it’s an experience, a journey into the realm of ghoulishly good gastronomy, perfect for adding a dramatic flair to any occasion.
While there might not be ancient scrolls detailing the origins of Vampire Fudge, its spirit perfectly captures the allure of autumn evenings, Halloween festivities, and any gathering where a uniquely dramatic dessert is desired. It’s a modern classic in the making, designed to evoke wonder and a playful chill. This particular Vampire Fudge Recipe is crafted to bring that intriguing theme right into your kitchen, promising both visual spectacle and gourmet delight with remarkable ease.
Beyond its captivating appearance, what truly makes this fudge irresistible is its exquisite taste and incredibly smooth texture. Each bite offers a luxurious creaminess that melts delightfully on the tongue, followed by a profound chocolatey richness, often with a delightful counterpoint of a fruity or tangy ‘blood-like’ swirl. It’s remarkably easy to prepare, making it a perfect last-minute indulgence or a show-stopping addition to any dessert table. The ease of preparation combined with its striking visual appeal ensures that it’s always a crowd-pleaser, leaving a lasting impression long after the last piece is savored.

Ingredients:
- For the Dark Chocolate Fudge Base:
- 24 ounces (about 680g) high-quality dark chocolate, chopped into small, even pieces or in chip form. I find a cocoa content of 60-70% works beautifully for a rich, not-too-bitter flavor, perfect for our Vampire Fudge Recipe. Avoid anything too bitter unless you absolutely love it! The quality of your chocolate really shines through in a simple recipe like fudge, so choose wisely for the best results.
- Two 14-ounce (about 397g each) cans full-fat sweetened condensed milk. Make sure it’s condensed milk, not evaporated milk, as this is crucial for the fudge’s creamy texture and sweetness. This is the secret to that classic, melt-in-your-mouth fudge consistency that everyone adores. The high sugar content in condensed milk helps to stabilize the fudge and gives it its signature smoothness.
- 4 tablespoons (1/4 cup or 56g) unsalted butter, cut into smaller pieces for faster melting. The butter adds a wonderful richness, a velvety texture, and helps create that smooth, glossy finish that makes fudge so appealing. It also aids in preventing the fudge from becoming too stiff.
- 2 teaspoons pure vanilla extract. A good quality pure vanilla extract really enhances the chocolate flavor, adding a touch of warmth and complexity. It’s an indispensable ingredient for rounding out the sweetness and deepening the overall profile of our Vampire Fudge.
- 1/2 teaspoon fine sea salt. Just a small amount of salt helps to balance the sweetness of the condensed milk and really brings out the depth of the dark chocolate. Don’t skip this; it’s a game-changer for flavor! The salt provides a subtle counterpoint that makes the chocolate taste even more intensely chocolatey.
- For the “Vampire” Raspberry Swirl & Topping:
- 1/2 cup (about 150g) good quality raspberry jam or preserves. Choose one with a vibrant red color and a nice balance of sweet and tart. A seedless variety is often preferred for a smoother texture in the swirl, avoiding any gritty bits. This is where our “bloody” aesthetic truly comes to life!
- 2 tablespoons (30g) unsalted butter. This will be melted with the jam to make it easier to drizzle and swirl through the fudge, ensuring it has a smooth, flowing consistency. It also adds a touch of richness to the raspberry element.
- 1/4 cup (about 10g) freeze-dried raspberries, crushed or left whole for garnish. These add a fantastic burst of tartness, a delightful textural contrast, and a beautiful, natural red hue that really fits our Vampire Fudge Recipe theme. Their intense flavor is perfect for complementing the rich chocolate.
- Optional: A few drops of red food coloring (gel preferred). If you want to intensify the “bloody” red of your raspberry swirl, especially if your jam isn’t as vibrant as you’d like, a tiny bit of gel food coloring can create a truly dramatic effect. I sometimes use a tiny bit to get that extra pop of color.
Preparing Your Workspace and Ingredients
-
Gather All Your Tools and Ingredients:
Before we even think about melting, let’s make sure everything is at hand. This is a quick process once you start melting the fudge, so you won’t have time to search for things mid-recipe. You’ll need a heavy-bottomed saucepan (a 3-quart size is usually perfect for the quantities specified), a sturdy heat-resistant rubber spatula or a wooden spoon for stirring, an 8×8-inch (or 9×9-inch for slightly thinner fudge) baking pan, a roll of parchment paper, and all your measured ingredients neatly laid out. Having your dark chocolate chopped and your butter cut into smaller pieces will save you precious minutes when things start to heat up and the mixture demands your full attention. I always find that a little mise en place makes the cooking process so much more enjoyable and significantly less stressful, ensuring a smooth culinary journey to perfect Vampire Fudge. It prevents panic and helps you stay focused on the beautiful transformation happening in your pot.
-
Prepare Your Baking Pan:
Line your chosen baking pan (an 8×8-inch pan will yield thicker pieces, while a 9×9-inch will give you slightly thinner ones) with parchment paper. Ensure you leave a generous overhang on all sides of the pan. This overhang is absolutely essential as it will act as convenient “handles” later, making it incredibly easy to lift the entire slab of set fudge cleanly out of the pan. I highly recommend spraying the pan lightly with a non-stick cooking spray before laying down the parchment paper; this little trick helps the parchment stick to the pan, preventing any frustrating slippage while you’re pouring the warm, thick fudge mixture. This step is absolutely crucial for easy removal and for achieving those clean, perfect squares of your decadent Vampire Fudge. Trust me, trying to dig fudge out of a pan without proper parchment lining is a nightmare that no one wants to experience!
Crafting the Rich Dark Chocolate Fudge Base
-
Melt the Core Ingredients:
In your heavy-bottomed saucepan, combine the pre-chopped dark chocolate, the contents of both cans of full-fat sweetened condensed milk, and the 4 tablespoons of unsalted butter that you’ve cut into smaller pieces. Place the saucepan over <strong>low to medium-low heat</strong>. This is where patience is not just a virtue, but a necessity! You absolutely do not want to rush this process by cranking up the heat. High heat can easily scorch the chocolate, leading to a burnt taste and gritty texture, which would tragically ruin our beautiful Vampire Fudge. Stir constantly, gently, and patiently with your rubber spatula or wooden spoon. The mixture will gradually start to melt and combine, slowly transforming into a glossy and smooth consistency. Continue stirring until all the chocolate and butter are completely melted and the mixture is well combined and uniform throughout, with no visible lumps. This crucial melting process should typically take about 7-10 minutes. The consistency should become wonderfully thick, visibly glossy, and perfectly smooth, signaling it’s ready for the next step.
As you meticulously stir, you’ll notice the chocolate slowly breaking down, merging seamlessly with the creamy condensed milk and the rich butter. The incredible aroma filling your kitchen will be absolutely divine – a tantalizing promise of the rich, decadent treat to come. Make sure to constantly scrape the bottom and sides of the pan frequently as you stir to prevent any chocolate from sticking or scorching. We are aiming for a perfectly smooth, unblemished, and luxurious base for our hauntingly delicious and dramatically dark fudge. This attention to detail ensures the ultimate texture and flavor.
-
Remove from Heat and Add Flavorings:
Once your chocolate mixture has reached that perfectly smooth, glossy, and lump-free state, immediately remove the saucepan from the heat. Speed is important here! Now, quickly stir in the 2 teaspoons of pure vanilla extract and the 1/2 teaspoon of fine sea salt. Stir vigorously for about 30 seconds to ensure these crucial flavor enhancers are thoroughly and evenly incorporated into the hot fudge mixture. The vanilla adds an extra layer of warmth, sweetness, and complexity, deepening the rich chocolate flavor, while the salt, as I mentioned earlier, is absolutely crucial for balancing the sweetness of the condensed milk and significantly enhancing the overall taste profile. It makes the chocolate taste even more intense. Do not put the pan back on the heat after adding the vanilla extract, as the alcohol in the extract can evaporate rapidly, which would diminish its delicate flavor, a step we want to avoid for maximum impact.
At this stage, the fudge will be wonderfully thick, pliable, and incredibly fragrant, ready for its next transformation. The captivating scent of pure vanilla mingling with the deep, dark chocolate is truly intoxicating and an experience in itself. Give it a good, enthusiastic stir, making sure every single bit of that rich chocolate base gets infused with these crucial flavor enhancers. This perfectly flavored base is the very foundation of our Vampire Fudge, so let’s make it as impeccably delicious as possible before moving on to its dramatic visual elements!
Creating the “Vampire” Raspberry Swirl
-
Prepare the Raspberry Swirl Mixture:
In a small, microwave-safe bowl or a very small saucepan, combine the 1/2 cup of good quality raspberry jam or preserves and the 2 tablespoons of unsalted butter. Our goal here is to make this mixture fluid and easily drizzled. Heat gently until the butter is completely melted and the jam is warm and easily stirred into a smooth consistency. If you’re using a microwave, heat in short 15-second intervals, stirring thoroughly after each, until it reaches a smooth and pourable consistency (this usually takes about 30-45 seconds in total, depending on your microwave’s power). If you prefer using a saucepan, heat it over very low heat, stirring continuously to prevent scorching. If you’re opting for that extra dramatic “blood red” effect for your Vampire Fudge, now is the perfect time to stir in a tiny drop or two of red gel food coloring until you achieve your desired intensity. Remember, a little gel coloring goes a very long way, so start with just a speck on a toothpick and add more if needed! You want a rich, deep, vibrant red that contrasts beautifully with the dark fudge.
The main goal here is to make the jam mixture fluid enough to drizzle effortlessly, allowing it to create those striking, artistic swirls. The butter helps to give it a slightly richer texture and makes it more cohesive and glossy, which is perfect for a swirl. Stir it well until there are absolutely no lumps of butter and the jam is a consistent, glossy, and smooth texture. This vibrant red mixture is what will truly elevate our fudge from simply delicious to spectacularly vampiric and visually stunning, making each piece a small masterpiece. The aroma of warm raspberries is a delightful counterpoint to the deep chocolate, creating a complex and inviting scent.
-
Assemble the Vampire Fudge:
Now that both your fudge base and raspberry swirl are ready, it’s time for the artistic assembly! Pour about two-thirds of the warm, rich dark chocolate fudge base into your prepared pan. Use your spatula to gently spread it evenly into the bottom of the pan, forming a smooth and consistent layer. Next, take your prepared raspberry swirl mixture and drizzle about half of it artfully over the fudge base in random lines and patterns. Don’t be too neat or precise; a chaotic, artistic drizzle actually adds to the mysterious and “vampire” aesthetic we’re aiming for. Following that, carefully dollop the remaining one-third of the dark chocolate fudge over the raspberry drizzle. It doesn’t need to be perfectly smooth or cover every bit of the raspberry at this point.
Finally, drizzle the remaining raspberry swirl mixture over the very top of the fudge in a similar fashion. Now for the truly fun and creative part: take a skewer, a chopstick, or even the tip of a clean knife, and gently swirl through the fudge layers, creating beautiful, dramatic marbled patterns. The key here is not to over-swirl! If you swirl too much, you’ll lose the distinct dark and red contrast, and the colors will blend into a muddy purplish-brown. Just a few elegant, deliberate passes are all you need to achieve that mesmerizing, marbled effect. Imagine streaks of “blood” through a dark, mysterious night – that’s precisely the hauntingly beautiful look we’re going for with our unique Vampire Fudge! Each swirl you create adds to the unique character of your treat.
Setting, Slicing, and Serving Your Vampire Fudge
-
Chill to Perfection:
Once your Vampire Fudge is swirled and looking perfectly dramatic, sprinkle the crushed or whole freeze-dried raspberries evenly over the top. These not only add a beautiful textural contrast and another layer of tart, fruity flavor but also provide a stunning visual appeal that truly finishes the “vampire” theme. Now, carefully transfer the pan to the refrigerator and chill for at least 3-4 hours. For the absolute best results and a perfectly firm texture, I strongly recommend chilling it preferably overnight. Patience is a profound virtue here! Rushing the chilling process will inevitably result in soft, sticky fudge that is incredibly difficult to cut cleanly and handle without making a mess. The longer it chills, the firmer, cleaner, and more perfectly sliceable your exquisite Vampire Fudge will be.
During this extended chilling period, the flavors will also have ample time to meld and deepen, making your Vampire Fudge even more irresistible and complex. You’ll know it’s ready when you can gently press on the surface with your finger and feel no give; it should be completely solid to the touch. This indicates that the chocolate and condensed milk have properly solidified into that wonderful, firm fudge texture we’re aiming for. The waiting is the hardest part, but it’s worth every minute for the glorious outcome.
-
Slice and Serve:
Once the fudge is thoroughly chilled and perfectly firm, use the parchment paper overhangs to carefully lift the entire slab of fudge out of the pan and transfer it onto a clean cutting board. Now, for the cutting: use a large, sharp knife. For the cleanest, most precise cuts, I recommend a little professional trick: heat your knife under hot running water, wipe it completely dry with a clean cloth, and then make each cut with a single, firm motion. Reheat and wipe the knife after every few cuts to ensure continuous cleanliness and sharpness. This simple technique helps the knife glide through the rich fudge without dragging or creating crumbly edges, ensuring beautifully crisp, defined squares.
Cut the fudge into 1-inch squares, or whatever size you prefer for serving. I find that smaller squares are often perfect for a rich and indulgent treat like this, allowing everyone to savor the deep chocolate and tart raspberry without feeling overwhelmed. As you slice, take a moment to admire the stunning dark chocolate and vibrant red raspberry swirls – each individual piece will be a unique work of art, perfectly embodying the mysterious and elegant “Vampire Fudge Recipe” aesthetic. Arrange your gorgeous fudge squares on a serving platter and prepare for an avalanche of compliments and delighted murmurs!
-
Storage Tips for Lasting Freshness:
Your homemade Vampire Fudge will keep wonderfully, maintaining its delightful texture and flavor for a good amount of time. Store the fudge in an airtight container at room temperature for up to 1 week. If you prefer to extend its shelf life, you can store it in the refrigerator for up to 2-3 weeks. If you plan on storing the fudge in multiple layers within the container, place a sheet of parchment paper between each layer to prevent the pieces from sticking together and making a mess when you try to retrieve them. While it’s perfectly delightful chilled, I often find that allowing it to come to room temperature for about 15-20 minutes before serving truly enhances its melt-in-your-mouth texture and allows the full spectrum of its rich, complex flavors to shine through beautifully. This fudge is perfect for gifting, for making a dramatic statement at parties, or simply for indulging your own sweet tooth with a treat that’s as beautiful as it is delicious. It’s an impressively decadent dessert that tastes even better than it looks! Enjoy every darkly delicious bite of your spooky-chic creation!
Consider making a double batch, especially if you plan to share this extraordinary treat with friends, family, or colleagues. This Vampire Fudge Recipe is absolutely guaranteed to be a hit, disappearing quickly from any dessert spread due to its irresistible charm and flavor. The exquisite combination of intense dark chocolate and bright, tangy raspberry is simply irresistible, making it a perfect indulgence for any occasion, particularly around Halloween or any time you want to add a touch of gothic elegance and dramatic flair to your dessert table. It’s a conversation starter as much as it is a dessert!
Quick Tip for Gifting:
If you’re making this as a thoughtful and impressive gift, place the beautifully cut squares into small, decorative candy boxes. You could even line the boxes with some dark tissue paper or cellophane for an extra touch of elegance. It makes for a truly homemade present that showcases both your impressive culinary skills and your artistic flair. Just imagine presenting a box of these beautifully swirled, dark and decadent treats – it’s sure to leave a lasting and wonderfully delicious impression!

Conclusion:
I’ve poured my heart into sharing this incredible fudge creation with you, and I truly believe it’s one you absolutely must experience for yourself. This isn’t just another sweet treat; it’s an experience, a delightful indulgence that brings a touch of magic and intrigue to any gathering or a quiet evening at home. What we’ve explored today is more than a simple recipe; it is the definitive Recipe:vampire Fudge Recipe?utm_source=pinzk, a culinary creation designed to bewitch and delight from the very first bite. The unique blend of rich cocoa, subtle undertones, and that unforgettable visual appeal truly sets it apart. Imagine the deep, dark hue, almost velvety in its appearance, perfectly offset by any garnishes you choose to add – perhaps a sprinkle of crimson sugar crystals, or a dusting of cocoa powder that hints at its profound flavor. This fudge offers a perfect balance: it’s sweet enough to satisfy the most ardent sugar cravings, yet sophisticated enough not to overwhelm, ensuring that each piece leaves you wanting just one more.
The beauty of this recipe lies not only in its sensational taste and striking looks but also in its remarkable versatility and ease of preparation. I know some people are intimidated by making fudge, but I promise you, this particular method is straightforward and incredibly rewarding. Even if you’re a novice in the kitchen, I’m confident you’ll achieve fantastic results. That’s why I’m so passionate about encouraging you to give it a try. It’s a recipe that builds confidence and delivers on its promise of deliciousness every single time. Moreover, it’s incredibly adaptable. While I’ve given you the core, perfect foundation, there are so many ways to personalize your batch. For instance, consider adding a handful of finely chopped roasted nuts – pecans, walnuts, or even macadamias – for an exciting textural contrast and a nutty depth of flavor. A swirl of salted caramel or a drizzle of melted white chocolate across the top before it sets would not only enhance its visual drama but also introduce another layer of delightful complexity. Don’t be afraid to experiment with flavor extracts either; a tiny splash of peppermint or almond extract can transform the entire profile, offering a surprising twist that will keep your taste buds guessing.
Serving Suggestions & Creative Variations to Elevate Your Fudge Experience
Once your sublime fudge has set to perfection, the possibilities for serving are as endless as your imagination. I love to cut mine into small, bite-sized squares, making them ideal for a dessert platter at your next dinner party. They pair exquisitely with a robust cup of coffee or a glass of chilled milk, making for a truly satisfying afternoon pick-me-up. For a more sophisticated touch, try serving a single square alongside a scoop of vanilla bean ice cream, allowing the rich fudge to slowly melt and mingle with the creamy coldness. It’s pure decadence! Thinking seasonally, this fudge is an absolute showstopper for Halloween gatherings, obviously, but don’t limit it to just one holiday. Its deep, intriguing color makes it perfect for winter festivities, a sophisticated addition to a Christmas cookie exchange, or even a dark, romantic treat for Valentine’s Day. Imagine it beautifully packaged in small decorative boxes, tied with a ribbon – it makes for an unforgettable homemade gift that speaks volumes about your thoughtfulness and culinary prowess.
And let’s not forget the fun you can have with variations! While the “vampire” theme is fantastic, you can easily adapt the colors and flavors for other occasions. For a festive Christmas batch, perhaps add some crushed candy canes to the top and a touch of peppermint extract within. For a spring celebration, a vibrant green food coloring and a hint of lime zest could transform it into an entirely different, equally delightful confection. Think about swirling in a contrasting color of melted candy wafers to create a marbled effect – perhaps orange for fall, or purple for a whimsical touch. The base of this particular fudge recipe is incredibly forgiving and robust, allowing for endless creative permutations. I’ve even seen variations where people press a thin layer of crushed biscuits at the bottom before pouring in the fudge, creating a delicious base similar to a cheesecake. The key is to have fun with it and make it uniquely yours.
Your Turn: Embrace the Culinary Adventure!
So, now that I’ve shared all my tips, tricks, and enthusiasm for this extraordinary treat, it’s your turn to step into the kitchen. I truly can’t wait for you to experience the joy of making and tasting this fudge. Don’t hesitate; gather your ingredients, follow the steps, and prepare to be utterly charmed. This is more than just a recipe; it’s an invitation to create something truly special, something that will undoubtedly earn you rave reviews from family and friends alike. Once you’ve whipped up your own batch of this sensational fudge, I would absolutely love to hear all about your experience. Did you add any exciting variations? What did your loved ones think? Please, share your photos and stories! Tag me on social media, or drop a comment below. Your feedback and creative takes inspire me and the entire community of fellow food lovers. Let’s spread the joy of this amazing fudge far and wide. Happy fudging!
Vampire Fudge Recipe: Spooky & Easy Chocolate Treat
Imagine a rich, velvety dark chocolate fudge with a dramatic, crimson raspberry swirl. This easy recipe creates a visually stunning and delicious treat, perfect for adding a spooky-chic flair to any occasion or Halloween festivities.
Ingredients
-
24 oz (680g) high-quality dark chocolate, chopped or chips (60-70% cocoa)
-
Two 14-oz (397g each) cans full-fat sweetened condensed milk
-
4 tbsp (56g) unsalted butter, cut into pieces (for fudge base)
-
2 tsp non-alcoholic vanilla extract
-
1/2 tsp fine sea salt
-
1/2 cup (150g) good quality raspberry jam or preserves (seedless preferred)
-
2 tbsp (30g) unsalted butter (for raspberry swirl)
-
1/4 cup (10g) freeze-dried raspberries, crushed or whole
-
Optional: A few drops of red gel food coloring
Instructions
-
Step 1
Line an 8×8-inch (or 9×9-inch) baking pan with parchment paper, leaving generous overhangs. Lightly spray the pan before lining to help the parchment stick. -
Step 2
In a heavy-bottomed saucepan, combine the 24 oz dark chocolate, two 14-oz cans sweetened condensed milk, and 4 tbsp unsalted butter. Melt over low to medium-low heat, stirring constantly for 7-10 minutes, until the mixture is glossy, smooth, and lump-free. -
Step 3
Remove the saucepan from heat. Quickly stir in 2 tsp non-alcoholic vanilla extract and 1/2 tsp fine sea salt until thoroughly incorporated. -
Step 4
In a small microwave-safe bowl or saucepan, gently heat 1/2 cup raspberry jam and 2 tbsp unsalted butter until melted and smooth. Stir in optional red gel food coloring for an intense ‘blood red’ effect if desired. -
Step 5
Pour about two-thirds of the warm dark chocolate fudge into the prepared pan and spread evenly. Drizzle about half of the raspberry swirl over it. Dollop the remaining one-third of the dark chocolate fudge over the raspberry drizzle, then drizzle the remaining raspberry swirl mixture over the top. Gently swirl the layers with a skewer or knife to create marbled patterns; do not over-swirl. -
Step 6
Sprinkle the crushed or whole freeze-dried raspberries evenly over the top. Refrigerate the pan for at least 3-4 hours, or preferably overnight, until the fudge is thoroughly chilled and perfectly firm. -
Step 7
Once firm, use the parchment paper overhangs to lift the entire slab of fudge onto a clean cutting board. Heat a large, sharp knife under hot running water, wipe it dry, then cut the fudge into 1-inch squares. Reheat and wipe the knife after every few cuts for clean, precise edges. -
Step 8
Store the fudge in an airtight container at room temperature for up to 1 week, or in the refrigerator for 2-3 weeks. If stacking layers, place parchment paper between them. For best texture and flavor, allow to come to room temperature for 15-20 minutes before serving.
Important Information
Nutrition Facts (Per Serving)
It is important to consider this information as approximate and not to use it as definitive health advice.
Allergy Information
Please check ingredients for potential allergens and consult a health professional if in doubt.
-
Leave a Comment