

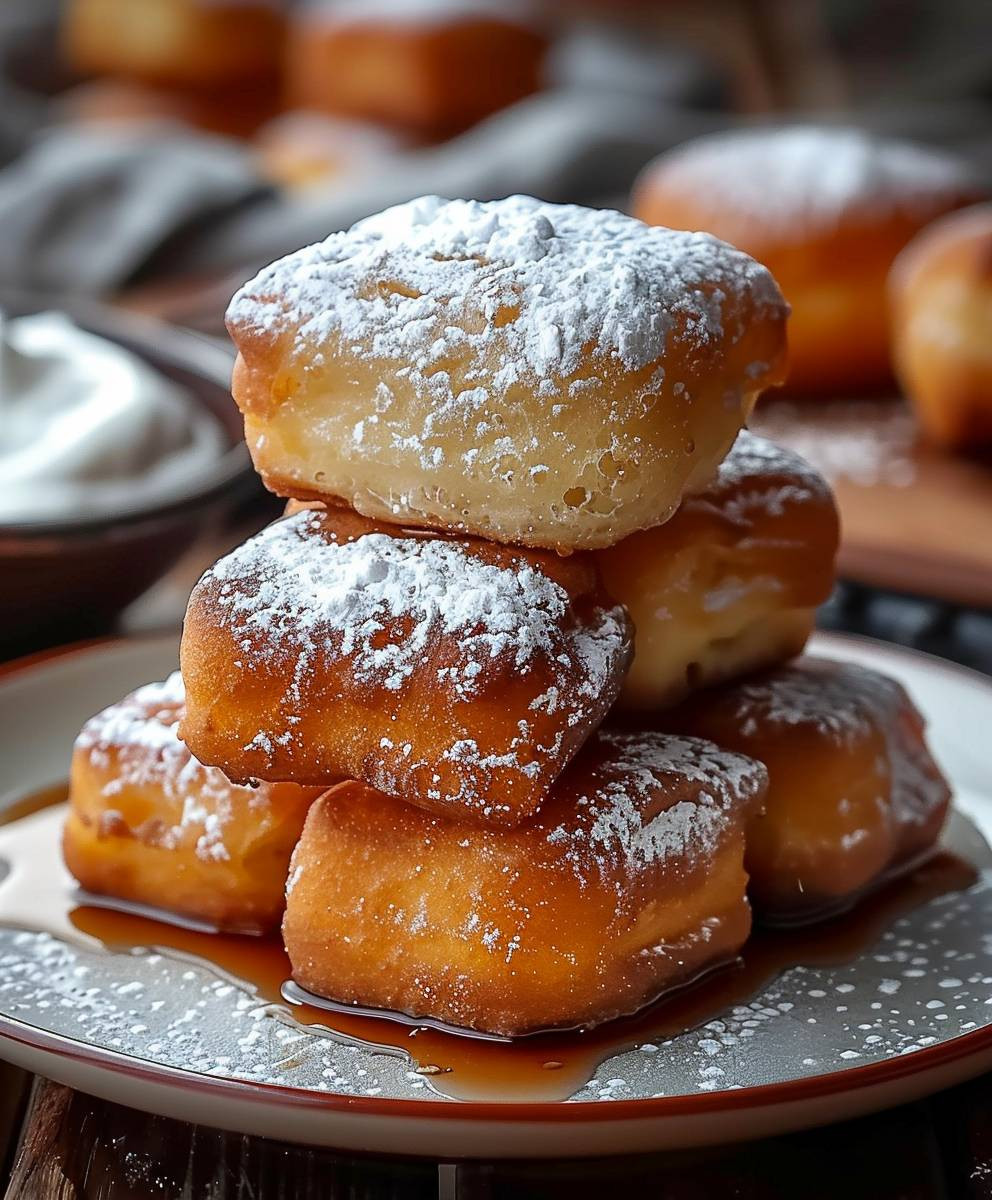
Vanilla French Beignets: Imagine biting into a cloud of golden-brown dough, its delicate crispness giving way to a pillowy soft interior, all dusted with a generous blanket of powdered sugar. That, my friends, is the magic of a beignet, and today, we’re elevating this classic treat with a touch of fragrant vanilla.
Beignets, deeply rooted in New Orleans’ culinary heritage, are more than just fried dough; they’re a symbol of celebration and community. Brought to Louisiana by French colonists in the 18th century, these square-shaped doughnuts quickly became a beloved staple, particularly at the iconic Café Du Monde. The aroma of freshly fried beignets and the lively atmosphere of the French Quarter are intrinsically linked, creating an unforgettable experience for locals and tourists alike.
But what makes Vanilla French Beignets so irresistible? It’s the perfect combination of textures and flavors. The slight chewiness of the dough, the satisfying crunch of the exterior, and the subtle sweetness, now enhanced with the warm embrace of vanilla, create a symphony of sensations in every bite. Plus, they’re incredibly easy to make at home, allowing you to bring a taste of New Orleans into your own kitchen. Whether you’re looking for a delightful breakfast treat, a comforting afternoon snack, or a show-stopping dessert, these beignets are guaranteed to impress. So, let’s get started and create some vanilla-infused magic!

Ingredients:
- 1 cup warm water (105-115°F)
- 1/4 ounce (7 grams or 2 1/4 teaspoons) active dry yeast
- 1/4 cup granulated sugar
- 1 teaspoon salt
- 2 large eggs, lightly beaten
- 1/2 cup evaporated milk
- 4 cups all-purpose flour, plus more for dusting
- 1/4 cup (1/2 stick) unsalted butter, melted
- Vegetable oil, for frying
- Powdered sugar, for dusting
- 1 teaspoon vanilla extract
Preparing the Dough:
Okay, let’s get started! Making beignets might seem a little intimidating, but trust me, it’s totally doable and incredibly rewarding. The key is patience and following the steps carefully. We’re going to start by activating the yeast, which is crucial for that light and airy texture we all crave.
- Activate the Yeast: In a large bowl (or the bowl of your stand mixer), pour in the warm water. Make sure it’s not too hot, or you’ll kill the yeast! The ideal temperature is between 105 and 115°F. Sprinkle the active dry yeast over the water and add a pinch of the granulated sugar (about 1/4 teaspoon). This little bit of sugar helps the yeast get going. Let it sit for about 5-10 minutes, or until the yeast is foamy and bubbly. This means the yeast is alive and ready to work its magic! If it doesn’t foam, your yeast might be old, and you’ll need to start with fresh yeast.
- Combine Wet Ingredients: Once the yeast is foamy, add the remaining granulated sugar, salt, beaten eggs, evaporated milk, melted butter, and vanilla extract to the bowl. Whisk everything together until well combined. The mixture should be smooth and slightly creamy.
- Add Flour Gradually: Now, it’s time to add the flour. Add the flour one cup at a time, mixing well after each addition. If you’re using a stand mixer, use the dough hook attachment and mix on low speed. If you’re mixing by hand, use a wooden spoon or a sturdy spatula. The dough will start to come together and become quite sticky.
- Knead the Dough: Once all the flour is incorporated, turn the dough out onto a lightly floured surface. Knead the dough for about 5-7 minutes, or until it becomes smooth and elastic. If you’re using a stand mixer, continue kneading with the dough hook for about 5 minutes. The dough should be slightly tacky but not overly sticky. If it’s too sticky, add a little more flour, one tablespoon at a time, until it reaches the right consistency.
- First Rise: Lightly grease a large bowl with oil or cooking spray. Place the dough in the bowl, turning it to coat all sides. Cover the bowl with plastic wrap or a clean kitchen towel. Let the dough rise in a warm place for about 2 hours, or until it has doubled in size. This is where the magic happens! The yeast is working hard, creating those air pockets that will make our beignets light and fluffy.
Refrigerating and Rolling Out the Dough:
After the first rise, we’re going to chill the dough. This makes it much easier to handle and roll out. Don’t skip this step!
- Punch Down the Dough: After the dough has doubled in size, gently punch it down to release the air. This helps to redistribute the yeast and create a more even texture.
- Refrigerate the Dough: Wrap the dough tightly in plastic wrap and refrigerate for at least 2 hours, or preferably overnight. This chilling period allows the gluten to relax, making the dough easier to roll out and preventing it from shrinking back too much. You can even refrigerate it for up to 24 hours.
Shaping and Frying the Beignets:
Now for the fun part – shaping and frying! This is where your patience will really pay off. Get ready for some golden-brown deliciousness!
- Prepare Your Frying Station: While the dough is chilling, prepare your frying station. You’ll need a large, heavy-bottomed pot or Dutch oven filled with about 2-3 inches of vegetable oil. Make sure you have a thermometer to monitor the oil temperature. You’ll also need a slotted spoon or spider for removing the beignets from the oil, and a wire rack lined with paper towels to drain the excess oil.
- Heat the Oil: Heat the vegetable oil over medium heat to 350-375°F (175-190°C). It’s crucial to maintain this temperature for even cooking. If the oil is too hot, the beignets will brown too quickly on the outside and remain raw on the inside. If the oil is too cold, they’ll absorb too much oil and become greasy.
- Roll Out the Dough: Once the dough is chilled, remove it from the refrigerator and place it on a lightly floured surface. Roll the dough out to about 1/4-inch thickness. Try to keep the dough as even as possible to ensure even cooking.
- Cut the Beignets: Using a sharp knife or a pizza cutter, cut the dough into 2-3 inch squares or rectangles. You can also use a cookie cutter to create different shapes, if you’re feeling creative!
- Fry the Beignets: Carefully drop a few beignets at a time into the hot oil. Don’t overcrowd the pot, as this will lower the oil temperature and result in greasy beignets. Fry for about 2-3 minutes per side, or until golden brown and puffed up.
- Drain and Cool: Use a slotted spoon or spider to remove the beignets from the oil and place them on the wire rack lined with paper towels to drain the excess oil.
Serving:
Almost there! The final step is the best part – dusting with powdered sugar and enjoying your freshly made beignets!
- Dust with Powdered Sugar: While the beignets are still warm, generously dust them with powdered sugar. You can use a sifter or a small strainer to ensure an even coating.
- Serve Immediately: Serve the beignets immediately while they’re still warm and fluffy. They’re best enjoyed fresh! You can serve them with coffee, hot chocolate, or your favorite dipping sauce.
Tips for Success:
- Use Fresh Yeast: Make sure your yeast is fresh and active. If it doesn’t foam when you activate it, it’s likely old and needs to be replaced.
- Control the Oil Temperature: Maintaining the correct oil temperature is crucial for even cooking. Use a thermometer to monitor the temperature and adjust the heat as needed.
- Don’t Overcrowd the Pot: Frying too many beignets at once will lower the oil temperature and result in greasy beignets. Fry them in batches.
- Dust Generously: Don’t be shy with the powdered sugar! A generous dusting is what makes beignets so irresistible.
- Enjoy Immediately: Beignets are best enjoyed fresh and warm. They tend to lose their fluffiness as they cool.
Variations:
- Chocolate Beignets: Add 1/4 cup of cocoa powder to the flour mixture for chocolate beignets.
- Cinnamon Sugar Beignets: Toss the fried beignets in a mixture of cinnamon and sugar instead of powdered sugar.
- Filled Beignets: Before frying, cut a small slit in each beignet and fill with your favorite jam, cream, or chocolate.
And there you have it! Homemade vanilla French beignets that are sure to impress. Enjoy the process, and don’t be afraid to experiment and make them your own. Happy baking!
Conclusion:
Well, there you have it! I truly believe this recipe for Vanilla French Beignets is a must-try for anyone who loves a little bit of magic in their kitchen. From the incredibly satisfying process of watching the dough puff up in hot oil to the first bite of that warm, pillowy, vanilla-infused goodness, this recipe is a winner. It’s more than just a dessert; it’s an experience, a little taste of New Orleans right in your own home.
Why is it a must-try? Because these aren’t just any beignets. The touch of vanilla elevates them to something truly special, adding a depth of flavor that complements the sweetness perfectly. They’re light, airy, and melt-in-your-mouth delicious. Plus, let’s be honest, who can resist a freshly fried, sugar-dusted treat? This recipe is surprisingly simple to follow, even for beginner bakers, and the results are guaranteed to impress. Forget store-bought donuts; once you’ve tasted these homemade beignets, you’ll never go back!
But the fun doesn’t stop there! These Vanilla French Beignets are incredibly versatile. While a generous dusting of powdered sugar is the classic way to enjoy them, feel free to get creative with your toppings. Imagine drizzling them with melted chocolate, caramel sauce, or even a tangy raspberry coulis. For a more sophisticated twist, try serving them with a scoop of vanilla bean ice cream and a sprinkle of chopped nuts.
Looking for serving suggestions? These beignets are perfect for a weekend brunch, a special occasion dessert, or even just a spontaneous treat on a cozy evening. Pair them with a steaming cup of coffee or a refreshing glass of iced tea. They’re also a fantastic addition to any party or gathering, guaranteed to be a crowd-pleaser. And if you happen to have any leftovers (though I highly doubt it!), they’re delicious reheated in the oven or microwave.
Don’t be afraid to experiment with the recipe itself! If you’re feeling adventurous, try adding a pinch of cinnamon or nutmeg to the dough for a warm, spiced flavor. You could also incorporate a tablespoon of your favorite liqueur, like rum or Grand Marnier, for an extra touch of indulgence. For a chocolate version, add a couple of tablespoons of cocoa powder to the dry ingredients. The possibilities are endless!
I’m so excited for you to try this recipe and experience the joy of making your own Vanilla French Beignets. I promise you won’t be disappointed. So, gather your ingredients, put on some music, and get ready to create some delicious memories.
And most importantly, I want to hear about your experience! Did you try any variations? What toppings did you use? How did your family and friends react? Share your photos and stories in the comments below. I can’t wait to see your creations and hear all about your beignet adventures. Happy baking!
Vanilla French Beignets: A Delicious & Easy Recipe
Light, airy homemade beignets! These classic French doughnuts are fried to golden perfection and dusted with powdered sugar.
Ingredients
Instructions
Recipe Notes
- Use fresh yeast for the best results. If it doesn’t foam when activated, it’s likely old.
- Maintaining the correct oil temperature is crucial for even cooking. Use a thermometer to monitor the temperature.
- Don’t overcrowd the pot when frying. Fry in batches to avoid lowering the oil temperature.
- Beignets are best enjoyed fresh and warm.

Leave a Comment