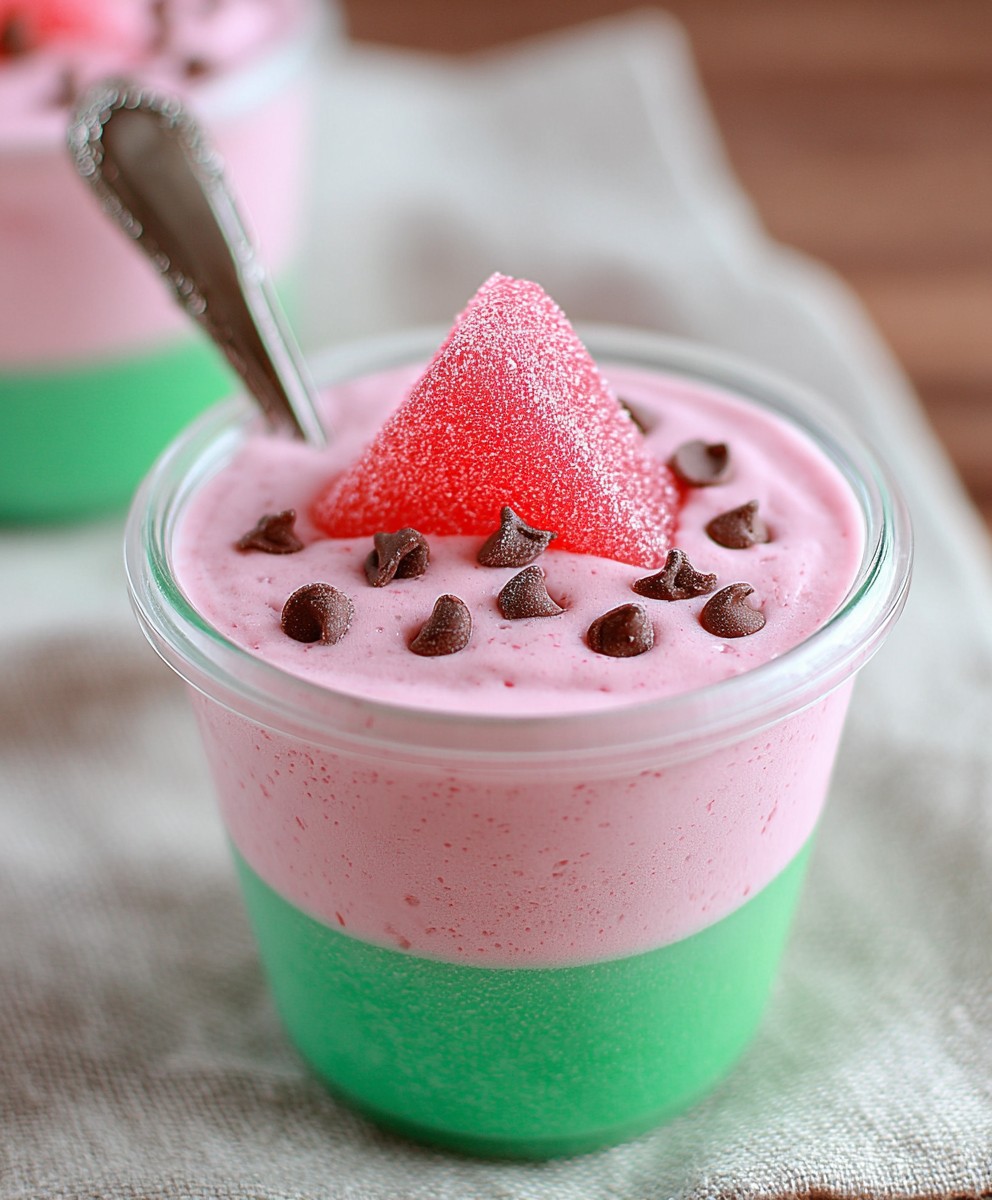
Watermelon pudding cups: the quintessential summer treat you didn’t know you needed! Imagine a dessert that perfectly captures the refreshing essence of a juicy watermelon, transformed into a creamy, dreamy pudding. These aren’t your average pudding cups; they’re a vibrant celebration of flavor and fun, guaranteed to bring a smile to your face with every spoonful.
While the exact origins of watermelon pudding are a bit hazy, the concept of transforming simple ingredients into delightful desserts has been around for centuries. Watermelon itself has a rich history, enjoyed for millennia across various cultures for its hydrating and refreshing properties. It’s no surprise that creative cooks eventually found a way to capture its unique flavor in a sweet and satisfying pudding.
What makes watermelon pudding cups so irresistible? It’s the delightful combination of creamy texture and the unmistakable taste of summer. The light, fruity flavor is incredibly refreshing, making it the perfect dessert on a hot day. Plus, they are incredibly easy to make, requiring minimal ingredients and effort. Whether you’re looking for a quick and easy treat for the kids or a light and refreshing dessert to impress your guests, these pudding cups are sure to be a hit. Get ready to experience a taste of summer in every bite!
Ingredients:
- 6 cups cubed seedless watermelon, chilled
- 1/4 cup granulated sugar (adjust to taste based on watermelon sweetness)
- 2 tablespoons lemon juice, freshly squeezed
- 1 packet (1/4 ounce) unflavored gelatin
- 1/4 cup cold water
- 1 cup heavy cream, chilled
- 1/4 cup powdered sugar
- 1/2 teaspoon vanilla extract
- Optional garnishes: fresh mint sprigs, watermelon wedges, whipped cream
Preparing the Watermelon Puree
Alright, let’s get started! The first thing we need to do is create a beautiful, smooth watermelon puree. This is the base of our pudding, so we want it to be perfect.
- Cube the Watermelon: Make sure your watermelon is nice and chilled. Cut it into roughly 1-inch cubes. This will help it blend evenly.
- Blend the Watermelon: Place the cubed watermelon into a high-powered blender or food processor. Blend until completely smooth. You might need to do this in batches depending on the size of your blender.
- Strain the Puree (Optional but Recommended): For the smoothest possible pudding, strain the watermelon puree through a fine-mesh sieve lined with cheesecloth. This will remove any seeds or fibrous bits that might have escaped the blending process. This step is optional, but I highly recommend it for a truly luxurious texture.
- Adjust Sweetness: Taste the watermelon puree. Watermelons vary in sweetness, so now’s the time to adjust. If it’s not sweet enough for your liking, stir in the granulated sugar, a tablespoon at a time, until you reach your desired sweetness. Remember, you can always add more, but you can’t take it away!
- Add Lemon Juice: Stir in the lemon juice. This brightens the flavor of the watermelon and adds a lovely tang that balances the sweetness.
Preparing the Gelatin
Gelatin is what gives our pudding its set, so it’s important to handle it correctly. We’ll bloom the gelatin first, which means softening it in cold water.
- Bloom the Gelatin: In a small bowl, sprinkle the unflavored gelatin over the cold water. Let it sit for about 5-10 minutes. You’ll notice the gelatin will absorb the water and become a soft, spongy mass. This is exactly what we want!
- Dissolve the Gelatin: Gently heat the watermelon puree in a saucepan over low heat. Do not boil! We just want it warm enough to dissolve the gelatin. Remove the saucepan from the heat and add the bloomed gelatin. Stir until the gelatin is completely dissolved and the mixture is smooth. Make sure there are no lumps of gelatin remaining.
Chilling the Watermelon Mixture
Now, we need to chill the watermelon mixture to help it set properly. This step is crucial for achieving the right consistency.
- Chill the Mixture: Pour the watermelon mixture into a bowl or container. Cover it with plastic wrap, pressing the plastic wrap directly onto the surface of the mixture to prevent a skin from forming. Refrigerate for at least 2-3 hours, or until the mixture is partially set. It should be thickened but not completely solid.
Preparing the Whipped Cream
While the watermelon mixture is chilling, let’s prepare the whipped cream. This adds a lovely lightness and creaminess to our pudding cups.
- Chill the Bowl and Whisk: Place your mixing bowl and whisk (or the bowl and whisk attachment of your stand mixer) in the freezer for about 15-20 minutes. This helps the cream whip up faster and hold its shape better.
- Whip the Cream: Pour the chilled heavy cream into the chilled bowl. Beat with the whisk or mixer on medium speed until soft peaks form.
- Add Sugar and Vanilla: Gradually add the powdered sugar and vanilla extract. Continue beating until stiff peaks form. Be careful not to overwhip, or the cream will turn grainy. You want it to be firm enough to hold its shape but still smooth and creamy.
Assembling the Watermelon Pudding Cups
Now for the fun part – assembling our beautiful watermelon pudding cups!
- Whisk the Watermelon Mixture: Remove the partially set watermelon mixture from the refrigerator. Whisk it gently to break it up and make it smooth again. This will ensure a consistent texture throughout the pudding.
- Fold in the Whipped Cream: Gently fold the whipped cream into the watermelon mixture in two or three additions. Be careful not to overmix, as this will deflate the whipped cream and result in a less airy pudding. We want to keep that light and fluffy texture!
- Spoon into Cups: Spoon the watermelon pudding mixture into individual serving cups or glasses. You can use small mason jars, wine glasses, or any other decorative cups you like.
- Chill Again: Cover the pudding cups with plastic wrap and refrigerate for at least 2-3 hours, or preferably overnight, to allow the pudding to set completely.
Garnishing and Serving
Finally, it’s time to garnish our watermelon pudding cups and enjoy the fruits (or rather, the watermelon) of our labor!
- Garnish (Optional): Before serving, garnish the pudding cups with fresh mint sprigs, small watermelon wedges, or a dollop of extra whipped cream. You can also sprinkle a little bit of finely grated lime zest on top for an extra burst of flavor. Get creative and have fun with it!
- Serve Chilled: Serve the watermelon pudding cups chilled. They’re perfect for a light and refreshing dessert on a hot summer day.
Tips and Variations:
- Vegan Option: To make this recipe vegan, substitute the gelatin with agar-agar powder. Follow the package instructions for using agar-agar. Use a plant-based heavy cream alternative for the whipped cream.
- Watermelon Varieties: Feel free to experiment with different varieties of watermelon, such as yellow watermelon or orange watermelon. Each variety will have a slightly different flavor and color.
- Add a Layer of Graham Cracker Crumbs: For a little extra texture, add a layer of graham cracker crumbs to the bottom of the pudding cups before adding the watermelon mixture.
- Boozy Watermelon Pudding: For an adult twist, add a tablespoon or two of watermelon liqueur or vodka to the watermelon puree before chilling.
- Storage: Watermelon pudding cups can be stored in the refrigerator for up to 3 days.
Enjoy your delicious and refreshing Watermelon Pudding Cups!
Conclusion:
And there you have it! These Watermelon Pudding Cups are more than just a dessert; they’re a burst of summer sunshine in every spoonful. I truly believe this recipe is a must-try because it’s incredibly easy, refreshingly light, and absolutely delicious. Forget heavy, complicated desserts – this is the perfect treat for a hot day, a casual gathering, or simply when you’re craving something sweet and guilt-free. The vibrant color and natural sweetness of the watermelon make it a crowd-pleaser, and the creamy pudding base adds a touch of indulgence that will leave you wanting more.
But the best part? It’s so versatile! While I love the simplicity of the original recipe, feel free to get creative with your serving suggestions and variations. For a more sophisticated presentation, try layering the pudding and watermelon in elegant parfait glasses. A sprinkle of fresh mint or a dollop of whipped cream can elevate the visual appeal and add a delightful aroma.
Looking for variations? Consider adding a squeeze of lime juice to the watermelon for a tangy twist. Or, for a richer flavor, incorporate a layer of coconut cream between the pudding and watermelon. If you’re feeling adventurous, you could even blend a small amount of watermelon into the pudding itself for a more intense watermelon flavor. For the adults, a splash of vodka or rum in the watermelon puree can transform these into delightful summer cocktails. Just remember to enjoy responsibly!
These Watermelon Pudding Cups are also incredibly kid-friendly. My own little ones absolutely adore them, and I love that they’re getting a healthy dose of fruit in a fun and appealing way. You can even let them help with the preparation – layering the watermelon and pudding is a great activity for little hands.
I’ve poured my heart into perfecting this recipe, and I’m confident that you’ll love it as much as I do. It’s the perfect way to celebrate the flavors of summer and create lasting memories with your loved ones. The simplicity of this recipe makes it a winner, and the refreshing taste of watermelon pudding will have everyone asking for seconds.
So, what are you waiting for? Grab a watermelon, gather your ingredients, and get ready to whip up a batch of these irresistible Watermelon Pudding Cups. I promise you won’t be disappointed!
And most importantly, I’d love to hear about your experience! Did you try any of the variations I suggested? Did you add your own unique twist? Share your photos and comments on social media using #WatermelonPuddingCups. I can’t wait to see your creations and hear what you think. Happy cooking (and eating)!
Watermelon Pudding Cups: A Refreshing Summer Treat
Cool and refreshing Watermelon Pudding Cups! This light and airy dessert is perfect for summer, featuring a smooth watermelon puree, a hint of lemon, and a cloud of homemade whipped cream.
Ingredients
Instructions
Recipe Notes
- Vegan Option: Substitute gelatin with agar-agar powder (follow package instructions). Use plant-based heavy cream alternative for whipped cream.
- Watermelon Varieties: Experiment with different watermelon varieties for unique flavors and colors.
- Add Graham Cracker Crumbs: Add a layer of graham cracker crumbs to the bottom of the pudding cups for extra texture.
- Boozy Watermelon Pudding: Add a tablespoon or two of watermelon liqueur or vodka to the watermelon puree before chilling (for adults only).
- Storage: Watermelon pudding cups can be stored in the refrigerator for up to 3 days.


Leave a Comment