

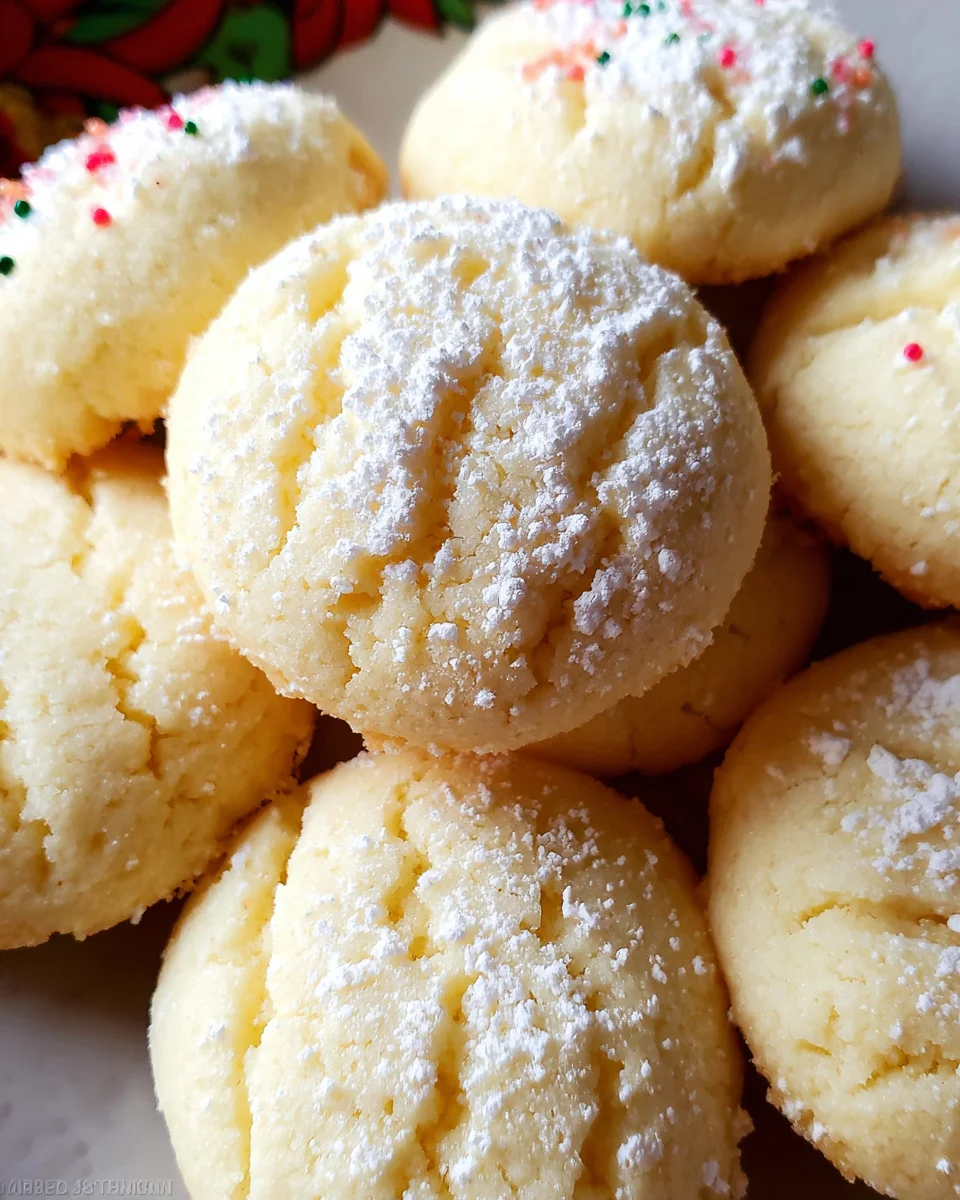
Whipped Shortbread Cookies: Are you searching for that perfect cookie that practically melts in your mouth, leaving a buttery, sweet whisper on your palate with every delicate bite? I know I am, especially when the desire for something truly special strikes, and these delightful treats are my absolute go-to for delivering pure joy. While traditional shortbread has a rich history rooted in Scottish culinary traditions, celebrated for its simple elegance and pure butter flavor, Whipped Shortbread Cookies take this classic to an ethereal new level. It’s the unique technique of creaming butter and sugar until incredibly light and fluffy that truly sets these apart, transforming a typically dense crumb into an impossibly tender, airy texture.
People absolutely adore this dish not just for its unparalleled melt-in-your-mouth sensation and rich buttery taste, but also for its beautiful simplicity and festive appeal. They are not just cookies; they are tiny, edible clouds of pure delight, often adorned with sprinkles or a simple cherry, making them an elegant addition to any holiday platter or a perfect accompaniment to an afternoon cup of tea. You are about to discover why these cookies consistently earn their spot as a cherished favorite in kitchens around the world!

Ingredients:
- 1 cup (2 sticks or 226g) unsalted butter, very soft but not melted. This is absolutely crucial for achieving that characteristic melt-in-your-mouth texture in your whipped shortbread cookies. I usually leave mine out on the counter for at least 2-3 hours, or even overnight if my kitchen is cool.
- ¾ cup (150g) granulated sugar. While some shortbread recipes use powdered sugar, granulated sugar here provides a subtle crispness that beautifully complements the tender, buttery crumb of these whipped shortbread cookies.
- 1 teaspoon pure vanilla extract. I always opt for pure vanilla extract over imitation; the difference in flavor is undeniable and elevates the entire cookie experience.
- 2 cups (240g) all-purpose flour, spooned and leveled. Proper measurement of flour is essential. Scooping directly from the bag can compact the flour, leading to dense, dry cookies. Use a spoon to lightly fill your measuring cup, then level it off with a straight edge.
- ½ cup (60g) cornstarch. This is one of the secret weapons for exceptionally tender and delicate whipped shortbread cookies. Cornstarch helps to reduce gluten formation, resulting in a wonderfully crumbly and melt-away texture. Don’t skip it!
- ¼ teaspoon fine sea salt. A small amount of salt enhances all the other flavors, particularly the sweetness and the richness of the butter. It truly balances the profile of your whipped shortbread cookies.
- Optional Toppings:
- Sprinkles: Nonpareils or colorful jimmies add a festive touch.
- Glacé cherries (candied cherries): Cut into small pieces, these are a classic addition, providing a lovely chewiness and a pop of color.
- Chocolate drizzle: Melted chocolate chips or tempering chocolate can add an elegant finish.
- Coarse sugar: For a sparkling top and extra crunch.
Equipment You’ll Need:
Before we dive into creating these delightful whipped shortbread cookies, let’s make sure you have all the necessary tools ready. Having everything at hand will make the baking process smooth and enjoyable.
- Stand mixer with paddle attachment or a large mixing bowl with an electric hand mixer: While you can make these by hand, a mixer will give you the best results for truly whipped, airy shortbread dough. The key to whipped shortbread is, well, the whipping!
- Rubber spatula: Essential for scraping down the sides of the bowl to ensure all ingredients are thoroughly incorporated.
- Sifter or whisk: For combining your dry ingredients and ensuring there are no lumps.
- Measuring cups and spoons: For precise ingredient measurement.
- Baking sheets: You’ll need at least two, possibly three, depending on their size and your oven capacity.
- Parchment paper or silicone baking mats: These are non-negotiable for preventing sticking and ensuring even baking.
- Wire cooling rack: For allowing your baked cookies to cool completely.
- Optional: Piping bag with a star tip (e.g., Wilton 1M or 2D): If you want to create beautiful, ornate designs, a piping bag is your best friend. Otherwise, a small cookie scoop or even your hands will work perfectly for shaping.
Phase 1: Preparing Your Workspace and Ingredients
Baking is all about preparation! A well-organized kitchen sets the stage for baking success, especially when making delicate treats like whipped shortbread cookies.
- Preheat Your Oven: My first step is always to preheat the oven. Set your oven to 325°F (160°C). This lower temperature is ideal for shortbread, allowing the cookies to bake through gently without browning too much, preserving their pale, tender texture. A properly preheated oven ensures consistent baking from the moment your cookies go in.
- Prepare Your Baking Sheets: Line two large baking sheets with parchment paper or silicone baking mats. I find parchment paper particularly helpful because it makes transferring the cooled cookies a breeze and clean-up almost non-existent. You’ll be grateful for this step later!
- Ensure Butter is Perfect: Now, let’s talk about the star ingredient: butter. Your unsalted butter absolutely must be very soft, but not at all melted or greasy. I mean, truly soft to the touch, where your finger leaves a significant indentation without effort. If it’s too cold, it won’t cream properly with the sugar, leading to a dense dough. If it’s too warm or melted, your cookies will spread excessively in the oven. Room temperature, for me, means leaving it out for a good 2-3 hours. If you’re in a hurry, you can cut it into smaller pieces to speed up the process, but never microwave it to soften unless you’re extremely careful to avoid melting.
- Whisk Dry Ingredients: In a medium bowl, whisk together your 2 cups of all-purpose flour, ½ cup of cornstarch, and ¼ teaspoon of fine sea salt. Whisking or sifting these ingredients together ensures they are thoroughly combined and aerated, preventing pockets of unmixed flour or cornstarch in your final dough. This step is crucial for an even texture in your whipped shortbread cookies.
Phase 2: The Whipping Process – Creating the Perfect Dough
This phase is where the “whipped” in whipped shortbread cookies truly comes to life! It’s all about incorporating air for that signature light, tender texture.
- Cream the Butter and Sugar: In the bowl of your stand mixer (or a large bowl if using a hand mixer), place your very soft 1 cup of unsalted butter and ¾ cup of granulated sugar. Begin beating them on medium-low speed until they start to come together, then increase the speed to medium-high. You want to beat this mixture for a solid 5 to 7 minutes. Yes, that long! The goal is for the mixture to become incredibly pale, light, and fluffy, almost like a buttercream frosting. This extensive creaming process incorporates air into the butter, which is what gives whipped shortbread cookies their characteristic tender, melt-in-your-mouth quality and helps them hold their shape without spreading too much. Don’t rush this step; it’s the foundation of your delicious cookies!
- Add Vanilla Extract: Once your butter and sugar mixture is beautifully light and airy, add in the 1 teaspoon of pure vanilla extract. Beat for another 30 seconds to fully incorporate it. The aroma alone will make your kitchen smell heavenly!
- Gradually Add Dry Ingredients: Now, with the mixer on its lowest speed, begin to gradually add your whisked flour, cornstarch, and salt mixture to the wet ingredients. Add about a third of the dry mixture at a time, mixing only until just combined before adding the next portion. This is incredibly important: do not overmix! Overmixing develops the gluten in the flour, which will make your shortbread tough instead of tender and crumbly. As soon as the last of the flour disappears and a soft, cohesive dough forms, stop mixing. The dough will be quite thick and somewhat stiff, but still soft and pliable.
- Check Dough Consistency: At this point, I like to give the dough a little test. It should be firm enough to hold its shape when piped or scooped, but still soft enough to press through a piping bag without too much effort. If it seems too soft, you can chill it for 10-15 minutes, though usually, with correctly softened butter, it’s just right.
Phase 3: Shaping the Cookies
This is where you can get creative and give your whipped shortbread cookies their beautiful, signature look! The good news is, there are several ways to shape them.
- Prepare for Shaping: Have your prepared baking sheets ready and close by. If you’re using optional toppings like sprinkles or candied cherries, have them ready in small bowls.
- Using a Piping Bag (Recommended for Classic Look):
- Fit a large piping bag with a large star tip (like a Wilton 1M or 2D).
- Spoon the dough into the piping bag, filling it about two-thirds full. Twist the top to seal and apply gentle pressure.
- Pipe the dough onto the prepared baking sheets, leaving about 1 to 1.5 inches between each cookie. I usually aim for small rosettes, about 1 ½ to 2 inches in diameter. To pipe a rosette, hold the bag perpendicular to the baking sheet, apply steady pressure, and pipe a small circle starting from the center and spiraling outwards, then release pressure and lift.
- The dough for whipped shortbread cookies is quite firm, so don’t be discouraged if it feels like a bit of a workout for your hands! This firmness is what helps the cookies hold their intricate piped shapes beautifully during baking.
- Using a Cookie Scoop or Spoon (Easier Method):
- If you prefer a simpler approach or don’t have a piping bag, use a small cookie scoop (about 1 tablespoon capacity) or two spoons to drop rounded mounds of dough onto the baking sheets.
- For a neater look, you can gently flatten the tops slightly with the back of a spoon or your fingertips, or even create a crosshatch pattern with a fork, similar to traditional peanut butter cookies.
- Add Optional Toppings: Now’s the time for those finishing touches! Gently press a small piece of glacé cherry into the center of each piped rosette, or sprinkle some nonpareils or coarse sugar over the tops of your shaped cookies. These not only add visual appeal but also a lovely textural contrast.
Phase 4: Baking Your Whipped Shortbread Cookies
Baking shortbread is a delicate art; the goal is to bake them through without allowing them to brown significantly, preserving their signature pale color and tender crumb. This ensures your whipped shortbread cookies truly melt in your mouth.
- Bake in a Preheated Oven: Carefully transfer your baking sheets to the preheated 325°F (160°C) oven. If your oven can accommodate two sheets at once, place them on separate racks (e.g., upper-middle and lower-middle) and rotate them halfway through baking for even cooking.
- Baking Time: Bake your whipped shortbread cookies for 15 to 20 minutes. The exact time will depend on the size and thickness of your cookies and the specific calibration of your oven.
- What to Look For: The cookies should look very pale, almost white, or only very lightly golden around the edges. They should not be deeply browned at all. If the tops start to look too golden, your oven might be running a bit hot, or your cookies are getting close to being overbaked.
- Consistency Check: When gently touched, the cookies should feel firm to the touch, especially in the center. If they still feel soft and wobbly, they need a few more minutes.
- Do Not Overbake: I cannot stress this enough for whipped shortbread cookies! Overbaking is the enemy of tender shortbread. It will make them dry, tough, and crumbly in an unpleasant way. It’s better to err on the side of slightly underbaked than overbaked. Remember, they will continue to firm up as they cool.
Phase 5: Cooling and Finishing Touches
Patience is a virtue, especially when waiting for these beautiful whipped shortbread cookies to cool!
- Initial Cooling on Baking Sheets: Once baked, remove the baking sheets from the oven. Leave the cookies on the hot baking sheets for about 5 to 10 minutes. This crucial step allows the delicate cookies to firm up enough to be handled without breaking. They are quite fragile right out of the oven.
- Transfer to Wire Rack: After this initial cooling period, carefully transfer the cookies to a wire cooling rack to cool completely. Use a thin metal spatula to gently lift them from the parchment paper.
- Complete Cooling: Allow the whipped shortbread cookies to cool entirely before storing or serving. They develop their full, melt-in-your-mouth texture as they cool completely.
- Optional Chocolate Drizzle: If you’re opting for a chocolate drizzle, this is the time to do it! Once the cookies are completely cool, melt some chocolate chips or tempering chocolate. You can either dip half of each cookie into the melted chocolate or drizzle it artfully over the tops using a spoon or a small piping bag with a very fine tip. Let the chocolate set completely before storing.
Tips for Perfect Whipped Shortbread Cookies:
Achieving bakery-quality whipped shortbread cookies is absolutely within your reach with a few key considerations. These tips will help ensure every batch is a resounding success!
-
Butter Temperature is King:
I cannot emphasize this enough: your butter needs to be perfectly soft, but not melted. If it’s too cold, it won’t cream properly, and your cookies will be dense. If it’s too warm, they’ll spread excessively. It truly makes or breaks the texture of your whipped shortbread cookies. Plan ahead and let it sit out.
-
Creaming Time Matters:
Don’t skimp on the creaming of the butter and sugar. Those 5-7 minutes of whipping are what incorporate enough air to give these whipped shortbread cookies their characteristic lightness and tenderness. It’s not just mixing; it’s an aeration process.
-
Do Not Overmix the Flour:
Once you add the dry ingredients, mix only until they are just combined. Overmixing develops gluten, which will lead to tough, chewy cookies – the opposite of what we want for delicate shortbread. As soon as the flour streaks disappear, stop the mixer.
-
Piping Technique:
If you’re piping, steady pressure is key. The dough for whipped shortbread cookies is quite firm, so a strong piping bag and a sturdy tip are helpful. If your hands get tired, take a break! You can also chill the dough briefly if it becomes too soft from the heat of your hands, but typically, it should be firm enough.
-
Low and Slow Baking:
Baking at a lower temperature (325°F/160°C) is essential. It allows the cookies to bake evenly without browning too quickly, maintaining their pale, almost white appearance, which is traditional for whipped shortbread cookies. Keep a close eye on them, especially towards the end of the baking time.
-
Cooling is Crucial:
Allow the cookies to cool completely on the baking sheet for a few minutes before transferring them to a wire rack. They are very delicate when warm and can easily break. They also continue to firm up and crisp slightly as they cool.
-
Storage:
Whipped shortbread cookies store beautifully! Once completely cool, place them in an airtight container at room temperature. They will stay fresh and delicious for up to 1-2 weeks. You can also freeze them for up to 2-3 months; just be sure to place parchment paper between layers to prevent sticking.
-
Flavor Variations for Your Whipped Shortbread Cookies:
- Citrus Zest: Add 1-2 teaspoons of finely grated lemon, orange, or lime zest to the butter and sugar mixture for a bright, refreshing flavor.
- Nutty Notes: Stir in ¼ cup of finely ground toasted almonds or pecans with the flour for a subtle nutty flavor.
- Espresso Boost: Add ½-1 teaspoon of espresso powder with the dry ingredients to deepen the flavor and add a hint of coffee.
- Almond Extract: Substitute ½ teaspoon of almond extract for ½ teaspoon of vanilla for a distinct almond flavor that pairs wonderfully with these buttery cookies.
- Dipped Delights: After cooling, dip half of each cookie in melted dark, milk, or white chocolate, then sprinkle with sea salt or chopped nuts before the chocolate sets. This is a favorite way to dress up my whipped shortbread cookies for gifting!
Conclusion:
Well, my friends, we’ve reached the sweet finale of our baking adventure! If you’ve followed along with the recipe, you’re now standing on the precipice of pure, unadulterated shortbread bliss. I truly hope you’re as excited as I am about the prospect of sinking your teeth into these delectable treats. From the moment you taste them, you’ll understand why this isn’t just another cookie recipe; it’s an experience waiting to happen in your very own kitchen. I’ve poured my heart into perfecting this method, and I can confidently say that the results are nothing short of spectacular.
So, why is this recipe an absolute must-try for every home baker, from novice to seasoned pro? It all comes down to that utterly unique, melt-in-your-mouth texture that sets these shortbreads apart. The magic truly happens with the “whipping” step – it incorporates just the right amount of air into the butter and sugar, creating a cookie that is unbelievably tender, delicate, and practically dissolves on your tongue. It’s a buttery dream come true, with a rich, comforting flavor that speaks of home and tradition, yet feels incredibly luxurious. Unlike many shortbreads that can be dense or crumbly, these offer a light, almost airy crispness that is simply irresistible. Plus, the ingredient list is beautifully simple, relying on pantry staples, meaning you can whip up a batch whenever a craving strikes without a special trip to the store. The simplicity of the process, combined with the profound deliciousness of the outcome, makes it a truly rewarding baking project. These really are the quintessential Whipped Shortbread Cookies you’ve been searching for, delivering on every promise of buttery perfection.
Now that you’ve mastered the art of making them, let’s talk about how to enjoy these wonders to their fullest, or even how to put your own creative spin on them. The classic way to serve them is, of course, simple and elegant: alongside a steaming cup of tea or a robust coffee. Their delicate flavor is the perfect complement to your favorite hot beverage. For a touch of sophistication, try dusting them with a fine layer of powdered sugar just before serving. Want to elevate them further? A drizzle of melted dark chocolate or a quick dip in white chocolate, perhaps sprinkled with a few festive nonpareils or a pinch of flaky sea salt, can transform them into gourmet delights. They also pair beautifully with fresh berries, a dollop of homemade lemon curd, or even a light fruit compote – the tanginess cutting through the richness perfectly. Don’t be afraid to experiment with variations during the baking process itself! A teaspoon of orange zest or a hint of almond extract can introduce a delightful new dimension. For the holiday season, a touch of cardamom or a sprinkle of finely chopped pistachios before baking adds a festive touch that your guests will adore. They make absolutely wonderful homemade gifts, too, beautifully packaged in a tin or cellophane bag – a truly heartfelt present.
I genuinely encourage each and every one of you to give this recipe a try. Don’t hesitate to dive in; I promise you won’t regret it. The joy of creating something so utterly delicious from scratch is incredibly satisfying, and the smiles these cookies will bring to your family and friends are priceless. Once you’ve baked your batch, I would absolutely love to hear about your experience! Did you stick to the classic? Did you add your own creative twist with a new flavor or decoration? Please feel free to share your success stories, your beautiful photos, and any brilliant serving suggestions you come up with in the comments section below, or on social media. Your culinary adventures inspire me, and I can’t wait to see what amazing creations you conjure up. Happy baking, and enjoy every single buttery crumb!
Whipped Shortbread Cookies: Easy Melt-in-Your-Mouth Recipe
Searching for that perfect cookie that practically melts in your mouth? These delightful whipped shortbread cookies take the classic to an ethereal new level, transforming a typically dense crumb into an impossibly tender, airy texture. This is achieved through a unique technique of creaming butter and sugar until incredibly light and fluffy, creating tiny, edible clouds of pure delight. Discover why these cookies are a cherished favorite in kitchens worldwide!
Ingredients
Instructions
Important Information
Nutrition Facts (Per Serving)
It is important to consider this information as approximate and not to use it as definitive health advice.
Allergy Information
Please check ingredients for potential allergens and consult a health professional if in doubt.

Leave a Comment