

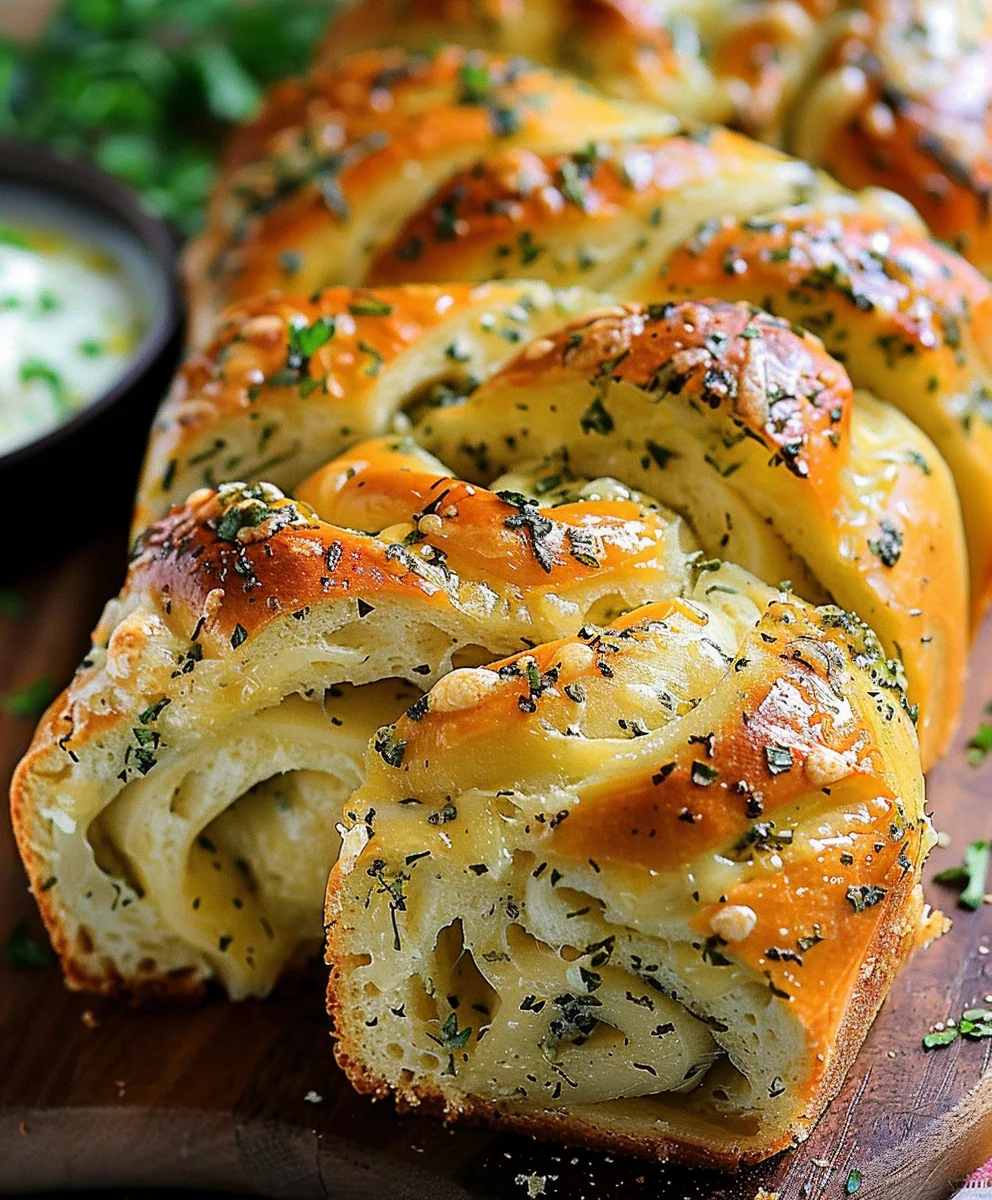
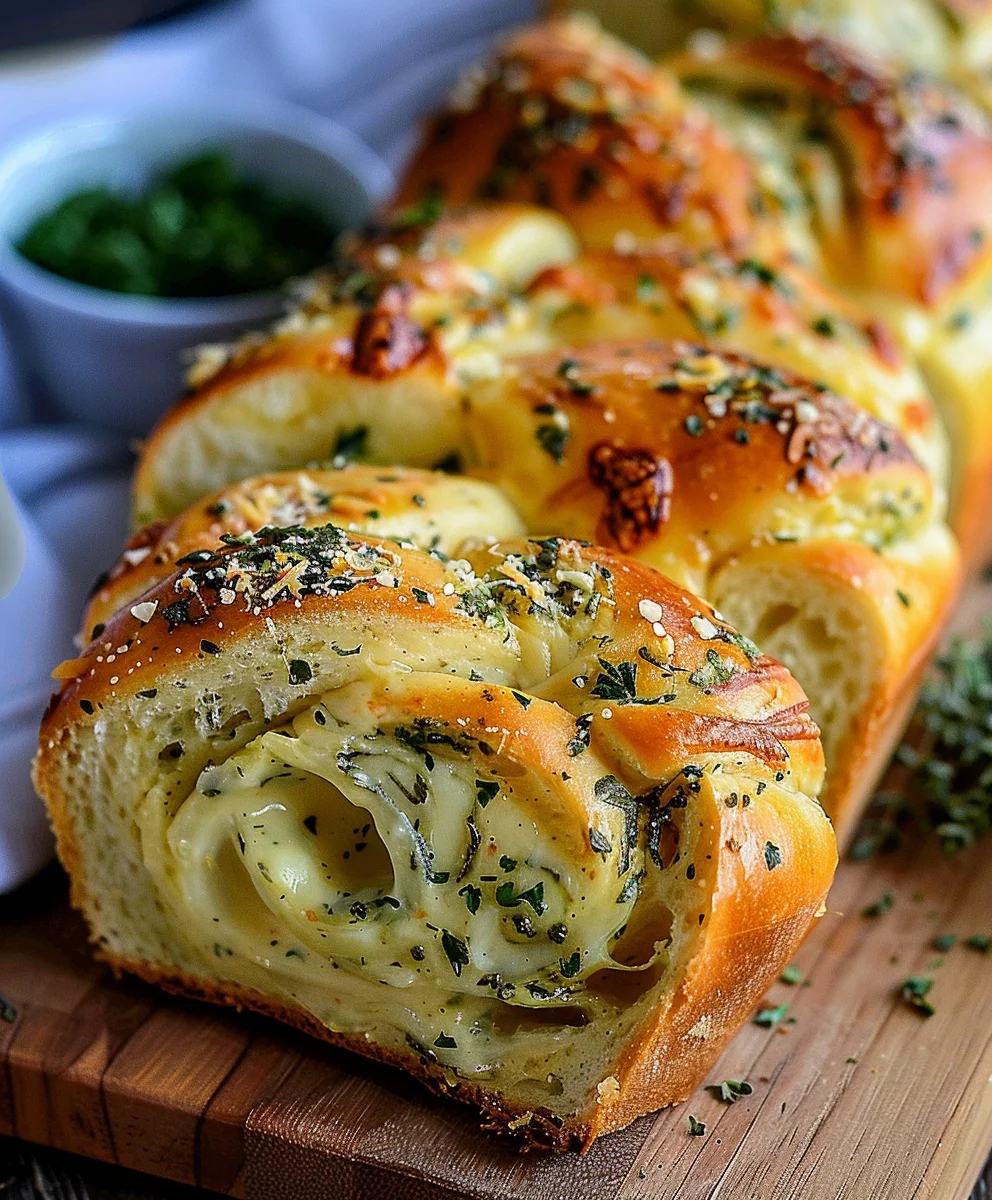
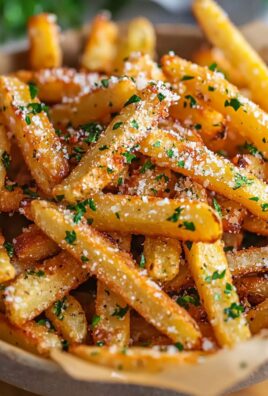
Swirled Garlic Herb And Cheese Bread is more than just a side dish; it’s a showstopper that promises to steal the spotlight at any meal. Imagine the irresistible aroma filling your kitchen as this golden-brown masterpiece bakes, its surface glistening with melted cheese and vibrant green herbs. From the moment it emerges from the oven, its visually stunning swirls hint at the layers of flavor awaiting you. While the concept of garlic bread has roots in Italian-American cuisine, transforming humble bread into an aromatic delight, this particular swirled rendition elevates it into a truly artisanal experience, blending those beloved flavors with a beautiful presentation.
Why is this bread so universally adored?
It’s the perfect marriage of textures: a delightfully crisp exterior giving way to a soft, pillowy interior, each bite bursting with savory garlic, fragrant herbs, and wonderfully gooey, melted cheese. It’s not just a treat for the taste buds; it’s an experience. Whether you’re serving it alongside a hearty pasta, a comforting soup, or simply enjoying it as a delightful snack, this homemade Swirled Garlic Herb And Cheese Bread is guaranteed to impress. I am so excited for you to discover the joy of baking and savoring this magnificent creation.

Ingredients:
-
For the Enriched Dough:
- 2 ¼ teaspoons (7g or 1 packet) active dry yeast
- ½ cup (120ml) warm milk (around 105-115°F / 40-46°C)
- 1 teaspoon granulated sugar (for activating yeast)
- 3 cups (360g) all-purpose flour, plus more for dusting
- 1 teaspoon salt
- ¼ cup (56g) unsalted butter, melted and cooled slightly
- 1 large egg, at room temperature
-
For the Aromatic Garlic Herb and Cheese Filling:
- ½ cup (113g) unsalted butter, melted
- 4-5 cloves garlic, minced very finely (or grated)
- ¼ cup fresh parsley, finely chopped
- 2 tablespoons fresh chives, finely chopped
- 1 tablespoon fresh oregano, finely chopped (or 1 ½ teaspoons dried)
- 1 cup (112g) freshly grated Parmesan cheese
- 1 cup (112g) shredded mozzarella cheese (low moisture, whole milk preferred)
- ½ teaspoon salt
- ¼ teaspoon black pepper, freshly ground
-
For the Optional Glaze (After Baking):
- 2 tablespoons unsalted butter, melted
- 1 tablespoon fresh parsley, finely chopped (optional, for garnish)
For the Enriched Dough: The Foundation of Your Swirled Garlic Herb And Cheese Bread
- Activate the Yeast: In a small bowl or a liquid measuring cup, combine the warm milk (ensure it’s not too hot, or it will kill the yeast; if it’s too cool, the yeast won’t activate properly), 1 teaspoon of granulated sugar, and the active dry yeast. Give it a gentle stir and let it sit undisturbed for 5-10 minutes. You’ll know your yeast is alive and well when it becomes foamy and bubbly on the surface, indicating it’s ready to work its magic. This bubbling action is proof that your dough will rise beautifully, providing that essential light and airy texture to our Swirled Garlic Herb And Cheese Bread.
- Combine Dry Ingredients: In the large bowl of a stand mixer fitted with the dough hook attachment, or in a very large mixing bowl if you’re kneading by hand, whisk together the all-purpose flour and salt. Creating this homogeneous mixture ensures the salt is evenly distributed throughout the dough, contributing to its overall flavor profile.
- Mix Wet and Dry: Once your yeast mixture is frothy, pour it into the bowl with the flour. Add the slightly cooled melted butter and the room-temperature egg. Using a stand mixer on low speed, or a sturdy wooden spoon if mixing by hand, begin to combine the ingredients. Mix until a shaggy, cohesive dough starts to form. If the dough seems too sticky, add a tablespoon of flour at a time; if it’s too dry, add a teaspoon of milk. The goal is a dough that is not overly wet but comes together well.
-
Knead the Dough: This is a crucial step for developing the gluten, which gives bread its structure and chewiness.
- Using a Stand Mixer: Increase the speed to medium-low and knead for 6-8 minutes. The dough will pull away from the sides of the bowl and become smooth, elastic, and supple.
- Kneading by Hand: Turn the dough out onto a lightly floured surface. Knead continuously for 8-10 minutes. Use the heel of your hand to push the dough away from you, then fold it back over, turn it slightly, and repeat. You’ll notice the dough changing texture, becoming less sticky and more smooth and elastic. A good test for readiness is the “windowpane test”: tear off a small piece of dough and gently stretch it. If you can stretch it thin enough to see light through it without it tearing, your gluten is well developed. This meticulous kneading process ensures our Swirled Garlic Herb And Cheese Bread will have a tender crumb.
- First Rise (Bulk Fermentation): Lightly grease a clean large bowl with a little oil. Transfer the kneaded dough to the bowl, turning it once to coat the entire surface with oil. This prevents it from drying out. Cover the bowl tightly with plastic wrap or a clean kitchen towel. Place the bowl in a warm, draft-free spot (like a turned-off oven with the light on, or a sunny windowsill) for 1 to 1 ½ hours, or until the dough has roughly doubled in size. The exact time will depend on the warmth of your environment. This first rise allows the yeast to work its magic, creating air pockets and developing the bread’s flavor. Patience here is key for a truly magnificent Swirled Garlic Herb And Cheese Bread.
Preparing the Aromatic Garlic Herb and Cheese Filling: The Heart of the Swirl
- Prepare the Herbs and Garlic: While your dough is on its first rise, you can prepare the incredibly flavorful filling. Finely mince the garlic. For the herbs, it’s absolutely essential to use fresh ones for the best flavor and aroma. Finely chop the fresh parsley, chives, and oregano. The fresher your ingredients, the more vibrant the taste of your Swirled Garlic Herb And Cheese Bread will be.
- Melt the Butter: In a small bowl, melt the ½ cup of unsalted butter. Let it cool for a minute or two, ensuring it’s warm enough to mix easily but not so hot that it might cook the herbs or cheese.
- Grate the Cheeses: Freshly grated cheese makes a significant difference in taste and texture compared to pre-shredded varieties, which often contain anti-caking agents. Grate your Parmesan cheese and shred your mozzarella. The combination of sharp, salty Parmesan and creamy, meltable mozzarella creates a wonderful balance that complements the herbs and garlic perfectly.
- Combine the Filling Ingredients: In a medium bowl, combine the melted butter, minced garlic, all of your finely chopped fresh herbs (parsley, chives, and oregano), grated Parmesan cheese, shredded mozzarella cheese, ½ teaspoon of salt, and ¼ teaspoon of freshly ground black pepper. Mix everything together thoroughly until it’s well combined and forms a spreadable mixture. Make sure all the flavors are evenly distributed. Do not overmix; just ensure everything is incorporated. This luscious filling is what gives our “Swirled Garlic Herb And Cheese Bread” its signature taste and appearance.
Assembling Your Swirled Garlic Herb And Cheese Masterpiece
- Prepare the Dough for Rolling: Once your dough has doubled in size, gently punch it down to release the trapped gases. Turn the dough out onto a lightly floured work surface. Briefly knead it for about 30 seconds to deflate it evenly and form it into a rough rectangle.
- Roll Out the Dough: Using a rolling pin, roll the dough out into a large rectangle, approximately 18 inches long by 12 inches wide (about 45cm x 30cm). Aim for an even thickness across the entire rectangle, roughly ¼ inch (about 6mm) thick. A consistent thickness will ensure even baking and a beautiful swirl in your finished Swirled Garlic Herb And Cheese Bread.
- Spread the Filling: Evenly spread the entire garlic herb and cheese mixture over the rolled-out dough rectangle, leaving a ½-inch (1.25 cm) border clear along one of the long edges. This border will help seal the roll later. Don’t be shy; spread the deliciousness right to the edges on the other three sides. The aroma at this stage will be absolutely incredible and is a preview of the amazing flavors to come!
- Roll Up the Dough: Starting from the long edge opposite the one you left clear, carefully and tightly roll up the dough into a log. Work slowly and try to keep the roll as tight and even as possible. A tight roll will give you distinct, beautiful swirls when sliced. Once rolled, pinch the seam along the bottom edge firmly to seal it. Gently turn the log seam-side down.
- Slice the Swirls: Using a very sharp knife, a serrated knife, or even unflavored dental floss (which can give a cleaner cut), slice the log into approximately 12-14 equal pieces, each about 1 to 1 ½ inches (2.5-4 cm) thick. If using dental floss, slide it under the log, cross the ends over the top of the log, and pull to slice through. The visible layers of dough and filling are starting to form the iconic “Swirled Garlic Herb And Cheese Bread” look.
- Arrange in Baking Dish: Lightly grease a 9×13-inch (23x33cm) baking dish, a 9-inch (23cm) round springform pan, or a similar-sized baking vessel. Arrange the sliced dough pieces, cut-side up, in the prepared dish. You can place them close together; they will expand and fill the dish as they rise and bake. If using a rectangular dish, you might arrange them in rows. If using a round pan, arrange them in concentric circles or in a pull-apart pattern. Make sure they fit snugly but aren’t squashed.
The Second Rise and Baking: Bringing Your Swirled Garlic Herb And Cheese Bread to Life
- Second Rise (Proofing): Cover the baking dish loosely with plastic wrap or a clean kitchen towel. Place it back in a warm, draft-free spot for another 30-45 minutes, or until the bread rolls have visibly puffed up and are touching each other, filling out the pan. This second rise is crucial for a soft, airy texture in the final bread. It also allows the flavors to meld further.
- Preheat Oven: While your bread is on its second rise, preheat your oven to 375°F (190°C). Make sure to give your oven enough time to come to temperature and stabilize.
- Bake the Bread: Once the rolls have proofed, remove the cover and place the baking dish into the preheated oven. Bake for 25-35 minutes, or until the Swirled Garlic Herb And Cheese Bread is beautifully golden brown on top, puffed up, and the cheese filling is bubbling slightly. The internal temperature of the bread should reach around 200-210°F (93-99°C) for optimal doneness, though a visual check for golden color is often sufficient. If you notice the top browning too quickly, you can loosely tent it with aluminum foil for the last 10-15 minutes of baking.
Finishing Touches and Serving: Enjoying Your Creation
- Optional Glaze: As soon as you pull the Swirled Garlic Herb And Cheese Bread from the oven, if desired, brush the top with the melted butter. You can also sprinkle a little extra fresh chopped parsley over the top for a vibrant pop of color and an additional layer of fresh herb aroma. This step adds a beautiful sheen and a final touch of richness.
- Cool and Serve: Let the bread cool in the baking dish for at least 10-15 minutes on a wire rack before serving. This brief cooling period allows the cheeses and butter to set slightly, making it easier to pull apart the individual rolls without them falling apart, and prevents you from burning your mouth. The delicious aroma of garlic, herbs, and cheese will fill your kitchen, a testament to your baking prowess!
- Enjoy: Serve your homemade Swirled Garlic Herb And Cheese Bread warm, directly from the pan. The individual swirls pull apart effortlessly, revealing soft, savory, cheesy layers. It’s perfect as a side dish for pasta, soups, salads, or as a stand-alone savory snack. Prepare for rave reviews; this bread is truly a crowd-pleaser and remarkably satisfying to make.
Conclusion:
Why This Swirled Garlic Herb And Cheese Bread is a Must-Try
So, there you have it – my incredible recipe for the ultimate Swirled Garlic Herb And Cheese Bread. I truly believe this isn’t just another bread recipe; it’s an experience that will elevate your baking game and delight everyone at your table. From the moment you pull it from the oven, its golden-brown crust hinting at the magic within, to that first bite where the warmth of the garlic and fresh herbs mingles perfectly with the melted, gooey cheese, you’ll understand exactly why I’m so passionate about it. This bread isn’t just delicious; it’s comforting, it’s impressive, and it’s surprisingly simple to create, even for those who might feel a little intimidated by yeasted doughs. The swirling technique isn’t merely for aesthetics; it plays a crucial role in ensuring that every single slice is packed with that irresistible, savory flavor, making each mouthful a delightful journey for your senses. It’s the kind of bread that effortlessly transforms any meal, turning a simple weeknight dinner into something truly memorable and special. I promise you, once you taste the rich, savory notes and experience the soft, tender crumb, especially when it’s still warm, you’ll want to make this a regular fixture in your baking rotation. It’s a guaranteed crowd-pleaser and a staple for any bread lover.
Serving Suggestions & Creative Variations
Now, let’s talk about how to truly enjoy your homemade creation and explore the myriad ways it can enhance your culinary adventures. While a warm slice of this bread, fresh from the oven, needs absolutely no accompaniment to be utterly divine – honestly, I could eat an entire loaf by myself! – it truly shines when thoughtfully paired with other dishes. Imagine tearing off a generous piece and using it to sop up the last, flavorful drops of a hearty minestrone or a rich, slow-simmered tomato soup on a chilly evening. It’s also the perfect, robust companion for a comforting beef stew or a flavorful lentil soup, adding an extra layer of texture and a burst of complementary flavor. For your next Italian night, forget plain garlic bread; this Swirled Garlic Herb And Cheese Bread is the ideal, sophisticated side for virtually any pasta dish, from a simple spaghetti aglio e olio to a complex, layered lasagna or a creamy fettuccine Alfredo. You could even serve it alongside a fresh, crisp green salad, allowing its robust, savory flavors to beautifully balance the lighter, refreshing fare.
And why stop there? The beauty of this recipe lies in its versatility. Think about experimenting with different cheese combinations to tailor it to your preferences – a sharper provolone mixed with mozzarella for more bite and a wonderful pull, or a smoky gouda for a unique, intriguing twist. Don’t hesitate to play with fresh herbs beyond parsley; consider adding finely chopped rosemary or thyme for an earthier aroma, or even a hint of red pepper flakes directly into the garlic herb mixture for a subtle, warming kick. For a more decadent and gourmet treat, consider incorporating sun-dried tomatoes (chopped finely) or finely chopped black olives into the swirl for an extra burst of Mediterranean flavor and a beautiful color contrast. The possibilities for customization are truly endless, and each variation offers a new and exciting adventure for your taste buds. This bread isn’t just a recipe; it’s a canvas for your culinary creativity.
Your Turn: Bake, Share, and Enjoy!
So, what are you waiting for? I wholeheartedly encourage you to set aside some dedicated time this week, gather your ingredients, and dive headfirst into the wonderful, rewarding world of baking this fantastic bread. Trust me, the aroma alone as it bakes – that intoxicating blend of garlic, herbs, and warm, melting cheese – will make your kitchen feel like the warmest, most inviting place on earth, a true sanctuary. Don’t be shy about experimenting with the fillings or the cheese blend, either; make this recipe truly and uniquely your own! Once you’ve pulled your golden-brown masterpiece from the oven, carefully sliced into its cheesy, herby goodness, and savored that first glorious, unforgettable bite, I would absolutely love to hear all about your experience. Did you make any fun and interesting variations? What delicious dishes did you serve your bread with? Please share your baking triumphs, your innovative serving ideas, and even your “aha!” moments in the comments below – your insights could inspire other bakers! And if you snap a photo of your beautiful Swirled Garlic Herb And Cheese Bread, whether it’s a perfect slice or a full loaf, I’d be absolutely thrilled if you shared it! Seeing your incredible creations truly makes my day and fuels my passion for sharing more recipes. This recipe is more than just a set of instructions; it’s an invitation to create, to share, and most importantly, to enjoy truly spectacular, homemade food with those you love. Happy baking, my dear friends, and I can’t wait to hear from you!
Ultimate Swirled Garlic Herb Cheese Bread
Whether you’re hosting a dinner party, planning a cozy brunch, or simply craving a warm homemade indulgence, this bread hits all the notes. It’s soft yet structured, rich but balanced, and every pull-apart bite offers a burst of gooey, cheesy goodness enhanced by the subtle kick of garlic and the earthy depth of herbs.
Ingredients
-
2 ¼ tsp active dry yeast
-
1 cup warm milk (105-115°F)
-
¼ cup granulated sugar
-
3 ½ cups all-purpose flour, plus more for dusting
-
1 tsp salt (for dough)
-
¼ cup unsalted butter, melted
-
1 large egg, room temperature
-
½ cup unsalted butter, melted (for filling)
-
4-5 cloves garlic, minced
-
¼ cup fresh parsley, chopped
-
2 tbsp fresh chives, chopped
-
1 tbsp fresh oregano, chopped (or 1 ½ tsp dried)
-
½ cup grated Parmesan cheese
-
2 cups shredded mozzarella cheese
-
½ tsp salt (for filling)
-
¼ tsp black pepper, freshly ground
-
2 tbsp unsalted butter, melted (for glaze, optional)
-
1 tbsp fresh parsley, chopped (for glaze/garnish, optional)
Instructions
-
Step 1
Combine warm milk, ¼ cup granulated sugar, and active dry yeast in a small bowl. Stir gently and let sit for 5-10 minutes until foamy and bubbly. -
Step 2
In a large mixing bowl (or stand mixer with dough hook), whisk together flour and 1 tsp salt. Pour in the yeast mixture, melted butter, and egg. Mix on low speed until a shaggy dough forms. -
Step 3
Knead for 6-8 minutes with a stand mixer on medium-low, or 8-10 minutes by hand on a lightly floured surface, until the dough is smooth and elastic. -
Step 4
Lightly grease a clean bowl, transfer dough, turn to coat. Cover and place in a warm, draft-free spot for 1 to 1 ½ hours, or until doubled in size. -
Step 5
While dough rises, mince garlic and finely chop fresh parsley, chives, and oregano. Melt ½ cup unsalted butter. In a medium bowl, combine melted butter, minced garlic, all chopped fresh herbs, grated Parmesan, shredded mozzarella, ½ tsp salt, and ¼ tsp black pepper. Mix thoroughly until well combined. -
Step 6
Gently punch down the risen dough and turn it onto a lightly floured surface. Roll into a large 18×12 inch (45x30cm) rectangle, about ¼ inch (6mm) thick. -
Step 7
Evenly spread the entire garlic herb and cheese mixture over the rolled-out dough, leaving a ½-inch (1.25 cm) border clear along one of the long edges. Starting from the long edge opposite the clear border, tightly roll up the dough into a log. Pinch the seam firmly to seal it and place seam-side down. -
Step 8
Using a sharp knife or dental floss, slice the log into 12-14 equal pieces, each about 1 to 1 ½ inches (2.5-4 cm) thick. Lightly grease a 9×13-inch (23x33cm) baking dish and arrange the sliced dough pieces, cut-side up, fitting them snugly. -
Step 9
Cover the baking dish loosely and place it in a warm, draft-free spot for another 30-45 minutes, or until the rolls have visibly puffed up and are touching each other. -
Step 10
Preheat your oven to 375°F (190°C). Remove cover and bake for 25-35 minutes, or until golden brown on top and the cheese filling is bubbling. If browning too quickly, loosely tent with aluminum foil. -
Step 11
Immediately after baking, brush the top with 2 tbsp melted butter and sprinkle with chopped parsley, if desired. Let cool in the dish for 10-15 minutes on a wire rack before serving warm. Pull apart and enjoy!
Important Information
Nutrition Facts (Per Serving)
It is important to consider this information as approximate and not to use it as definitive health advice.
Allergy Information
Please check ingredients for potential allergens and consult a health professional if in doubt.
Leave a Comment