

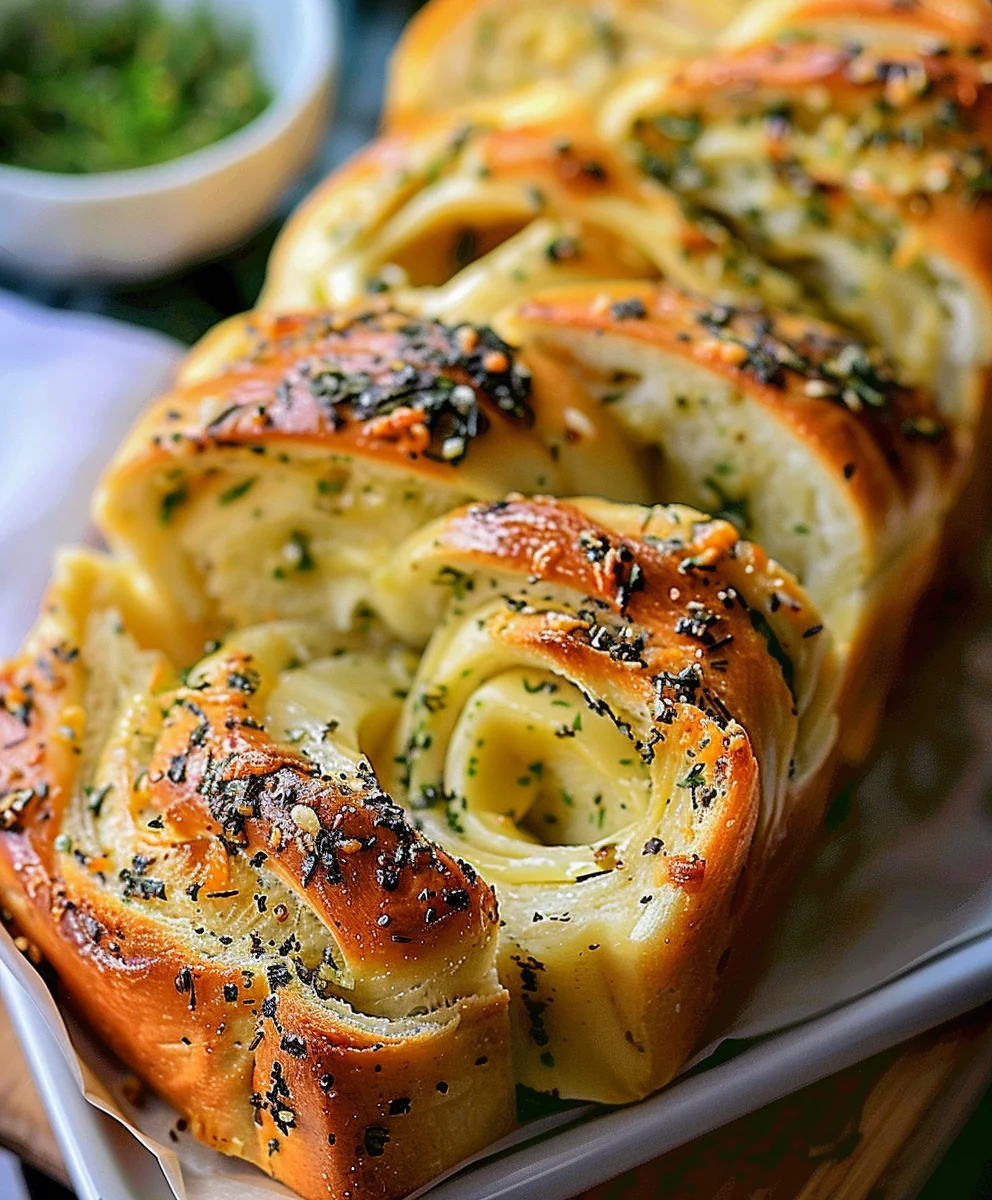
Swirled Garlic Herb And Cheese Bread is more than just a side dish; it’s a culinary masterpiece that I believe promises to transform any meal into a special occasion. Imagine, if you will, the intoxicating aroma filling your kitchen as this beautiful bread bakes, followed by the sheer delight of pulling apart a warm, golden slice. You’ll discover layers of gooey, melted cheese and vibrant green herbs nestled within, revealing its intricate swirl. For me, this isn’t merely bread; it’s an experience, a symphony of flavors and textures designed to captivate your senses from the very first glance.
While the precise ancient origins of this specific swirled delight might be debated, I see it as a magnificent testament to the timeless appeal of combining rustic bread with aromatic garlic, fresh herbs, and indulgent cheese—ingredients that have been cherished across countless cultures for generations. I truly believe we’ve elevated these beloved elements into a visually stunning and incredibly delicious form. People adore this dish for its unparalleled taste profile: the sharp, savory notes of garlic, the fragrant whispers of fresh herbs like parsley and chives, and the rich, comforting embrace of multiple cheeses, all nestled within a soft, yielding bread. The incredible visual appeal of the “swirl” makes it an instant showstopper at any gathering, while its comforting warmth and complex flavors make it an irresistible treat. This Swirled Garlic Herb And Cheese Bread truly offers a delightful blend of elegance and home-style comfort, perfect for sharing with loved ones, and I can’t wait for you to try it.

Ingredients:
- For the Dough:
- 2 ¼ teaspoons (1 packet or 7g) Active Dry Yeast: This is the magic ingredient that gives our bread its wonderful airy texture. Make sure it’s fresh for the best rise!
- 1 teaspoon Granulated Sugar: A little snack for our yeast to get it bubbling happily.
- 1 ½ cups Warm Water (105-115°F / 40-46°C): The perfect temperature to awaken the yeast without killing it. If it’s too hot, the yeast won’t activate; too cold, and it will be sluggish.
- 4 cups (about 500g) All-Purpose Flour, plus more for dusting: The backbone of our bread. I prefer unbleached all-purpose for a slightly chewier crumb, but standard all-purpose works beautifully too. You might need a little extra flour for kneading, so have some handy.
- 1 ½ teaspoons Fine Sea Salt: Essential for flavor and to control the yeast’s activity. Don’t skip this, as bland bread is no fun!
- 2 tablespoons Olive Oil, plus more for greasing the bowl: Adds richness and helps to tenderize the dough. A good quality extra virgin olive oil can impart a lovely subtle flavor.
- For the Garlic Herb and Cheese Swirl Filling:
- ½ cup (1 stick or 113g) Unsalted Butter, softened: Makes the filling spreadable and contributes to the golden crust. Softened butter is key for a smooth mix.
- 6-8 cloves Garlic, minced very finely: The star of our garlic bread! I love a generous amount of fresh garlic here for maximum flavor. You can adjust this to your personal taste, but I say, the more the merrier!
- ¼ cup Fresh Parsley, finely chopped: Adds a wonderful fresh, green note and a pop of color to our Swirled Garlic Herb And Cheese Bread.
- 2 tablespoons Fresh Chives, finely chopped: Their mild oniony flavor complements the garlic beautifully.
- 1 tablespoon Fresh Rosemary, finely chopped: Contributes an aromatic, earthy depth that really elevates the whole experience. If you’re not a fan, you can reduce this or substitute with another herb like oregano or thyme.
- 1 ½ cups Shredded Mozzarella Cheese: Melts beautifully, providing that classic gooey cheese pull. I recommend grating your own for better melting.
- ½ cup Shredded Parmesan Cheese (or Pecorino Romano): Adds a sharp, salty depth of flavor that contrasts wonderfully with the mozzarella.
- ¼ teaspoon Black Pepper, freshly ground: A touch of spice to round out the flavors in the filling.
- For the Egg Wash and Finish:
- 1 Large Egg: Whisked with a splash of water, this will give our bread a beautiful golden-brown crust.
- 1 tablespoon Water or Milk: To thin out the egg for an even wash.
- Optional: 1-2 tablespoons Melted Butter: For brushing on the bread straight out of the oven for an extra layer of richness and shine.
- Optional: Extra chopped fresh herbs or flaky sea salt: For a final garnish if desired.
Preparing the Dough for Our Swirled Garlic Herb And Cheese Bread
- Activate the Yeast: In a large mixing bowl, or the bowl of your stand mixer, combine the warm water and granulated sugar. Sprinkle the active dry yeast over the top. Give it a gentle stir and let it sit for 5-10 minutes. You’ll know your yeast is alive and well when it becomes foamy and bubbly on the surface. If it doesn’t foam, your yeast might be old or your water temperature was off, and you’ll need to start again with fresh yeast. This step is crucial for achieving that light and airy texture in your finished Swirled Garlic Herb And Cheese Bread.
- Combine Dry Ingredients: While the yeast is activating, in a separate medium bowl, whisk together the all-purpose flour and fine sea salt. This ensures the salt is evenly distributed throughout the dough.
- Form the Dough: Once your yeast is bubbly, add the 2 tablespoons of olive oil to the yeast mixture. Gradually add the flour mixture, one cup at a time, mixing with a wooden spoon or a dough hook on a stand mixer on low speed. Continue mixing until a shaggy dough forms and most of the flour is incorporated.
- Knead the Dough:
- By Hand: Turn the shaggy dough out onto a lightly floured surface. Knead for 8-10 minutes. At first, the dough will be sticky, but as you knead, it will become smoother, more elastic, and less sticky. The key is to push it away from you with the heels of your hands, fold it back over, and rotate. Keep a light dusting of flour nearby, but try not to add too much, as it can make the bread tough. You’re looking for a dough that springs back when gently poked.
- With a Stand Mixer: Attach the dough hook and knead on medium-low speed for 6-8 minutes. The dough will gather around the hook and pull away cleanly from the sides of the bowl. It should be smooth, elastic, and pass the “windowpane test” – where you can gently stretch a small piece of dough thin enough to see light through it without tearing.
This kneading process is vital for developing the gluten structure, which will give our Swirled Garlic Herb And Cheese Bread its characteristic chewiness and ability to rise.
- First Rise (Bulk Fermentation): Lightly oil a large clean bowl with olive oil. Place the kneaded dough into the bowl, turning it once to coat the entire surface with oil. Cover the bowl tightly with plastic wrap or a clean kitchen towel. Place the bowl in a warm, draft-free spot. I often use my oven with the light on (oven off!) to create a cozy environment. Let the dough rise for 1 to 1 ½ hours, or until it has doubled in size. The exact time will depend on the warmth of your kitchen. A slow rise often results in a more flavorful bread, so don’t rush this part.
Crafting the Irresistible Garlic Herb and Cheese Filling
- Prepare the Herbs and Garlic: While your dough is on its first rise, prepare the filling. Mince the garlic very finely. Chop the fresh parsley, chives, and rosemary. Fresh herbs are non-negotiable here for the vibrant flavor of our Swirled Garlic Herb And Cheese Bread; dried herbs just won’t give the same delightful aroma or taste.
- Shred the Cheeses: If you haven’t already, shred the mozzarella and Parmesan cheeses. I highly recommend shredding your own from blocks of cheese, as pre-shredded cheeses often contain anti-caking agents that can hinder smooth melting.
- Combine the Filling Ingredients: In a medium bowl, combine the softened unsalted butter, finely minced garlic, chopped fresh parsley, chives, and rosemary. Add the shredded mozzarella cheese, shredded Parmesan cheese, and freshly ground black pepper. Use a fork or a spatula to mix everything together thoroughly until all ingredients are evenly distributed and the mixture is well combined. It should be a spreadable, aromatic paste. Set this aside at room temperature so it remains soft and easy to spread later.
Assembling Your Beautiful Swirled Garlic Herb And Cheese Bread
- Prepare Your Pan: Lightly grease a standard 9×5-inch (23×13 cm) loaf pan with butter or cooking spray. Alternatively, line it with parchment paper, leaving an overhang on the longer sides to help lift the bread out later.
- Punch Down and Shape the Dough: Once the dough has doubled in size, gently punch it down to release the air. Turn the dough out onto a lightly floured surface. Briefly knead it a few times to de-gas and reshape it into a roughly rectangular form.
- Roll Out the Dough: Using a rolling pin, roll the dough into a large rectangle, approximately 18×12 inches (45×30 cm). Aim for an even thickness across the entire surface. This large surface area is essential for getting those beautiful, distinct swirls of garlic herb and cheese in every slice of your finished Swirled Garlic Herb And Cheese Bread.
- Spread the Filling: Evenly spread the entire garlic herb and cheese filling mixture over the rolled-out dough rectangle, leaving about a ½-inch (1 cm) border clear along one of the longer edges. Make sure the filling goes right to the other three edges. You want a good layer of flavor in every bite!
- Roll into a Log: Starting from the longer edge opposite the clear border, tightly roll the dough into a log. As you roll, try to keep it as tight as possible to ensure compact, well-defined swirls. Pinch the seam closed firmly along the bottom. You can also gently pinch the ends to seal them.
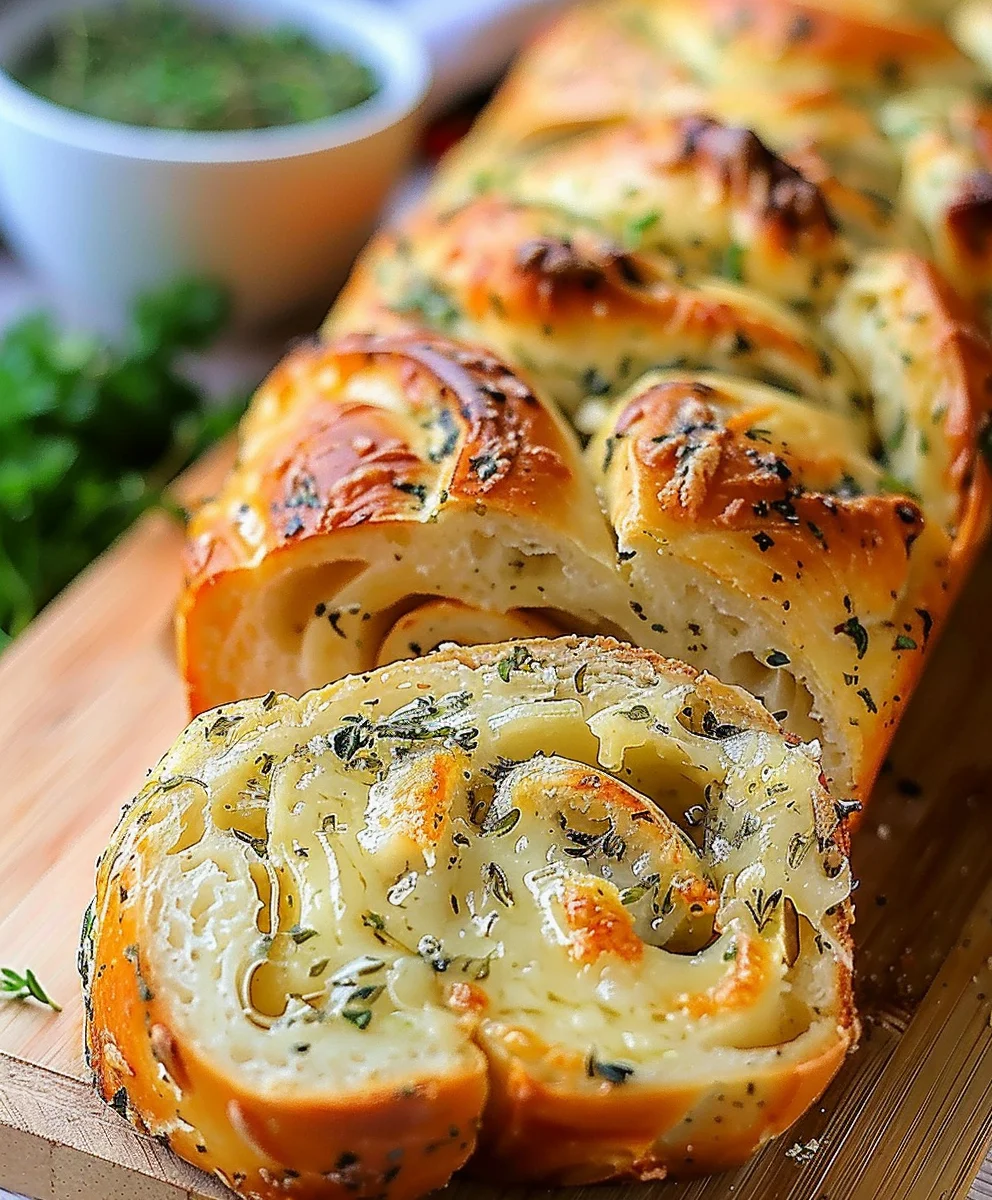
- Prepare for the Swirl (The Signature Step!): With the seam-side down, use a sharp knife or a bench scraper to cut the log lengthwise right down the middle, creating two long halves. Try to make the cut as even as possible. This is where the magic of the “swirl” happens!
- Twist and Shape: Turn the two cut halves so the cut sides are facing upwards, exposing all that glorious garlic herb and cheese filling. Carefully crisscross the two halves over each other, creating a braided or twisted effect. Keep the cut sides facing up as much as possible to showcase the layers. Gently twist them together a few more times, ensuring the filling remains exposed.
- Place in Loaf Pan: Carefully lift the twisted dough and place it into your prepared loaf pan. If it’s a little too long, gently tuck the ends under to fit. Make sure the most attractive, swirled side is facing upwards.
- Second Rise (Proofing): Cover the loaf pan loosely with plastic wrap or a clean kitchen towel. Return it to your warm, draft-free spot for another 30-45 minutes, or until the dough has noticeably puffed up and almost reached the top of the loaf pan. It won’t double in size quite as dramatically as the first rise, but it should look light and airy. This final rise is crucial for a tender, soft interior in your Swirled Garlic Herb And Cheese Bread.
Baking and Finishing Our Golden Swirled Garlic Herb And Cheese Bread
- Preheat Oven: About 15-20 minutes before the second rise is complete, preheat your oven to 375°F (190°C). Arrange an oven rack in the middle position.
- Prepare Egg Wash: In a small bowl, whisk together the large egg with 1 tablespoon of water or milk until well combined.
- Egg Wash and Bake: Gently brush the top and exposed sides of the risen dough in the loaf pan with the egg wash. Be careful not to deflate the dough. This egg wash will give your Swirled Garlic Herb And Cheese Bread a beautiful golden-brown, glossy crust. Place the loaf pan into the preheated oven.
- Bake the Bread: Bake for 30-35 minutes. After about 15-20 minutes, if you notice the top browning too quickly, you can loosely tent the bread with aluminum foil to prevent over-browning. The bread is done when it’s deeply golden brown on top and a wooden skewer or instant-read thermometer inserted into the center (avoiding a cheese pocket) registers an internal temperature of 200-210°F (93-99°C).
- Cool the Bread: Once baked, remove the loaf pan from the oven. If desired, you can immediately brush the top with 1-2 tablespoons of melted butter for extra richness and shine. Let the bread cool in the pan for 10-15 minutes. This allows the internal structure to set.
- Transfer and Slice: After the initial cooling, carefully remove the Swirled Garlic Herb And Cheese Bread from the loaf pan (using the parchment paper overhangs if you lined it, or by running a knife around the edges if not) and transfer it to a wire rack to cool completely. While it’s tempting to slice into it immediately, letting it cool almost completely (at least 30-45 minutes) will result in cleaner slices and prevent a gummy texture.
- Serve and Enjoy: Once cooled, slice your magnificent Swirled Garlic Herb And Cheese Bread into thick pieces and serve warm. It’s perfect on its own, alongside a bowl of soup, with pasta, or as an accompaniment to any meal. The aroma alone will have everyone rushing to the table! Store any leftovers at room temperature in an airtight container for up to 2-3 days, or freeze for longer storage. A quick reheat in the oven or microwave will bring back its delightful freshness.
Conclusion:
Well, my dear fellow food enthusiasts, we’ve journeyed through the creation of something truly magnificent today. As we reach the end of our culinary guide, I hope you’re feeling inspired and excited to roll up your sleeves and bring this masterpiece to life in your own kitchen. This isn’t just another bread recipe; it’s an experience, a symphony of aromas and flavors that will undoubtedly elevate any meal and impress anyone lucky enough to share a bite with you. The incredible satisfaction of pulling a golden-brown, beautifully baked loaf from the oven, knowing you’ve crafted it with your own hands, is a joy unlike any other. And when that loaf is the magnificent Swirled Garlic Herb And Cheese Bread, the experience is truly unparalleled.
What makes this particular recipe an absolute must-try? It’s the perfect harmony of robust garlic, aromatic fresh herbs, and savory melted cheese, all lovingly swirled into a tender, fluffy dough. Every slice offers a visual treat with its intricate layers and a textural delight that is both soft and slightly chewy. The moment it starts baking, your kitchen will be filled with an intoxicating scent that promises deliciousness, a promise this bread unequivocally delivers upon. It’s the kind of bread that doesn’t just complement a meal; it often becomes the star of the show, disappearing astonishingly quickly as hands reach for “just one more piece.” Trust me, once you taste the warm, gooey cheese mingling with the fragrant herbs and garlic in every bite, you’ll understand why this recipe earns its place as a cherished favorite.
Serving Suggestions:
Now that your kitchen will soon be filled with the irresistible aroma of freshly baked bread, let’s talk about how to enjoy it best. This versatile bread is a spectacular accompaniment to almost any meal. Imagine a chilly evening, a comforting bowl of rich, homemade tomato soup or a hearty lentil stew – a thick slice of this garlic and herb sensation, perfect for dipping, will turn a simple meal into an extraordinary feast. It’s also an absolute dream alongside a classic pasta dish, soaking up every last drop of your favorite marinara or creamy alfredo sauce. Don’t limit it to dinner, though! It makes an incredible addition to a weekend brunch spread, perhaps served with scrambled eggs and a fresh fruit salad. For a simple yet elegant appetizer, slice it thick and serve it warm with a good quality olive oil for dipping, maybe even infused with a touch of balsamic vinegar. It’s truly a showstopper for any gathering, a guaranteed crowd-pleaser that will have your guests asking for the recipe.
Creative Variations to Explore:
While the original recipe for this Swirled Garlic Herb And Cheese Bread is perfect as is, part of the fun of home baking is making it your own! Don’t hesitate to experiment with different cheeses – a sharp cheddar could add a wonderful tang, while smoked gouda would introduce a delightful smoky depth. Provolone or mozzarella would make it even stretchier and meltier. Feel free to play with the herbs too; rosemary, thyme, or even a hint of dried oregano can bring new dimensions to the flavor profile. For an extra kick, a pinch of red pepper flakes mixed in with the garlic and herbs would be a fantastic addition. You could also incorporate finely chopped sun-dried tomatoes or black olives for bursts of savory flavor. Another wonderful idea is to divide the dough into smaller portions before the final proof and bake them as individual garlic and herb rolls, perfect for dinner parties or packed lunches. Or, instead of a loaf, you could arrange the swirled slices in a bundt pan to create a stunning pull-apart bread centerpiece. The possibilities are truly endless, limited only by your imagination!
Your Culinary Adventure Awaits!
So, what are you waiting for? This is more than just a recipe; it’s an invitation to create something truly special, to fill your home with warmth and incredible aromas, and to share a piece of your heart with those you love. I wholeheartedly encourage you to carve out some time in your schedule, gather your ingredients, and embark on this delightful baking adventure. You’ll be so incredibly proud of the result, and I promise, the smiles and contented sighs from your family and friends will make every moment worthwhile.
Once you’ve experienced the joy of baking and tasting your very own batch, I would absolutely love to hear about it! Did you stick to the original, or did you put your own unique twist on it? What did you serve it with? Please, share your stories, your triumphs, and even your funny mishaps in the comments below. Better yet, snap a photo of your beautiful creation and share it with us! Your experiences and creative variations inspire not only me but countless other bakers in our growing community. Happy baking, my friends – may your kitchens always be filled with delicious aromas and your tables with wonderful company!
Swirled Garlic Herb Cheese Bread
Swirled Garlic Herb And Cheese Bread is a culinary masterpiece, transforming any meal into a special occasion. Imagine the intoxicating aroma filling your kitchen as this beautiful bread bakes, followed by the sheer delight of pulling apart a warm, golden slice revealing layers of gooey, melted cheese and vibrant herbs. It’s soft yet structured, rich but balanced, and every pull-apart bite offers a burst of cheesy goodness with subtle garlic and earthy herb notes. This dish offers a delightful blend of elegance and home-style comfort, perfect for sharing.
Ingredients
-
2 ¼ tsp active dry yeast (1 packet)
-
¼ cup granulated sugar
-
1 cup warm milk (105-115°F / 40-46°C)
-
3 ½ cups all-purpose flour, plus more for dusting
-
1 tsp salt
-
2 tablespoons Olive Oil, plus more for greasing
-
¼ cup unsalted butter, softened
-
6-8 cloves Garlic, minced very finely
-
¼ cup Fresh Parsley, finely chopped
-
2 tablespoons Fresh Chives, finely chopped
-
1 tablespoon Fresh Rosemary, finely chopped
-
2 cups Shredded Mozzarella Cheese
-
½ cup Grated Parmesan Cheese
-
¼ teaspoon Black Pepper, freshly ground
-
1 Large Egg
-
1 tablespoon Water or Milk (for egg wash)
-
Optional: 1-2 tablespoons Melted Butter (for brushing)
-
Optional: Extra chopped fresh herbs or flaky sea salt (for garnish)
Instructions
-
Step 1
In a large bowl, combine warm milk and ¼ cup sugar. Sprinkle yeast over and let sit 5-10 minutes until foamy. -
Step 2
In a separate bowl, whisk flour and 1 tsp salt. Add 2 tbsp olive oil to yeast mixture, then gradually add flour mixture. Mix until a shaggy dough forms. Knead for 8-10 minutes by hand or 6-8 minutes with a stand mixer until smooth and elastic. -
Step 3
Lightly oil a clean bowl. Place dough in bowl, turn to coat, cover, and let rise in a warm, draft-free spot for 1 to 1 ½ hours, or until doubled in size. -
Step 4
While dough rises, mince garlic and chop fresh parsley, chives, and rosemary. In a medium bowl, combine ¼ cup softened butter, minced garlic, all chopped herbs, 2 cups mozzarella, ½ cup Parmesan, and ¼ tsp black pepper. Mix thoroughly until well combined and spreadable. -
Step 5
Lightly grease a 9×5-inch loaf pan. Punch down dough, roll into an 18×12 inch rectangle on a lightly floured surface. Evenly spread the garlic herb and cheese filling over the dough, leaving a ½-inch border on one long edge. Tightly roll the dough into a log from the opposite long edge, pinching the seam closed firmly. -
Step 6
With the seam-side down, cut the log lengthwise down the middle. Turn the two halves so the cut sides face upwards. Carefully crisscross and twist the two halves together, keeping the cut sides exposed to showcase the layers. Gently lift and place the twisted dough into the prepared loaf pan. -
Step 7
Cover the loaf pan loosely and let rise in a warm spot for another 30-45 minutes, or until the dough has noticeably puffed up. -
Step 8
Preheat oven to 375°F (190°C). Whisk 1 large egg with 1 tablespoon water/milk for an egg wash. Gently brush the top and exposed sides of the risen dough with the egg wash. Bake for 30-35 minutes. If browning too quickly, loosely tent with aluminum foil after 15-20 minutes. Bread is done when deeply golden brown and internal temperature is 200-210°F (93-99°C). -
Step 9
Remove from oven. Optional: brush with melted butter. Cool in the pan for 10-15 minutes, then transfer to a wire rack to cool almost completely (30-45 minutes) before slicing. Serve warm. Store leftovers in an airtight container at room temperature for 2-3 days, or freeze.
Important Information
Nutrition Facts (Per Serving)
It is important to consider this information as approximate and not to use it as definitive health advice.
Allergy Information
Please check ingredients for potential allergens and consult a health professional if in doubt.


Leave a Comment