

This Hawaiian Roll Grilled Cheese Recipe Is The Best, and I am genuinely thrilled to introduce you to what I believe is the ultimate evolution of a timeless classic. Prepare to have your perceptions of comfort food completely revolutionized, as we take the beloved grilled cheese sandwich to an entirely new dimension of flavor and texture.
For generations, grilled cheese has been a staple in kitchens worldwide, cherished for its simplicity and the sheer joy of gooey, melted cheese between slices of perfectly toasted bread. But what if we told you there’s a way to elevate this nostalgic favorite even further? The secret lies in the unparalleled sweetness and fluffy texture of Hawaiian rolls. These delightful rolls, with their distinct golden hue and signature sweetness, trace their origins to Hawaii, bringing a touch of island warmth and a unique culinary heritage to any dish they grace.
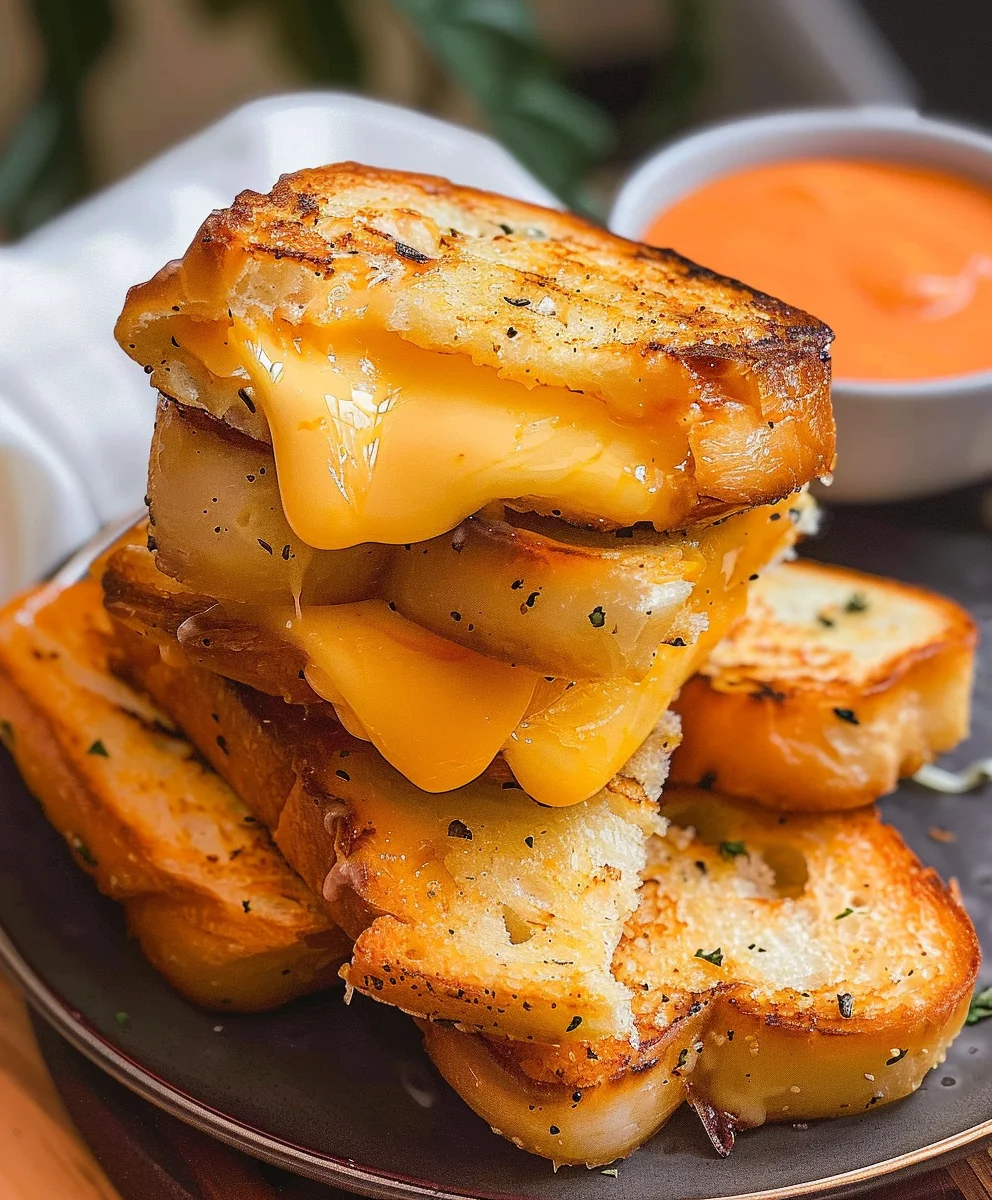
People absolutely adore this dish because it’s a brilliant symphony of contrasts: the subtle sweetness of the Hawaiian roll beautifully complements the savory, rich melted cheese. When toasted, the exterior achieves a crisp, buttery perfection, yielding to an incredibly soft interior cradling a warm, ooey-gooey core. It’s a convenient, quick-to-prepare meal that delivers an extraordinary taste experience, satisfying both sweet and savory cravings in one magnificent bite. I am confident that
this Hawaiian Roll Grilled Cheese Recipe is the best way to rediscover the magic of a classic, transformed into an unforgettable culinary delight.

Ingredients:
-
For the Glorious Grilled Cheese:
- 1 (12-count) package King’s Hawaiian Sweet Rolls: The star of our show! Their inherent sweetness and soft texture are truly what make this Hawaiian Roll Grilled Cheese Recipe the best.
- 8 ounces sharp cheddar cheese: Freshly grated for superior melt and flavor. A robust, tangy choice that pairs beautifully.
- 8 ounces Monterey Jack cheese: Freshly grated for its incredible melting properties and mild, creamy counterpoint to the cheddar.
- Optional: 4 ounces Gruyère or Provolone cheese: Also freshly grated or thinly sliced. Adding a third cheese brings complexity and an extra layer of gourmet gooeyness, taking our grilled cheese to new heights.
- 2 tablespoons unsalted butter: For prepping the rolls before applying our special garlic herb butter. This helps create an initial barrier and promotes even browning.
-
For Our Irresistible Garlic Herb Butter Spread:
- 1/2 cup (1 stick) unsalted butter: Melted. This forms the base for our intensely flavorful butter mixture, ensuring every bite is rich and delicious.
- 4 cloves garlic: Minced very finely. The aromatic heart of our spread, infusing the rolls with incredible savory depth.
- 2 tablespoons fresh parsley: Finely chopped. Adds a touch of freshness, color, and a subtle herbaceous note.
- 1/2 teaspoon onion powder: Enhances the savory profile and adds a foundational layer of flavor.
- 1/2 teaspoon garlic powder: A different dimension of garlic flavor, ensuring it permeates every inch of the bread.
- 1/4 teaspoon sea salt: Just enough to bring all the flavors forward without making it overtly salty.
- Pinch of black pepper: Freshly ground, to add a subtle warmth and complete our seasoning blend.
Prepping Our Flavorful Butter Mixture
- Melt the Butter Base: First things first, let’s get that butter for our incredible spread ready. In a small microwave-safe bowl or a small saucepan over very low heat, gently melt the 1/2 cup of unsalted butter. We want it fully liquid but not browned, just a beautiful golden pool ready to embrace our other flavors. This generous amount of butter is crucial for achieving that perfectly crispy, golden-brown crust that truly makes this Hawaiian Roll Grilled Cheese Recipe stand out.
- Infuse with Aromatics: Once the butter is melted, remove it from the heat (if using a saucepan). To this fragrant liquid, we’re going to add our flavor powerhouses: the 4 finely minced cloves of garlic, 2 tablespoons of freshly chopped parsley, 1/2 teaspoon of onion powder, 1/2 teaspoon of garlic powder, 1/4 teaspoon of sea salt, and a tiny pinch of freshly ground black pepper.
- Whisk to Combine: With a small whisk or a fork, gently stir all these ingredients together until they are thoroughly combined. Take a moment to breathe in that amazing aroma – this is the magic that’s going to transform ordinary sweet rolls into something truly extraordinary. The minced garlic and fresh parsley provide bursts of flavor and texture, while the powders ensure a consistent, deep savory note throughout.
- Set Aside to Mingle: Allow this aromatic butter mixture to sit for a few minutes while you prepare the other components. This brief resting period gives the flavors a chance to meld and intensify, ensuring every brushstroke delivers maximum deliciousness. This step is a secret weapon; trust me, it’s worth the wait for that profound flavor in “This Hawaiian Roll Grilled Cheese Recipe Is The Best.”
Preparing Our Cheeses for Optimal Gooeyness
- Grate Your Cheeses: If you’re using block cheeses (which I highly recommend for superior melt and flavor!), now is the time to grate them. Using the large holes of a box grater, shred your 8 ounces of sharp cheddar, 8 ounces of Monterey Jack, and the optional 4 ounces of Gruyère or Provolone. Pre-shredded cheeses often contain anti-caking agents that can hinder that perfect, smooth melt we’re aiming for. Freshly grated cheese melts beautifully, creating those irresistible, stretchy pulls we all crave in a grilled cheese. Combine all the grated cheeses in a medium bowl; this ensures an even distribution of flavors in every bite.
- Prepare the Hawaiian Rolls: Carefully remove the Hawaiian Sweet Rolls from their packaging. The key here is to keep the entire block of rolls intact. Using a long, serrated knife, slice the entire slab of rolls horizontally through the middle, separating the top halves from the bottom halves. Try to make one clean cut to ensure the tops and bottoms fit back together perfectly. It’s okay if a roll or two gets slightly separated, but the goal is to keep them as a single unit for easier assembly.
- Pre-Butter the Bottoms: Now, we’re going to give the bottom half of our rolls a little love. Melt the additional 2 tablespoons of unsalted butter in a small bowl. Using a pastry brush, lightly brush the cut side of the bottom half of the Hawaiian rolls with this melted butter. This layer acts as a gentle shield and helps create an even, subtle crispness when we cook them, preventing them from getting soggy from the cheese and preparing them for their flavorful journey.
Assembling The Ultimate Hawaiian Roll Grilled Cheese
- Place the Bottom Halves: Carefully transfer the buttered bottom slab of rolls to a large baking sheet (if you plan to bake, or just as a holding tray for stove-top cooking). Ensure it’s lying flat and stable.
- Layer on the Cheese: This is where the magic really starts to happen! Take your bowl of mixed grated cheeses and generously sprinkle an even layer over the entire buttered bottom half of the Hawaiian rolls. We want full coverage from edge to edge. Don’t be shy – a thick, luxurious layer of cheese is essential for “This Hawaiian Roll Grilled Cheese Recipe Is The Best.” If you’re using multiple types of cheese, try to distribute them evenly or layer them for varied melt and flavor. For example, you might put half of one type, then all of another, then the remaining half of the first. The goal is gooey, cheesy goodness!
- Crown with the Tops: Carefully place the top slab of the Hawaiian rolls directly over the cheese-laden bottom slab. Gently press down a little to ensure everything is nestled together snugly.
- Brush with Our Special Garlic Herb Butter: Now, retrieve your glorious garlic herb butter mixture. Using a pastry brush, generously coat the entire top surface of the assembled Hawaiian rolls with this flavorful butter. Make sure to get into all the nooks and crannies. This isn’t just for flavor; it’s going to create an absolutely irresistible golden, garlicky crust during cooking. Don’t worry if it seems like a lot – every bit contributes to the incredible taste and texture that truly makes this Hawaiian Roll Grilled Cheese Recipe the best.
The Grilling Process: Stove-top Perfection (Individual Rolls)
- Preheat Your Skillet: Place a large non-stick skillet or a cast-iron pan over medium-low heat. It’s crucial to use medium-low heat. Why medium-low? Because we want that beautiful, golden-brown crust without burning the bread before the cheese has a chance to fully melt and become gloriously gooey. Patience is key here, my friends! Let the pan heat up for a good 3-5 minutes.
- Separate and Grill: Carefully separate the individual Hawaiian roll sandwiches. Place a few of them (as many as comfortably fit without crowding) into the preheated skillet, butter-side down.
- Cook the First Side: Cook for about 3-5 minutes, or until the bottom is deeply golden brown and crispy. You’ll want to peek after about 3 minutes to gauge the color. While the first side is cooking, you can lightly brush any unbuttered sides or edges with a little more of our garlic herb butter mixture for extra flavor and browning.
- Flip and Finish: Using a spatula, carefully flip each grilled cheese sandwich to the other side. Cook for another 3-5 minutes, or until that side is also golden brown and crispy, and most importantly, the cheese inside is completely melted and oozing. If you like, you can gently press down on the sandwiches with your spatula occasionally to ensure good contact with the pan and encourage even browning and melting.
- Maintain Heat and Repeat: Adjust the heat as needed to prevent burning. If the pan gets too hot, the bread will brown too quickly, and the cheese won’t melt through. If it’s too low, they won’t get crispy. Once beautifully golden and gooey, remove the grilled cheese sandwiches from the skillet and place them on a wire rack set over a cutting board or baking sheet to cool slightly. This prevents the bottoms from getting soggy. Repeat with the remaining sandwiches, adding a tiny bit more butter to the pan if needed for subsequent batches.
Baking for a Crowd: An Oven-Baked Alternative (Slab Method)
If you’re making these for a larger gathering or prefer a hands-off approach, baking the entire slab is a fantastic option for “This Hawaiian Roll Grilled Cheese Recipe Is The Best.”
- Preheat Oven: Preheat your oven to 350°F (175°C). Have your baking sheet with the fully assembled, buttered slab of Hawaiian Roll Grilled Cheese ready.
- Cover and Bake (Initial Melt): Tightly cover the entire baking sheet with aluminum foil. This step is crucial as the foil creates a steamy environment that helps the cheese melt beautifully and evenly without the rolls burning. Place the covered baking sheet in the preheated oven and bake for 15-20 minutes.
- Uncover and Brown (The Crisp Finish): After 15-20 minutes, carefully remove the foil. The cheese should be mostly melted and gooey at this point. Return the uncovered baking sheet to the oven and continue to bake for another 5-10 minutes, or until the tops of the Hawaiian rolls are golden brown and crispy, and the cheese is bubbling deliciously. Keep a close eye on them during this phase to prevent over-browning.
- Golden Perfection: The goal is a beautiful, deeply golden crust and perfectly melted, gooey cheese throughout the entire slab. The oven method ensures consistent warmth and melt for every single sandwich, making it a stress-free way to serve many.
The Grand Finale: Slicing, Serving, and Savoring
- A Moment to Rest: Whether you’ve cooked them individually on the stove-top or baked them as a slab, once the grilled cheese sandwiches are done, transfer them to a cutting board. If you made the slab, let it rest for 2-3 minutes before slicing. This brief rest allows the cheese to set slightly, making for cleaner cuts and preventing too much ooze (though a little ooze is always welcome!).
- Slicing Perfection: If you baked the slab, use that same long, serrated knife to carefully slice along the original lines of the Hawaiian rolls, separating them into individual grilled cheese sliders. This makes them perfect for serving as appetizers or individual portions.
- Serve Immediately: Grilled cheese is best served hot, when the cheese is at its peak gooeyness and the bread is wonderfully crispy. Arrange them beautifully on a platter.
- Dipping Delights: These Hawaiian Roll Grilled Cheese sandwiches are fantastic on their own, but they also make an incredible companion to a warm bowl of creamy tomato soup or a side of marinara sauce for dipping. The subtle sweetness of the rolls truly shines, balancing the savory cheese and rich butter.
- Customization Ideas: Don’t be afraid to experiment! You can tuck in a thin slice of cooked ham or crispy bacon with the cheese for a heartier sandwich. A sprinkle of red pepper flakes in the butter mixture adds a subtle kick, or a dash of dried oregano for a more Italian flair. The versatility of “This Hawaiian Roll Grilled Cheese Recipe Is The Best” is one of its many charms, allowing you to personalize it to your heart’s content. Enjoy every incredible, cheesy, buttery bite!
Conclusion:
Well, my friends, we’ve reached the sweet, savory, and utterly satisfying end of our journey through what I truly believe is one of the most delightful comfort food creations you can whip up in your kitchen. If you’ve been following along, you know we’re not just talking about any old grilled cheese here. We’re talking about a culinary revelation that takes a classic and elevates it to new, exciting heights. The magic, as you’ve seen, lies in the humble Hawaiian roll. Its inherent sweetness isn’t just a background note; it’s a star player, caramelizing beautifully on the griddle to create an irresistible golden crust that perfectly contrasts with the gooey, savory melted cheese within. It’s quick, it’s ridiculously easy, and it consistently delivers a comforting hug in sandwich form. I’ve made countless grilled cheese sandwiches in my life, experimenting with all sorts of breads and cheeses, but honestly, there’s just something inherently special, almost addictive, about this particular combination. It’s more than just a snack; it’s an experience that brings a smile to your face with every single bite.
Why You Absolutely Must Try This Hawaiian Roll Grilled Cheese:
Beyond the simple act of combining bread and cheese, this recipe is a must-try for its unique texture and flavor profile. The subtle sweetness of the Hawaiian rolls, when toasted to perfection, creates an almost brioche-like exterior that’s both slightly crispy and wonderfully tender. It’s not just a vehicle for the cheese; it actively contributes to the overall flavor balance, cutting through the richness of the melted dairy in a way traditional sourdough or white bread simply can’t. Plus, the smaller size of the rolls makes for perfectly portioned, incredibly cute, and delightfully dippable sandwiches. They’re ideal for a quick lunch, a cozy dinner, or even as an impressive appetizer for a casual gathering. Trust me when I say, once you try it, you’ll understand why I confidently declare that This Hawaiian Roll Grilled Cheese Recipe Is The Best. It’s a game-changer that will forever alter your perception of what a grilled cheese sandwich can be. The ease of preparation combined with the gourmet-level taste is truly unparalleled, making it a staple in my own home and, I’m willing to bet, soon to be in yours too.
Serving Suggestions and Creative Variations to Elevate Your Experience:
Now that you’re convinced of its deliciousness, let’s talk about how to make this already incredible sandwich even better, or how to put your own unique spin on it. For a classic pairing, nothing beats a warm bowl of creamy tomato soup or a hearty butternut squash bisque. The sweet and savory symphony created when you dip a crispy, cheesy Hawaiian roll into a rich, flavorful soup is pure culinary bliss. A simple side salad, dressed with a light vinaigrette, also provides a refreshing counterpoint, cutting through the richness of the cheese. Don’t forget the pickles! A tangy dill pickle spear on the side adds a wonderful crunch and acidity that cleanses the palate beautifully. For a fruitier option, a few apple slices or a small fruit salad can also be a delightful accompaniment.
But why stop there? The beauty of a grilled cheese is its versatility. Let your culinary imagination run wild with variations! For the cheese, feel free to experiment beyond cheddar. A blend of provolone and Monterey Jack will give you an incredibly gooey, mild melt. Havarti offers a buttery, slightly tangy flavor, while Gruyère adds a sophisticated, nutty note. Don’t be afraid to mix and match! As for internal additions, the possibilities are endless. Crispy bacon bits or thinly sliced ham turn it into a more substantial meal. Caramelized onions add a profound depth of sweetness, while a few pickled jalapeño slices will give it a fantastic spicy kick. For a gourmet twist, try adding a smear of pesto, a few roasted red peppers, or even a thin layer of fig jam for an unexpected sweet and savory fusion. A sprinkle of fresh spinach or a few sun-dried tomato pieces can also add color and extra flavor. You could even replace butter with mayonnaise on the outside for an extra-crispy, golden-brown crust, or infuse your butter with garlic powder and dried herbs for an aromatic upgrade.
Finally, consider dipping sauces beyond the standard ketchup. A sriracha mayo offers a spicy, creamy kick, while a warm marinara sauce can transform it into a pizza-like experience. Honey mustard or a sweet chili sauce could also provide an interesting flavor contrast. The goal is to make this recipe truly your own, tailoring it to your preferences and whatever ingredients you have on hand. It’s a fantastic canvas for your creativity.
So, what are you waiting for? I wholeheartedly encourage you to step into your kitchen, gather those simple ingredients, and experience the pure joy of making and devouring this exceptional grilled cheese. It’s more than just a recipe; it’s an invitation to rediscover the comforting power of simple, yet utterly delicious, food. Once you’ve savored every sweet, savory, and perfectly melted bite, I would absolutely love to hear from you! Please come back and share your experiences in the comments below. Did you try a fun variation? What was your favorite cheese blend? Did you pair it with soup, or something else entirely? Your insights and creative twists inspire me and the entire cooking community. Happy grilling, my friends, and enjoy every single glorious moment!

The Best Hawaiian Roll Grilled Cheese Sandwich Recipe
Revolutionize your comfort food with this ultimate Hawaiian Roll Grilled Cheese. Sweet Hawaiian rolls perfectly complement savory cheddar, creating a crisp, buttery exterior with an incredibly soft, gooey core. A quick and extraordinary taste experience, satisfying both sweet and savory cravings.
Ingredients
-
1 (12-count) package King’s Hawaiian Sweet Rolls
-
8 ounces Sliced cheddar cheese
-
4 tbsp unsalted butter, softened
-
1/2 tsp oregano
-
1/2 tsp garlic powder
-
1/2 tbsp parsley
Instructions
-
Step 1
Melt the softened unsalted butter. Stir in oregano, garlic powder, and parsley until well combined. Set aside to infuse. -
Step 2
Carefully slice the entire slab of King’s Hawaiian Sweet Rolls horizontally through the middle, separating the top from the bottom. If using block cheese, grate the cheddar. If using sliced, ensure it’s ready to layer. -
Step 3
Place the bottom slab of rolls on a baking sheet. Generously sprinkle an even layer of sliced cheddar cheese over the entire buttered bottom half. Carefully place the top slab of rolls directly over the cheese, pressing gently. -
Step 4
Using a pastry brush, generously coat the entire top surface of the assembled Hawaiian rolls with the prepared herb butter mixture, ensuring full coverage. -
Step 5
Preheat your oven to 350°F (175°C). Place the baking sheet with the assembled, buttered rolls into the preheated oven. -
Step 6
Tightly cover the baking sheet with aluminum foil. Bake for 15-20 minutes, allowing the cheese to melt beautifully and evenly. -
Step 7
Carefully remove the foil. Return the uncovered baking sheet to the oven and bake for another 5-10 minutes, or until the tops of the rolls are golden brown and crispy, and the cheese is bubbling. -
Step 8
Transfer the baked slab to a cutting board and let it rest for 2-3 minutes. Use a serrated knife to slice along the original lines of the rolls, separating them into individual grilled cheese sliders. Serve immediately while hot and gooey, perhaps with tomato soup or marinara sauce.
Important Information
Nutrition Facts (Per Serving)
It is important to consider this information as approximate and not to use it as definitive health advice.
Allergy Information
Please check ingredients for potential allergens and consult a health professional if in doubt.


Leave a Comment