

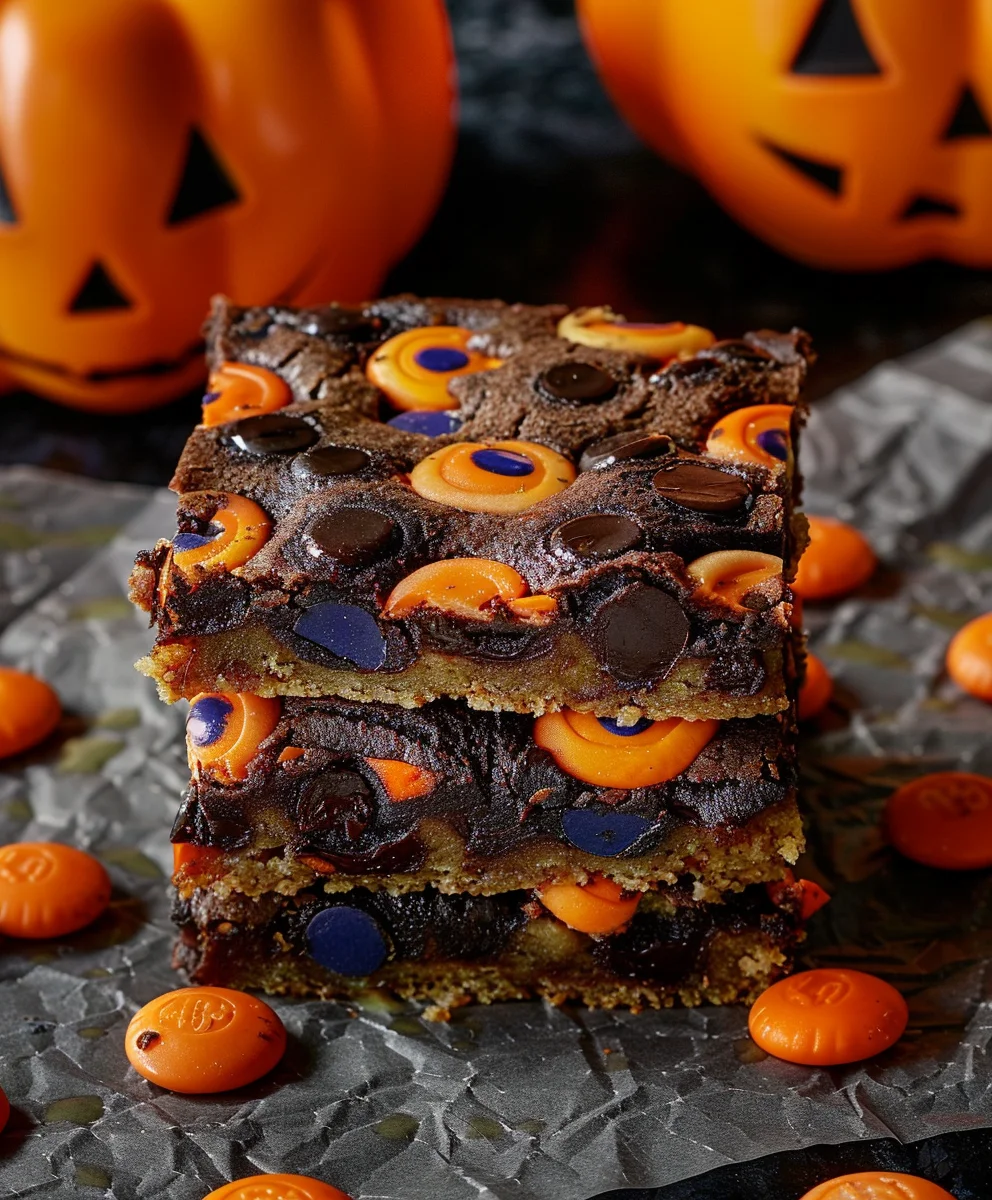
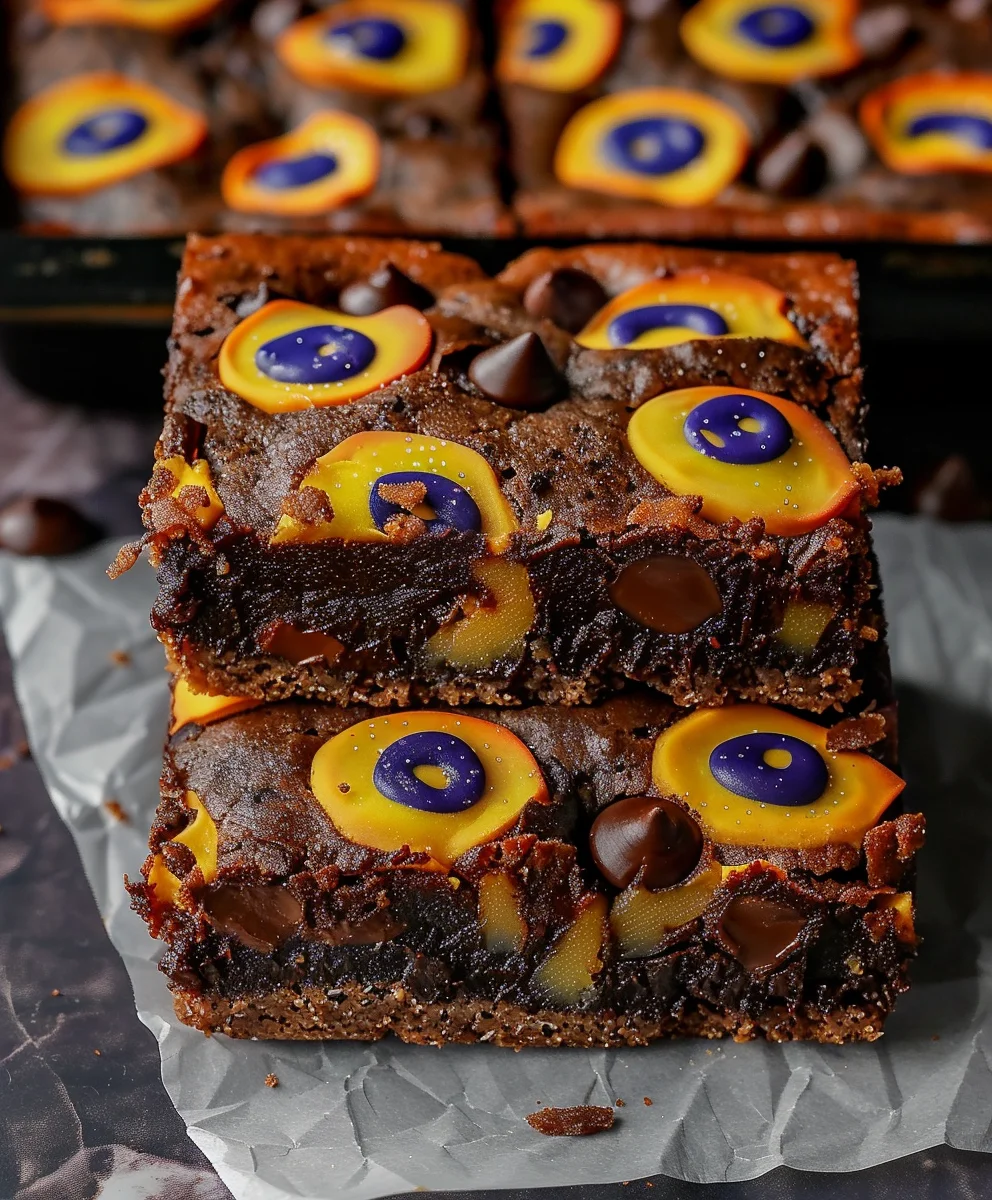
Halloween Brookies are the ultimate spooky season indulgence, a truly magical treat that captures the very essence of autumn’s most enchanting holiday. Have you ever found yourself torn between a rich, fudgy brownie and a perfectly chewy chocolate chip cookie? What if I told you that you don’t have to choose, especially when celebrating the spirit of ghosts and goblins? This delightful hybrid dessert brings the best of both worlds together, offering a symphony of textures and flavors that will tantalize your taste buds and impress your party guests.
Just as Halloween itself is a vibrant tapestry of traditions, creative costumes, and playful combinations, our

Ingredients:
- For the Fudgy Brownie Layer:
- 1 cup (2 sticks or 226g) unsalted butter, melted
- 2 cups (400g) granulated sugar
- 4 large eggs, at room temperature
- 2 teaspoons pure vanilla extract
- 1 cup (90g) unsweetened cocoa powder (I prefer Dutch-processed for a darker, richer brownie)
- 1 cup (125g) all-purpose flour
- 1 teaspoon salt
- 1/2 teaspoon baking powder
- 1 cup (170g) semi-sweet chocolate chips or chunks (optional, but highly recommended for extra fudginess)
- For the Spooky Chocolate Chip Cookie Layer:
- 1 cup (2 sticks or 226g) unsalted butter, softened to room temperature
- 3/4 cup (150g) granulated sugar
- 3/4 cup (150g) packed light brown sugar
- 2 large eggs, at room temperature
- 1 teaspoon pure vanilla extract
- 2 1/4 cups (280g) all-purpose flour
- 1 teaspoon baking soda
- 1/2 teaspoon salt
- 1 1/2 cups (255g) semi-sweet chocolate chips (or a mix of semi-sweet and milk chocolate for varied sweetness)
- 1/2 cup (approximately 80g) Halloween-themed sprinkles (orange, black, purple, green) and/or candy corn, chopped Halloween candies, or festive M&M’s for extra flair.
- For Optional Halloween Decoration & Garnish:
- Additional Halloween sprinkles
- Candy corn, gummy worms, or other small Halloween candies
- White chocolate, melted (for drizzle or spiderweb effect)
- Orange or black food coloring (if making a colored drizzle)
Prepping for Spooky Success
- First things first, let’s get our oven ready to welcome these magnificent Halloween Brookies! Preheat your oven to 350°F (175°C). Achieving the correct oven temperature from the start is crucial for even baking, so don’t rush this step.
- Next, prepare your baking pan. I find that a 9×13-inch (23x33cm) baking pan is ideal for this recipe, giving you generously sized brookies that are neither too thin nor too thick. Line the pan with parchment paper, making sure to leave an overhang on the longer sides. This parchment paper sling will be your best friend when it comes to lifting the cooled brookies out of the pan with ease, preventing any sticking disasters. Trust me, this little step saves so much frustration later on! Lightly grease the exposed sides of the pan with a little butter or non-stick cooking spray to ensure nothing sticks, even where the parchment might not reach perfectly.
- Before we dive into mixing, make sure all your cold ingredients, especially the eggs and butter for the cookie layer, are at room temperature. This allows for better emulsification and a smoother, more uniform batter and dough. For the brownie layer, we’ll be using melted butter, so that’s one less thing to worry about there! Gathering all your ingredients now will make the whole process smoother and more enjoyable. It’s like setting up your magic potion station before brewing your spell!
Crafting the Fudgy Brownie Base
- In a large mixing bowl, combine the melted butter and granulated sugar for the brownie layer. Whisk these two together vigorously for about 1-2 minutes until they are well combined and the mixture looks glossy. This initial mixing is important because it starts to dissolve the sugar, leading to a chewier brownie texture.
- Now, one at a time, crack in your four large eggs, mixing well after each addition. This is where patience pays off! Each egg needs to be fully incorporated before the next one goes in. You’ll notice the mixture becoming lighter in color and increasing in volume, almost like a thick, rich custard. This aeration is key to a perfectly fudgy and slightly cakey brownie.
- Stir in the pure vanilla extract. Don’t skimp on the vanilla; it truly enhances the chocolate flavor and adds a beautiful aromatic depth to your brownies.
- Sift in the unsweetened cocoa powder, all-purpose flour, salt, and baking powder directly over the wet ingredients. Sifting helps to break up any lumps in the dry ingredients, ensuring a smooth batter and preventing pockets of unmixed flour in your finished brookies.
- Using a spatula or wooden spoon, gently fold the dry ingredients into the wet ingredients. Mix just until no streaks of flour remain. Overmixing at this stage can develop the gluten in the flour too much, resulting in a tough or dry brownie, which is the last thing we want for our fudgy base! We’re aiming for that rich, dense texture.
- Finally, if you’re using them, fold in your cup of semi-sweet chocolate chips or chunks. These melt into little pockets of gooey chocolate in the brownie layer, adding an extra layer of decadence that’s simply irresistible.
- Pour the brownie batter into your prepared 9×13-inch pan. Use your spatula to spread it evenly into a single layer. Don’t worry if it seems a bit thick; that’s exactly what we’re looking for! Set this aside while we prepare our cookie layer.
Whipping Up the Spooktacular Cookie Dough
- In a separate large mixing bowl, using an electric mixer (either a stand mixer with a paddle attachment or a hand mixer), cream together the softened unsalted butter, granulated sugar, and light brown sugar until the mixture is light and fluffy. This process can take anywhere from 3 to 5 minutes. You’ll notice the color lightening and the texture becoming airy. This creaming step is vital for the tender, chewy texture of our cookies, as it incorporates air into the butter and sugar mixture.
- Beat in the two large eggs, one at a time, ensuring each egg is fully incorporated before adding the next. Just like with the brownie batter, this helps to build structure and moisture. Follow this by mixing in the pure vanilla extract until just combined. The mixture should look smooth and creamy.
- In a medium bowl, whisk together the all-purpose flour, baking soda, and salt. Whisking these dry ingredients separately ensures they are evenly distributed before being added to the wet ingredients.
- Gradually add the dry ingredient mixture to the wet ingredients, mixing on low speed until just combined. Again, be very careful not to overmix the dough. As soon as you no longer see any visible streaks of flour, stop mixing. Overmixing can lead to tough cookies, and we want these to be perfectly tender.
- Now for the fun part: fold in the semi-sweet chocolate chips. And here’s where we add our Halloween magic! Gently incorporate your chosen Halloween-themed sprinkles, candy corn, or chopped festive candies. I love to use a mix of orange and black sprinkles along with some tiny candy corns for that quintessential Halloween look and taste. Make sure these are evenly distributed throughout the dough for bursts of color and sweetness in every bite.
- At this point, your cookie dough will be quite thick and somewhat sticky. This is exactly how it should be! It will be layered directly over our brownie base.
Layering and Baking Your Halloween Brookies
- Carefully spoon dollops of the cookie dough evenly over the brownie batter in the prepared pan. This can be a bit tricky because the cookie dough is thick. I find it easiest to use a cookie scoop or two spoons to place small portions all over the surface, rather than trying to spread one large mass.
- Once you have dollops covering the entire surface, gently use the back of a spoon or your hands (lightly floured if it’s too sticky) to spread the cookie dough into an even layer over the brownie. Try not to press down too hard, as you don’t want to completely mix the layers. The goal is to create two distinct but cohesive layers. You might see some brownie peeking through the gaps, and that’s perfectly fine; it adds to the rustic charm of these brookies!
- Place the pan into your preheated 350°F (175°C) oven. Bake for 35 to 45 minutes. Baking times can vary depending on your oven, so keep an eye on them. You’ll know your Halloween Brookies are done when the edges of the cookie layer are set and golden brown, and a toothpick inserted into the center of the brownie layer (through the cookie layer) comes out with moist crumbs attached, but not wet batter. The center should still look slightly gooey, as it will continue to cook and set as it cools. An overbaked brookie is a dry brookie, and we definitely want that delicious fudgy texture!
- Once baked to perfection, carefully remove the pan from the oven. Allow the brookies to cool completely in the pan on a wire rack. This is a crucial step! Do not attempt to cut them while they are warm. Both the brownie and cookie layers need time to set up properly. Cutting them warm will result in a messy, crumbly disaster. Patience, my friend, is a virtue when it comes to brookies. I usually recommend at least 2-3 hours of cooling, but ideally, let them cool entirely, perhaps even refrigerating for 30-60 minutes once they’ve reached room temperature, which makes for cleaner cuts.
Decorating Your Ghastly Goodies
- Once your Halloween Brookies are completely cool, use the parchment paper overhang as a sling to carefully lift the entire slab out of the pan and onto a cutting board.
- Now comes the fun part: cutting and decorating! Using a sharp knife, cut the brookies into squares, rectangles, or even fun Halloween shapes using cookie cutters (though this might be a bit challenging with the two layers). I usually opt for classic squares, about 2×2 inches, which yield a good number of servings. For the cleanest cuts, wipe your knife clean between each slice.
- This is where you can truly unleash your creativity and make these Halloween Brookies uniquely yours.
- Simple Sprinkles: Before they fully set after baking, you can add more Halloween sprinkles directly onto the warm cookie layer for extra sparkle. If you missed that window, you can gently press them onto the cooled tops.
- Drizzle Fun: Melt some white chocolate chips in a microwave-safe bowl in 30-second increments, stirring until smooth. You can divide this and add a drop or two of orange or black food coloring for a themed drizzle. Drizzle it over the cooled brookies in a zig-zag pattern. For a spiderweb effect, drizzle concentric circles of melted white chocolate on top of a dark chocolate glaze (or directly on the cookie layer), then drag a toothpick from the center outwards to create a web design.
- Candy Toppers: Arrange small Halloween candies like candy corn, gummy worms, mini chocolate bats, or even small plastic spiders (make sure they are food-safe or just for display!) on top of each brookie square. A tiny dollop of melted chocolate or frosting can help secure them.
- Ghostly Swirls: Mix a small amount of powdered sugar with a tiny bit of milk or water to make a thin glaze. Drizzle this randomly over the top to create a “ghostly” swirl effect.
- Arrange your decorated Halloween Brookies on a festive platter. They are perfect for sharing at a Halloween party, sending to school for a class treat, or simply enjoying at home with a mug of hot cider while watching a spooky movie. These brookies are not just a treat; they’re a celebration of all things deliciously spooky! They store well in an airtight container at room temperature for up to 3-4 days, though I doubt they’ll last that long once your ghoulish guests get a taste!
<h2>Conclusion:</h2>
<p>So there you have it, my friends! We’ve journeyed through the delightful process of creating what I genuinely believe will become your new favorite festive treat. This isn’t just another dessert recipe; it’s an invitation to experience pure baking joy, delivering a finished product that is nothing short of spectacular. If you’ve ever found yourself torn between a rich, fudgy brownie and a chewy, chocolate-chip cookie, then you know exactly why this recipe is an absolute must-try. It truly offers the best of both worlds, flawlessly merged into one incredible, visually appealing, and utterly delicious square of happiness. The ease with which these come together belies their impressive appearance and complex flavor profile, making them perfect for both seasoned bakers and complete novices alike. You’re not just baking; you’re crafting moments of pure, unadulterated pleasure.</p>
<h4>Why These <strong>Halloween Brookies</strong> Are an Absolute Game-Changer:</h4>
<p>From the very first bite, you’ll understand. The bottom layer is a wonderfully dense, incredibly moist, and deeply chocolatey brownie – the kind that makes you close your eyes and savor every single morsel. Then, gracefully layered on top, is a perfectly golden, slightly crisp-edged, yet wonderfully soft and chewy chocolate chip cookie, studded with an abundance of gooey chocolate and vibrant, spooky sprinkles. The contrast in textures and the harmony of flavors create a dessert experience that is truly unmatched. They’re decadent without being overly rich, satisfying without being heavy, and endlessly customizable to suit any occasion. But for Halloween, with those playful sprinkles and the sheer fun of the concept, they are simply unbeatable. They truly stand out as a showstopper that will elicit gasps of delight and requests for the recipe!</p>
<h4>Serving Suggestions to Elevate Your Experience:</h4>
<p>While these brookies are absolutely divine on their own, fresh from the pan and still slightly warm, there are countless ways to elevate your serving experience. Imagine sinking your teeth into a warm square, the chocolate still molten, accompanied by a generous scoop of good quality vanilla bean ice cream. The cold, creamy ice cream melting into the warm, fudgy brownie and chewy cookie is a symphony of temperatures and textures that is simply heavenly. For a simpler yet equally satisfying treat, a dollop of freshly whipped cream and a light dusting of powdered sugar adds an elegant touch. They also pair wonderfully with a robust cup of coffee or a tall, cold glass of milk for that ultimate comfort food moment. You could even cut them into smaller, bite-sized pieces and arrange them artfully on a dessert platter for a party, ensuring everyone gets a taste of this glorious fusion.</p>
<h4>Unleash Your Creativity with These Variations:</h4>
<p>Don’t be afraid to experiment and make these brookies truly your own!</p>
<h5>Ingredient Swaps and Additions:</h5>
<ul>
<li>Feel free to swap out the semi-sweet chocolate chips for milk chocolate, white chocolate, or even a combination. Peanut butter chips could also add an exciting twist!</li>
<li>For an added textural dimension, mix in a handful of chopped walnuts or pecans into either the brownie or cookie batter.</li>
<li>A pinch of flaky sea salt sprinkled over the top just before baking can beautifully enhance the chocolate flavors.</li>
<li>Consider a swirl of caramel or peanut butter through the brownie batter for an extra layer of decadence.</li>
</ul>
<h5>Seasonal Adaptations:</h5>
<p>While designed for Halloween, this recipe’s core is versatile. Simply swap out the Halloween sprinkles for red and green at Christmas, pastels for Easter, or red, white, and blue for a patriotic celebration. The possibilities are truly endless, making this a go-to recipe for any festive gathering throughout the year. You could even add a dash of peppermint extract to the brownie for a holiday twist, or a hint of almond extract to the cookie for a subtle gourmet touch.</p>
<h5>Presentation & Texture Twists:</h5>
<p>If you prefer a chewier brownie, slightly underbake them. For crispier edges, give them an extra few minutes in the oven. You can also cut them into fun shapes using cookie cutters after they’ve cooled slightly, adding an extra layer of visual appeal to your dessert table.</p>
<h4>Your Turn to Create and Share!</h4>
<p>Now, it’s your moment to shine in the kitchen! I truly encourage you to roll up your sleeves, gather your ingredients, and give these incredible <strong>Halloween Brookies</strong> a try. Don’t be intimidated; the process is straightforward, and the rewards are immense. There’s a special kind of satisfaction that comes from creating something so delicious from scratch, especially when you know it’s going to bring smiles to the faces of your loved ones. These aren’t just desserts; they’re conversation starters, memory makers, and a testament to the simple joys of homemade treats. I poured my heart into perfecting this recipe, and I can’t wait for you to experience the magic for yourselves. Once you’ve baked them, I would absolutely love to hear about your experience! Did you try any fun variations? What did your family and friends think? Please, don’t hesitate to share your photos and stories with me. Your creativity and feedback inspire me endlessly. Happy baking, and get ready for some truly delicious Halloween fun!</p>
Spooky Halloween Brookies
Indulge in the ultimate spooky season treat! These Halloween Brookies combine the rich, fudgy texture of brownies with the chewy delight of chocolate chip cookies, creating a magical hybrid dessert perfect for any autumn gathering. Adorned with festive Halloween candies, they are a visually striking and delicious must-have for your holiday dessert table.
Ingredients
-
1 box store-bought brownie mix (plus ingredients required on box)
-
1 package Pillsbury ghost-shaped sugar cookie dough
-
1 package Halloween M&M’s
Instructions
-
Step 1
Preheat oven to 350°F (175°C). Line a 9×13-inch baking pan with parchment paper, leaving an overhang on the longer sides. Lightly grease any exposed pan sides. -
Step 2
Prepare brownie mix according to package directions. Pour batter into the prepared pan and spread evenly. -
Step 3
Break apart or crumble the ghost-shaped sugar cookie dough evenly over the brownie batter layer. -
Step 4
Sprinkle Halloween M&M’s evenly over the cookie dough layer. -
Step 5
Bake for 35 to 45 minutes, or until the cookie layer edges are set and golden brown, and a toothpick inserted into the brownie layer comes out with moist crumbs. -
Step 6
Remove from oven and allow to cool completely in the pan on a wire rack for at least 2-3 hours. Use the parchment paper overhang to lift the slab from the pan, then cut into squares and serve. Store in an airtight container at room temperature.
Important Information
Nutrition Facts (Per Serving)
It is important to consider this information as approximate and not to use it as definitive health advice.
Allergy Information
Please check ingredients for potential allergens and consult a health professional if in doubt.

Leave a Comment